2009 CHEVROLET TRAVERSE clock
[x] Cancel search: clockPage 200 of 422

To quickly adjust bass, midrange,
or treble to the middle position, press
the pushbutton positioned under the
BASS, MID, or TREB label for more
than two seconds. A beep sounds
and the level adjusts to the middle
position.
To quickly adjust all tone and
speaker controls to the middle
position, press
ffor more than
two seconds until a beep sounds.
EQ (Equalization):Press to choose
bass and treble equalization settings
designed for different types of music.
The choices are pop, rock, country,
talk, jazz, and classical. Selecting
MANUAL or changing bass or treble,
returns the EQ to the manual bass
and treble settings.
Unique EQ settings can be saved
for each source.
If the radio has a Bose
®audio
system, the EQ settings are either
MANUAL or TALK.
Adjusting the Speakers
(Balance/Fade)
BAL/FADE (Balance/Fade):
To adjust the balance or fade:
1. Press
funtil the speaker control
labels display.
2. Continue pressing
fto highlight
the desired label, or press the
pushbutton under the desired
label.
3. To adjust the highlighted setting,
do one of the following until the
desired levels are obtained.
Turnfclockwise or
counterclockwise.
Press\FWD, orsREV.
To quickly adjust balance or fade
to the middle position, press the
pushbutton positioned under the
BAL or FADE label for more than
two seconds. A beep sounds and the
level adjusts to the middle position.To quickly adjust all speaker and
tone controls to the middle position,
press
ffor more than two seconds
until a beep sounds.
Radios with CD and DVD fade
differently depending on the DVD
Media type:
With DVD-A 5.1 Surround
media, the left front and right
front speakers fade rearward,
leaving the center front speakers
unaffected until the last fade step,
then all front speakers mute.
With DVD-V 5.1 Surround media,
surround sound is maintained
until Step 4 of the Fade control is
reached while fading rearward.
At that point the audio system
output changes to Stereo to
prevent the loss of Center
channel output when the full
rearward fade position is reached.
If the Rear Seat Audio (RSA) is
turned on, the radio disables FADE
and mutes the rear speakers.
3-80 Instrument Panel
Page 207 of 422

Using the DVD Player
The DVD player can be controlled
by the buttons on the remote control,
the RSA system, or by the buttons
on the radio faceplate. See “Remote
Control”, underRear Seat
Entertainment (RSE) System on
page 3-114andRear Seat Audio
(RSA) on page 3-123for more
information.
The DVD player is only compatible
with DVDs of the appropriate region
code that is printed on the jacket of
most DVDs.
The DVD slot of the radio is
compatible with most audio
CDs, CD-R, CD-RW, DVD-Video,
DVD-Audio, DVD-R/RW, DVD+R/
RW media along with MP3 and
WMA formats.
If an error message displays on
the video screen or the radio, see
“DVD Display Error Messages”
under,Rear Seat Entertainment
(RSE) System on page 3-114and
“DVD Radio Error Messages” in
this section for more information.Playing a DVDf(Tune):Turn to change tracks
on a CD or DVD, to manually tune
a radio station, or to change clock
or date settings, while in the clock
or date setting mode. See the
information given earlier in this
section speci�c to the radio, CD,
and the DVD. Also, see “Setting the
Clock” in the index, for setting the
clock and date.
©SEEK (Previous Track/
Chapter):Press to return to the
start of the current track or chapter.
Press
©again to go to the previous
track or chapter. This button may not
work when the DVD is playing the
copyright information or the
previews.
SEEK
¨(Next Track/Chapter):
Press to go to the next track or
chapter. This button may not work
when the DVD is playing the
copyright information or the
previews.
sREV (Fast Reverse):Press
to quickly reverse the DVD at
�ve times the normal speed.
The radio displays the elapsed time
while in fast reverse. To stop fast
reversing, press again. This button
may not work when the DVD is
playing the copyright information
or the previews.
\FWD (Fast Forward):Press
to fast forward the DVD. The radio
displays the elapsed time and fast
forwards �ve times the normal
speed. To stop fast forwarding,
press again. This button may not
work when the DVD is playing
the copyright information or the
previews.
Z(Eject):Press to eject a
DVD. If the DVD is ejected, but not
removed, the player automatically
pulls it back in after 15 seconds.
If loading and reading of a DVD
cannot be completed, because of an
unknown format, etc., and the disc
fails to eject, press and hold for more
than �ve seconds to force the disc to
eject.
Instrument Panel 3-87
Page 211 of 422

Using the Auxiliary Input Jack
The radio system has an auxiliary
input jack located on the lower
right side of the faceplate. This is
not an audio output; do not plug a
headphone set into the front auxiliary
input jack. Connect an auxiliary input
device such as an iPod, laptop
computer, MP3 player, CD player,
or cassette tape player, etc. to the
auxiliary input jack for use as another
source for audio listening.
Drivers are encouraged to set up
any auxiliary device while the vehicle
is in P (Park). SeeDefensive Driving
on page 4-2for more information on
driver distraction.
To use an auxiliary input device,
connect a 3.5 mm (1/8 inch) cable to
the radio’s front auxiliary input jack.
O(Power/Volume):Turn clockwise
or counterclockwise to increase
or decrease the volume of the
portable player. Additional volume
adjustments might have to be made
from the portable device if the
volume is not loud or soft enough.
BAND:Press to listen to the radio
when a portable audio device is
playing. The portable audio device
continues playing, so you might
want to stop it or turn it off.
CD/AUX (CD/Auxiliary):Press to
select between CD, or Auxiliary.
When a CD is in the player
the CD icon and a message
showing the disc and/or track
number displays.
If an auxiliary input device is not
connected, “No Input Device
Found” displays.DVD/CD AUX (Auxiliary):Press
to select between DVD, CD, or
Auxiliary.
If an auxiliary input device is not
connected, “No Aux Input Device”
displays.
When a disc is in either slot,
the DVD/CD text label and a
message showing the track or
chapter number displays.
If an auxiliary input device is not
connected, and a disc is in both
the DVD slot and the CD slot the
DVD/CD AUX button only cycles
between the two sources and
does not indicate “No Aux Input
Device”.
If a front auxiliary input device is
connected, the DVD/CD AUX
button cycles through all available
options.
Instrument Panel 3-91
Page 257 of 422

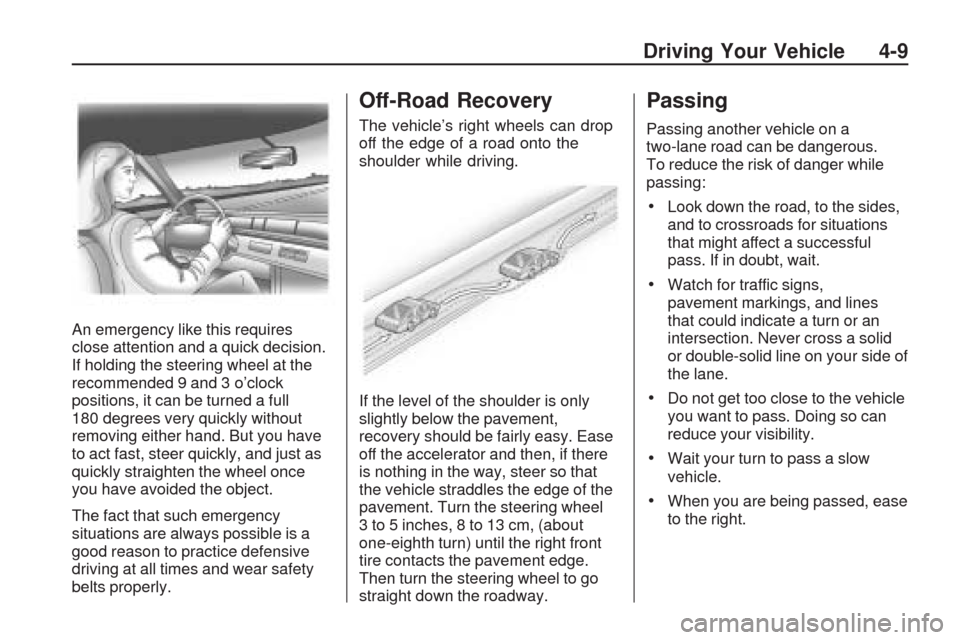
An emergency like this requires
close attention and a quick decision.
If holding the steering wheel at the
recommended 9 and 3 o’clock
positions, it can be turned a full
180 degrees very quickly without
removing either hand. But you have
to act fast, steer quickly, and just as
quickly straighten the wheel once
you have avoided the object.
The fact that such emergency
situations are always possible is a
good reason to practice defensive
driving at all times and wear safety
belts properly.
Off-Road Recovery
The vehicle’s right wheels can drop
off the edge of a road onto the
shoulder while driving.
If the level of the shoulder is only
slightly below the pavement,
recovery should be fairly easy. Ease
off the accelerator and then, if there
is nothing in the way, steer so that
the vehicle straddles the edge of the
pavement. Turn the steering wheel
3 to 5 inches, 8 to 13 cm, (about
one-eighth turn) until the right front
tire contacts the pavement edge.
Then turn the steering wheel to go
straight down the roadway.
Passing
Passing another vehicle on a
two-lane road can be dangerous.
To reduce the risk of danger while
passing:
Look down the road, to the sides,
and to crossroads for situations
that might affect a successful
pass. If in doubt, wait.
Watch for traffic signs,
pavement markings, and lines
that could indicate a turn or an
intersection. Never cross a solid
or double-solid line on your side of
the lane.
Do not get too close to the vehicle
you want to pass. Doing so can
reduce your visibility.
Wait your turn to pass a slow
vehicle.
When you are being passed, ease
to the right.
Driving Your Vehicle 4-9
Page 289 of 422

Filling the Tank
{CAUTION
Fuel vapor burns violently and a
fuel �re can cause bad injuries.
To help avoid injuries to you and
others, read and follow all the
instructions on the pump island.
Turn off the engine when you are
refueling. Do not smoke if you are
near fuel or refueling the vehicle.
Do not use cellular phones. Keep
sparks, �ames, and smoking
materials away from fuel. Do not
leave the fuel pump unattended
when refueling the vehicle. This is
against the law in some places.
Do not re-enter the vehicle while
pumping fuel. Keep children away
from the fuel pump; never let
children pump fuel.
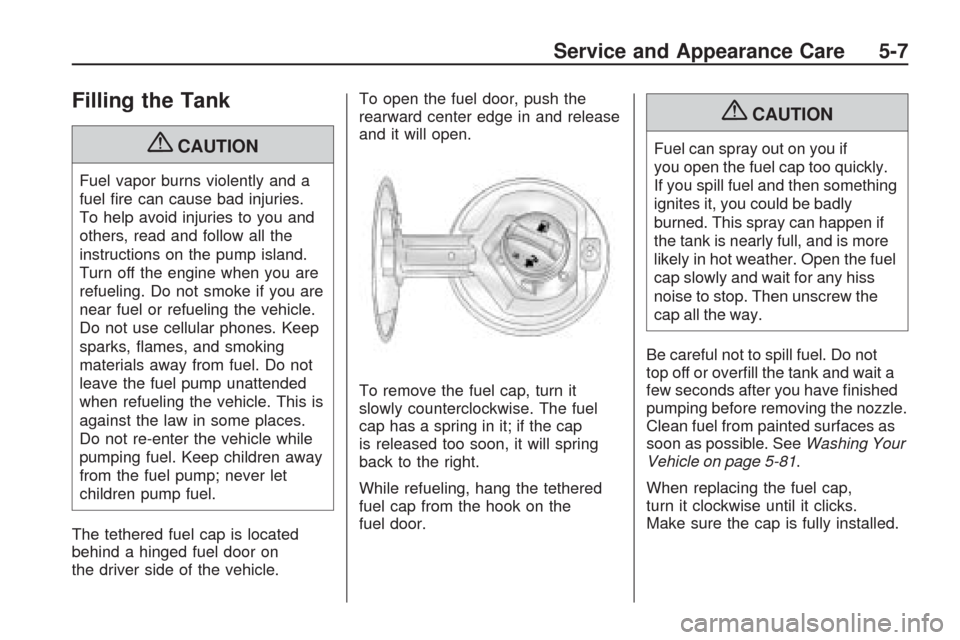
The tethered fuel cap is located
behind a hinged fuel door on
the driver side of the vehicle.To open the fuel door, push the
rearward center edge in and release
and it will open.
To remove the fuel cap, turn it
slowly counterclockwise. The fuel
cap has a spring in it; if the cap
is released too soon, it will spring
back to the right.
While refueling, hang the tethered
fuel cap from the hook on the
fuel door.
{CAUTION
Fuel can spray out on you if
you open the fuel cap too quickly.
If you spill fuel and then something
ignites it, you could be badly
burned. This spray can happen if
the tank is nearly full, and is more
likely in hot weather. Open the fuel
cap slowly and wait for any hiss
noise to stop. Then unscrew the
cap all the way.
Be careful not to spill fuel. Do not
top off or over�ll the tank and wait a
few seconds after you have �nished
pumping before removing the nozzle.
Clean fuel from painted surfaces as
soon as possible. SeeWashing Your
Vehicle on page 5-81.
When replacing the fuel cap,
turn it clockwise until it clicks.
Make sure the cap is fully installed.
Service and Appearance Care 5-7
Page 302 of 422

How to Add Coolant to the
Radiator
{CAUTION
An electric engine cooling fan
under the hood can start up even
when the engine is not running
and can cause injury. Keep
hands, clothing, and tools away
from any underhood electric fan.
{CAUTION
Steam and scalding liquids from a
hot cooling system can blow out
and burn you badly. They are
under pressure, and if you turn the
surge tank pressure cap — even a
little — they can come out at high
speed. Never turn the cap when
the cooling system, including the
surge tank pressure cap, is hot.
(Continued)
CAUTION (Continued)
Wait for the cooling system and
surge tank pressure cap to cool
if you ever have to turn the
pressure cap.
If coolant is needed, add the proper
mixture directly to the radiator,
but be sure the cooling system is
cool before this is done.
1. Detach fasteners and lift off
the panel that covers the
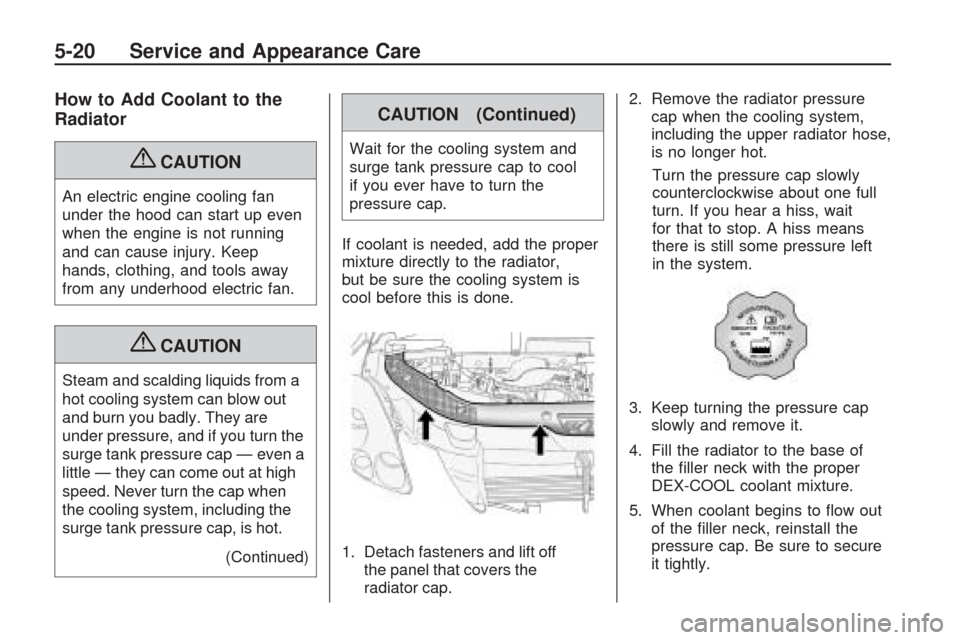
radiator cap.2. Remove the radiator pressure
cap when the cooling system,
including the upper radiator hose,
is no longer hot.
Turn the pressure cap slowly
counterclockwise about one full
turn. If you hear a hiss, wait
for that to stop. A hiss means
there is still some pressure left
in the system.
3. Keep turning the pressure cap
slowly and remove it.
4. Fill the radiator to the base of
the �ller neck with the proper
DEX-COOL coolant mixture.
5. When coolant begins to �ow out
of the �ller neck, reinstall the
pressure cap. Be sure to secure
it tightly.
5-20 Service and Appearance Care
Page 316 of 422

3. Remove the two taillamp nut
covers.4. Remove the two nuts holding the
taillamp assembly in place.
5. Pull out the taillamp assembly.
6. Turn the bulb socket
counterclockwise and pull it
straight out to remove it from the
taillamp assembly.
7. Pull the old bulb straight out of
the bulb socket.
8. Push the new bulb straight into
the bulb socket until it connects.9. Push the taillamp assembly back
into its original location.
When reinstalling the taillamp
assembly, make sure the pin on
the taillamp assembly lines
up and is inserted correctly into
the opening of the vehicle.
10. Reinstall the two nuts that hold
the taillamp assembly in place.
11. Reinstall the two taillamp nut
covers.Replacement Bulbs
Exterior LampBulb
Number
License Plate Lamp 194
Rear Sidemarker
Lamp194
Rear Turn Signal
and Taillamps7443
(W21/5W)
For replacement bulbs not listed
here, contact your dealer/retailer.
5-34 Service and Appearance Care
Page 342 of 422

2. Unwrap the sealant/air hose (F)
and the power plug (H).
3. Place the kit on the ground.
Make sure the tire valve
stem is positioned close to the
ground so the hose will reach it.
4. Remove the valve stem cap from
the �at tire by turning it
counterclockwise.
5. Attach the sealant/air hose (F)
onto the tire valve stem. Turn
it clockwise until it is tight.
6. Plug the power plug (H) into the
accessory power outlet in the
vehicle. Unplug all items from
other accessory power outlets.
SeeAccessory Power Outlet(s)
on page 3-17.
If the vehicle has an accessory
power outlet, do not use the
cigarette lighter.
If the vehicle only has a cigarette
lighter, use the cigarette lighter.
Do not pinch the power plug
cord in the door or window.7. Start the vehicle. The vehicle
must be running while using
the air compressor.
8. Turn the selector switch (A)
counterclockwise to the
Sealant + Air position.
9. Press the on/off (B) button to
turn the tire sealant and
compressor kit on.
The compressor will inject
sealant and air into the tire.
The pressure gage (C) will initially
show a high pressure while the
compressor pushes the sealant
into the tire. Once the sealant is
completely dispersed into the tire,
the pressure will quickly drop and
start to rise again as the tire
in�ates with air only.10. In�ate the tire to the
recommended in�ation
pressure using the pressure
gage (C). The recommended
in�ation pressure can be
found on the Tire and Loading
Information label. See
Inflation - Tire Pressure on
page 5-42.
The pressure gage (C) may
read higher than the actual tire
pressure while the compressor
is on. Turn the compressor
off to get an accurate pressure
reading. The compressor
may be turned on/off until the
correct pressure is reached.
5-60 Service and Appearance Care