2009 CHEVROLET TRAVERSE seats
[x] Cancel search: seatsPage 235 of 422

The wireless headphones have an
On/Off button, channel 1/2 switch,
and a volume control. Switch the
headphones to Off when not in use.
Push the power button to turn on
the headphones. An indicator light
located on the headphones comes
on. If the light does not come on,
the batteries might need to be
replaced. Intermittent sound or
static on the headphones can also
be an indication of weak batteries.
See “Battery Replacement” later in
this section for more information.
The headphones automatically turn
off after four hours of continuous use.
To adjust the volume on the
headphones, use the volume
control located on the right side.Infrared transmitters are located
at the rear of the RSE overhead
console. The headphones shut off
automatically to save the battery
power if the RSE system and RSA
are shut off or if the headphones are
out of range of the transmitters for
more than three minutes. Moving
too far forward or stepping out of the
vehicle, can cause the headphones
to lose the audio signal.
For optimal audio performance,
the headphones must be worn
correctly. Headphones should be
worn with the headband over the top
of the head for best audio reception.
The symbol L (Left) appears on the
upper left side, above the ear pad
and should be positioned on the left
ear. The symbol R (Right) appears
on the upper right side, above the
ear pad and should be positioned
on the right ear.Notice:Do not store the
headphones in heat or direct
sunlight. This could damage
the headphones and repairs will
not be covered by the warranty.
Storage in extreme cold can
weaken the batteries. Keep the
headphones stored in a cool,
dry place.
If the foam ear pads attached to
the headphones become worn or
damaged, the pads can be replaced
separately from the headphone set.
See your dealer/retailer for more
information.
Headphones should be stored in
the front �oor console and not in the
front seat back pocket. Headphone
damage can occur when the second
row seats are folded forward.
Instrument Panel 3-115
Page 269 of 422

{CAUTION
Things you put inside your
vehicle can strike and injure
people in a sudden stop or
turn, or in a crash.
Put things in the cargo
area of your vehicle. Try to
spread the weight evenly.
Never stack heavier things,
like suitcases, inside the
vehicle so that some of
them are above the tops
of the seats.
Do not leave an unsecured
child restraint in your
vehicle.
When you carry something
inside the vehicle, secure it
whenever you can.
Do not leave a seat folded
down unless you need to.
Towing
Towing Your Vehicle
To avoid damage, the disabled
vehicle should be towed with all four
wheels off the ground. Consult your
dealer/retailer or a professional
towing service if the disabled vehicle
must be towed. SeeRoadside
Assistance Program on page 7-6.
To tow the vehicle behind another
vehicle for recreational purposes,
such as behind a motorhome,
see “Recreational Vehicle Towing”
following.
Recreational Vehicle
Towing
Recreational vehicle towing means
towing the vehicle behind another
vehicle – such as behind a
motorhome. The two most common
types of recreational vehicle towing
are known as dinghy towing and
dolly towing. Dinghy towing is towing
the vehicle with all four wheels on theground. Dolly towing is towing the
vehicle with two wheels on the
ground and two wheels up on a
device known as a dolly.
Here are some important things to
consider before recreational
vehicle towing:
What is the towing capacity of the
towing vehicle? Be sure to read
the tow vehicle manufacturer’s
recommendations.
What is the distance that will be
travelled? Some vehicles have
restrictions on how far and how
long they can tow.
Is the proper towing equipment
going to be used? See your
dealer/retailer or trailering
professional for additional advice
and equipment recommendations.
Is the vehicle ready to be towed?
Just as preparing the vehicle for a
long trip, make sure the vehicle is
prepared to be towed. SeeBefore
Leaving on a Long Trip on
page 4-12.
Driving Your Vehicle 4-21
Page 321 of 422

Tire Size
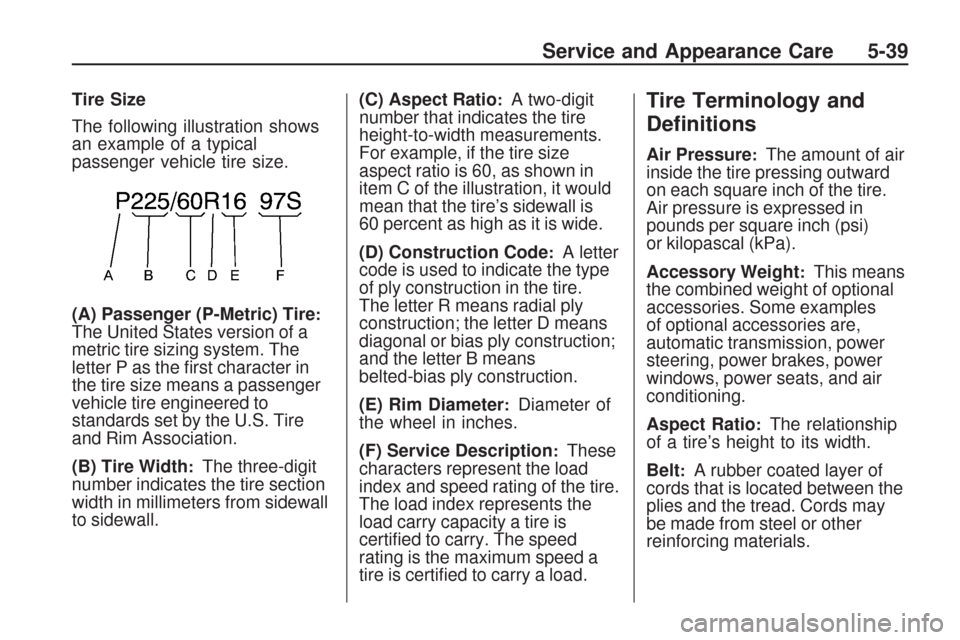
The following illustration shows
an example of a typical
passenger vehicle tire size.
(A) Passenger (P-Metric) Tire
:The United States version of a
metric tire sizing system. The
letter P as the �rst character in
the tire size means a passenger
vehicle tire engineered to
standards set by the U.S. Tire
and Rim Association.
(B) Tire Width
:The three-digit
number indicates the tire section
width in millimeters from sidewall
to sidewall.(C) Aspect Ratio
:A two-digit
number that indicates the tire
height-to-width measurements.
For example, if the tire size
aspect ratio is 60, as shown in
item C of the illustration, it would
mean that the tire’s sidewall is
60 percent as high as it is wide.
(D) Construction Code
:A letter
code is used to indicate the type
of ply construction in the tire.
The letter R means radial ply
construction; the letter D means
diagonal or bias ply construction;
and the letter B means
belted-bias ply construction.
(E) Rim Diameter
:Diameter of
the wheel in inches.
(F) Service Description
:These
characters represent the load
index and speed rating of the tire.
The load index represents the
load carry capacity a tire is
certi�ed to carry. The speed
rating is the maximum speed a
tire is certi�ed to carry a load.
Tire Terminology and
De�nitions
Air Pressure:The amount of air
inside the tire pressing outward
on each square inch of the tire.
Air pressure is expressed in
pounds per square inch (psi)
or kilopascal (kPa).
Accessory Weight
:This means
the combined weight of optional
accessories. Some examples
of optional accessories are,
automatic transmission, power
steering, power brakes, power
windows, power seats, and air
conditioning.
Aspect Ratio
:The relationship
of a tire’s height to its width.
Belt
:A rubber coated layer of
cords that is located between the
plies and the tread. Cords may
be made from steel or other
reinforcing materials.
Service and Appearance Care 5-39
Page 369 of 422

Fuses Usage
AIRBAG Airbag
AMP Ampli�er
BCK/UP/
STOPBack-up
Lamp/Stoplamp
BCMBody Control
Module
CNSTR/
VENTCanister Vent
CTSY Courtesy
DR/LCK Door Locks
DRLDaytime Running
Lamps
DRL 2GMC HID
Only/Rear Fog
Lamps-China Only
DSPLY Display
FRT/WSWFront Windshield
Washer
HTD/COOL
SEATHeated/Cooling
Seats
HVACHeating, Ventilation
and Air ConditioningFuses Usage
IADV/
PWR/LEDInadvertent
Power LED
INFOTMNT Infotainment
LT/TRN/SIGDriver Side Turn
Signal
MSMMemory Seat
Module
PDMPower Mirrors,
Liftgate Release
PWR
MODEPower Mode
PWR/MIR Power Mirrors
RDO Radio
REAR WPR Rear Wiper
RT/TRN/SIGPassenger Side
Turn Signal
SPARE Spare
SPARE Spare
STR/WHL/
ILLUMSteering Wheel
Illumination
Fuse Side
Service and Appearance Care 5-87
Page 382 of 422

(e)Make sure the safety belt
reminder light and safety belt
assemblies are working properly.
Look for any other loose or damaged
safety belt system parts. If you see
anything that might keep a safety
belt system from doing its job, have
it repaired. Have any torn or frayed
safety belts replaced. Also see
Checking the Restraint Systems
on page 1-59.
(f)Lubricate all key lock cylinders,
hood latch assemblies, secondary
latches, pivots, spring anchor and
release pawl, hood and door hinges,
rear folding seats, and liftgate
hinges. More frequent lubrication
may be required when exposed to
a corrosive environment. Applying
silicone grease on weatherstrips with
a clean cloth will make them last
longer, seal better, and not stick
or squeak.
(g)A fluid loss in any vehicle system
could indicate a problem. Have the
system inspected and repaired and
the fluid level checked. Add fluid if
needed.(h)Change automatic transmission
fluid if the vehicle is mainly driven
under one or more of these
conditions:
�In heavy city traffic where the
outside temperature regularly
reaches 90°F (32°C) or higher.
�In hilly or mountainous terrain.
�When doing frequent trailer
towing.
�Uses such as found in taxi, police,
or delivery service.
(i)Drain, flush, and refill cooling
system. This service can be
complex; you should have your
dealer/retailer perform this service.
See Engine Coolant on page 5-17 for
what to use. Inspect hoses. Clean
radiator, condenser, pressure cap,
and filler neck. Pressure test the
cooling system and pressure cap.(j)Check system for interference or
binding and for damaged or missing
parts. Replace parts as needed.
Replace any components that have
high effort or excessive wear. Do not
lubricate accelerator or cruise control
cables.
(k)Visually inspect belt for fraying,
excessive cracks, or obvious
damage. Replace belt if necessary.
(l)If driving regularly under dusty
conditions, inspect the filter at each
engine oil change.
(m)Change transfer case fluid if the
vehicle is mainly driven under one
or more of these conditions:
�In heavy city traffic where the
outside temperature regularly
reaches 90°F (32°C) or higher.
�In hilly or mountainous terrain.
�When doing frequent trailer
towing.
�Uses such as found in taxi, police,
or delivery service.
6-8 Maintenance Schedule
Page 413 of 422

Cleaning (cont.)
Instrument Panel, Vinyl,
and Other Plastic
Surfaces......................5-80
Interior............................5-78
Leather...........................5-80
Tires...............................5-83
Underbody Maintenance....5-84
Washing Your Vehicle........5-81
Weatherstrips...................5-81
Windshield, Backglass,
and Wiper Blades..........5-82
Climate Control System.........3-19
Outlet Adjustment.............3-27
Rear Air Conditioning and
Heating System.............3-28
Rear Air Conditioning
and Heating System,
Electronic.....................3-29
Climate Control Systems
Dual Automatic.................3-22
Clock, Setting......................3-74
Collision Damage Repair.......7-10
Compact Spare Tire.............5-77
Compass............................3-54
Compressor Kit,
Tire Sealant.....................5-57Content Theft-Deterrent.........2-16
Control of a Vehicle............... 4-3
Convenience Net.................2-55
Coolant
Engine............................5-17
Engine
Temperature Gage.........3-38
Engine Temperature
Warning Light...............3-38
Cooled Seats........................ 1-5
Cooling System...................5-17
Courtesy Lamps...................3-14
Courtesy Transportation.......... 7-9
Cruise Control....................... 3-9
Cruise Control Light..............3-43
Cupholders.........................2-52
Customer Assistance.............. 7-4
Offices.............................. 7-5
Text Telephone (TTY)
Users............................ 7-4
Customer Information
Service Publications
Ordering Information......7-15
Customer Satisfaction
Procedure......................... 7-1
D
Damage Repair, Collision......7-10
Data Recorders
Event..............................7-16
Daytime Running Lamps/
Automatic Headlamp
System...........................3-12
Defensive Driving................... 4-2
Delayed Entry Lighting..........3-15
Delayed Exit Lighting............3-15
Delayed Headlamps.............3-12
Delayed Locking.................... 2-8
DIC Compass......................3-54
Disc, MP3...................3-92, 3-96
Doing Your Own
Service Work..................... 5-4
Dome Lamp Override...........3-14
Dome Lamps .......................3-14
Door
Delayed Locking................. 2-8
Locks............................... 2-8
Power Door Locks.............. 2-8
Programmable Automatic
Door Locks.................... 2-9
Rear Door Security Locks.... 2-9
INDEX i-3
Page 415 of 422

F
Filter
Engine Air Cleaner............5-15
Finish Damage....................5-84
Flashers, Hazard Warning....... 3-5
Flash-to-Pass........................ 3-7
Flat Tire..............................5-56
Flat Tire, Changing...............5-65
Flat Tire, Storing..................5-74
Floor Mats..........................2-54
Fluid
Automatic Transmission.....5-16
Power Steering.................5-24
Windshield Washer...........5-24
Fog Lamp
Fog ................................3-13
Fuel..................................... 5-5
Additives........................... 5-5
California Fuel................... 5-5
Economy Driving................ 4-1
Filling a Portable Fuel
Container....................... 5-8
Filling the Tank.................. 5-7
Fuels in Foreign Countries . . . 5-6
Gage ..............................3-43
Gasoline Octane................ 5-5
Gasoline Speci�cations........ 5-5Fuses
Fuses and Circuit
Breakers......................5-86
Instrument Panel Fuse
Block...........................5-86
Underhood Fuse Block......5-88
Windshield Wiper..............5-86
G
Gage
Speedometer...................3-32
Tachometer......................3-32
Voltmeter Gage................3-35
Gages
Engine Coolant
Temperature.................3-38
Fuel................................3-43
Garage Door Opener............2-47
Gasoline
Octane............................. 5-5
Speci�cations..................... 5-5
Glove Box...........................2-52
GM Mobility Reimbursement
Program............................ 7-6
H
Halogen Bulbs.....................5-33
Hazard Warning Flashers........ 3-5
Head Restraints..................... 1-2
Headlamp
Aiming ............................5-33
Headlamps
Bulb Replacement.............5-33
Daytime Running Lamps/
Automatic Headlamp
System........................3-12
Delayed..........................3-12
Exterior Lamps.................3-11
Flash-to-Pass..................... 3-7
High/Low Beam Changer..... 3-7
Heated Seats........................ 1-5
Heater................................3-19
Engine Coolant.................2-23
Height Adjuster, Driver Seat.... 1-3
High Voltage Devices and
Wiring.............................5-85
Highbeam On Light..............3-43
Highway Hypnosis................4-13
Hill and Mountain Roads.......4-13
INDEX i-5
Page 417 of 422

Locks (cont.)
Power Door ....................... 2-8
Programmable Automatic
Door Locks.................... 2-9
Rear Door Security Locks.... 2-9
Loss of Control....................4-10
Lower Anchors and Tethers
for Children......................1-35
Luggage Carrier...................2-54
Lumbar
Manual Controls................. 1-4
Power Controls.................. 1-5
M
Maintenance
Footnotes.......................... 6-7
Maintenance Schedule
Additional Required
Services........................ 6-6
At Each Fuel Fill................ 6-9
At Least Once a Month....... 6-9
At Least Once a Year.......6-10
Maintenance Record.........6-16
Maintenance Replacement
Parts...........................6-14
Maintenance Requirements . . . 6-1Maintenance Schedule (cont.)
Owner Checks and
Services........................ 6-9
Recommended Fluids and
Lubricants....................6-12
Scheduled Maintenance....... 6-3
Using............................... 6-2
Your Vehicle and the
Environment................... 6-1
Malfunction Indicator Lamp....3-39
Manual Lumbar Controls......... 1-4
Manual Seats........................ 1-3
Memory Seat and Mirrors....... 1-6
Message
DIC Warnings and
Messages....................3-56
Mirrors
Automatic Dimming
Rearview......................2-31
Blind Spot.......................2-34
Manual Rearview Mirror.....2-31
Outside Convex Mirror.......2-35
Outside Heated Mirrors......2-35
Outside Power Foldaway
Mirrors.........................2-33
Outside Power Mirrors.......2-32
Park Tilt..........................2-35
MP3 ...........................3-92, 3-96
N
Navigation System, Privacy....7-17
Navigation/Radio System,
see Navigation Manual....3-103
Net
Convenience....................2-55
New Vehicle Break-In...........2-20
O
Odometer...........................3-32
Off-Road
Recovery.......................... 4-9
Oil
Engine............................5-11
Engine Oil Life System......5-13
Pressure Light..................3-42
Older Children, Restraints......1-27
Online Owner Center.............. 7-3
OnStar, Privacy....................7-17
OnStar
®System, see
OnStar®Manual...............2-43
Operation, Universal Home
Remote System................2-47
Outlet Adjustment.................3-27
Outlets
Accessory Power..............3-17
INDEX i-7