2009 CHEVROLET TRAIL BLAZER light
[x] Cancel search: lightPage 232 of 484
How to Change the Video Format when in
the Auxiliary Mode
The auxiliary input video format is preset to NTSC.
In some countries, the video format may be in the
PAL system. To change the video format:
1. Press the
zdisplay menu button.
2. Press the down
qnavigation arrow to highlight the
Video Format option.
3. Press the
rbutton to select Video Format.
4. Press the left
por rightonavigation arrows to
select the desired video format.
5. Press the
rbutton to accept the change.
Audio Output
Audio from the DVD player or auxiliary inputs can be
heard through the following possible sources:
Wireless Headphones
Vehicle Speakers
Vehicle wired headphone jacks on the Rear Seat
Audio system (if equipped)The RSE system always transmits the audio signal to
the wireless headphones, if there is audio available.
See “Headphones” earlier in this section for more
information.
The RSE system is capable of outputting audio to the
vehicle speakers by using the radio. The RSE system can
be selected as an audio source on the radio if the RSE
system power is on. Once the RSE system is selected as
an audio source on the radio, adjust the speaker volume
on the radio, if necessary. If the RSE system power is not
on, the RSE system is not an available source on the
radio. See the vehicle’s radio information.
The RSE system is capable of outputting audio to the
wired headphone jacks on the rear seat audio system
(if equipped). The RSE system can be selected as
an audio source on the rear seat audio system if the
RSE system power is on. SeeRear Seat Audio (RSA)
on page 3-108for more information.
3-98
Page 234 of 484
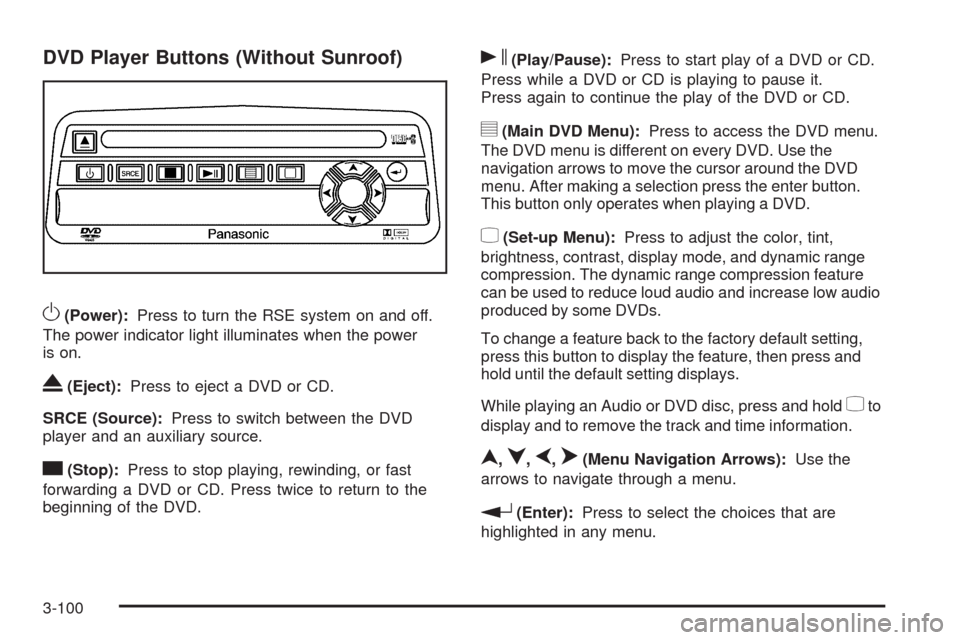
DVD Player Buttons (Without Sunroof)
O(Power):Press to turn the RSE system on and off.
The power indicator light illuminates when the power
is on.
X(Eject):Press to eject a DVD or CD.
SRCE (Source):Press to switch between the DVD
player and an auxiliary source.
c(Stop):Press to stop playing, rewinding, or fast
forwarding a DVD or CD. Press twice to return to the
beginning of the DVD.
s(Play/Pause):Press to start play of a DVD or CD.
Press while a DVD or CD is playing to pause it.
Press again to continue the play of the DVD or CD.
y(Main DVD Menu):Press to access the DVD menu.
The DVD menu is different on every DVD. Use the
navigation arrows to move the cursor around the DVD
menu. After making a selection press the enter button.
This button only operates when playing a DVD.
z(Set-up Menu):Press to adjust the color, tint,
brightness, contrast, display mode, and dynamic range
compression. The dynamic range compression feature
can be used to reduce loud audio and increase low audio
produced by some DVDs.
To change a feature back to the factory default setting,
press this button to display the feature, then press and
hold until the default setting displays.
While playing an Audio or DVD disc, press and hold
zto
display and to remove the track and time information.
n,q,p,o(Menu Navigation Arrows):Use the
arrows to navigate through a menu.
r(Enter):Press to select the choices that are
highlighted in any menu.
3-100
Page 236 of 484
Ejecting a Disc (DVD Player without
Sunroof)
Press thec/Xbutton on the DVD player faceplate
to eject the disc. There is not an eject button on
the remote control.
If a disc is ejected from the player, but is not removed,
the DVD player reloads the disc after a short period
of time. The disc is stored in the DVD player. The DVD
player does not resume play of the disc automatically.
Ejecting a Disc (DVD Player with Sunroof)
Press and hold thec/Xbutton for more than
two seconds on the DVD player faceplate to eject the
disc. There is not an eject button on the remote control.
If a disc is ejected from the player, but is not removed,
the DVD player reloads the disc after a short period
of time. The disc is stored in the DVD player. The DVD
player does not resume play of the disc automatically.
Remote Control
To use the remote control, aim it at the transmitter
window below the video screen and press the desired
button. Direct sunlight or very bright light can affect
the ability of the RSE system to receive signals from
the remote control. If the remote control does not seem
to be working, the batteries may need to be replaced.
See “Battery Replacement” later in this section.
Objects blocking the line of sight can also affect the
function of the remote control.
Notice:Storing the remote control in a hot area or
in direct sunlight can damage it, and the repairs will
not be covered by the warranty. Storage in extreme
cold can weaken the batteries. Keep the remote
control stored in a cool, dry place.
3-102
Page 238 of 484
\(Clear):Press within three seconds to clear a
number that has been entered.
P(Illumination):Press to turn the remote control
backlight on. The backlight times out after about 7 to
10 seconds if no other button is pressed while the
backlight is on.
y(Main DVD Menu):Press to access the DVD menu.
The DVD menu is different on every DVD. Use the
navigation arrows to move the cursor around the DVD
menu. After making a selection press the enter button.
This button only operates when playing a DVD.
r(Enter):Press to select the choices that are
highlighted in any menu.
q(Return):Press to exit the current active menu
and return to the previous menu. This button operates
only when a DVD is playing and a menu is active.
|(Camera Angle):Press to change camera angles
on DVDs that have this feature when a DVD is playing.
The format and content of this function will vary for
each disc.
{(Subtitle):Press to turn on subtitles and to move
through subtitle options when a DVD is playing. The
format and content of this function will vary for each disc.
[(Fast Forward):Press to fast forward the DVD or
CD. To stop fast forwarding, press again. This button
might not work while the DVD is playing the copyright
information or the previews.
s(Play/Pause):Press to start play of a DVD or CD.
Press while a DVD or CD is playing to pause it.
Press again to continue the play of the DVD or CD.
When the DVD is playing, press this button then press
the fast forward button. The DVD continues playing
in a slow play mode. To cancel slow play mode, press
this button.
u(Next Track/Chapter):Press to advance to the
beginning of the next track or chapter. This button
might not work when the DVD is playing the copyright
information or the previews.
3-104
Page 239 of 484

Battery Replacement
To change the remote control batteries:
1. Remove the battery compartment door located on
the bottom of the remote control.
2. Replace the two batteries in the compartment.
Make sure that they are installed correctly,
using the diagram on the inside of the battery
compartment.
3. Close the battery door securely.
If the remote control is to be stored for a long period
of time, remove the batteries and keep them in a cool,
dry place.
Problem Recommended Action
No power. The ignition might
not be in ON/RUN or
ACC/ACCESSORY.
The parental control
button might have been
turned on. The power
indicator light �ashes.
Disc will not play. The system might be off.
The parental control
button might have been
turned on. The power
indicator light �ashes.
The system might be
in auxiliary mode.
The disc is upside down
or is not compatible.
The picture does not �ll
the screen. There are
black borders on the top
and bottom or on both
sides or it looks
stretched out.Check the display
mode settings in the
display menu.
The disc was ejected, but
it was pulled back into the
DVD player.The disc is being stored in
the DVD player. Press the
eject button again to eject
the disc.
3-105
Page 240 of 484

Problem Recommended Action
In auxiliary mode, the
picture moves or scrolls.Check the auxiliary
input connections at
both devices.
Change the Video Format
to PAL or NTSC. See
“Stereo RCA Jacks”
previously for how to
change the video format.
The language in the audio
or on the screen is wrong.Check the audio or
language selection in
the main DVD menu.
The remote control does
not work.Check to make sure there
is no obstruction between
the remote control and
the transmitter window.
Check the batteries to
make sure they are
not dead or installed
incorrectly.
The parental control
button might have been
turned on. The power
indicator light �ashes.Problem Recommended Action
After stopping the player,
I push Play but
sometimes the DVD
starts where I left off
and sometimes at the
beginning.If the stop button was
pressed one time, the
DVD player resumes
playing where the DVD
was stopped. If the stop
button was pressed
two times the DVD player
begins to play from the
beginning of the DVD.
The auxiliary source is
running but there is no
picture or sound.Check that the DVD
player is in the auxiliary
source mode.
Check the auxiliary input
connections at both
devices.
My disc is stuck in the
player. The Load/Eject
button does not work.Turn the DVD power off,
then on, then press the
load/eject button on the
DVD player.
Do not attempt to forcibly
remove the disc from the
DVD player. This could
permanently damage the
disc and DVD player.
3-106
Page 243 of 484

To scan preset stations, press and hold the SEEK
button for two seconds and the radio advances to the
next preset station. If the button continues to be held
down, the radio advances through the available preset
stations. The display shows the selections. This function
is inactive if the front seat passengers are listing to
the radio.
While a CD is playing, press the SEEK button to go
to the next track on the CD. This function is inactive
if the front seat passengers are listening to a CD.
While a CD is playing in the six-disc CD player, press
and hold the SEEK button for two seconds to go to the
next CD, if multiple CDs are loaded. This function is
inactive if the front seat passengers are listening to a CD.
Theft-Deterrent Feature
THEFTLOCK®is designed to discourage theft of the
vehicle’s radio by learning a portion of the Vehicle
Identi�cation Number (VIN). The radio does not operate
and LOCKED displays if the radio is stolen or moved
to a different vehicle.
When the when the ignition is in the off position, a
blinking red light on the upper left side of the radio
indicates that THEFTLOCK
®is armed.
Audio Steering Wheel Controls
Vehicles with audio steering wheel controls could
differ depending on the vehicle’s options. Some audio
controls can be adjusted at the steering wheel.
g(Mute/ Voice Recognition):For vehicles with
OnStar®or Bluetooth®systems pressgto interact
with those systems. SeeOnStar®System on page 2-45
andBluetooth®on page 3-85in this manual for more
information.
If the vehicle does not have OnStar, press
gto silence
the vehicle speakers only. Press
gagain, or any other
radio button, to turn on the sound.
3-109
Page 245 of 484
XM™ Satellite Radio Service
XM Satellite Radio Service gives digital radio reception
from coast-to-coast in the 48 contiguous United States,
and in Canada. Just as with FM, tall buildings or hills can
interfere with satellite radio signals, causing the sound to
fade in and out. In addition, traveling or standing under
heavy foliage, bridges, garages, or tunnels may cause
loss of the XM signal for a period of time.
Cellular Phone Usage
Cellular phone usage may cause interference with the
vehicle’s radio. This interference may occur when making
or receiving phone calls, charging the phone’s battery,
or simply having the phone on. This interference causes
an increased level of static while listening to the radio.
If static is received while listening to the radio, unplug
the cellular phone and turn it off.
Fixed Mast Antenna
The �xed mast antenna can withstand most car washes
without being damaged. If the mast becomes slightly
bent, straighten it out by hand. If the mast is badly bent,
replace it.
Occasionally check to make sure the antenna is
tightened to its base. If tightening is required, tighten
by hand until fully seated plus one quarter turn.
XM™ Satellite Radio Antenna
System
The XM Satellite Radio antenna is located on the roof of
the vehicle. Keep the antenna clear of obstructions for
clear radio reception.
If the vehicle has a sunroof, the performance of the XM
system may be affected if the sunroof is open.
Chime Level Adjustment
The radio is used to adjust the vehicle’s chime level.
To change the volume level of the chime, press and hold
pushbutton 6 with the ignition on and the radio power off.
The volume level will change from the normal level to
loud, and LOUD CHIME will appear on the radio display.
To change back to the default or normal setting, press
and hold pushbutton 6 again. The volume level will
change from the loud level to normal, and NORMAL
CHIME will appear on the radio display. Removing the
radio and not replacing it with a factory radio or chime
module will disable vehicle chimes.
3-111