2009 CHEVROLET TAHOE display
[x] Cancel search: displayPage 171 of 574

Symbols
The navigation system may have a feature that lets the
driver view symbols on the navigation screen while
using the rear vision camera. The Ultrasonic Rear Park
Assist (URPA) system must not be disabled to use
the caution symbols. If URPA has been disabled and
the symbols have been turned on, the Rear Parking
Assist Symbols Unavailable error message may display.
SeeUltrasonic Rear Parking Assist (URPA) on
page 2-56.
The symbols appear when an object has been detected
by the URPA system. The symbol may cover the
object when viewing the navigation screen.
To turn the symbols on or off:
1. Make sure that URPA has not been disabled.
2. Shift into P (Park).
3. Press the MENU hard key to enter the con�gure
menu options, then press the MENU hard key
repeatedly until Display is selected or touch
the Display screen button.
4. Select the Rear Camera Options screen button.
The Rear Camera Options screen will display.
5. Touch the Symbols screen button. The screen
button will be highlighted when on.
Rear Vision Camera Error Messages
Service Rear Vision Camera System:This message
can display when the system is not receiving
information it requires from other vehicle systems.
If any other problem occurs or if a problem persists, see
your dealer/retailer.
Rear Vision Camera Location
The image is provided by the camera located above the
license plate.
2-65
Page 172 of 574

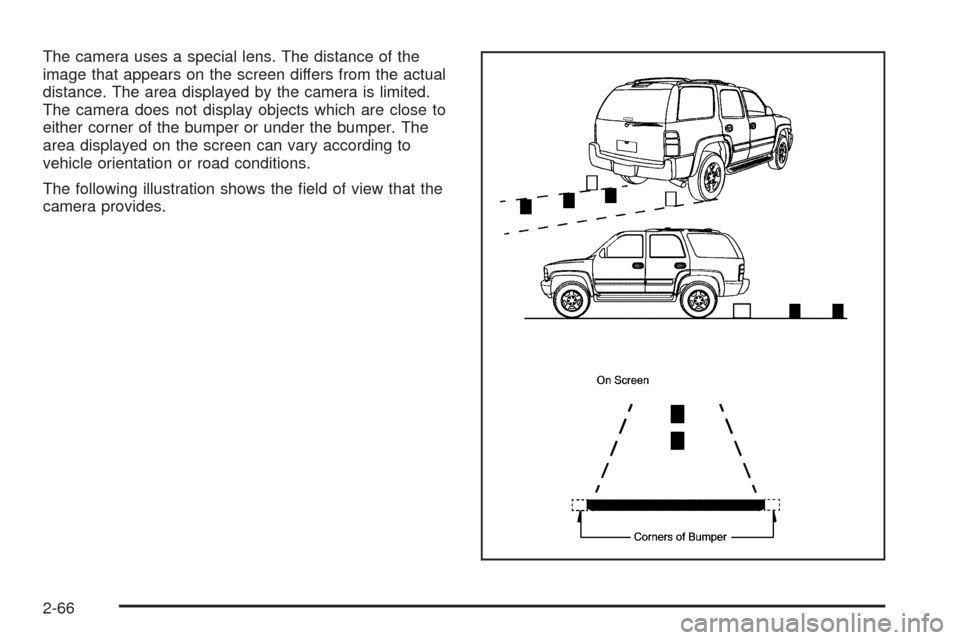
The camera uses a special lens. The distance of the
image that appears on the screen differs from the actual
distance. The area displayed by the camera is limited.
The camera does not display objects which are close to
either corner of the bumper or under the bumper. The
area displayed on the screen can vary according to
vehicle orientation or road conditions.
The following illustration shows the �eld of view that the
camera provides.
2-66
Page 173 of 574

When the System Does Not Seem To
Work Properly
The rear vision camera system might not work properly
or display a clear image if:
The RVC is turned off. See “Turning the Rear
Camera System On or Off” earlier in this section.
It is dark.
The sun or the beam of headlights is shining
directly into the camera lens.
Ice, snow, mud, or anything else builds up on the
camera lens. Clean the lens, rinse it with water,
and wipe it with a soft cloth.
The back of the vehicle is in an accident, the
position and mounting angle of the camera
can change or the camera can be affected. Be sure
to have the camera and its position and mounting
angle checked at your dealer/retailer.
There are extreme temperature changes.The rear vision camera system display in the rearview
mirror may turn off or not appear as expected due to one
of the following conditions. If this occurs the left
indicator light on the mirror will �ash.
A slow �ash may indicate a loss of video signal, or
no video signal present during the reverse cycle.
A fast �ash may indicate that the display has been
on for the maximum allowable time during a
reverse cycle, or the display has reached an Over
Temperature limit.
The fast �ash conditions are used to protect the
video device from high temperature conditions. Once
conditions return to normal the device will reset
and the green indicator will stop �ashing.
During any of these fault conditions, the display will be
blank and the indicator will continue to �ash as long
as the vehicle is in R (Reverse) or until the conditions
return to normal.
Pressing and holding
zwhen the left indicator light is
�ashing will turn off the video display along with the
left indicator light.
2-67
Page 190 of 574

Oil Pressure Light.........................................3-48
Security Light...............................................3-48
Fog Lamp Light............................................3-49
Cruise Control Light......................................3-49
Highbeam On Light.......................................3-49
Tow/Haul Mode Light....................................3-49
Fuel Gage...................................................3-50
Low Fuel Warning Light.................................3-51
Driver Information Center (DIC).......................3-51
DIC Operation and Displays
(With DIC Buttons)....................................3-52
DIC Operation and Displays
(Without DIC Buttons)................................3-58
DIC Compass..............................................3-61
DIC Warnings and Messages.........................3-64
DIC Vehicle Customization
(With DIC Buttons)....................................3-74Audio System(s).............................................3-82
Setting the Clock..........................................3-83
Radio(s)......................................................3-85
Using an MP3 (Radio with CD or
Six-Disc CD Player).................................3-104
Using an MP3 (Radio with CD and
DVD Player)...........................................3-108
XM Radio Messages...................................3-113
Navigation/Radio System..............................3-114
Bluetooth
®.................................................3-115
Rear Seat Entertainment (RSE) System.........3-125
Rear Seat Audio (RSA)................................3-135
Theft-Deterrent Feature................................3-137
Audio Steering Wheel Controls......................3-137
Radio Reception.........................................3-138
Rear Side Window Antenna..........................3-139
XM™ Satellite Radio Antenna System............3-139
Section 3 Instrument Panel
3-2
Page 198 of 574

When Rainsense is active, the headlamps will turn on
automatically if the exterior lamp control is in the AUTO
position and the wipers are active.
Notice:Going through an automatic car wash with
the wipers on can damage them. Turn the wipers
off when going through an automatic car wash.
Windshield Washer
{CAUTION:
In freezing weather, do not use your washer until
the windshield is warmed. Otherwise the washer
�uid can form ice on the windshield, blocking your
vision.
L(Washer Fluid):Push the paddle marked with the
windshield washer symbol at the top of the multifunction
lever, to spray washer �uid on the windshield. The
wipers clear the window and then either stop or return
to the preset speed.
Heated Windshield Washer
For vehicles with the heated windshield washer �uid
system it can be used to help clear ice, snow, tree sap,
or bugs from the windshield.
_(Heated Washer Fluid):Press the heated washer
�uid button to activate the heated windshield washer
�uid system. This activation initiates four heated
wash/wipe cycles. The �rst heated wash/wipe cycle may
take up to 40 seconds to occur, depending on outside
temperature. After the �rst wash/wipe cycle, it may take
up to 20 seconds for each of the remaining cycles to
begin. Press the button again to turn off the heated
windshield washer �uid system or it will automatically
turn off after four wipe cycles have been completed.
When the heated windshield washer �uid system
is activated under certain outside temperature
conditions, steam may �ow out of the washer nozzles
for a short period of time before washer �uid is sprayed.
This is a normal condition.
HEATING WASH FLUID WASH WIPES PENDING is
displayed on the DIC when the washer system is heating
the �uid. WASHER FLUID LOW ADD FLUID is
displayed when the washer �uid is low. SeeDIC
Warnings and Messages on page 3-64.
3-10
Page 207 of 574

Dome Lamp Override
The dome lamp override button is located next to the
exterior lamps control.
k(Dome Off):Press the button in and the dome
lamps remain off when a door is opened. Press the
button again to return it to the extended position so that
the dome lamps come on when a door is opened.
Entry Lighting
The vehicle has an illuminated entry feature.
When the doors are opened, the dome lamps will come
on if the dome override button is in the extended
position. If the dome override button is pressed in, the
lamps will not come on.
Exit Lighting
The interior lamps come on when the key is removed
from the ignition. They turn off automatically in
20 seconds. The lights do not come on if the dome
override button is pressed in.
Reading Lamps
For vehicles with reading lamps they are located on the
overhead console.
To turn on the reading lamps, press the button located
next to each lamp. To turn them off, press the button
again.
The vehicle may also have reading lamps in other
locations. To turn the lamps on or off, press the button
located next to the lamp.
The lamps are �xed and cannot be adjusted.
Electric Power Management
The vehicle has Electric Power Management (EPM)
that estimates the battery’s temperature and state
of charge. It then adjusts the voltage for best
performance and extended life of the battery.
When the battery’s state of charge is low, the voltage is
raised slightly to quickly bring the charge back up.
When the state of charge is high, the voltage is lowered
slightly to prevent overcharging. If the vehicle has a
voltmeter gage or a voltage display on the Driver
Information Center (DIC), you may see the voltage move
up or down. This is normal. If there is a problem, an
alert will be displayed.
3-19
Page 208 of 574

The battery can be discharged at idle if the electrical
loads are very high. This is true for all vehicles. This
is because the generator (alternator) may not be
spinning fast enough at idle to produce all the power
that is needed for very high electrical loads.
A high electrical load occurs when several of the
following are on, such as: headlamps, high beams, fog
lamps, rear window defogger, climate control fan at
high speed, heated seats, engine cooling fans, trailer
loads, and loads plugged into accessory power outlets.
EPM works to prevent excessive discharge of the
battery. It does this by balancing the generator’s output
and the vehicle’s electrical needs. It can increase
engine idle speed to generate more power, whenever
needed. It can temporarily reduce the power demands of
some accessories.
Normally, these actions occur in steps or levels, without
being noticeable. In rare cases at the highest levels
of corrective action, this action may be noticeable to the
driver. If so, a Driver Information Center (DIC)
message might be displayed, such as BATTERY
SAVER ACTIVE, BATTERY VOLTAGE LOW, or LOW
BATTERY. If this message is displayed, it is
recommended that the driver reduce the electrical loads
as much as possible. SeeDIC Warnings and Messages
on page 3-64.Battery Run-Down Protection
This feature shuts off the dome, and reading lamps
if they are left on for more than 10 minutes when
the ignition is off. This will keep the battery from
running down.
Accessory Power Outlet(s)
Accessory power outlets can be used to connect
auxiliary electrical equipment, such as a cellular
telephone.
There are two under the climate controls, one inside the
center �oor console, one on the rear of the center
�oor console and one accessory power outlet in the rear
cargo area on the passenger side.
To use an accessory power outlet, remove the protective
cap. When not in use, always cover the accessory
power outlet with the protective cap.
The accessory power outlets are powered, even with
the ignition off. Continuing to use accessory power
outlets while the ignition is in LOCK/OFF may cause the
vehicle’s battery to run down.
3-20
Page 213 of 574

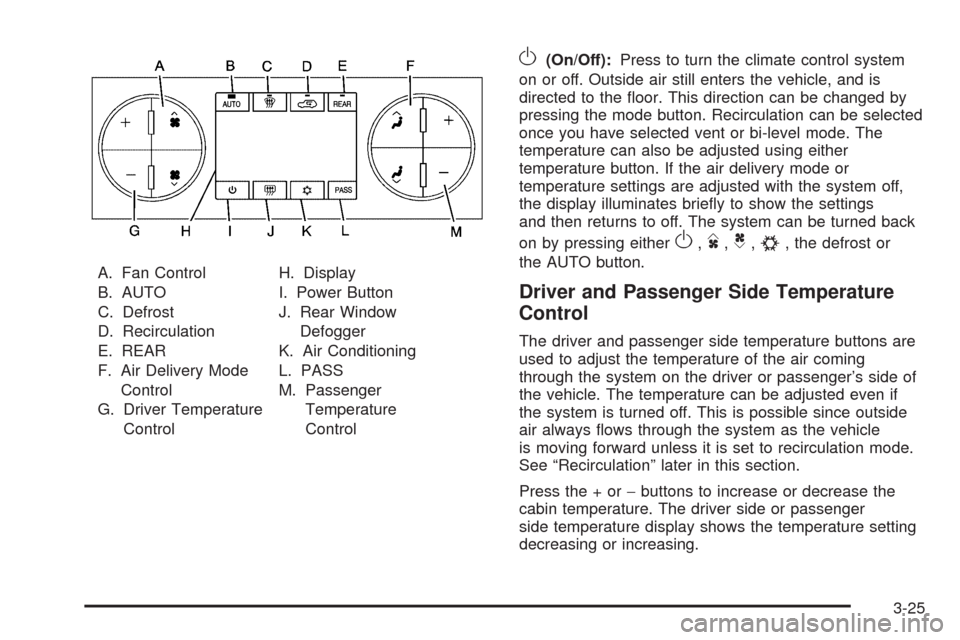
A. Fan Control
B. AUTO
C. Defrost
D. Recirculation
E. REAR
F. Air Delivery Mode
Control
G. Driver Temperature
ControlH. Display
I. Power Button
J. Rear Window
Defogger
K. Air Conditioning
L. PASS
M. Passenger
Temperature
Control
O(On/Off):Press to turn the climate control system
on or off. Outside air still enters the vehicle, and is
directed to the �oor. This direction can be changed by
pressing the mode button. Recirculation can be selected
once you have selected vent or bi-level mode. The
temperature can also be adjusted using either
temperature button. If the air delivery mode or
temperature settings are adjusted with the system off,
the display illuminates brie�y to show the settings
and then returns to off. The system can be turned back
on by pressing either
O,D,C,#, the defrost or
the AUTO button.
Driver and Passenger Side Temperature
Control
The driver and passenger side temperature buttons are
used to adjust the temperature of the air coming
through the system on the driver or passenger’s side of
the vehicle. The temperature can be adjusted even if
the system is turned off. This is possible since outside
air always �ows through the system as the vehicle
is moving forward unless it is set to recirculation mode.
See “Recirculation” later in this section.
Press the + or−buttons to increase or decrease the
cabin temperature. The driver side or passenger
side temperature display shows the temperature setting
decreasing or increasing.
3-25