Page 8 of 574
Head Restraints
The front seats have adjustable head restraints in the
outboard seating positions.
{CAUTION:
With head restraints that are not installed and
adjusted properly, there is a greater chance that
occupants will suffer a neck/spinal injury in a
crash. Do not drive until the head restraints for all
occupants are installed and adjusted properly.
Adjust the head restraint so that the top of the restraint
is at the same height as the top of the occupant’s
head. This position reduces the chance of a neck injury
in a crash.
1-2
Page 12 of 574
Power Lumbar
On seats with power lumbar, the controls used to
operate this feature are located on the outboard side of
the seats.
To increase lumbar support, press and hold the
front of the control.
To decrease lumbar support, press and hold the
rear of the control.The vehicle may have additional features to adjust your
vehicle’s power seat:
To raise the height of the lumbar support, press
and hold the top of the control.
To lower the height of the lumbar support, press
and hold the bottom of the control.
Release the control when the lower seatback reaches
the desired level of lumbar support.
Your vehicle may have a memory function which allows
seat settings to be saved and recalled. SeeMemory
Seat, Mirrors, and Pedals on page 1-8for more
information.
Keep in mind that as your seating position changes, as
it may during long trips, so should the position of
your lumbar support. Adjust the seat as needed.
1-6
Page 54 of 574
4. If equipped with a shoulder belt height adjuster,
move it to the height that is right for you. See
“Shoulder Belt Height Adjustment” later in this
section for instructions on use and important safety
information.
5. To make the lap part tight, pull up on the
shoulder belt.
It may be necessary to pull stitching on the safety
belt through the latch plate to fully tighten the
lap belt on smaller occupants.To unlatch the belt, push the button on the buckle. The
belt should return to its stowed position.
Before a door is closed, be sure the safety belt is out of
the way. If a door is slammed against a safety belt,
damage can occur to both the belt and the vehicle.
1-48
Page 55 of 574

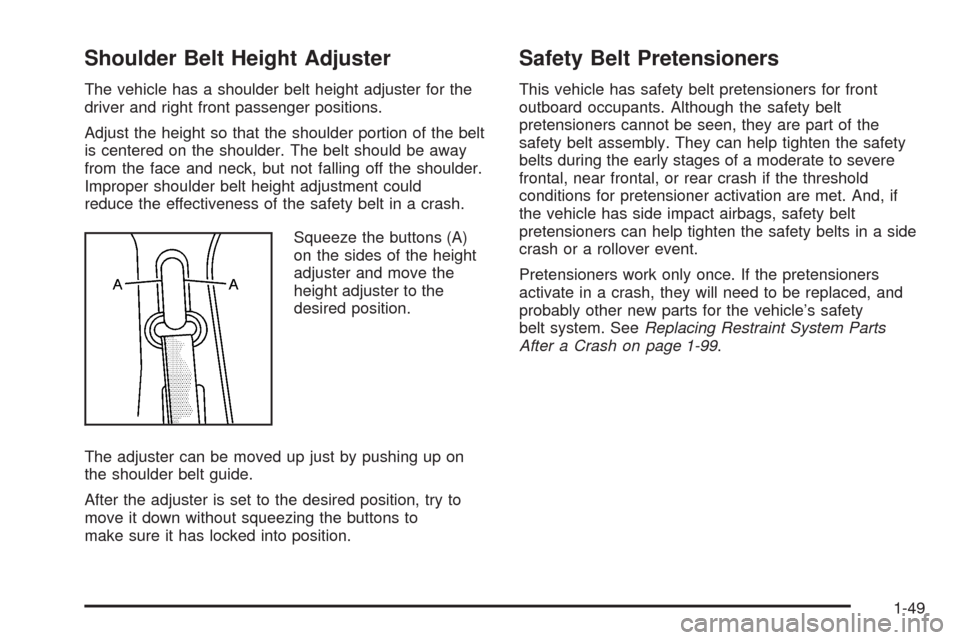
Shoulder Belt Height Adjuster
The vehicle has a shoulder belt height adjuster for the
driver and right front passenger positions.
Adjust the height so that the shoulder portion of the belt
is centered on the shoulder. The belt should be away
from the face and neck, but not falling off the shoulder.
Improper shoulder belt height adjustment could
reduce the effectiveness of the safety belt in a crash.
Squeeze the buttons (A)
on the sides of the height
adjuster and move the
height adjuster to the
desired position.
The adjuster can be moved up just by pushing up on
the shoulder belt guide.
After the adjuster is set to the desired position, try to
move it down without squeezing the buttons to
make sure it has locked into position.
Safety Belt Pretensioners
This vehicle has safety belt pretensioners for front
outboard occupants. Although the safety belt
pretensioners cannot be seen, they are part of the
safety belt assembly. They can help tighten the safety
belts during the early stages of a moderate to severe
frontal, near frontal, or rear crash if the threshold
conditions for pretensioner activation are met. And, if
the vehicle has side impact airbags, safety belt
pretensioners can help tighten the safety belts in a side
crash or a rollover event.
Pretensioners work only once. If the pretensioners
activate in a crash, they will need to be replaced, and
probably other new parts for the vehicle’s safety
belt system. SeeReplacing Restraint System Parts
After a Crash on page 1-99.
1-49
Page 61 of 574

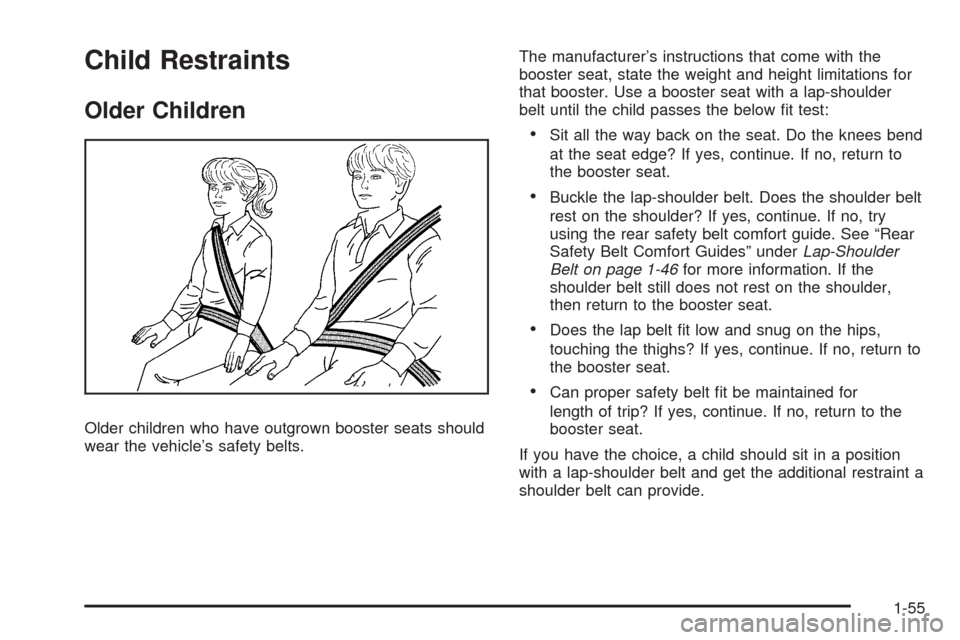
Child Restraints
Older Children
Older children who have outgrown booster seats should
wear the vehicle’s safety belts.The manufacturer’s instructions that come with the
booster seat, state the weight and height limitations for
that booster. Use a booster seat with a lap-shoulder
belt until the child passes the below �t test:
Sit all the way back on the seat. Do the knees bend
at the seat edge? If yes, continue. If no, return to
the booster seat.
Buckle the lap-shoulder belt. Does the shoulder belt
rest on the shoulder? If yes, continue. If no, try
using the rear safety belt comfort guide. See “Rear
Safety Belt Comfort Guides” underLap-Shoulder
Belt on page 1-46for more information. If the
shoulder belt still does not rest on the shoulder,
then return to the booster seat.
Does the lap belt �t low and snug on the hips,
touching the thighs? If yes, continue. If no, return to
the booster seat.
Can proper safety belt �t be maintained for
length of trip? If yes, continue. If no, return to the
booster seat.
If you have the choice, a child should sit in a position
with a lap-shoulder belt and get the additional restraint a
shoulder belt can provide.
1-55
Page 66 of 574

Q:What are the different types of add-on child
restraints?
A:Add-on child restraints, which are purchased by the
vehicle’s owner, are available in four basic types.
Selection of a particular restraint should take
into consideration not only the child’s weight, height,
and age but also whether or not the restraint will
be compatible with the motor vehicle in which it will
be used.
For most basic types of child restraints, there are
many different models available. When purchasing a
child restraint, be sure it is designed to be used
in a motor vehicle. If it is, the restraint will have a
label saying that it meets federal motor vehicle
safety standards.
The restraint manufacturer’s instructions that come
with the restraint state the weight and height
limitations for a particular child restraint. In addition,
there are many kinds of restraints available for
children with special needs.
{CAUTION:
To reduce the risk of neck and head injury during
a crash, infants need complete support. This is
because an infant’s neck is not fully developed
and its head weighs so much compared with the
rest of its body. In a crash, an infant in a
rear-facing child restraint settles into the restraint,
so the crash forces can be distributed across the
strongest part of an infant’s body, the back and
shoulders. Infants should always be secured in
rear-facing child restraints.
1-60
Page 102 of 574

Servicing Your Airbag-Equipped
Vehicle
Airbags affect how the vehicle should be serviced.
There are parts of the airbag system in several places
around the vehicle. Your dealer/retailer and the
service manual have information about servicing the
vehicle and the airbag system. To purchase a service
manual, seeService Publications Ordering Information
on page 7-15.
{CAUTION:
For up to 10 seconds after the ignition is turned off
and the battery is disconnected, an airbag can still
in�ate during improper service. You can be injured
if you are close to an airbag when it in�ates. Avoid
yellow connectors. They are probably part of the
airbag system. Be sure to follow proper service
procedures, and make sure the person performing
work for you is quali�ed to do so.
Adding Equipment to Your
Airbag-Equipped Vehicle
Q:Is there anything I might add to or change
about the vehicle that could keep the airbags
from working properly?
A:Yes. If you add things that change your vehicle’s
frame, bumper system, height, front end or side
sheet metal, they may keep the airbag system from
working properly. Changing or moving any parts
of the front seats, safety belts, the airbag sensing
and diagnostic module, steering wheel, instrument
panel, roof-rail airbag modules, ceiling headliner
or pillar garnish trim, overhead console, front
sensors, side impact sensors, rollover sensor
module, or airbag wiring can affect the operation of
the airbag system.
In addition, your vehicle has a passenger
sensing system for the right front passenger’s
position, which includes sensors that are part of
the passenger’s seat.
1-96
Page 166 of 574

SBZA Detection Zones
The SBZA sensor covers a zone of approximately one
lane over from both sides of the vehicle, 11 ft. or
3.5 m. This zone starts at each side mirror and goes
back approximately 16 ft. (5.0 m). The height of the zone
is approximately between 1.5 ft. (0.5 m) and 6 ft. (2.0 m)
off the ground.
Use caution while changing lanes when towing a trailer,
as the SBZA detection zones do not change when a
trailer is towed.
How the System Works
When the vehicle is started, both outside mirror displays
will brie�y come on to indicate that the system is
operating. When the vehicle is moving forward, the left
or right side mirror SBZA display will light up if a
vehicle is detected in that blind zone. If the turn signal is
activated and a vehicle is also detected on the same
side, the SBZA display will �ash to give you extra
warning not to change lanes.
SBZA displays do not come on while the vehicle is
approaching or passing other vehicles. At speeds
greater then 20 mph (32 km/h), SBZA displays may
come on when a vehicle you have passed remains in or
drops back into the detection zone.
Left Side Mirror DisplayRight Side Mirror
Display
2-60