2009 CHEVROLET TAHOE warning
[x] Cancel search: warningPage 147 of 574

2m(Two-Wheel Drive High):This setting is used for
driving in most street and highway situations. The
front axle is not engaged in two-wheel drive. This setting
also provides the best fuel economy.
AUTO (Automatic Four-Wheel Drive):This setting is
ideal for use when road surface traction conditions
are variable. When driving your vehicle in AUTO, the
front axle is engaged, but the vehicle’s power is primarily
sent to the rear wheels. When the vehicle’s software
determines a need for more traction, the system
will transfer more power to the front wheels. Driving in
this mode results in slightly lower fuel economy than
Two-Wheel Drive High.
4
m(Four-Wheel Drive High):Use the four-wheel high
position when you need extra traction, such as on snowy
or icy roads or in most off-road situations. This setting
also engages your front axle to help drive the vehicle.
This is the best setting to use when plowing snow.
4
n(Four-Wheel Drive Low):This setting also
engages the front axle and delivers extra torque. You
may never need this setting. It sends maximum power to
all four wheels. You might choose Four-Wheel Drive Low
if you are driving off-road in deep sand, deep mud, deep
snow, and while climbing or descending steep hills.The vehicle has StabiliTrak
®. Shifting into
Four-Wheel-Drive Low will turn Traction Control and
StabiliTrak
®off. SeeStabiliTrak®System on page 4-6.
{CAUTION:
Shifting the transfer case to N (Neutral) can cause
the vehicle to roll even if the transmission is in
P (Park). You or someone else could be seriously
injured. Be sure to set the parking brake before
placing the transfer case in N (Neutral). See
Parking Brake on page 2-45.
N (Neutral):Shift the vehicle’s transfer case to
N (Neutral) only when towing the vehicle. See
Recreational Vehicle Towing on page 4-44orTowing
Your Vehicle on page 4-43for more information.
If the SERVICE 4 WHEEL DRIVE message stays on,
you should take the vehicle to your dealer/retailer
for service. See “SERVICE 4 WHEEL DRIVE message”
underDIC Warnings and Messages on page 3-64.
2-41
Page 151 of 574

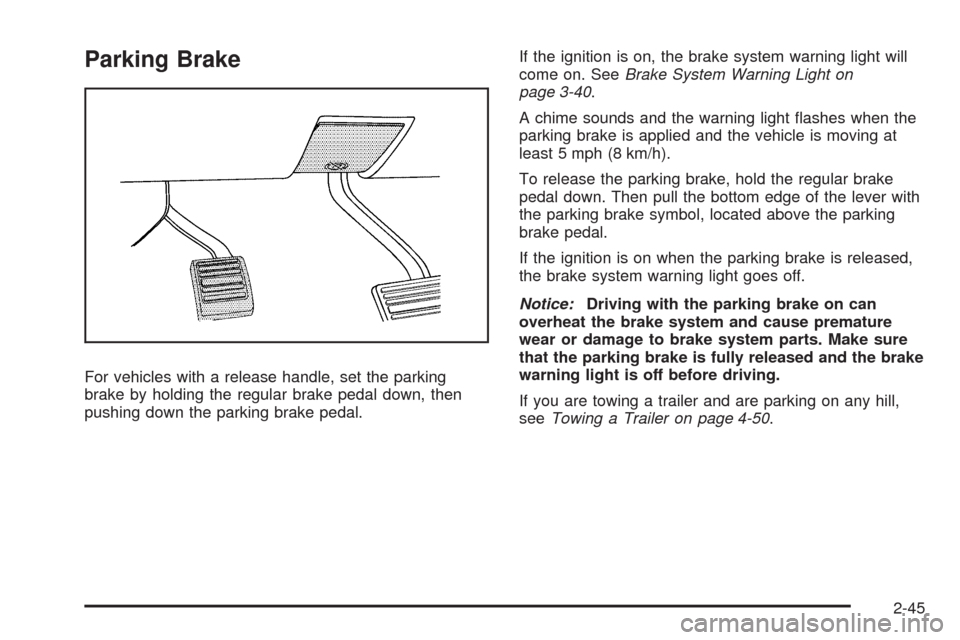
Parking Brake
For vehicles with a release handle, set the parking
brake by holding the regular brake pedal down, then
pushing down the parking brake pedal.If the ignition is on, the brake system warning light will
come on. SeeBrake System Warning Light on
page 3-40.
A chime sounds and the warning light �ashes when the
parking brake is applied and the vehicle is moving at
least 5 mph (8 km/h).
To release the parking brake, hold the regular brake
pedal down. Then pull the bottom edge of the lever with
the parking brake symbol, located above the parking
brake pedal.
If the ignition is on when the parking brake is released,
the brake system warning light goes off.
Notice:Driving with the parking brake on can
overheat the brake system and cause premature
wear or damage to brake system parts. Make sure
that the parking brake is fully released and the brake
warning light is off before driving.
If you are towing a trailer and are parking on any hill,
seeTowing a Trailer on page 4-50.
2-45
Page 152 of 574

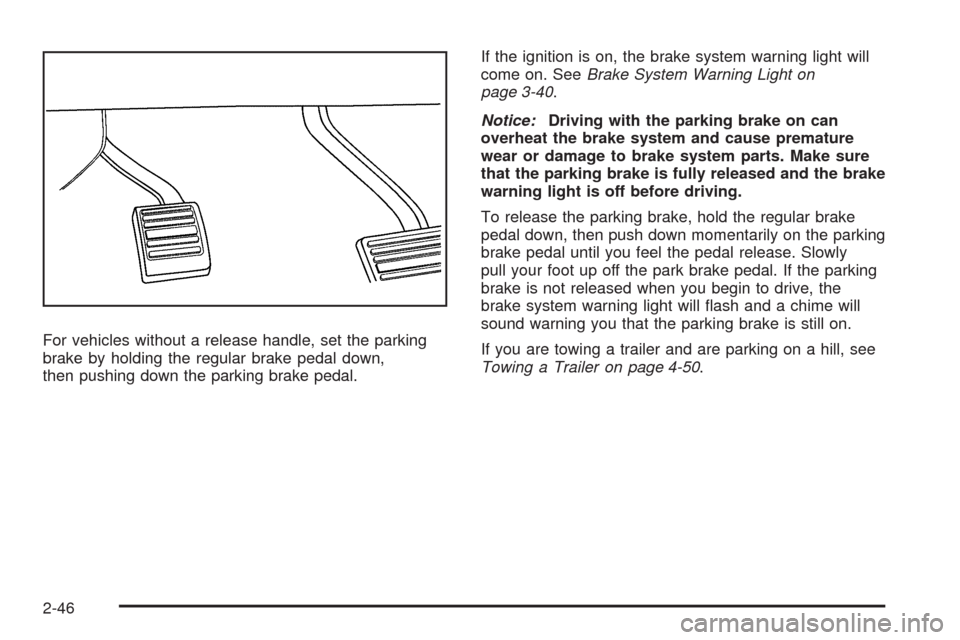
For vehicles without a release handle, set the parking
brake by holding the regular brake pedal down,
then pushing down the parking brake pedal.If the ignition is on, the brake system warning light will
come on. SeeBrake System Warning Light on
page 3-40.
Notice:Driving with the parking brake on can
overheat the brake system and cause premature
wear or damage to brake system parts. Make sure
that the parking brake is fully released and the brake
warning light is off before driving.
To release the parking brake, hold the regular brake
pedal down, then push down momentarily on the parking
brake pedal until you feel the pedal release. Slowly
pull your foot up off the park brake pedal. If the parking
brake is not released when you begin to drive, the
brake system warning light will �ash and a chime will
sound warning you that the parking brake is still on.
If you are towing a trailer and are parking on a hill, see
Towing a Trailer on page 4-50.
2-46
Page 164 of 574

The system can be
disabled by pressing the
rear park aid disable button
located next to the radio.
The indicator light will come on and PARK ASSIST OFF
displays on the Driver Information Center (DIC) to
indicate that URPA is off, seeDIC Warnings and
Messages on page 3-64for information about clearing
the message.
When the System Does Not Seem to
Work Properly
If the URPA system will not activate due to a temporary
condition, the message PARK ASSIST OFF will be
displayed on the DIC and a red light will be shown on
the rear URPA display when the shift lever is moved into
R (Reverse). This occurs under the following conditions:
The driver disables the system.
The ultrasonic sensors are not clean. Keep the
vehicle’s rear bumper free of mud, dirt, snow,
ice and slush. For cleaning instructions, see
Washing Your Vehicle on page 5-109.
A trailer was attached to the vehicle, or a bicycle or
an object was hanging out of the liftgate during the
last drive cycle, the red light may illuminate in
the rear display. Once the attached object is
removed, URPA will return to normal operation.
A tow bar is attached to the vehicle.
The vehicle’s bumper is damaged. Take the vehicle
to your dealer/retailer to repair the system.
Other conditions may affect system performance,
such as vibrations from a jackhammer or the
compression of air brakes on a very large truck.
If the system is still disabled, after driving forward at
least 15 mph (25 km/h), take the vehicle to your
dealer/retailer.
Side Blind Zone Alert (SBZA)
The vehicle may have a Side Blind Zone Alert (SBZA)
system. Read this entire section before using the
system.
The SBZA system operates on a radio frequency
subject to Federal Communications Commission (FCC)
Rules and with Industry Canada.
2-58
Page 166 of 574

SBZA Detection Zones
The SBZA sensor covers a zone of approximately one
lane over from both sides of the vehicle, 11 ft. or
3.5 m. This zone starts at each side mirror and goes
back approximately 16 ft. (5.0 m). The height of the zone
is approximately between 1.5 ft. (0.5 m) and 6 ft. (2.0 m)
off the ground.
Use caution while changing lanes when towing a trailer,
as the SBZA detection zones do not change when a
trailer is towed.
How the System Works
When the vehicle is started, both outside mirror displays
will brie�y come on to indicate that the system is
operating. When the vehicle is moving forward, the left
or right side mirror SBZA display will light up if a
vehicle is detected in that blind zone. If the turn signal is
activated and a vehicle is also detected on the same
side, the SBZA display will �ash to give you extra
warning not to change lanes.
SBZA displays do not come on while the vehicle is
approaching or passing other vehicles. At speeds
greater then 20 mph (32 km/h), SBZA displays may
come on when a vehicle you have passed remains in or
drops back into the detection zone.
Left Side Mirror DisplayRight Side Mirror
Display
2-60
Page 189 of 574

Instrument Panel Overview...............................3-4
Hazard Warning Flashers................................3-6
Horn .............................................................3-6
Tilt Wheel.....................................................3-6
Turn Signal/Multifunction Lever.........................3-7
Turn and Lane-Change Signals........................3-7
Headlamp High/Low-Beam Changer..................3-8
Flash-to-Pass.................................................3-8
Windshield Wipers..........................................3-9
Rainsense™ II Wipers.....................................3-9
Windshield Washer.......................................3-10
Rear Window Wiper/Washer...........................3-11
Cruise Control..............................................3-12
Exterior Lamps.............................................3-14
Headlamps on Reminder................................3-15
Daytime Running Lamps (DRL).......................3-16
Automatic Headlamp System..........................3-16
Fog Lamps ..................................................3-17
Auxiliary Roof Mounted Lamp.........................3-18
Instrument Panel Brightness...........................3-18
Dome Lamps ...............................................3-18
Dome Lamp Override....................................3-19
Entry Lighting...............................................3-19
Exit Lighting.................................................3-19
Reading Lamps............................................3-19
Electric Power Management...........................3-19
Battery Run-Down Protection..........................3-20Accessory Power Outlet(s).............................3-20
Ashtray(s) and Cigarette Lighter......................3-21
Climate Controls............................................3-22
Climate Control System.................................3-22
Dual Automatic Climate Control System...........3-24
Outlet Adjustment.........................................3-30
Rear Air Conditioning and Heating System.......3-31
Rear Air Conditioning and Heating System
and Electronic Climate Controls
...................3-32
Warning Lights, Gages, and Indicators............3-34
Instrument Panel Cluster................................3-35
Speedometer and Odometer...........................3-36
Trip Odometer..............................................3-36
Tachometer.................................................3-36
Safety Belt Reminders...................................3-36
Airbag Readiness Light..................................3-37
Passenger Airbag Status Indicator...................3-38
Charging System Light..................................3-39
Voltmeter Gage............................................3-39
Brake System Warning Light..........................3-40
Antilock Brake System (ABS) Warning Light.....3-41
StabiliTrak
®Indicator Light.............................3-42
Engine Coolant Temperature Gage..................3-42
Tire Pressure Light.......................................3-43
Malfunction Indicator Lamp.............................3-43
Oil Pressure Gage........................................3-46
Section 3 Instrument Panel
3-1
Page 190 of 574

Oil Pressure Light.........................................3-48
Security Light...............................................3-48
Fog Lamp Light............................................3-49
Cruise Control Light......................................3-49
Highbeam On Light.......................................3-49
Tow/Haul Mode Light....................................3-49
Fuel Gage...................................................3-50
Low Fuel Warning Light.................................3-51
Driver Information Center (DIC).......................3-51
DIC Operation and Displays
(With DIC Buttons)....................................3-52
DIC Operation and Displays
(Without DIC Buttons)................................3-58
DIC Compass..............................................3-61
DIC Warnings and Messages.........................3-64
DIC Vehicle Customization
(With DIC Buttons)....................................3-74Audio System(s).............................................3-82
Setting the Clock..........................................3-83
Radio(s)......................................................3-85
Using an MP3 (Radio with CD or
Six-Disc CD Player).................................3-104
Using an MP3 (Radio with CD and
DVD Player)...........................................3-108
XM Radio Messages...................................3-113
Navigation/Radio System..............................3-114
Bluetooth
®.................................................3-115
Rear Seat Entertainment (RSE) System.........3-125
Rear Seat Audio (RSA)................................3-135
Theft-Deterrent Feature................................3-137
Audio Steering Wheel Controls......................3-137
Radio Reception.........................................3-138
Rear Side Window Antenna..........................3-139
XM™ Satellite Radio Antenna System............3-139
Section 3 Instrument Panel
3-2
Page 193 of 574

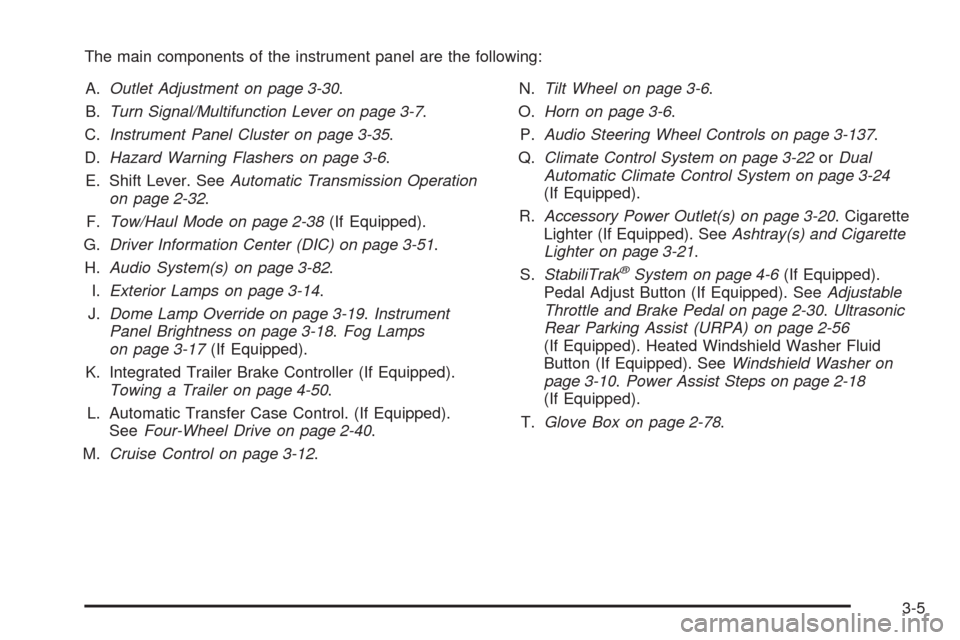
The main components of the instrument panel are the following:
A.Outlet Adjustment on page 3-30.
B.Turn Signal/Multifunction Lever on page 3-7.
C.Instrument Panel Cluster on page 3-35.
D.Hazard Warning Flashers on page 3-6.
E. Shift Lever. SeeAutomatic Transmission Operation
on page 2-32.
F.Tow/Haul Mode on page 2-38(If Equipped).
G.Driver Information Center (DIC) on page 3-51.
H.Audio System(s) on page 3-82.
I.Exterior Lamps on page 3-14.
J.Dome Lamp Override on page 3-19.Instrument
Panel Brightness on page 3-18.Fog Lamps
on page 3-17(If Equipped).
K. Integrated Trailer Brake Controller (If Equipped).
Towing a Trailer on page 4-50.
L. Automatic Transfer Case Control. (If Equipped).
SeeFour-Wheel Drive on page 2-40.
M.Cruise Control on page 3-12.N.Tilt Wheel on page 3-6.
O.Horn on page 3-6.
P.Audio Steering Wheel Controls on page 3-137.
Q.Climate Control System on page 3-22orDual
Automatic Climate Control System on page 3-24
(If Equipped).
R.Accessory Power Outlet(s) on page 3-20. Cigarette
Lighter (If Equipped). SeeAshtray(s) and Cigarette
Lighter on page 3-21.
S.StabiliTrak
®System on page 4-6(If Equipped).
Pedal Adjust Button (If Equipped). SeeAdjustable
Throttle and Brake Pedal on page 2-30.Ultrasonic
Rear Parking Assist (URPA) on page 2-56
(If Equipped). Heated Windshield Washer Fluid
Button (If Equipped). SeeWindshield Washer on
page 3-10.Power Assist Steps on page 2-18
(If Equipped).
T.Glove Box on page 2-78.
3-5