2009 CHEVROLET SUBURBAN service
[x] Cancel search: servicePage 146 of 578
Four-Wheel Drive
If the vehicle has four-wheel drive, you can send the
engine’s driving power to all four wheels for extra
traction. Read the following before using four-wheel
drive.
Notice:Driving on clean, dry pavement in
Four-Wheel-Drive High or Four-Wheel-Drive Low for
an extended period of time may cause premature
wear on your vehicle’s powertrain. Do not drive on
clean, dry pavement in Four-Wheel-Drive High or
Four-Wheel-Drive Low for extended periods of time.
While driving on clean dry pavement and during tight
turns, you may experience a vibration in the steering
system.
The vehicle has StabiliTrak
®. Shifting into
Four-Wheel-Drive Low will turn Traction Control
and StabiliTrak
®off. SeeStabiliTrak®System on
page 4-6.
Front Axle
The front axle engages and disengages automatically
when you shift the transfer case. Some delay for
the axle to engage or disengage is normal.
Automatic Transfer Case
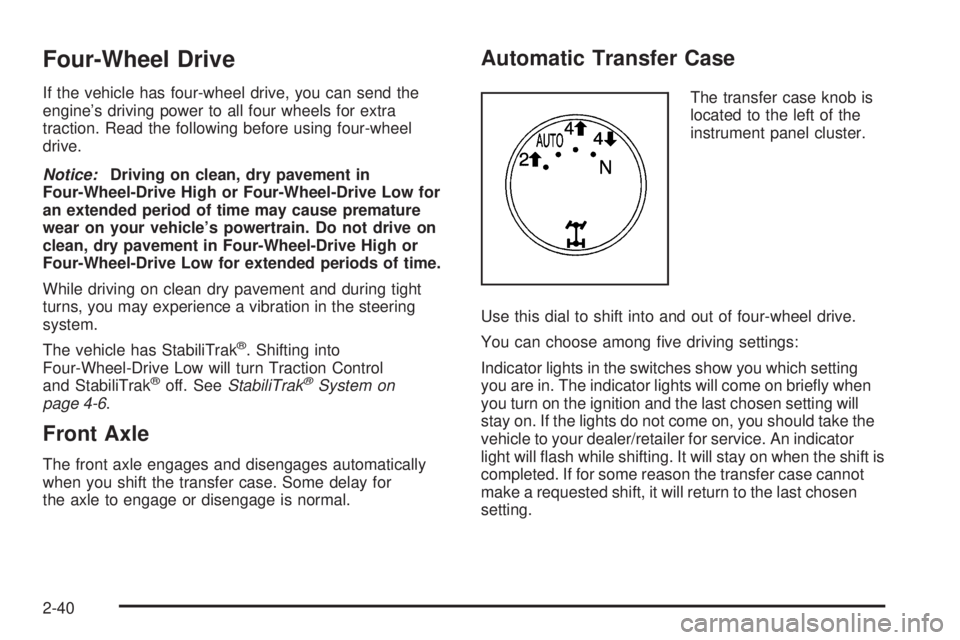
The transfer case knob is
located to the left of the
instrument panel cluster.
Use this dial to shift into and out of four-wheel drive.
You can choose among �ve driving settings:
Indicator lights in the switches show you which setting
you are in. The indicator lights will come on brie�y when
you turn on the ignition and the last chosen setting will
stay on. If the lights do not come on, you should take the
vehicle to your dealer/retailer for service. An indicator
light will �ash while shifting. It will stay on when the shift is
completed. If for some reason the transfer case cannot
make a requested shift, it will return to the last chosen
setting.
2-40
Page 147 of 578

2m(Two-Wheel Drive High):This setting is used
for driving in most street and highway situations.
The front axle is not engaged in two-wheel drive.
This setting also provides the best fuel economy.
AUTO (Automatic Four-Wheel Drive):This setting is
ideal for use when road surface traction conditions are
variable. When driving your vehicle in AUTO, the front
axle is engaged, but the vehicle’s power is primarily
sent to the rear wheels. When the vehicle’s software
determines a need for more traction, the system will
transfer more power to the front wheels. Driving in
this mode results in slightly lower fuel economy than
Two-Wheel Drive High.
4
m(Four-Wheel Drive High):Use the four-wheel high
position when you need extra traction, such as on snowy
or icy roads or in most off-road situations. This setting
also engages your front axle to help drive the vehicle.
This is the best setting to use when plowing snow.
4
n(Four-Wheel Drive Low):This setting also engages
the front axle and delivers extra torque. You may never
need this setting. It sends maximum power to all four
wheels. You might choose Four-Wheel Drive Low if you
are driving off-road in deep sand, deep mud, deep snow,
and while climbing or descending steep hills.The vehicle has StabiliTrak
®. Shifting into
Four-Wheel-Drive Low will turn Traction Control and
StabiliTrak
®off. SeeStabiliTrak®System on page 4-6.
{CAUTION:
Shifting the transfer case to N (Neutral) can cause
the vehicle to roll even if the transmission is in
P (Park). You or someone else could be seriously
injured. Be sure to set the parking brake before
placing the transfer case in N (Neutral). See
Parking Brake on page 2-45.
N (Neutral):Shift the vehicle’s transfer case
to N (Neutral) only when towing the vehicle.
SeeRecreational Vehicle Towing on page 4-43
orTowing Your Vehicle on page 4-43for more
information.
If the SERVICE 4 WHEEL DRIVE message stays on,
you should take the vehicle to your dealer/retailer
for service. See “SERVICE 4 WHEEL DRIVE message”
underDIC Warnings and Messages on page 3-64.
2-41
Page 155 of 578
Shifting Out of Park
This vehicle is equipped with an electronic shift lock
release system. The shift lock release is designed to:
Prevent ignition key removal unless the shift
lever is in P (Park) with the shift lever button fully
released, and
Prevent movement of the shift lever out of
P (Park), unless the ignition is in ON/RUN or
ACC/ACCESSORY and the regular brake pedal
is applied.
The shift lock release is always functional except in the
case of an uncharged or low voltage (less than 9 volt)
battery.
If the vehicle has an uncharged battery or a battery with
low voltage, try charging or jump starting the battery.
SeeJump Starting on page 5-44for more information.
To shift out of P (Park) use the following:
1. Apply the brake pedal.
2. Move the shift lever to the desired position.If you still are unable to shift out of P (Park):
1. Ease the pressure on the shift lever.
2. While holding down the brake pedal, press the shift
lever all the way into P (Park).
3. Move the shift lever to the desired position.
If you are still having a problem shifting, then have the
vehicle serviced soon.
Parking Over Things That Burn
{CAUTION:
Things that can burn could touch hot exhaust
parts under the vehicle and ignite. Do not park
over papers, leaves, dry grass, or other things that
can burn.
2-49
Page 158 of 578
Mirrors
Manual Rearview Mirror
Hold the inside rearview mirror in the center to move
it for a clearer view behind your vehicle. Adjust the
mirror to avoid glare from the headlamps behind you.
Push the tab forward for daytime use and pull it for
nighttime use.
Automatic Dimming Rearview Mirror
The vehicle may have an automatic dimming inside
rearview mirror.
Vehicles with OnStar
®have three additional control
buttons for the OnStar®system. See your dealer/retailer
for more information about OnStar®and how to
subscribe to it. SeeOnStar®System on page 2-68for
more information about the services OnStar®provides.
O(On/Off):Press to turn the dimming feature on
or off.
The vehicle may also have a Rear Vision Camera (RVC).
SeeRear Vision Camera (RVC) on page 2-62for more
information.
If the vehicle has RVC, the
O(On/Off) button for turning
the automatic dimming feature on or off will not be
available.
Automatic Dimming Mirror Operation
Automatic dimming reduces the glare from the
headlamps of the vehicle behind you. The dimming
feature comes on and the indicator light illuminates
each time the ignition is turned to start.
Cleaning the Mirror
Do not spray glass cleaner directly on the mirror.
Use a soft towel dampened with water.
Outside Manual Mirrors
Adjust the outside mirror so that the side of the vehicle
and the area behind are seen.
Manually fold the mirrors inward to prevent damage
when going through an automatic car wash. To fold, push
the mirror toward the vehicle. Push the mirror outward, to
return to its original position.
Using hood-mounted air de�ectors and add-on convex
mirror attachments could decrease mirror performance.
2-52
Page 167 of 578
SBZA can be disabled through the Driver Information
Center (DIC). SeeDriver Information Center (DIC)
on page 3-51for more information. If the SBZA
is disabled by the driver, the SBZA mirror displays
will not light up during normal driving.
When the System Does Not Seem To Work
Properly
Occasional missed alerts can occur under normal
circumstances and will increase in wet conditions.
The system does not need to be serviced due to
an occasional missed alert. The number of missed
alerts will increase with increased rainfall or road spray.
If the SBZA displays do not light up when the system is
on and vehicles are in the blind zone, the system may
need service. Take the vehicle to your dealer/retailer.
SBZA is designed to ignore stationary objects; however,
the system may occasionally light up due to guard
rails, signs, trees, shrubs, and other stationary objects.
This is normal system operation, the vehicle does
not need service.SBZA does not operate when the left or right corners
of the rear bumper are covered with mud, dirt, snow, ice,
slush, or in heavy rainstorms. For cleaning instructions,
seeWashing Your Vehicle on page 5-110. If the DIC still
displays the SIDE BLIND ZONE SYS. UNAVAILABLE
message after cleaning the bumper, see your
dealer/retailer.
The SBZA displays may remain on if a trailer is attached
to the vehicle, or a bicycle or object is extending out
to either side of the vehicle.
When SBZA is disabled for any reason other than the
driver turning it off, the driver will not be able to turn
SBZA back on using the DIC. The SIDE BLIND ZONE
ALERT ON option will not be selectable if the
conditions for normal system operation are not met.
Until normal operating conditions for SBZA are met,
you should not rely upon SBZA while driving.
2-61
Page 168 of 578
SBZA Error Messages
The following messages may appear in the DIC:
SIDE BLIND ZONE ALERT SYSTEM OFF:This
message indicates that the driver has turned the
system off.
SIDE BLIND ZONE SYS. UNAVAILABLE:This
message indicates that the SBZA system is disabled
either because the sensor is blocked and cannot detect
vehicles in your blind zone, or the vehicle is passing
through an open �eld of view area, such as the desert,
where there is insufficient data for operation. The sensor
may be blocked by mud, dirt, snow, ice, slush, or even
heavy rainstorms. This message may also activate during
heavy rain or due to road spray. The vehicle does not
need service. For cleaning, seeWashing Your Vehicle
on page 5-110.
SERVICE SIDE BLIND ZONE ALERT SYSTEM:If this
message appears, both SBZA displays will remain on
indicating there is a problem with the SBZA system.
If these displays remain on after continued driving,
the system needs service. Take the vehicle to your
dealer/retailer.
Rear Vision Camera (RVC)
This vehicle may have a Rear Vision Camera system.
Read this entire section before using it.
{CAUTION:
The Rear Vision Camera (RVC) system does not
replace driver vision. RVC does not:
Detect objects that are outside the camera’s
�eld of view, below the bumper, or
underneath the vehicle.
Detect children, pedestrians, bicyclists, or pets.
Do not back the vehicle by only looking at the rear
vision camera screen, or use the screen during
longer, higher speed backing maneuvers or where
there could be cross-traffic. Your judged distances
using the screen will differ from actual distances.
So if you do not use proper care before backing up,
you could hit a vehicle, child, pedestrian, bicyclist,
or pet, resulting in vehicle damage, injury, or death.
Even though the vehicle has the RVC system,
always check carefully before backing up by
checking behind and around the vehicle.
2-62
Page 171 of 578
Symbols
The navigation system may have a feature that lets the
driver view symbols on the navigation screen while using
the rear vision camera. The Ultrasonic Rear Park Assist
(URPA) system must not be disabled to use the caution
symbols. If URPA has been disabled and the symbols
have been turned on, the Rear Parking Assist Symbols
Unavailable error message may display. SeeUltrasonic
Rear Parking Assist (URPA) on page 2-56.
The symbols appear when an object has been detected
by the URPA system. The symbol may cover the
object when viewing the navigation screen.To turn the symbols on or off:
1. Make sure that URPA has not been disabled.
2. Shift into P (Park).
3. Press the MENU hard key to enter the con�gure
menu options, then press the MENU hard key
repeatedly until Display is selected or touch
the Display screen button.
4. Select the Rear Camera Options screen button.
The Rear Camera Options screen will display.
5. Touch the Symbols screen button. The screen
button will be highlighted when on.
Rear Vision Camera Error Messages
Service Rear Vision Camera System:This message
can display when the system is not receiving
information it requires from other vehicle systems.
If any other problem occurs or if a problem persists, see
your dealer/retailer.
2-65
Page 174 of 578
OnStar®System
OnStar uses several innovative technologies and live
advisors to provide a wide range of safety, security,
information, and convenience services. If the airbags
deploy, the system is designed to make an automatic
call to OnStar Emergency advisors who can request
emergency services be sent to your location. If the keys
are locked in the vehicle, call OnStar at 1-888-4-ONSTAR
to have a signal sent to unlock the doors. OnStar
Hands-Free Calling, including 30 trial minutes good
for 60 days, is available on most vehicles. OnStar
Turn-by-Turn Navigation service, with one trial route, is
available on most vehicles. Press the OnStar button to
have an OnStar advisor contact Roadside Service.OnStar service is provided subject to the OnStar Terms
and Conditions included in the OnStar Subscriber
glove box literature.
Some services such as Remote Door Unlock or Stolen
Vehicle Location Assistance may not be available until
the owner of the vehicle registers with OnStar. After the
�rst prepaid year, contact OnStar to select a monthly or
annual subscription payment plan. If a payment plan is
not selected, the OnStar system and all services,
including airbag noti�cation and emergency services,
may be deactivated and no longer available. For more
information visit onstar.com (U.S.) or onstar.ca (Canada),
or press the OnStar button to speak with an advisor.
Not all OnStar services are available on all vehicles.
To check if this vehicle is able to provide the services
described below, or for a full description of OnStar
services and system limitations, see the OnStar Owner’s
Guide in the glove box or visit onstar.com (U.S.) or
onstar.ca (Canada), contact OnStar at 1-888-4-ONSTAR
(1-888-466-7827) or TTY 1-877-248-2080, or press
the OnStar button to speak with an OnStar advisor
24 hours a day, 7 days a week.
2-68