2009 CHEVROLET MALIBU light
[x] Cancel search: lightPage 73 of 420
If the On Indicator is Lit for a Child
Restraint
If a child restraint has been installed and the on
indicator is lit:
1. Turn the vehicle off.
2. Remove the child restraint from the vehicle.
3. Remove any additional items from the seat such as
blankets, cushions, seat covers, seat heaters, or
seat massagers.
4. Reinstall the child restraint following the directions
provided by the child restraint manufacturer and
refer toSecuring a Child Restraint in the Right Front
Seat Position on page 1-54.5. If, after reinstalling the child restraint and restarting
the vehicle, the on indicator is still lit, turn the vehicle
off. Then slightly recline the vehicle seatback and
adjust the seat cushion, if adjustable, to make sure
that the vehicle seatback is not pushing the child
restraint into the seat cushion.
Also make sure the child restraint is not trapped
under the vehicle head restraint. If this happens,
adjust the head restraint. SeeHead Restraints
on page 1-2.
6. Restart the vehicle.
If the on indicator is still lit with an infant present in
a child restraint, secure the child restraint in a
rear seat position in the vehicle and see your
dealer/retailer.
1-69
Page 77 of 420
Restraint System Check
Checking the Restraint Systems
Safety Belts
Now and then, check that the safety belt reminder light,
safety belts, buckles, latch plates, retractors, and
anchorages are all working properly.
Look for any other loose or damaged safety belt system
parts that might keep a safety belt system from doing
its job. See your dealer/retailer to have it repaired. Torn
or frayed safety belts may not protect you in a crash.
They can rip apart under impact forces. If a belt is torn
or frayed, get a new one right away.
Make sure the safety belt reminder light is working.
SeeSafety Belt Reminders on page 3-30for more
information.
Keep safety belts clean and dry. SeeCare of Safety
Belts on page 5-93.
Airbags
The airbag system does not need regularly scheduled
maintenance or replacement. Make sure the airbag
readiness light is working. SeeAirbag Readiness Light
on page 3-31for more information.
Notice:If an airbag covering is damaged, opened,
or broken, the airbag may not work properly. Do not
open or break the airbag coverings. If there are any
opened or broken airbag covers, have the airbag
covering and/or airbag module replaced. For the
location of the airbag modules, seeWhat Makes an
Airbag Inflate? on page 1-64. See your dealer/retailer
for service.
1-73
Page 78 of 420
Replacing Restraint System Parts
After a Crash
{CAUTION:
A crash can damage the restraint systems in your
vehicle. A damaged restraint system may not
properly protect the person using it, resulting in
serious injury or even death in a crash. To help
make sure your restraint systems are working
properly after a crash, have them inspected and
any necessary replacements made as soon as
possible.If the vehicle has been in a crash, do you need new
safety belts or LATCH system (if equipped) parts?
After a very minor crash, nothing may be necessary.
But the safety belt assemblies that were used during any
crash may have been stressed or damaged. See your
dealer/retailer to have the safety belt assemblies
inspected or replaced.
If the vehicle has the LATCH system and it was being
used during a crash, you may need new LATCH
system parts.
New parts and repairs may be necessary even if the
safety belt or LATCH system (if equipped), was not
being used at the time of the crash.
If an airbag in�ates, you will need to replace airbag
system parts. See the part on the airbag system earlier
in this section.
Have the safety belt pretensioners checked if the vehicle
has been in a crash, if the airbag readiness light stays
on after the vehicle is started, or while you are driving.
SeeAirbag Readiness Light on page 3-31.
1-74
Page 83 of 420
Remote Keyless Entry (RKE)
System Operation
The Remote Keyless Entry (RKE) transmitter functions
work up to 195 feet (60 m) away from the vehicle.
There are other conditions which can affect the
performance of the transmitter. SeeRemote Keyless
Entry (RKE) System on page 2-4.
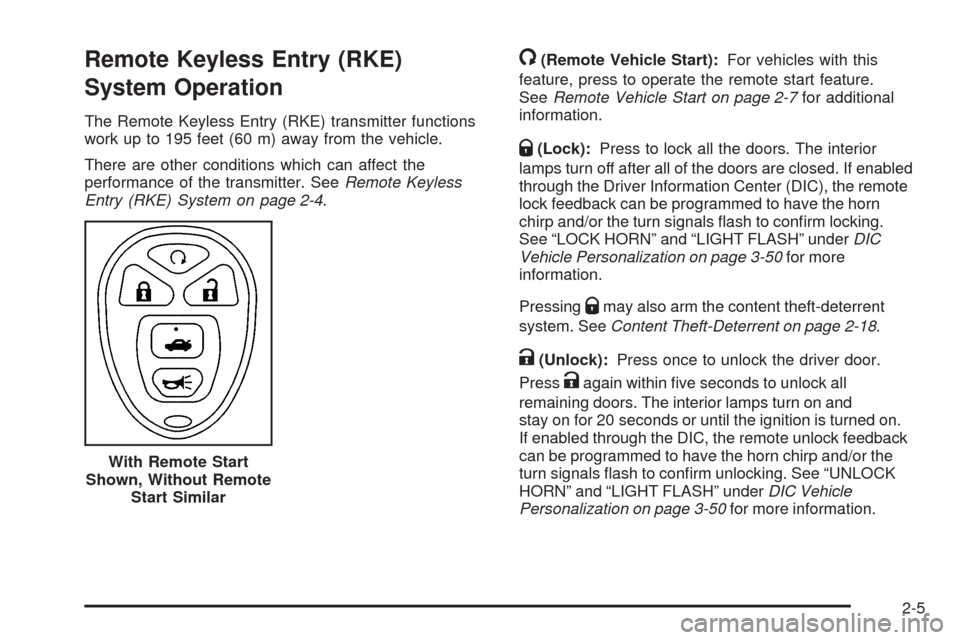
/(Remote Vehicle Start):For vehicles with this
feature, press to operate the remote start feature.
SeeRemote Vehicle Start on page 2-7for additional
information.
Q(Lock):Press to lock all the doors. The interior
lamps turn off after all of the doors are closed. If enabled
through the Driver Information Center (DIC), the remote
lock feedback can be programmed to have the horn
chirp and/or the turn signals �ash to con�rm locking.
See “LOCK HORN” and “LIGHT FLASH” underDIC
Vehicle Personalization on page 3-50for more
information.
Pressing
Qmay also arm the content theft-deterrent
system. SeeContent Theft-Deterrent on page 2-18.
K(Unlock):Press once to unlock the driver door.
Press
Kagain within �ve seconds to unlock all
remaining doors. The interior lamps turn on and
stay on for 20 seconds or until the ignition is turned on.
If enabled through the DIC, the remote unlock feedback
can be programmed to have the horn chirp and/or the
turn signals �ash to con�rm unlocking. See “UNLOCK
HORN” and “LIGHT FLASH” underDIC Vehicle
Personalization on page 3-50for more information. With Remote Start
Shown, Without Remote
Start Similar
2-5
Page 84 of 420
The high-beam headlamps, parking lamps, and
back-up lamps may come on each time
Kis pressed.
See “EXT (Exterior) LIGHTS” underDIC Vehicle
Personalization on page 3-50for additional information.
Pressing
Kon the RKE transmitter disarms the content
theft-deterrent system. SeeContent Theft-Deterrent on
page 2-18.
V(Remote Trunk Release):Press and hold for
about one second to unlock the trunk. The trunk can be
opened with the transmitter when the vehicle speed
is less than 2 mph (3 km/h) or when the ignition is off.
L(Vehicle Locator/Panic Alarm):Press and release
to locate the vehicle. The horn sounds three times
and the headlamps and turn signals �ash three times.
Press and hold
Lfor about three seconds to initiate
the panic alarm. The horn sounds and the headlamps
and turn signals �ash for 30 seconds. Press
Lagain
to cancel the panic alarm.
Programming Transmitters to the
Vehicle
Only RKE transmitters programmed to the vehicle
will work. If a transmitter is lost or stolen, a replacement
can be purchased and programmed through your
dealer/retailer. When the replacement transmitter is
programmed to the vehicle, all remaining transmitters
must also be programmed. Any lost or stolen transmitters
no longer work once the new transmitter is programmed.
Each vehicle can have up to four transmitters
programmed to it.
Battery Replacement
Replace the battery if the KEY FOB BATT (Battery)
LOW message displays in the DIC. See “KEY FOB BATT
(Battery) LOW” underDIC Warnings and Messages
on page 3-46for additional information.
Notice:When replacing the battery, do not touch
any of the circuitry on the transmitter. Static
from your body could damage the transmitter.
2-6
Page 87 of 420
After the engine has been started two times, or one
time with a time extension, the vehicle’s ignition must be
turned to ON/RUN using the key before the remote start
procedure can be used again. SeeIgnition Positions on
page 2-22for information regarding the ignition positions
on your vehicle.
The remote vehicle start feature will not operate if any
of the follow occur:
The remote start system is disabled through
the DIC.
The vehicle’s key is in the ignition.
The vehicle’s hood is open.
The hazard warning �ashers are on.
The check engine light is on. SeeMalfunction
Indicator Lamp on page 3-38.
The engine coolant temperature is too high.
The oil pressure is low.
Two remote vehicle starts, or one start with a time
extension, have already been provided for that
ignition cycle.Vehicles that have the remote vehicle start feature are
shipped from the factory with the remote start system
enabled. The system may be enabled or disabled
through the DIC. See “REMOTE START” underDIC
Vehicle Personalization on page 3-50for additional
information.
Remote Start Ready
If your vehicle does not have the remote vehicle start
feature, it may have the remote start ready feature.
This feature allows your dealer/retailer to add the
manufacturer’s remote vehicle start feature.
See your dealer/retailer if you would like to add the
manufacturer’s remote vehicle start feature to your
vehicle.
2-9
Page 92 of 420
Trunk Assist Handle
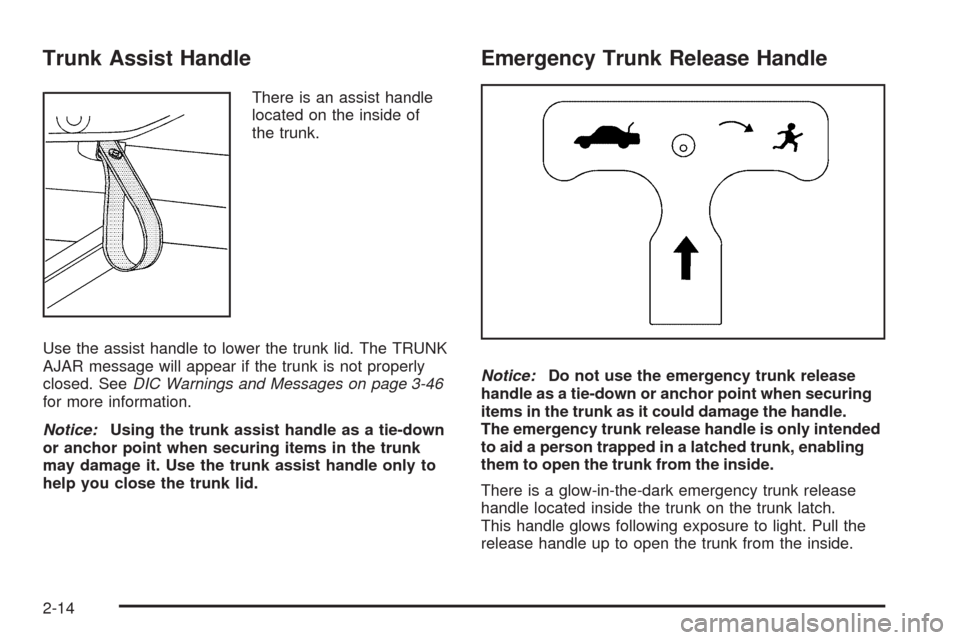
There is an assist handle
located on the inside of
the trunk.
Use the assist handle to lower the trunk lid. The TRUNK
AJAR message will appear if the trunk is not properly
closed. SeeDIC Warnings and Messages on page 3-46
for more information.
Notice:Using the trunk assist handle as a tie-down
or anchor point when securing items in the trunk
may damage it. Use the trunk assist handle only to
help you close the trunk lid.
Emergency Trunk Release Handle
Notice:Do not use the emergency trunk release
handle as a tie-down or anchor point when securing
items in the trunk as it could damage the handle.
The emergency trunk release handle is only intended
to aid a person trapped in a latched trunk, enabling
them to open the trunk from the inside.
There is a glow-in-the-dark emergency trunk release
handle located inside the trunk on the trunk latch.
This handle glows following exposure to light. Pull the
release handle up to open the trunk from the inside.
2-14
Page 95 of 420
Express Window Anti-Pinch Feature
If any object is in the path of the window when
the express-up is active, the window stops at the
obstruction and auto-reverse to a preset factory position.
Weather conditions such as severe icing may also
cause the window to auto-reverse. The window returns
to normal operation once the obstruction or condition
is removed.
Express Window Anti-Pinch Override
{CAUTION:
If express override is activated, the window will
not reverse automatically. You or others could be
injured and the window could be damaged. Before
you use express override, make sure that all people
and obstructions are clear of the window path.
In an emergency, the anti-pinch feature can be
overridden in a supervised mode. Hold the window
switch all the way up to the second position. The window
rises for as long as the switch is held. Once the switch
is released, the express mode is re-activated.
In this mode, the window can still close on an object in
its path. Use care when using the override mode.
Window Lockout
The driver power window controls also include a lockout
button.
o(Window Lockout):Press the lockout button to stop
the rear passengers from using their window switches.
The driver and front passenger can still operate all the
windows with the lock on. When the red part of the switch
is visible, you have returned to normal window operation.
Sun Visors
To block out glare, you can swing down the visors.
You can also remove them from the center mount and
swing them to the side, to block out glare from the side.
Your vehicle may have lighted visor vanity mirrors
located on the passenger and driver’s side visor.
When you lift the cover, the light will turn on.
2-17