Page 302 of 406
5. Turn the two hex nuts counterclockwise to
remove them.
6. Pull out the taillamp assembly and disconnect the
wiring harness.
7. Turn the bulb socket counterclockwise to remove it.
8. Pull the old bulb straight out to remove it.
9. Push the new bulb straight in until it clicks to
install it.
10. Turn the bulb socket clockwise to reinstall it.11. Push the taillamp assembly back into place.
When reinstalling the taillamp assembly, make sure
that you line up the four posts on the assembly
with the slots in the vehicle.
12. Turn the two hex nuts clockwise to reinstall them.
13. Put the carpet back in place at the rear of the vehicle.
14. Turn the upper wing nut clockwise to reinstall.
15. Put the convenience net back into place by hooking
it to the upper wing nut.
5-50
Page 303 of 406

License Plate Lamp
To replace one of these bulbs:
1. Turn the lamp assembly counterclockwise and pull
the lamp assembly out of the connector.
2. Pull the old bulb from the lamp assembly, keeping
the bulb straight as you pull it out.
3. Install the new bulb.
4. Reverse Steps 1 through 3 to reinstall the license
plate lamp.
Replacement Bulbs
Exterior Lamp Bulb Number
Back-Up 921
Front Parking/Turn Signal 3157NAK
License Plate Lamp 194
Headlamps
High-Beam H9
Low-Beam H11
Sidemarker 194
Stoplamp, Taillamp, and Turn
Signal3057
For replacement bulbs not listed here, contact your
dealer/retailer.
Windshield Wiper Blade
Replacement
Windshield wiper blades should be inspected for wear
or cracking. SeeScheduled Maintenance on page 6-4
for more information on wiper blade inspection.
Replacement blades come in different types and are
removed in different ways. Here’s how to remove the
wiper blade:
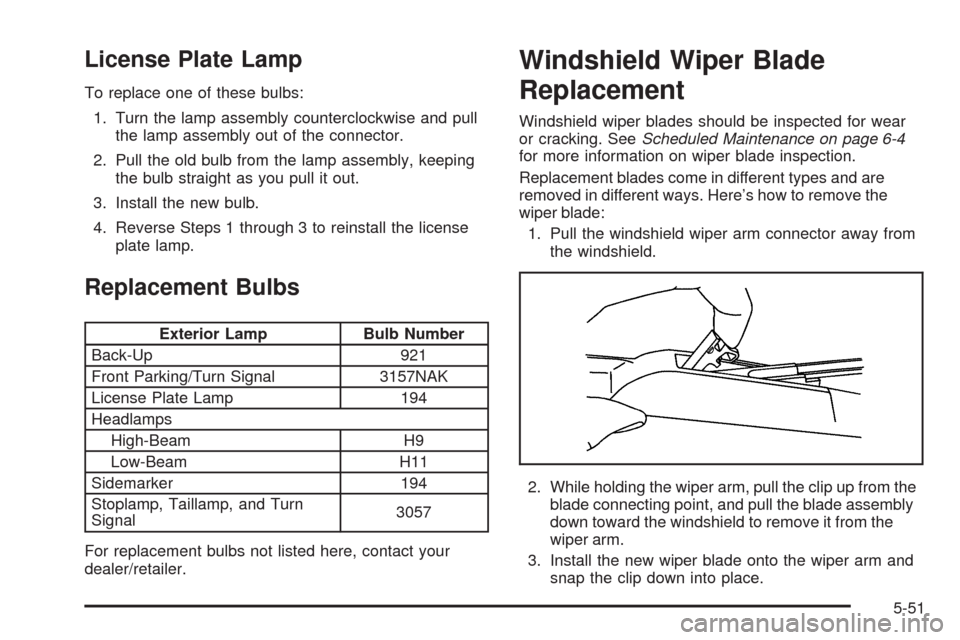
1. Pull the windshield wiper arm connector away from
the windshield.
2. While holding the wiper arm, pull the clip up from the
blade connecting point, and pull the blade assembly
down toward the windshield to remove it from the
wiper arm.
3. Install the new wiper blade onto the wiper arm and
snap the clip down into place.
5-51
Page 329 of 406
CAUTION: (Continued)
To be even more certain the vehicle will not move,
you should put blocks at the front and rear of the
tire farthest away from the one being changed.
That would be the tire, on the other side, at the
opposite end of the vehicle.
When the vehicle has a �at tire (B), use the following
example as a guide to assist you in the placement
of wheel blocks (A).
A. Wheel Block
B. Flat Tire
The following information explains how to use the jack
and change a tire.
Removing the Spare Tire and Tools
The equipment you will need is located in the trunk.
1. Open the trunk. SeeTrunk on page 2-12.
2. Remove the convenience net if the vehicle has one.
3. Remove the spare tire cover.
4. Turn the wing nut counterclockwise and remove it.
5. Remove the compact spare tire.
5-77
Page 330 of 406
6. Turn the nut holding the jack counterclockwise and
remove it. Then remove the jack and wrench.The tools you will need to change a tire include the
jack (A), extension and protection guide (B), and wheel
wrench (C).
5-78
Page 331 of 406

Removing the Flat Tire and
Installing the Spare Tire
This vehicle may have aluminum wheels with exposed
wheel nuts. Use the wheel wrench to loosen all the
wheel nuts. Do not remove them yet.
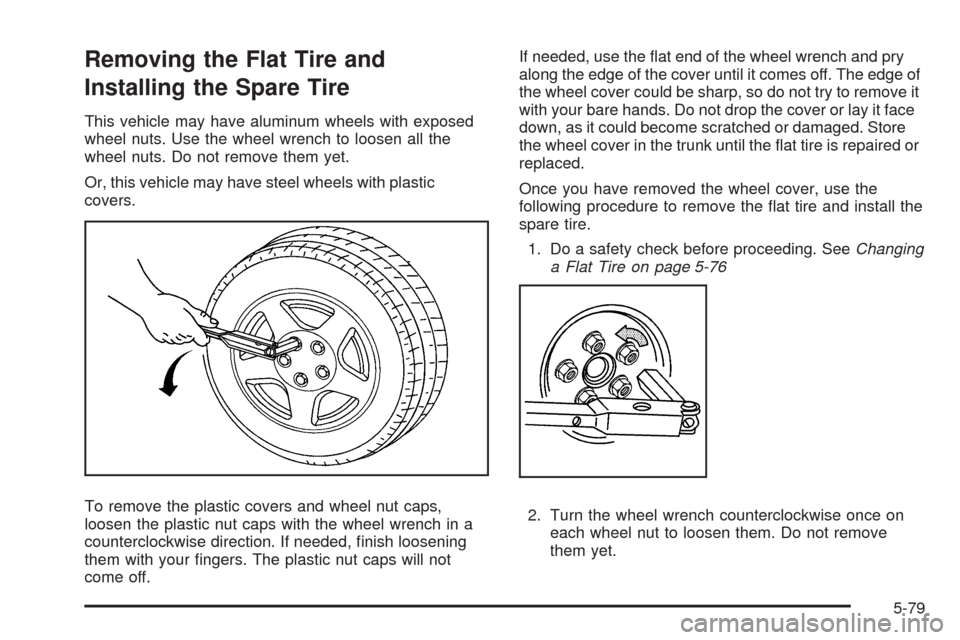
Or, this vehicle may have steel wheels with plastic
covers.
To remove the plastic covers and wheel nut caps,
loosen the plastic nut caps with the wheel wrench in a
counterclockwise direction. If needed, �nish loosening
them with your �ngers. The plastic nut caps will not
come off.If needed, use the �at end of the wheel wrench and pry
along the edge of the cover until it comes off. The edge of
the wheel cover could be sharp, so do not try to remove it
with your bare hands. Do not drop the cover or lay it face
down, as it could become scratched or damaged. Store
the wheel cover in the trunk until the �at tire is repaired or
replaced.
Once you have removed the wheel cover, use the
following procedure to remove the �at tire and install the
spare tire.
1. Do a safety check before proceeding. SeeChanging
a Flat Tire on page 5-76
2. Turn the wheel wrench counterclockwise once on
each wheel nut to loosen them. Do not remove
them yet.
5-79
Page 333 of 406
{CAUTION:
Lifting a vehicle and getting under it to do
maintenance or repairs is dangerous without the
appropriate safety equipment and training. If a jack
is provided with the vehicle, it is designed only for
changing a �at tire. If it is used for anything else,
you or others could be badly injured or killed if the
vehicle slips off the jack. If a jack is provided with
the vehicle, only use it for changing a �at tire.
5. Raise the vehicle by turning the jack handle
clockwise. Raise the vehicle far enough off the
ground to install the compact spare tire.
6. Remove all wheel nuts and the �at tire.
5-81
Page 335 of 406
9. Reinstall the wheel
nuts with the rounded
end of the nuts
toward the wheel.
Tighten each nut
clockwise by hand until
the wheel is held
against the hub.
10. Lower the vehicle by turning the jack handle
counterclockwise. Lower the jack completely.
5-83
Page 394 of 406

Ashtray.........................................................3-19
Assistance Program, Roadside........................... 7-8
Audio System.................................................3-63
Audio Steering Wheel Controls......................3-94
Setting the Clock.........................................3-64
XM™ Satellite Radio Antenna System............3-96
Audio System(s).............................................3-66
Audio Systems
Radio Reception..........................................3-95
Theft-Deterrent Feature................................3-93
Automatic Door Lock.......................................2-10
Automatic Transmission
Fluid..........................................................5-24
Operation...................................................2-24
B
Backglass Antenna..........................................3-96
Battery..........................................................5-40
Electric Power Management..........................3-17
Run-Down Protection...................................3-18
Belt Routing, Engine.......................................6-14
Bluetooth
®.....................................................3-82
Brake
Emergencies................................................ 4-6
Brake Fluid....................................................5-37Brakes..........................................................5-37
Antilock....................................................... 4-5
Parking......................................................2-26
System Warning Light..................................3-30
Braking........................................................... 4-4
Braking in Emergencies..................................... 4-6
Break-In, New Vehicle.....................................2-19
Bulb Replacement...........................................5-51
Fog Lamp ..................................................3-14
Halogen Bulbs............................................5-45
Headlamp Aiming........................................5-45
Headlamps.................................................5-45
Headlamps, Front Turn Signal, Sidemarker,
and Parking Lamps..................................5-46
License Plate Lamps....................................5-51
Taillamps, Turn Signal, Sidemarker, Stoplamps,
and Back-Up Lamps.................................5-49
Buying New Tires...........................................5-69
C
Calibration.....................................................3-47
California
Perchlorate Materials Requirements................. 5-4
California Fuel.................................................. 5-6
California Proposition 65 Warning....................... 5-4
2