2009 CHEVROLET HHR tire type
[x] Cancel search: tire typePage 114 of 450
Downshifting the transmission in slippery road conditions
could result in skidding, see “Skidding” underLoss of
Control on page 4-16.
I (Intermediate):This position is also used for normal
driving. However, it reduces vehicle speed without
using the brakes for slight downgrades where the vehicle
would otherwise accelerate due to steepness of grade.
If constant upshifting or downshifting occurs while
driving up steep hills, this position can be used to
prevent repetitive types of shifts. You might choose
I (Intermediate) instead of D (Drive) when driving on hilly,
winding roads and when towing a trailer, so that there is
less shifting between gears.
PERFORMANCE SHIFTING:If the vehicle has this
feature, it can detect a change in driving patterns
while in the Intermediate position. If you make an
aggressive driving maneuver, the vehicle’s transmission
automatically shifts to the lowest possible gear to
maximize vehicle performance. The vehicle will
automatically return to normal operation when you
return to normal driving patterns.
L (Low):This position reduces vehicle speed more than
I (Intermediate) without actually using the brakes. You
can use it on very steep hills, or in deep snow or mud. If
the shift lever is put in L (Low), the transmission will not
shift into L (Low) until the vehicle is going slowly enough.Notice:Spinning the tires or holding the vehicle in
one place on a hill using only the accelerator pedal
may damage the transmission. The repair will not be
covered by the vehicle warranty. If you are stuck, do
not spin the tires. When stopping on a hill, use the
brakes to hold the vehicle in place.
Manual Transmission Operation
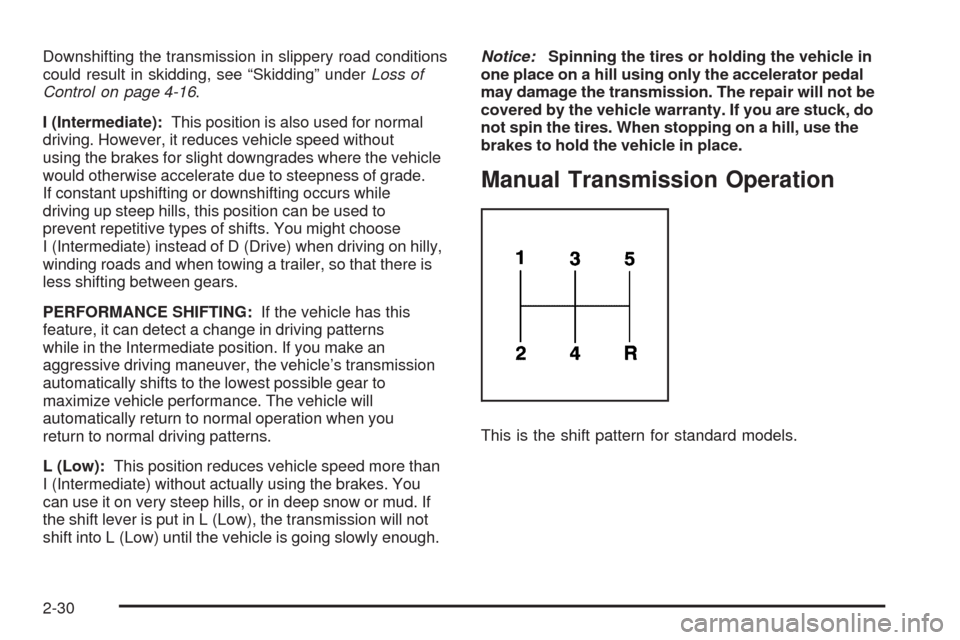
This is the shift pattern for standard models.
2-30
Page 253 of 450
Skidding
In a skid, a driver can lose control of the vehicle.
Defensive drivers avoid most skids by taking reasonable
care suited to existing conditions, and by not overdriving
those conditions. But skids are always possible.
The three types of skids correspond to the vehicle’s three
control systems. In the braking skid, the wheels are not
rolling. In the steering or cornering skid, too much speed
or steering in a curve causes tires to slip and lose
cornering force. And in the acceleration skid, too much
throttle causes the driving wheels to spin.
If the vehicle has the Traction Control System (TCS) or
the Enhanced Traction System (ETS), remember: It helps
to avoid only the acceleration skid. SeeTraction Control
System (TCS) on page 4-10orEnhanced Traction
System (ETS) on page 4-12. If the vehicle does not have
TCS or ETS, or if the system is off, then an acceleration
skid is best handled by easing your foot off the
accelerator pedal.
If the vehicle starts to slide, ease your foot off the
accelerator pedal and quickly steer the way you want
the vehicle to go. If you start steering quickly enough,
the vehicle may straighten out. Always be ready for
a second skid if it occurs.If the vehicle has Electronic Stability Control (ESC), the
ESC might activate. SeeElectronic Stability Control
(ESC) on page 4-7.
Of course, traction is reduced when water, snow, ice,
gravel, or other material is on the road. For safety, slow
down and adjust your driving to these conditions. It is
important to slow down on slippery surfaces because
stopping distance will be longer and vehicle control
more limited.
While driving on a surface with reduced traction, try
your best to avoid sudden steering, acceleration, or
braking, including reducing vehicle speed by shifting
to a lower gear. Any sudden changes could cause the
tires to slide. You may not realize the surface is slippery
until the vehicle is skidding. Learn to recognize warning
clues — such as enough water, ice, or packed snow on
the road to make a mirrored surface — and slow down
when you have any doubt.
If the vehicle has the Antilock Brake System (ABS),
remember: It helps avoid only the braking skid. If the
vehicle does not have ABS, then in a braking skid,
where the wheels are no longer rolling, release enough
pressure on the brakes to get the wheels rolling again.
This restores steering control. Push the brake pedal down
steadily when you have to stop suddenly. As long as the
wheels are rolling, you will have steering control.
4-17
Page 255 of 450
Driving in Rain and on Wet Roads
Rain and wet roads can reduce vehicle traction and affect
your ability to stop and accelerate. Always drive slower
in these types of driving conditions and avoid driving
through large puddles and deep-standing or �owing
water.
{CAUTION:
Wet brakes can cause crashes. They might not
work as well in a quick stop and could cause
pulling to one side. You could lose control of the
vehicle.
After driving through a large puddle of water or a
car/vehicle wash, lightly apply the brake pedal until
the brakes work normally.
Flowing or rushing water creates strong forces.
Driving through �owing water could cause your
vehicle to be carried away. If this happens, you
and other vehicle occupants could drown. Do not
ignore police warnings and be very cautious about
trying to drive through �owing water.
Hydroplaning
Hydroplaning is dangerous. Water can build up under
your vehicle’s tires so they actually ride on the water. This
can happen if the road is wet enough and you are going
fast enough. When your vehicle is hydroplaning, it has
little or no contact with the road.
There is no hard and fast rule about hydroplaning.
The best advice is to slow down when the road is wet.
Other Rainy Weather Tips
Besides slowing down, other wet weather driving tips
include:
Allow extra following distance.
Pass with caution.
Keep windshield wiping equipment in good shape.
Keep the windshield washer �uid reservoir �lled.
Have good tires with proper tread depth. SeeTires
on page 5-53.
Turn off cruise control.
4-19
Page 274 of 450
It is important that the vehicle does not exceed any of
its ratings — GCWR, GVWR, RGAWR, Maximum Trailer
Rating or Tongue Weight. The only way to be sure it
is not exceeding any of these ratings is to weigh
the vehicle and trailer.
Total Weight on the Vehicle’s Tires
Be sure the vehicle’s tires are in�ated to the upper
limit for cold tires. These numbers can be found on the
Tire-Loading Information label. SeeLoading the Vehicle
on page 4-25. Make sure not to go over the GVW limit for
the vehicle, or the GAWR, including the weight of the
trailer tongue.
Hitches
It is important to have the correct hitch equipment.
Crosswinds, large trucks going by and rough roads are
a few reasons why the right hitch is needed.
The rear bumper on the vehicle is not intended
for hitches. Do not attach rental hitches or other
bumper-type hitches to it. Use only a frame-mounted
hitch that does not attach to the bumper.
Will there be any holes in the body of the vehicle
after installing a trailer hitch? If there are, then be
sure to seal the holes later when the hitch is
removed. If the holes are not sealed, deadly carbon
monoxide (CO) from exhaust can get into the vehicle.
SeeEngine Exhaust on page 2-37. Dirt and water
can also enter the vehicle.
Safety Chains
Always attach chains between the vehicle and the
trailer. Cross the safety chains under the tongue of
the trailer to help prevent the tongue from contacting the
road if it becomes separated from the hitch. Always
leave just enough slack so the rig can turn. Never
allow safety chains to drag on the ground.
Trailer Brakes
A loaded trailer that weighs more than 1,500 lbs
(680 kg) needs to have its own brake system that is
adequate for the weight of the trailer. Be sure to read
and follow the instructions for the trailer brakes so
they are installed, adjusted and maintained properly.
Driving with a Trailer
Towing a trailer requires a certain amount of experience.
Get to know the rig before setting out for the open road.
Get acquainted with the feel of handling and braking with
the added weight of the trailer. And always keep in mind
that the vehicle you are driving is now longer and not as
responsive as the vehicle is by itself.
Before starting, check all trailer hitch parts and
attachments, safety chains, electrical connectors,
lamps, tires and mirror adjustments. If the trailer has
electric brakes, start the vehicle and trailer moving
and then apply the trailer brake controller by hand
to be sure the brakes are working. This checks
the electrical connection at the same time.
4-38
Page 332 of 450
Low-Pro�le Performance Tire
If your vehicle has P225/45R18 size tires, they are
classi�ed as low-pro�le performance tires. These
tires are designed for very responsive driving on
wet or dry pavement. You may also notice more
road noise with low-pro�le performance tires and
that they tend to wear faster.
Notice:If the vehicle has low-pro�le tires,
they are more susceptible to damage from road
hazards or curb impact than standard pro�le
tires. Tire and/or wheel assembly damage
can occur when coming into contact with
road hazards like, potholes, or sharp edged
objects, or when sliding into a curb. The
vehicle warranty does not cover this type of
damage. Keep tires set to the correct in�ation
pressure and, when possible avoid contact
with curbs, potholes, and other road hazards.
Tire Sidewall Labeling
Useful information about a tire is molded into its
sidewall. The examples below show a typical
passenger vehicle tire and a compact spare tire
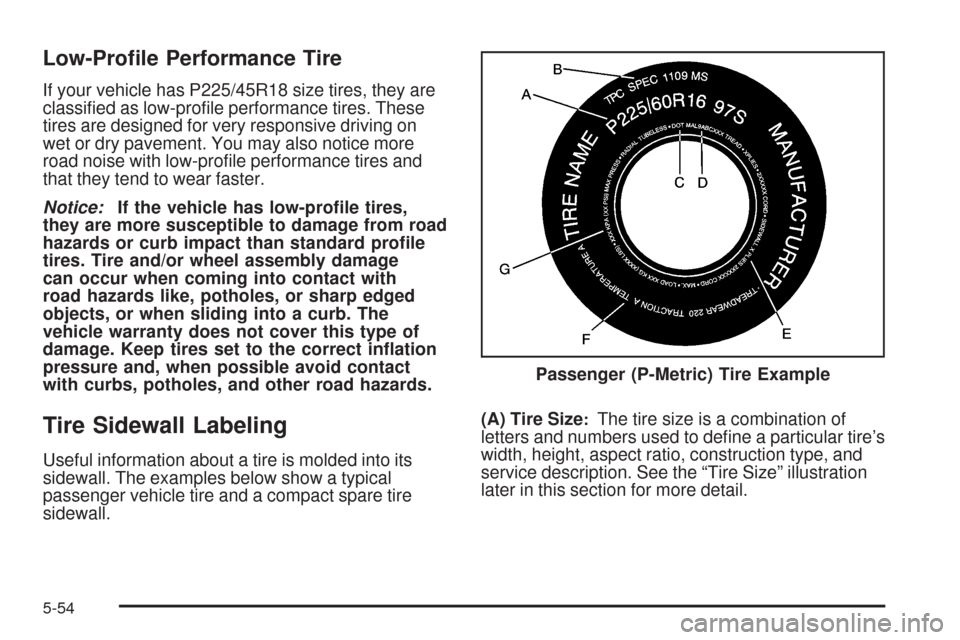
sidewall.(A) Tire Size
:The tire size is a combination of
letters and numbers used to de�ne a particular tire’s
width, height, aspect ratio, construction type, and
service description. See the “Tire Size” illustration
later in this section for more detail.Passenger (P-Metric) Tire Example
5-54
Page 333 of 450
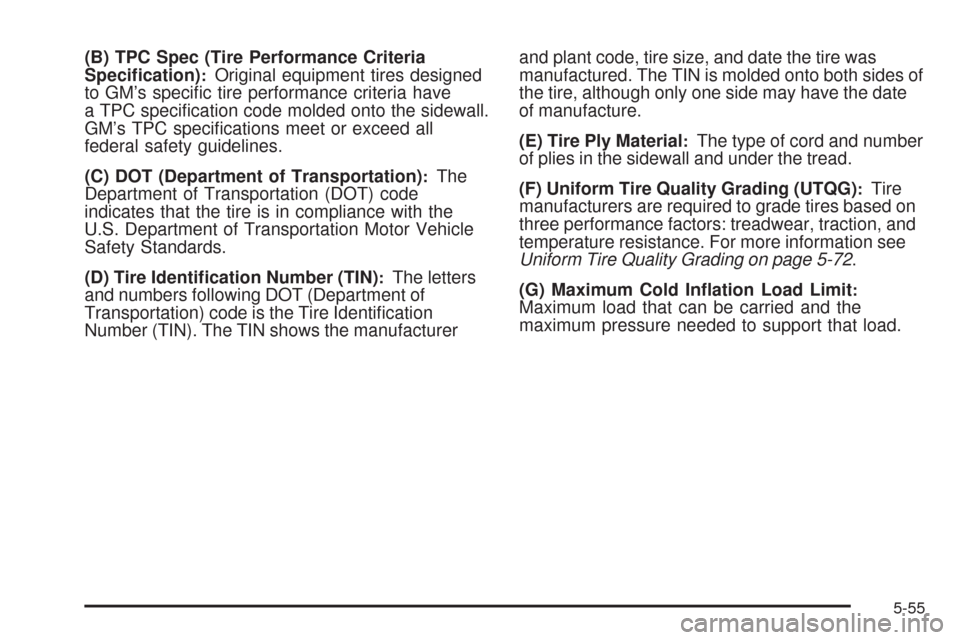
(B) TPC Spec (Tire Performance Criteria
Speci�cation):Original equipment tires designed
to GM’s speci�c tire performance criteria have
a TPC speci�cation code molded onto the sidewall.
GM’s TPC speci�cations meet or exceed all
federal safety guidelines.
(C) DOT (Department of Transportation)
:The
Department of Transportation (DOT) code
indicates that the tire is in compliance with the
U.S. Department of Transportation Motor Vehicle
Safety Standards.
(D) Tire Identi�cation Number (TIN)
:The letters
and numbers following DOT (Department of
Transportation) code is the Tire Identi�cation
Number (TIN). The TIN shows the manufacturerand plant code, tire size, and date the tire was
manufactured. The TIN is molded onto both sides of
the tire, although only one side may have the date
of manufacture.
(E) Tire Ply Material
:The type of cord and number
of plies in the sidewall and under the tread.
(F) Uniform Tire Quality Grading (UTQG)
:Tire
manufacturers are required to grade tires based on
three performance factors: treadwear, traction, and
temperature resistance. For more information see
Uniform Tire Quality Grading on page 5-72.
(G) Maximum Cold In�ation Load Limit
:Maximum load that can be carried and the
maximum pressure needed to support that load.
5-55
Page 334 of 450
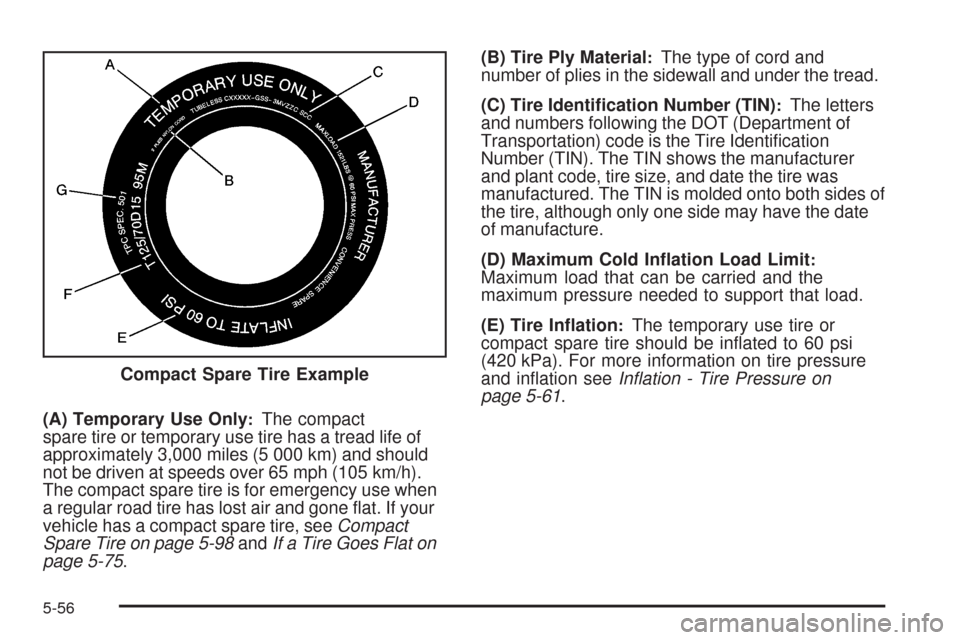
(A) Temporary Use Only:The compact
spare tire or temporary use tire has a tread life of
approximately 3,000 miles (5 000 km) and should
not be driven at speeds over 65 mph (105 km/h).
The compact spare tire is for emergency use when
a regular road tire has lost air and gone �at. If your
vehicle has a compact spare tire, seeCompact
Spare Tire on page 5-98andIf a Tire Goes Flat on
page 5-75.(B) Tire Ply Material
:The type of cord and
number of plies in the sidewall and under the tread.
(C) Tire Identi�cation Number (TIN)
:The letters
and numbers following the DOT (Department of
Transportation) code is the Tire Identi�cation
Number (TIN). The TIN shows the manufacturer
and plant code, tire size, and date the tire was
manufactured. The TIN is molded onto both sides of
the tire, although only one side may have the date
of manufacture.
(D) Maximum Cold In�ation Load Limit
:Maximum load that can be carried and the
maximum pressure needed to support that load.
(E) Tire In�ation
:The temporary use tire or
compact spare tire should be in�ated to 60 psi
(420 kPa). For more information on tire pressure
and in�ation seeInflation - Tire Pressure on
page 5-61. Compact Spare Tire Example
5-56
Page 335 of 450
(F) Tire Size:A combination of letters and
numbers de�ne a tire’s width, height, aspect
ratio, construction type, and service description.
The letter T as the �rst character in the tire size
means the tire is for temporary use only.
(G) TPC Spec (Tire Performance Criteria
Speci�cation)
:Original equipment tires designed
to GM’s speci�c tire performance criteria have
a TPC speci�cation code molded onto the sidewall.
GM’s TPC speci�cations meet or exceed all
federal safety guidelines.
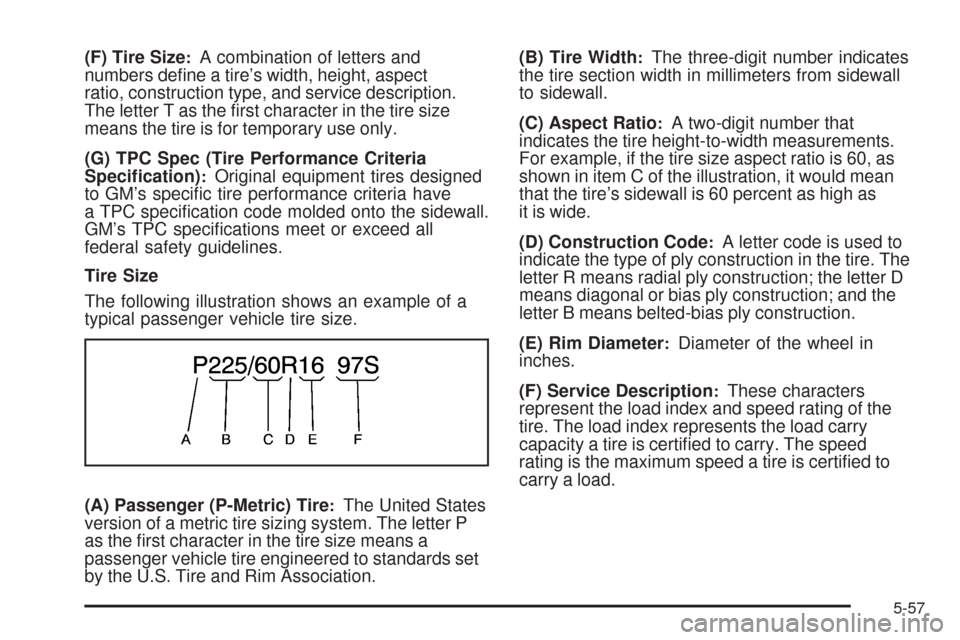
Tire Size
The following illustration shows an example of a
typical passenger vehicle tire size.
(A) Passenger (P-Metric) Tire
:The United States
version of a metric tire sizing system. The letter P
as the �rst character in the tire size means a
passenger vehicle tire engineered to standards set
by the U.S. Tire and Rim Association.(B) Tire Width
:The three-digit number indicates
the tire section width in millimeters from sidewall
to sidewall.
(C) Aspect Ratio
:A two-digit number that
indicates the tire height-to-width measurements.
For example, if the tire size aspect ratio is 60, as
shown in item C of the illustration, it would mean
that the tire’s sidewall is 60 percent as high as
it is wide.
(D) Construction Code
:A letter code is used to
indicate the type of ply construction in the tire. The
letter R means radial ply construction; the letter D
means diagonal or bias ply construction; and the
letter B means belted-bias ply construction.
(E) Rim Diameter
:Diameter of the wheel in
inches.
(F) Service Description
:These characters
represent the load index and speed rating of the
tire. The load index represents the load carry
capacity a tire is certi�ed to carry. The speed
rating is the maximum speed a tire is certi�ed to
carry a load.
5-57