Page 113 of 408
Shifting Out of Park
The vehicle has an automatic transmission shift lock
control system. You have to fully apply the brakes before
you can shift from P (Park) when the ignition is in
ON/RUN. SeeAutomatic Transmission Operation on
page 2-23.
The shift lock control system is designed to do the
following:
•Prevent the ignition key from being removed unless
the shift lever is in P (Park).
•Prevent movement of the shift lever out of P (Park),
unless the ignition is in ON/RUN and the regular
brake pedal is applied.
The shift lock control system is always functional except
in the case of a dead battery or low voltage (less
than 9 V) battery.
If the vehicle has an uncharged battery or a battery with
low voltage, try charging or jump starting the battery.
SeeJump Starting on page 5-40for more information.To shift out of P (Park) use the following:
1. Apply the brake pedal.
2. Move the shift lever to the desired position.
If you still are unable to shift out of P (Park):
1. Ease the pressure on the shift lever.
2. While holding down the brake pedal, push the shift
lever all the way into P (Park)
3. Move the shift lever to the desired position.
If you are still having a problem shifting, then have the
vehicle serviced.
Parking Over Things That Burn
{CAUTION:
Things that can burn could touch hot exhaust
parts under the vehicle and ignite. Do not park
over papers, leaves, dry grass, or other things that
can burn.
2-29
Page 286 of 408
{CAUTION:
Using a match near a battery can cause battery
gas to explode. People have been hurt doing this,
and some have been blinded. Use a flashlight if
you need more light.
Be sure the battery has enough water. You do not
need to add water to the battery installed in your
new vehicle. But if a battery has filler caps, be
sure the right amount of fluid is there. If it is low,
add water to take care of that first. If you do not,
explosive gas could be present.
Battery fluid contains acid that can burn you.
Do not get it on you. If you accidentally get it in
your eyes or on your skin, flush the place with
water and get medical help immediately.
{CAUTION:
Fans or other moving engine parts can injure you
badly. Keep your hands away from moving parts
once the engine is running.
5. Check that the jumper cables do not have loose
or missing insulation. If they do, you could get a
shock. The vehicles could be damaged too.
Before you connect the cables, here are some
basic things you should know. Positive (+) will go
to positive (+) or to a remote positive (+) terminal
if the vehicle has one. Negative (−) will go to a
heavy, unpainted metal engine part or to a remote
negative (−) terminal if the vehicle has one.
Do not connect positive (+) to negative (−)oryou
will get a short that would damage the battery
and maybe other parts too. And do not connect the
negative (−) cable to the negative (−) terminal on
the dead battery because this can cause sparks.
5-42
Page 287 of 408
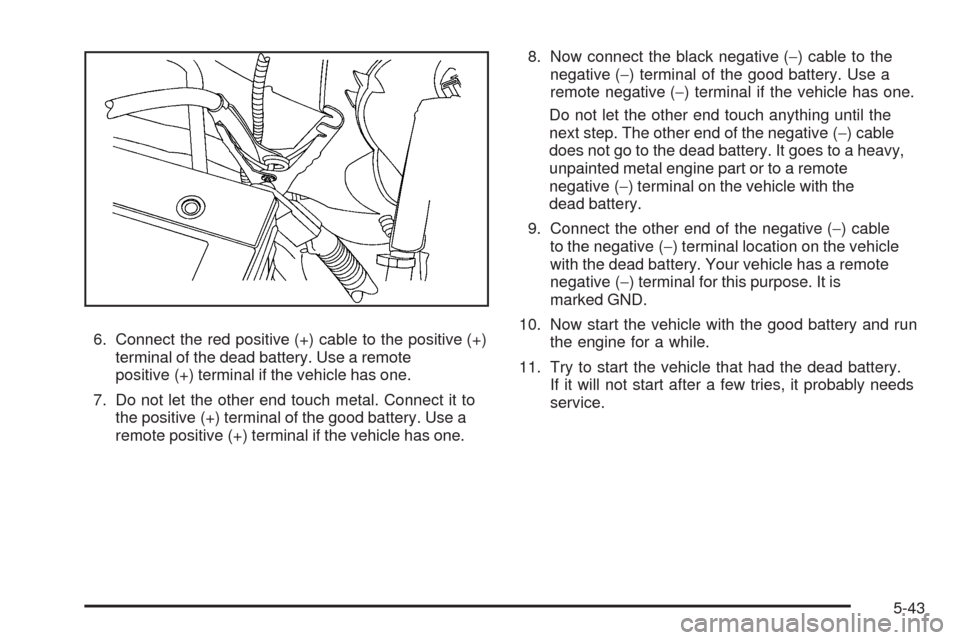
6. Connect the red positive (+) cable to the positive (+)
terminal of the dead battery. Use a remote
positive (+) terminal if the vehicle has one.
7. Do not let the other end touch metal. Connect it to
the positive (+) terminal of the good battery. Use a
remote positive (+) terminal if the vehicle has one.8. Now connect the black negative (−) cable to the
negative (−) terminal of the good battery. Use a
remote negative (−) terminal if the vehicle has one.
Do not let the other end touch anything until the
next step. The other end of the negative (−) cable
does not go to the dead battery. It goes to a heavy,
unpainted metal engine part or to a remote
negative (−) terminal on the vehicle with the
dead battery.
9. Connect the other end of the negative (−) cable
to the negative (−) terminal location on the vehicle
with the dead battery. Your vehicle has a remote
negative (−) terminal for this purpose. It is
marked GND.
10. Now start the vehicle with the good battery and run
the engine for a while.
11. Try to start the vehicle that had the dead battery.
If it will not start after a few tries, it probably needs
service.
5-43
Page 288 of 408
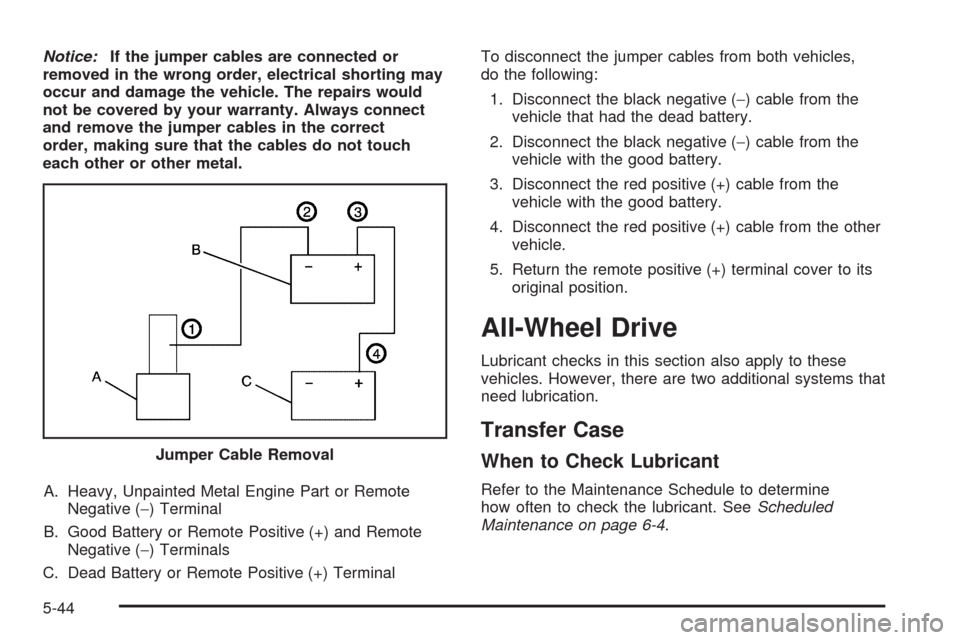
Notice:If the jumper cables are connected or
removed in the wrong order, electrical shorting may
occur and damage the vehicle. The repairs would
not be covered by your warranty. Always connect
and remove the jumper cables in the correct
order, making sure that the cables do not touch
each other or other metal.
A. Heavy, Unpainted Metal Engine Part or Remote
Negative (−) Terminal
B. Good Battery or Remote Positive (+) and Remote
Negative (−) Terminals
C. Dead Battery or Remote Positive (+) TerminalTo disconnect the jumper cables from both vehicles,
do the following:
1. Disconnect the black negative (−) cable from the
vehicle that had the dead battery.
2. Disconnect the black negative (−) cable from the
vehicle with the good battery.
3. Disconnect the red positive (+) cable from the
vehicle with the good battery.
4. Disconnect the red positive (+) cable from the other
vehicle.
5. Return the remote positive (+) terminal cover to its
original position.
All-Wheel Drive
Lubricant checks in this section also apply to these
vehicles. However, there are two additional systems that
need lubrication.
Transfer Case
When to Check Lubricant
Refer to the Maintenance Schedule to determine
how often to check the lubricant. SeeScheduled
Maintenance on page 6-4. Jumper Cable Removal
5-44
Page 385 of 408
Services Provided
•Emergency Fuel Delivery:Delivery of enough fuel
for the vehicle to get to the nearest service station.
•Lock-Out Service:Service is provided to unlock the
vehicle if you are locked out. A remote unlock may be
available if you have OnStar
®. For security reasons,
the driver must present identification before this
service is given.
•Emergency Tow From a Public Road or Highway:
Tow to the nearest Chevrolet dealer for warranty
service, or if the vehicle was in a crash and cannot
be driven. Assistance is also given when the vehicle
is stuck in the sand, mud, or snow.
•Flat Tire Change:Service is provided to change a
flat tire with the spare tire. The spare tire, if equipped,
must be in good condition and properly inflated.
It is the owner’s responsibility for the repair or
replacement of the tire if it is not covered by the
warranty.
•Battery Jump Start:Service is provided to jump
start a dead battery.
•Trip Interruption Bene�ts and Assistance:If your
trip is interrupted due to a warranty failure, incidental
expenses may be reimbursed during the 5 years/
100,000 miles (160 000 km) Powertrain warranty
period. Items considered are hotel, meals, and
rental car.
Services Not Included in Roadside
Assistance
•Impound towing caused by violation of any laws.
•Legal fines.
•Mounting, dismounting or changing of snow tires,
chains, or other traction devices.
•Towing or services for vehicles driven on a
non-public road or highway.
Services Speci�c to Canadian
Purchased Vehicles
•Fuel delivery:Reimbursement is approximately
$5 Canadian. Diesel fuel delivery may be restricted.
Propane and other fuels are not provided through
this service.
•Lock-Out Service:Vehicle registration is required.
•Trip Routing Service:Detailed maps of North
America are provided when requested either with
the most direct route or the most scenic route. There
is a limit of six requests per year. Additional travel
information is also available. Allow three weeks for
delivery.
7-9