2009 CHEVROLET EXPRESS CARGO VAN clock setting
[x] Cancel search: clock settingPage 120 of 408

Cruise Control Light......................................3-39
Highbeam On Light.......................................3-39
Tow/Haul Mode Light....................................3-40
Fuel Gage...................................................3-40
Driver Information Center (DIC).......................3-41
DIC Operation and Displays...........................3-41
DIC Compass..............................................3-46
DIC Warnings and Messages.........................3-48
DIC Vehicle Customization.............................3-57Audio System(s).............................................3-63
Setting the Clock..........................................3-64
Radio(s)......................................................3-67
Using an MP3..............................................3-77
Theft-Deterrent Feature..................................3-82
Audio Steering Wheel Controls.......................3-83
Radio Reception...........................................3-84
Fixed Mast Antenna......................................3-84
Section 3 Instrument Panel
3-2
Page 137 of 408
Climate Controls
Climate Control System
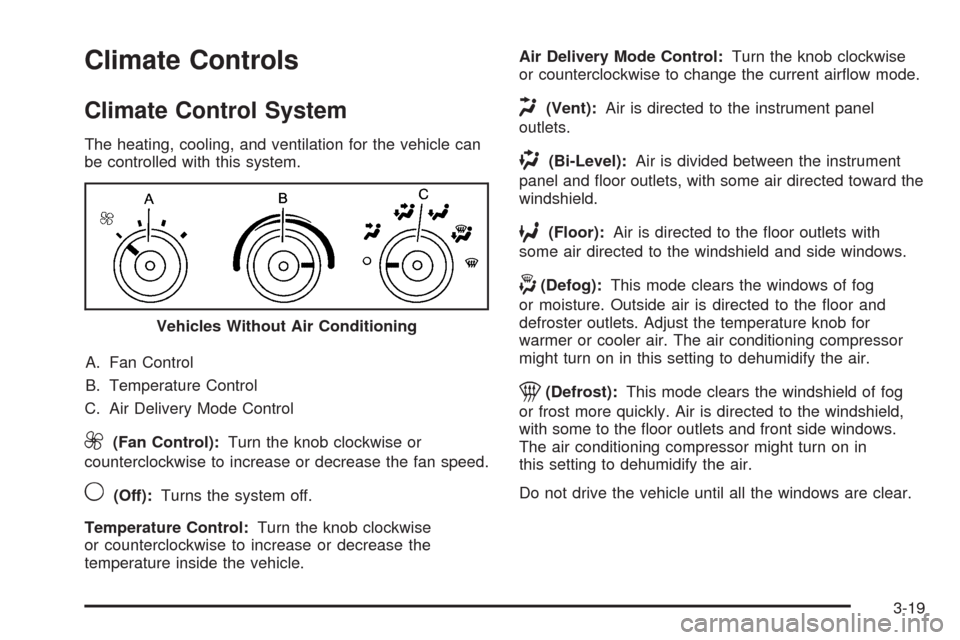
The heating, cooling, and ventilation for the vehicle can
be controlled with this system.
A. Fan Control
B. Temperature Control
C. Air Delivery Mode Control
9(Fan Control):Turn the knob clockwise or
counterclockwise to increase or decrease the fan speed.
9(Off):Turns the system off.
Temperature Control:Turn the knob clockwise
or counterclockwise to increase or decrease the
temperature inside the vehicle.Air Delivery Mode Control:Turn the knob clockwise
or counterclockwise to change the current airflow mode.
H(Vent):Air is directed to the instrument panel
outlets.
)(Bi-Level):Air is divided between the instrument
panel and floor outlets, with some air directed toward the
windshield.
6(Floor):Air is directed to the floor outlets with
some air directed to the windshield and side windows.
-(Defog):This mode clears the windows of fog
or moisture. Outside air is directed to the floor and
defroster outlets. Adjust the temperature knob for
warmer or cooler air. The air conditioning compressor
might turn on in this setting to dehumidify the air.
1(Defrost):This mode clears the windshield of fog
or frost more quickly. Air is directed to the windshield,
with some to the floor outlets and front side windows.
The air conditioning compressor might turn on in
this setting to dehumidify the air.
Do not drive the vehicle until all the windows are clear. Vehicles Without Air Conditioning
3-19
Page 182 of 408
To minimize taking your eyes off the road while driving,
do the following while the vehicle is parked:
•Become familiar with the operation and controls of
the audio system.
•Set up the tone, speaker adjustments, and preset
radio stations.
For more information, seeDefensive Driving on
page 4-2.
Notice:Contact your dealer/retailer before adding
any equipment.
Adding audio or communication equipment could
interfere with the operation of the vehicle’s engine,
radio, or other systems, and could damage them.
Follow federal rules covering mobile radio and
telephone equipment.
Notice:The chime signals related to safety belts,
parking brake, and other functions of your vehicle
operate through the radio/entertainment system.
If that equipment is replaced or additional equipment
is added to your vehicle, the chimes may not work.
Make sure that replacement or additional equipment
is compatible with your vehicle before installing it.
SeeAccessories and Modifications on page 5-3.
The vehicle has Retained Accessory Power (RAP).
With RAP, the audio system can be played even after
the ignition is turned off. SeeRetained Accessory Power
(RAP) on page 2-20for more information.
Setting the Clock
AM/FM Radio with Optional CD Player
If your vehicle has an AM/FM radio with an optional CD
player, it has a
Hbutton for setting the time. With these
types of radios, the clock can be set with either the radio
turned on or off.
Set the time by following these steps:
1. Press
Huntil the hour begins flashing on display.
Press this button a second time and the minutes
begin flashing on display.
Press
Ha third time and the 12HR or 24HR time
format begins flashing.
2. While either the hour or the minutes are flashing,
turn the
fknob, located on the upper right side of
the radio, clockwise or counterclockwise to increase
or decrease the time. While the 12HR or 24HR time
format is flashing, turn the
fknob clockwise or
counterclockwise to select the default time settings.
3. Press
Hagain until the clock display stops flashing
to set the currently displayed time; otherwise, the
flashing stops after five seconds and the current
time displayed is automatically set.
3-64
Page 186 of 408

Radio Data System (RDS)
The Radio may have a Radio Data System (RDS).
The RDS feature is available for use only on FM stations
that broadcast RDS information. This system relies upon
receiving specific information from these stations and
only works when the information is available. While the
radio is tuned to an FM-RDS station, the station name or
call letters displays. In rare cases, a radio station could
broadcast incorrect information that causes the radio
features to work improperly. If this happens, contact the
radio station.
Playing the Radio
O
(Power/Volume):Press to turn the system on
and off.
Turn clockwise or counterclockwise to increase or
decrease the volume.
When the radio is turned on, it plays at the volume level
that was last set. The volume can be adjusted using
this knob.
4(Information) (AM-FM Radio and Radio with CD
(Base)):Press to switch the display between the radio
station frequency and the time. While the ignition is
off, press to display the time.
4(Information) (MP3 and RDS Features):Press to
display additional text information related to the current
FM-RDS station or MP3 song. A choice of additional
information such as: Channel, Song, Artist, and
CAT (category) can display. Continue pressing to
highlight the desired label, or press the pushbutton
positioned under any one of the labels and the
information about that label displays.
When information is not available, No Info displays.
H(Clock) (AM-FM Radio and Radio with CD (Base)):
The radio has a clock button for setting the time.
With this type of radio, the clock can be set with either
the radio turned on or off. SeeSetting the Clock on
page 3-64for more information.
3-68
Page 187 of 408
Speed Compensated Volume (SCV):Radios with
Speed Compensated Volume (SCV) automatically
adjusts the radio volume to compensate for road and
wind noise as you speed up or slow down while driving.
That way, the volume level should sound about the
same as you drive.
To activate SCV:
1. Set the radio volume to the desired level.
2. Press the MENU button to display the radio
setup menu.
3. Press the pushbutton under the AUTO VOLUM
label on the radio display.
4. Press the pushbutton under the desired Speed
Compensated Volume setting (OFF, Low, Med,
or High) to select the level of radio volume
compensation. The display times out after
approximately 10 seconds. Each higher setting
allows for more radio volume compensation at
faster vehicle speeds.Finding a Station
BAND:Press to switch between FM1 and FM2 and
AM. The selection displays.
f(Tune):Turn clockwise or counterclockwise to
increase or decrease the station frequency.
©SEEK¨:Press the arrows to go to the previous
or to the next station and stay there.
To scan stations, press and hold either arrow for
two seconds until a beep sounds. The radio goes to a
station, plays for a few seconds, then goes to the next
station. For AM-FM Radio and Radio with CD (Base), the
station frequency flashes while the radio is in the scan
mode. Press either arrow again to stop scanning.
The radio seeks and scans stations only with a strong
signal that are in the selected band.
For AM-FM Radio and Radio with CD (Base), scan
presets within the current selected band by pressing and
holding either SEEK arrow for four seconds until a double
beep sounds. The radio goes to a stored preset, plays for
a few seconds if a strong signal is present, then goes to
the next stored preset. The station frequency flashes
while the radio is in the scan mode.
3-69
Page 189 of 408
The number of favorites pages can be setup using the
MENU button. To setup the number of favorites pages:
1. Press the MENU button to display the radio
setup menu.
2. Press the pushbutton located below the
FAV 1-6 label.
3. Select the desired number of favorites pages
by pressing the pushbutton located below the
displayed page numbers.
4. Press the FAV button, or let the menu time out, to
return to the original main radio screen showing the
radio station frequency labels and to begin the
process of programming your favorites for the
chosen amount of numbered pages.
Setting the Tone (Bass/Treble) (AM-FM
Radio and Radio with CD (Base))
BASS/TREB Bass/Treble:To adjust the bass or treble,
press the
fknob or the EQ button until the desired tone
control label displays. Turn the
fknob clockwise or
counterclockwise to increase or decrease the setting.
The display shows the current bass or treble level. If a
station’s frequency is weak, or if there is static, decrease
the treble.
Unique BASS/TREB settings can be saved for each
source.
Setting the Tone
(Bass/Midrange/Treble)
BASS/MID/TREB (Bass, Midrange, or Treble):
To adjust bass, midrange, or treble, press the
fknob
until the tone control labels display. Continue pressing
to highlight the desired label, or press the pushbutton
positioned under the desired label. Turn the
fknob
clockwise or counterclockwise to adjust the highlighted
setting. You can also adjust the highlighted setting by
pressing either SEEK arrow,
\FWD, orsREV button
until the desired levels are obtained. If a station’s
frequency is weak or if there is static, decrease the treble.
To quickly adjust bass, midrange, or treble to the middle
position, press the pushbutton positioned under the
BASS, MID, or TREB label for more than two seconds
and the level adjusts to the middle position.
To quickly adjust all tone and speaker controls to the
middle position, press the
fknob for more than
two seconds until a beep sounds.
EQ (Equalization):Press this button to choose bass
and treble equalization settings designed for different
types of music. The choices are pop, rock, country,
talk, jazz, and classical. Selecting MANUAL or changing
bass or treble, returns the EQ to the manual bass
and treble settings.
Unique EQ settings can be saved for each source.
3-71
Page 190 of 408
Adjusting the Speakers (Balance/Fade)
(AM-FM Radio and Radio with
CD (Base))
`
(Balance/Fade):To adjust the balance or fade,
press the
`button or thefknob until the desired
speaker control label displays. Turn the
fknob
clockwise or counterclockwise to adjust the setting.
Adjusting the Speakers (Balance/Fade)
BAL/FADE (Balance/Fade):To adjust balance or
fade, press the
fknob until the speaker control labels
display. Continue pressing to highlight the desired
label, or press the pushbutton positioned under
the desired label. Turn the
fknob clockwise or
counterclockwise to adjust the highlighted setting.
To quickly adjust balance or fade to the middle position,
press the pushbutton positioned under the BAL or
FADE label for more than two seconds. A beep sounds
and the level adjusts to the middle position.
To quickly adjust all speaker and tone controls to the
middle position, press the
fknob for more than
two seconds until a beep sounds.
Finding a Category (CAT) Station
CAT (Category):The CAT button is used to find XM™
stations while the radio is in the XM™ mode.
XM™ is a satellite radio service that is based in the
United States and Canada only.
For this vehicle, the XM™ function is not available.
Radio Messages
Calibration Error:The audio system has been
calibrated for the vehicle from the factory. If Calibration
Error displays, it means that the radio has not been
configured properly for the vehicle and it must be
returned to your dealer/retailer for service.
Locked or Loc:One of these messages will display
when the THEFTLOCK
®system has locked up the
radio. Take the vehicle to your dealer/retailer for service.
If any error occurs repeatedly or if an error cannot be
corrected, contact your dealer/retailer.
Playing a CD (Single CD Player)
Insert a CD partway into the slot, label side up.
The player pulls it in and the CD should begin playing.
3-72
Page 397 of 408

A
Accessories and Modifications............................ 5-3
Accessory Power Outlets.................................3-18
Adding Equipment to Your Airbag-Equipped
Vehicle.......................................................1-76
Additives, Fuel................................................. 5-7
Add-On Electrical Equipment...........................5-105
Air Cleaner/Filter, Engine.................................5-20
Air Conditioning..............................................3-19
Airbag
Off Light.....................................................3-28
Passenger Status Indicator...........................3-29
Readiness Light..........................................3-27
Airbag System................................................1-58
Adding Equipment to Your Airbag-Equipped
Vehicle...................................................1-76
Airbag Off Switch........................................1-67
How Does an Airbag Restrain?......................1-65
Passenger Sensing System...........................1-70
Servicing Your Airbag-Equipped Vehicle..........1-76
What Makes an Airbag Inflate?......................1-64
What Will You See After an Airbag Inflates?........1-65
When Should an Airbag Inflate?....................1-63
Where Are the Airbags?...............................1-60
All-Wheel-Drive (AWD) System...................4-8, 5-44
Antenna, Fixed Mast.......................................3-84
Antilock Brake System (ABS)............................. 4-4
Antilock Brake, System Warning Light................3-32Appearance Care
Aluminum Wheels......................................5-102
Care of Safety Belts...................................5-100
Chemical Paint Spotting..............................5-103
Cleaning Exterior Lamps/Lenses..................5-101
Fabric/Carpet..............................................5-98
Finish Care...............................................5-101
Finish Damage..........................................5-103
Instrument Panel, Vinyl, and Other Plastic
Surfaces.................................................5-99
Interior Cleaning..........................................5-97
Sheet Metal Damage..................................5-103
Tires........................................................5-103
Underbody Maintenance.............................5-103
Washing Your Vehicle.................................5-100
Weatherstrips............................................5-100
Windshield and Wiper Blades......................5-102
Appointments, Scheduling Service.....................7-10
Ashtray.........................................................3-18
Audio System.................................................3-63
Audio Steering Wheel Controls......................3-83
Fixed Mast Antenna.....................................3-84
Radio Reception..........................................3-84
Setting the Clock.........................................3-64
Theft-Deterrent Feature................................3-82
Audio System(s).............................................3-67
Automatic Door Lock......................................... 2-8
Automatic Door Unlock...................................... 2-8
1