2009 CHEVROLET EXPRESS CARGO VAN ignition
[x] Cancel search: ignitionPage 263 of 408
How to Reset the Engine Oil Life
System
The Engine Oil Life System calculates when to change
the engine oil and filter based on vehicle use. Whenever
the oil is changed, reset the system so it can calculate
when the next oil change is required. If a situation occurs
where you change the oil prior to a CHANGE ENGINE
OIL SOON message being turned on, reset the system.
To reset the CHANGE ENGINE OIL SOON message:
1. Turn the ignition key to ON/RUN with the engine off.
2. Fully press and release the accelerator pedal
slowly three times within five seconds.
3. Turn the key to LOCK/OFF.
If the message comes back on when you start the
vehicle, the engine oil life system has not reset.
Repeat the procedure. If it still does not reset,
see your dealer/retailer for service.
What to Do with Used Oil
Used engine oil contains certain elements that can be
unhealthy for your skin and could even cause cancer.
Do not let used oil stay on your skin for very long. Clean
your skin and nails with soap and water, or a good hand
cleaner. Wash or properly dispose of clothing or rags
containing used engine oil. See the manufacturer’s
warnings about the use and disposal of oil products.
Used oil can be a threat to the environment. If you
change your own oil, be sure to drain all the oil from the
filter before disposal. Never dispose of oil by putting it
in the trash, pouring it on the ground, into sewers, or into
streams or bodies of water. Recycle it by taking it to a
place that collects used oil.
5-19
Page 285 of 408
Notice:If you leave the radio or other accessories
on during the jump starting procedure, they could
be damaged. The repairs would not be covered by
the warranty. Always turn off the radio and other
accessories when jump starting the vehicle.
3. Turn off the ignition on both vehicles. Unplug
unnecessary accessories plugged into the cigarette
lighter or the accessory power outlet. Turn off
the radio and all lamps that are not needed.
This will avoid sparks and help save both
batteries. And it could save the radio!
4. Open the hoods and locate the positive (+) and
negative (−) terminal locations of the other vehicle.
Your vehicle has a remote positive (+) jump
starting terminal and a remote negative (−) jump
starting terminal. You should always use these
remote terminals instead of the terminals on the
battery.The remote positive (+) terminal is located
behind a red plastic cover near the engine accessory
drive bracket on the driver’s side of the engine
compartment, below the alternator. To uncover
the remote positive (+) terminal, open the red
plastic cover.
The remote negative (−) terminal is located on
the engine drive bracket on all V8 engines and is
marked GND (Ground).
On V6 engines the remote negative (−) terminal is
located on a tab attached to the engine accessory
drive bracket and is marked GND (Ground).
5-41
Page 309 of 408
Federal Communications
Commission (FCC) and
Industry and Science Canada
The Tire Pressure Monitor System (TPMS) operates
on a radio frequency and complies with Part 15 of
the FCC Rules. Operation is subject to the following
two conditions:
1. This device may not cause harmful interference.
2. This device must accept any interference received,
including interference that may cause undesired
operation.
The TPMS operates on a radio frequency and complies
with RSS-210 of Industry and Science Canada.
Operation is subject to the following two conditions:
1. This device may not cause interference.
2. This device must accept any interference received,
including interference that may cause undesired
operation of the device.
Changes or modifications to this system by other than
an authorized service facility could void authorization to
use this equipment.
Tire Pressure Monitor Operation
The Tire Pressure Monitor System (TPMS), if your
vehicle has this feature, is designed to warn the driver
when a low tire pressure condition exists. TPMS sensors
are mounted onto each tire and wheel assembly,
excluding the spare tire and wheel assembly. The TPMS
sensors monitor the air pressure in the vehicle’s tires and
transmits the tire pressure readings to a receiver located
in the vehicle.
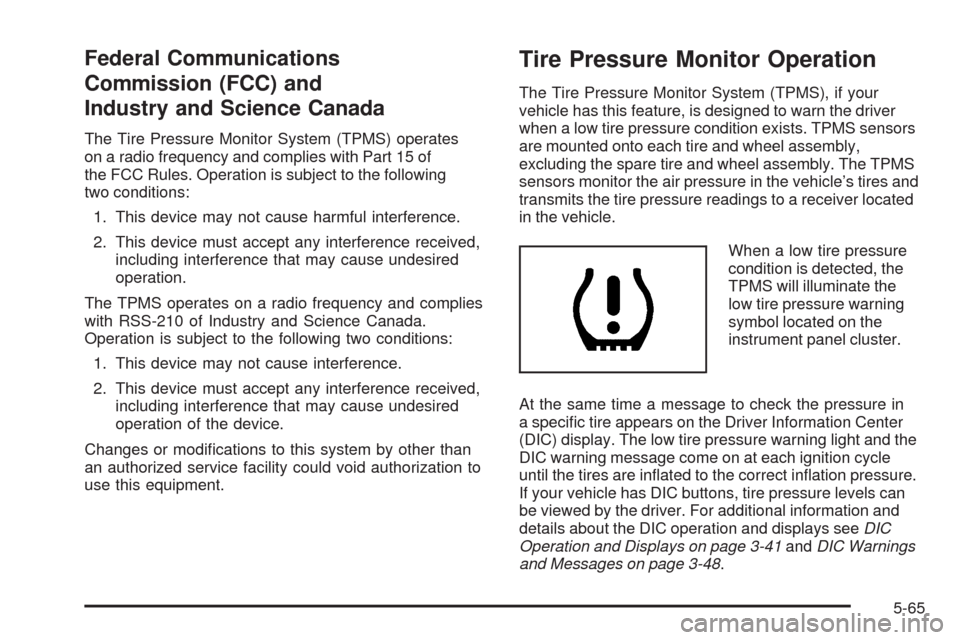
When a low tire pressure
condition is detected, the
TPMS will illuminate the
low tire pressure warning
symbol located on the
instrument panel cluster.
At the same time a message to check the pressure in
a specific tire appears on the Driver Information Center
(DIC) display. The low tire pressure warning light and the
DIC warning message come on at each ignition cycle
until the tires are inflated to the correct inflation pressure.
If your vehicle has DIC buttons, tire pressure levels can
be viewed by the driver. For additional information and
details about the DIC operation and displays seeDIC
Operation and Displays on page 3-41andDIC Warnings
and Messages on page 3-48.
5-65
Page 310 of 408
The low tire pressure warning light may come on in
cool weather when the vehicle is first started, and then
turn off as you start to drive. This could be an early
indicator that the air pressure in the tire(s) are getting
low and need to be inflated to the proper pressure.
A Tire and Loading Information label, attached to
your vehicle, shows the size of your vehicle’s original
equipment tires and the correct inflation pressure
for your vehicle’s tires when they are cold. SeeLoading
the Vehicle on page 4-19, for an example of the Tire
and Loading Information label and its location on
your vehicle. Also seeInflation - Tire Pressure on
page 5-62.
Your vehicle’s TPMS can warn you about a low tire
pressure condition but it does not replace normal
tire maintenance. SeeTire Inspection and Rotation
on page 5-69andTires on page 5-54.
Notice:Liquid tire sealants could damage the Tire
Pressure Monitor System (TPMS) sensors. Sensor
damage caused by using a tire sealant is not
covered by your warranty. Do not use liquid
tire sealants.TPMS Malfunction Light and Message
The TPMS will not function properly if one or more of
the TPMS sensors are missing or inoperable. When the
system detects a malfunction, the low tire warning light
flashes for about one minute and then stays on for the
remainder of the ignition cycle. A DIC warning message
is also displayed. The low tire warning light and DIC
warning message come on at each ignition cycle until
the problem is corrected. Some of the conditions that
can cause the malfunction light and DIC message to
come on are:
•One of the road tires has been replaced with the
spare tire. The spare tire does not have a TPMS
sensor. The TPMS malfunction light and DIC
message should go off once you re-install the
road tire containing the TPMS sensor.
•The TPMS sensor matching process was started but
not completed or not completed successfully after
rotating the vehicle’s tires. The DIC message and
TPMS malfunction light should go off once the TPMS
sensor matching process is performed successfully.
See “TPMS Sensor Matching Process” later in this
section.
5-66
Page 312 of 408
The TPMS sensor matching process is outlined below:
1. Set the parking brake.
2. Turn the ignition switch to ON/RUN with the
engine off.
3. Press the Remote Keyless Entry (RKE) transmitter’s
LOCK and UNLOCK buttons at the same time
for approximately five seconds. The horn sounds
twice to signal the receiver is in relearn mode and
TIRE LEARNING ACTIVE message displays on the
DIC screen.
If your vehicle does not have RKE, press the Driver
Information Center (DIC) vehicle information button
until the PRESS
VTO RELEARN TIRE POSITIONS
message displays. The horn sounds twice to signal
the receiver is in relearn mode and TIRE LEARNING
ACTIVE message displays on the DIC screen.
If your vehicle does not have RKE or DIC buttons,
press the trip odometer reset stem located on
the instrument panel cluster until the PRESS
VTO
RELEARN TIRE POSITIONS message displays.
The horn sounds twice to signal the receiver
is in relearn mode and TIRE LEARNING ACTIVE
message displays on the DIC screen.
4. Start with the driver side front tire.5. Remove the valve cap from the valve cap stem.
Activate the TPMS sensor by increasing or
decreasing the tire’s air pressure for five seconds, or
until a horn chirp sounds. The horn chirp, which may
take up to 30 seconds to sound, confirms that the
sensor identification code has been matched to this
tire and wheel position.
6. Proceed to the passenger side front tire, and repeat
the procedure in Step 5.
7. Proceed to the passenger side rear tire, and repeat
the procedure in Step 5.
8. Proceed to the driver side rear tire, and repeat the
procedure in Step 5. The horn sounds two times to
indicate the sensor identification code has been
matched to the driver side rear tire, and that
the TPMS sensor matching process is no longer
active. The TIRE LEARNING ACTIVE message
on the DIC display screen goes off.
9. Turn the ignition switch to LOCK/OFF.
10. Set all four tires to the recommended air pressure
level as indicated on the Tire and Loading
Information label.
11. Put the valve caps back on the valve stems.
5-68
Page 350 of 408
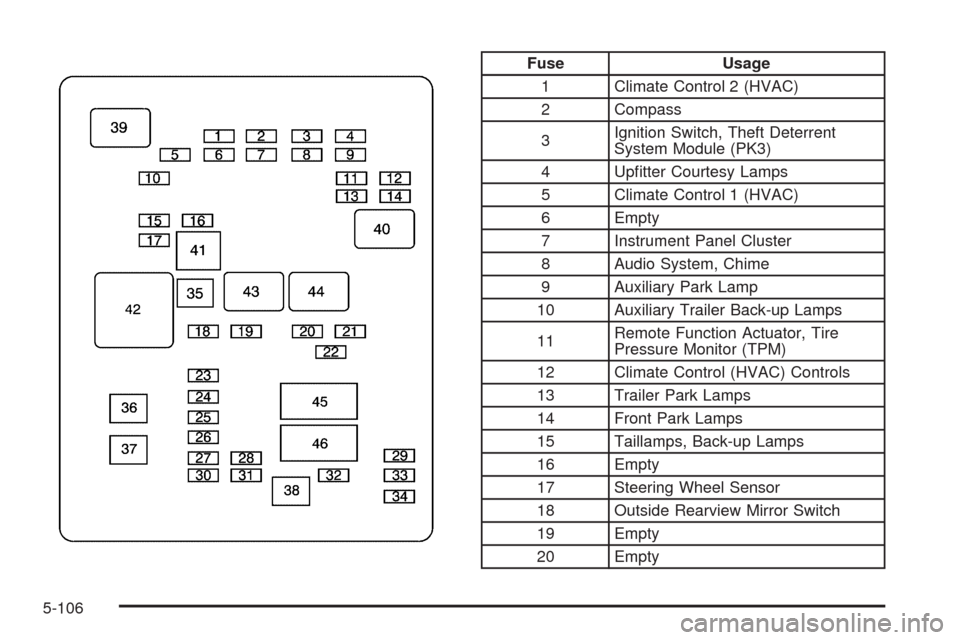
Fuse Usage
1 Climate Control 2 (HVAC)
2 Compass
3Ignition Switch, Theft Deterrent
System Module (PK3)
4 Upfitter Courtesy Lamps
5 Climate Control 1 (HVAC)
6 Empty
7 Instrument Panel Cluster
8 Audio System, Chime
9 Auxiliary Park Lamp
10 Auxiliary Trailer Back-up Lamps
11Remote Function Actuator, Tire
Pressure Monitor (TPM)
12 Climate Control (HVAC) Controls
13 Trailer Park Lamps
14 Front Park Lamps
15 Taillamps, Back-up Lamps
16 Empty
17 Steering Wheel Sensor
18 Outside Rearview Mirror Switch
19 Empty
20 Empty
5-106
Page 353 of 408
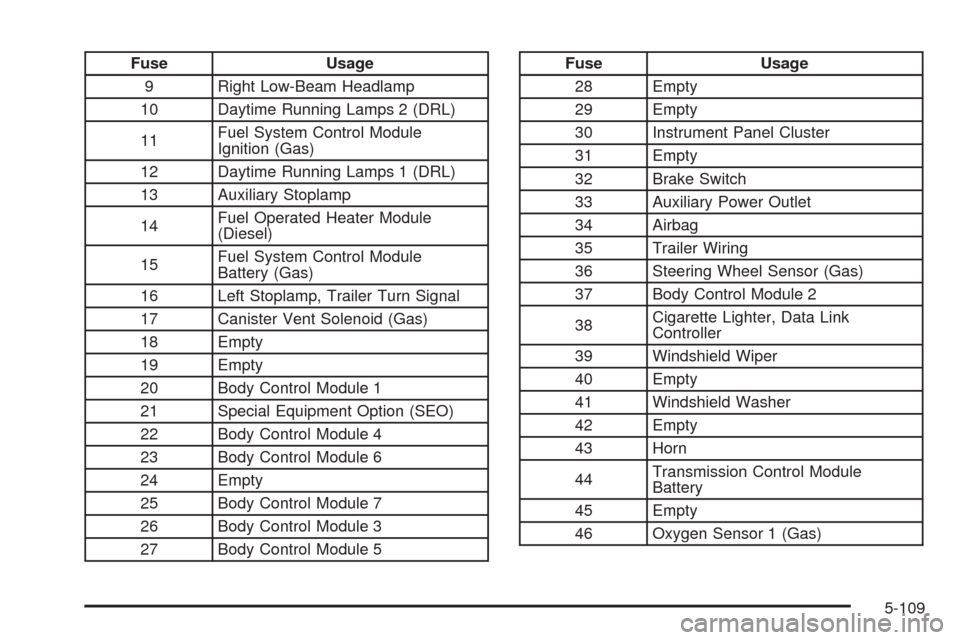
Fuse Usage
9 Right Low-Beam Headlamp
10 Daytime Running Lamps 2 (DRL)
11Fuel System Control Module
Ignition (Gas)
12 Daytime Running Lamps 1 (DRL)
13 Auxiliary Stoplamp
14Fuel Operated Heater Module
(Diesel)
15Fuel System Control Module
Battery (Gas)
16 Left Stoplamp, Trailer Turn Signal
17 Canister Vent Solenoid (Gas)
18 Empty
19 Empty
20 Body Control Module 1
21 Special Equipment Option (SEO)
22 Body Control Module 4
23 Body Control Module 6
24 Empty
25 Body Control Module 7
26 Body Control Module 3
27 Body Control Module 5Fuse Usage
28 Empty
29 Empty
30 Instrument Panel Cluster
31 Empty
32 Brake Switch
33 Auxiliary Power Outlet
34 Airbag
35 Trailer Wiring
36 Steering Wheel Sensor (Gas)
37 Body Control Module 2
38Cigarette Lighter, Data Link
Controller
39 Windshield Wiper
40 Empty
41 Windshield Washer
42 Empty
43 Horn
44Transmission Control Module
Battery
45 Empty
46 Oxygen Sensor 1 (Gas)
5-109
Page 354 of 408
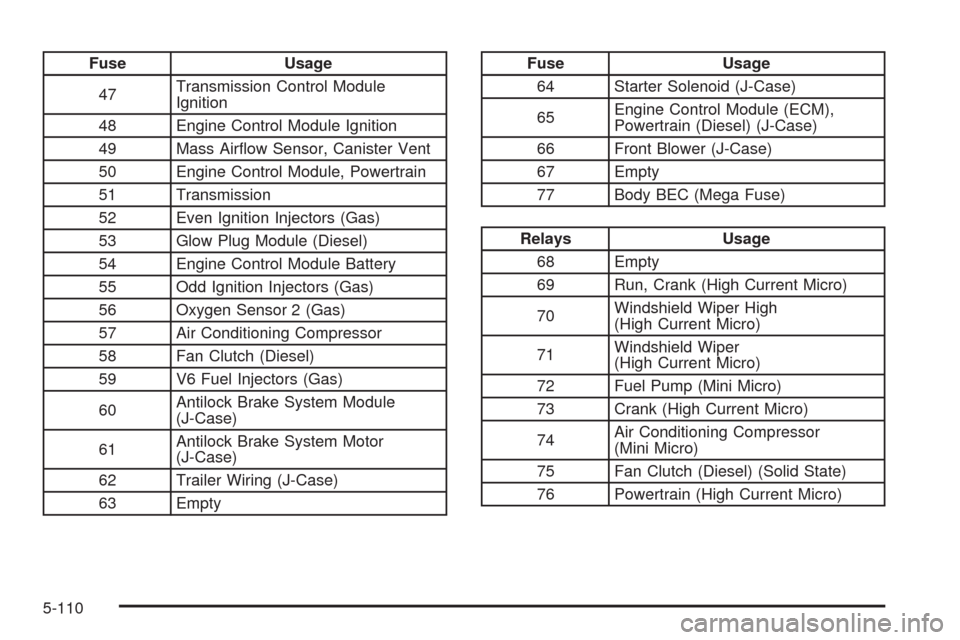
Fuse Usage
47Transmission Control Module
Ignition
48 Engine Control Module Ignition
49 Mass Airflow Sensor, Canister Vent
50 Engine Control Module, Powertrain
51 Transmission
52 Even Ignition Injectors (Gas)
53 Glow Plug Module (Diesel)
54 Engine Control Module Battery
55 Odd Ignition Injectors (Gas)
56 Oxygen Sensor 2 (Gas)
57 Air Conditioning Compressor
58 Fan Clutch (Diesel)
59 V6 Fuel Injectors (Gas)
60Antilock Brake System Module
(J-Case)
61Antilock Brake System Motor
(J-Case)
62 Trailer Wiring (J-Case)
63 EmptyFuse Usage
64 Starter Solenoid (J-Case)
65Engine Control Module (ECM),
Powertrain (Diesel) (J-Case)
66 Front Blower (J-Case)
67 Empty
77 Body BEC (Mega Fuse)
Relays Usage
68 Empty
69 Run, Crank (High Current Micro)
70Windshield Wiper High
(High Current Micro)
71Windshield Wiper
(High Current Micro)
72 Fuel Pump (Mini Micro)
73 Crank (High Current Micro)
74Air Conditioning Compressor
(Mini Micro)
75 Fan Clutch (Diesel) (Solid State)
76 Powertrain (High Current Micro)
5-110