Page 115 of 354

Outside Power Mirrors
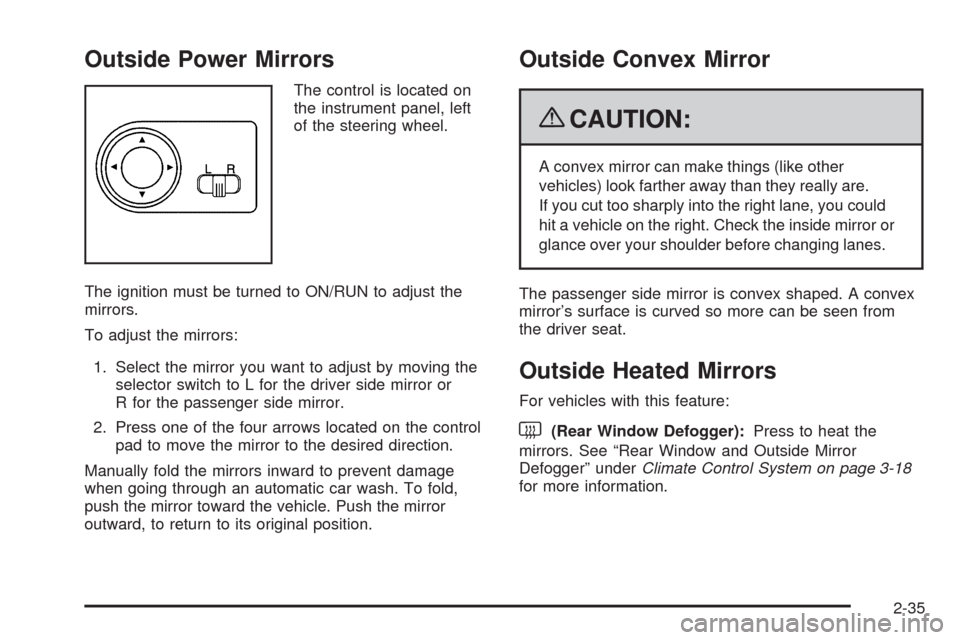
The control is located on
the instrument panel, left
of the steering wheel.
The ignition must be turned to ON/RUN to adjust the
mirrors.
To adjust the mirrors:
1. Select the mirror you want to adjust by moving the
selector switch to L for the driver side mirror or
R for the passenger side mirror.
2. Press one of the four arrows located on the control
pad to move the mirror to the desired direction.
Manually fold the mirrors inward to prevent damage
when going through an automatic car wash. To fold,
push the mirror toward the vehicle. Push the mirror
outward, to return to its original position.
Outside Convex Mirror
{CAUTION:
A convex mirror can make things (like other
vehicles) look farther away than they really are.
If you cut too sharply into the right lane, you could
hit a vehicle on the right. Check the inside mirror or
glance over your shoulder before changing lanes.
The passenger side mirror is convex shaped. A convex
mirror’s surface is curved so more can be seen from
the driver seat.
Outside Heated Mirrors
For vehicles with this feature:
<(Rear Window Defogger):Press to heat the
mirrors. See “Rear Window and Outside Mirror
Defogger” underClimate Control System on page 3-18
for more information.
2-35
Page 120 of 354

Sunglasses Storage Compartment
For vehicles with this feature, the sunglasses storage
compartment is located above the driver’s door.
To open, pull down and hold the upper part of the
cover. Release the cover and the compartment will
automatically close.
Sunroof
On vehicles with this
feature, the switch is
located on the headliner
between the sun visors.
The sunroof only operates when the ignition is turned
to ON/RUN. The sunroof can be opened to a vent
position or it can be opened all of the way.
To open the sunroof, to the vent position, open the
sunshade. Then press and hold the driver’s side of the
switch. To close the sunroof, press and hold the
passenger’s side of the switch until the sunroof reaches
the desired position.
To fully open the sunroof, press and hold the passenger’s
side of the switch. The sunshade opens with the sunroof.
To close the sunroof, press and hold the driver’s side of
the switch. The sunroof will stop if the switch is released
during operation. Close the sunshade manually.
In both the vent and fully open positions, the air �ow
can be adjusted by pushing and holding the switch until
the sunroof moves to the desired position.
The sunroof cannot be opened or closed if the vehicle
has an electrical failure.
2-40
Page 128 of 354
Headlamp High/Low-Beam Changer
The headlamps must be on for this feature to work.
Push the turn signal lever away from you to turn the high
beams on.
This instrument panel cluster light
3comes on while
the high beams are on and the ignition is turned to
ON/RUN.
Pull the lever towards you to return to low beams.
Flash-to-Pass
This feature is used to signal to the vehicle ahead that
you want to pass.
Pull the turn signal/multifunction lever towards you until
the high-beam headlamps come on, then release
the lever to turn them off.
Windshield Wipers
Sedan shown
Hatchback shown
3-8
Page 129 of 354

The lever is located on the right side of the steering
column. The ignition must be turned to ON/RUN
to operate the windshield wipers.
Move the lever to one of the following positions:
HI (High Speed):For steady wiping at high speed.
LO (Low Speed):For steady wiping at low speed.
INT (Intermittent):Move to this position for a delayed
wiping cycle. Turn the band on the windshield wiper
toward FAST or SLOW for a shorter or longer
delay between wipes. The wiper speed can only be
adjusted when the lever is in the INT position.
OFF:Turns the windshield wipers off.
Misting Function
Move the lever toward INT for a single wiping cycle.
Hold it there until the windshield wipers start; then let go.
The windshield wipers will stop after one wipe. If more
wipes are needed, hold the band toward INT longer.
Clear ice and snow from the wiper blades before using
them. If they are frozen to the windshield, carefully
loosen or thaw them. If the blades become damaged,
get new blades or blade inserts. SeeWindshield
Wiper Blade Replacement on page 5-50.
Heavy snow or ice can overload the wipers. A circuit
breaker stops them until the motor cools.
Windshield Washer
To use this feature the ignition must be turned to
ON/RUN. Pull the windshield washer/wiper lever toward
you to spray washer �uid on the windshield.
The spray continues until the lever is released.
The wipers will run a few times and either stop or
will resume at the speed being used previously.
SeeWindshield Washer Fluid on page 5-33for
information on �lling the windshield washer �uid.
{CAUTION:
In freezing weather, do not use your washer until
the windshield is warmed. Otherwise the washer
�uid can form ice on the windshield, blocking your
vision.
3-9
Page 133 of 354

Using Cruise Control on Hills
How well the cruise control works on hills depends upon
the vehicle speed, load, and the steepness of the
hills. When going up steep hills, you might have to step
on the accelerator pedal to maintain the vehicle’s
speed. When going downhill, you might have to brake
or shift to a lower gear to keep the vehicle’s speed
down. When the brakes are applied the cruise control
turns off.
Ending Cruise Control
There are two ways to turn off the cruise control:
Step lightly on the brake pedal, or press the clutch
pedal, if you have a manual transmission.
PressI/Oon the cruise control pad.
Erasing Speed Memory
The cruise control set speed memory is erased when
the cruise control or the ignition is turned off.
Exterior Lamps
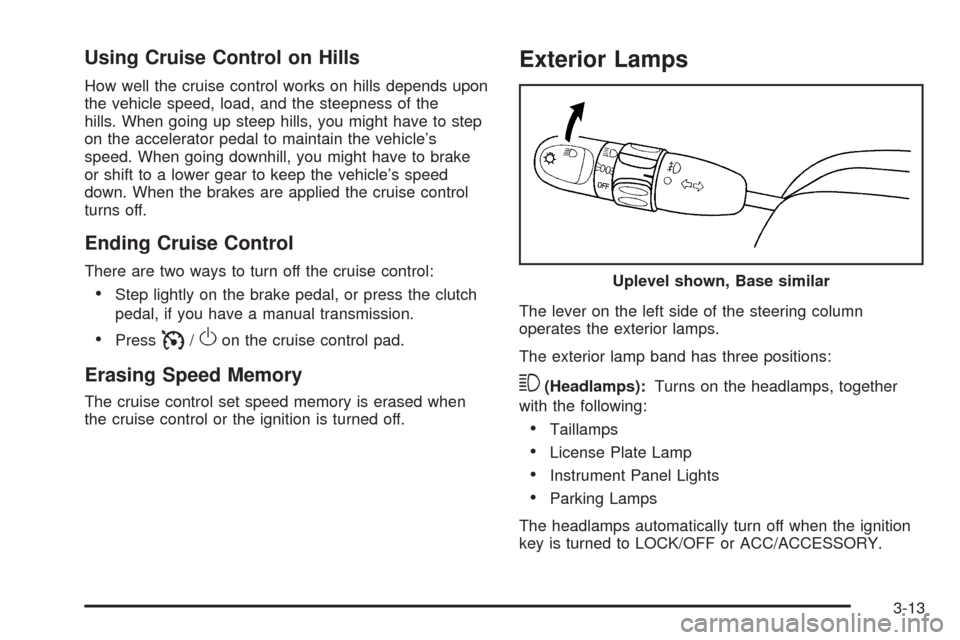
The lever on the left side of the steering column
operates the exterior lamps.
The exterior lamp band has three positions:
3(Headlamps):Turns on the headlamps, together
with the following:
Taillamps
License Plate Lamp
Instrument Panel Lights
Parking Lamps
The headlamps automatically turn off when the ignition
key is turned to LOCK/OFF or ACC/ACCESSORY.Uplevel shown, Base similar
3-13
Page 134 of 354

;(Parking Lamps):Turns on the parking lamps,
together with the taillamps, license plate lamp,
and instrument panel lights.
OFF:Turns all the lamps off, except the Daytime
Running Lamps (DRL).
Daytime Running Lamps (DRL)
Daytime Running Lamps (DRL) can make it easier for
others to see the front of your vehicle during the day.
Fully functional daytime running lamps are required on
all vehicles �rst sold in Canada.
The DRL system makes the headlamps come on when
the following conditions are met:
The ignition is on.
The exterior lamp band is in OFF or in the parking
lamp position.
The parking brake is released.
An indicator light on instrument panel cluster comes on
when the DRL system is on.When the DRL system is on, the taillamps, sidemarker
lamps, parking lamps and instrument panel lights do
not come on unless the exterior lamps control is turned
to the parking lamp or headlamp position.
The DRL system turns off when one of the following
conditions are met:
The ignition is off.
The parking brake is on.
The high-beam headlamps are on.
The low-beam headlamps are on.
The �ash-to-pass feature is used.
The regular headlamp system should be used when
needed.
3-14
Page 135 of 354

Fog Lamps
For vehicles with fog lamps, they are controlled by
the
#band located on the middle of the turn signal/
multifunction lever.
To use the fog lamps, the ignition must be turned to
ON/RUN and the low-beam headlamps or parking lamps
must be on.
Turn the band to
#to turn the fog lamps on. The band
automatically returns to its starting position when
released. The fog lamp indicator light comes on in the
instrument panel cluster. SeeFog Lamp Light on
page 3-35.
To turn the fog lamps off, turn the band to
#again.
The fog lamp indicator light will go off.
The fog lamps will also turn off when the high-beam
headlamps are turned on. When the high-beam
headlamps are turned off, the fog lamps will turn on
again.
Some localities have laws that require the headlamps
to be on along with the fog lamps.
Instrument Panel Brightness
This feature controls the brightness of the instrument
panel lights.
The thumbwheel for this feature is located on the
instrument panel to the left of the steering column.
Turn the thumbwheel to brighten or dim the lights.
3-15
Page 136 of 354

Dome Lamp
The vehicle has a dome lamp.
ON:The light comes on and stays on.
O(Door):The light comes on when a door is opened.
The light turns off when all the doors are closed.
OFF:The light remains off even when a door is opened.
Inadvertent Power Battery Saver
This feature is designed to protect the vehicle’s battery
against drainage. If the exterior lamps control is left
in the
;or2position, the key is removed and
the driver door is opened, the lights will turn off
automatically.
If the key is removed and the driver door is opened
while the dome lamp is on, the dome lamp will not turn
off automatically.
Accessory Power Outlet(s)
Accessory power outlets can be used to plug in auxiliary
electrical equipment, such as a cellular phone.
The accessory power outlet is located next to the
parking brake on the center console.To use the accessory power outlet, remove the protective
cap. When not in use, always cover the outlet with the
protective cap. The accessory power outlet is operational
when the ignition is turned to ACC/ACCESSORY or
ON/RUN.
Notice:Leaving electrical equipment on for
extended periods will drain the battery. Always turn
off electrical equipment when not in use and do not
plug in equipment that exceeds the maximum
amperage rating.
Certain electrical accessories may not be compatible
with the accessory power outlet and could result
in blown vehicle or adapter fuses. If you experience a
problem, see your dealer/retailer for additional
information on accessory power outlets.
Notice:Adding any electrical equipment to the
vehicle can damage it or keep other components
from working as they should. The repairs would not
be covered by the vehicle warranty. Do not use
equipment exceeding maximum amperage rating of
20 amperes. Check with your dealer/retailer before
adding electrical equipment.
When adding electrical equipment, be sure to follow
the proper installation instructions included with
the equipment.
3-16