2009 CHEVROLET AVEO radiator cap
[x] Cancel search: radiator capPage 235 of 354

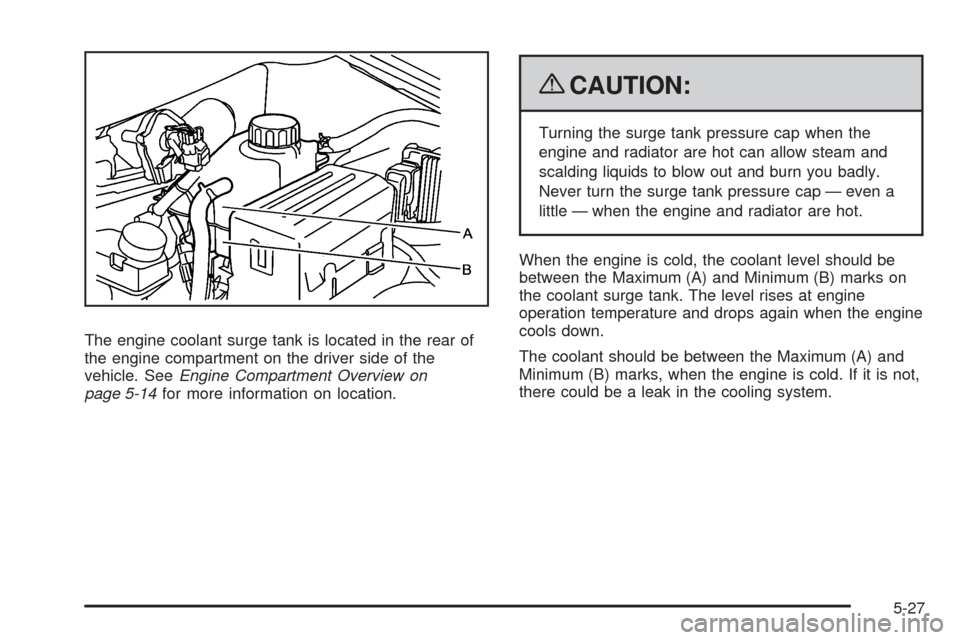
The engine coolant surge tank is located in the rear of
the engine compartment on the driver side of the
vehicle. SeeEngine Compartment Overview on
page 5-14for more information on location.
{CAUTION:
Turning the surge tank pressure cap when the
engine and radiator are hot can allow steam and
scalding liquids to blow out and burn you badly.
Never turn the surge tank pressure cap — even a
little — when the engine and radiator are hot.
When the engine is cold, the coolant level should be
between the Maximum (A) and Minimum (B) marks on
the coolant surge tank. The level rises at engine
operation temperature and drops again when the engine
cools down.
The coolant should be between the Maximum (A) and
Minimum (B) marks, when the engine is cold. If it is not,
there could be a leak in the cooling system.
5-27
Page 236 of 354

How to Add Coolant to the Coolant
Surge Tank
{CAUTION:
You can be burned if you spill coolant on hot
engine parts. Coolant contains ethylene glycol and
it will burn if the engine parts are hot enough. Do
not spill coolant on a hot engine.
Notice:This vehicle has a speci�c coolant �ll
procedure. Failure to follow this procedure could
cause the engine to overheat and be severely
damaged.
{CAUTION:
An electric engine cooling fan under the hood can
start up even when the engine is not running and
can cause injury. Keep hands, clothing, and tools
away from any underhood electric fan.
{CAUTION:
Steam and scalding liquids from a hot cooling
system can blow out and burn you badly. They are
under pressure, and if you turn the surge tank
pressure cap — even a little — they can come out
at high speed. Never turn the cap when the
cooling system, including the surge tank pressure
cap, is hot. Wait for the cooling system and surge
tank pressure cap to cool if you ever have to turn
the pressure cap.
If no coolant is visible in the surge tank, add coolant as
follows:
1. Remove the coolant surge tank pressure cap when
the cooling system, including the coolant surge tank
pressure cap and upper radiator hose, is no longer
hot. Turn the pressure cap slowly counterclockwise
about two or two and one-half turns.
If you hear a hiss, wait for that to stop. This will
allow any pressure still left to be vented out
the discharge hose.
5-28
Page 238 of 354

4. With the coolant surge tank pressure cap off, start
the engine and let it run until you can feel the upper
radiator hose getting hot. Watch out for the
engine cooling fan.
By this time, the coolant level inside the coolant
surge tank may be lower. If the level is lower than
the Maximum mark, add more of the proper mixture
to the coolant surge tank until the level reaches
the mark.
5. Replace the pressure cap. Be sure the pressure
cap is hand-tight and fully seated.
Notice:If the pressure cap is not tightly installed,
coolant loss and possible engine damage may
occur. Be sure the cap is properly and tightly
secured.Engine Overheating
The vehicle has an indicator to warn of the engine
overheating.
There is a coolant temperature gage on the instrument
panel cluster. SeeEngine Coolant Temperature
Gage on page 3-31.
You may decide not to lift the hood when this warning
appears, but instead get service help right away.
SeeRoadside Assistance Program on page 7-7.
If you do decide to lift the hood, make sure the vehicle
is parked on a level surface.
Then check to see if the engine cooling fan is running.
If the engine is overheating, the fan should be
running. If it is not, do not continue to run the engine
and have the vehicle serviced.
Notice:Engine damage from running the engine
without coolant is not covered by the warranty.
Notice:If the engine catches �re because of being
driven with no coolant, your vehicle can be badly
damaged. The costly repairs would not be covered
by the vehicle warranty.
5-30
Page 310 of 354

Maintenance Footnotes
†The U.S. Environmental Protection Agency or the
California Air Resources Board has determined that the
failure to perform this maintenance item will not nullify
the emission warranty or limit recall liability prior to
the completion of the vehicle’s useful life. We, however,
urge that all recommended maintenance services be
performed at the indicated intervals and the
maintenance be recorded.
(a)Visually inspect brake lines and hoses for proper
hook-up, binding, leaks, cracks, chafing, etc. Inspect
disc brake pads for wear and rotors for surface
condition. Inspect drum brake linings/shoes for wear or
cracks. Inspect other brake parts, including drums,
wheel cylinders, calipers, parking brake, etc.
(b)Visually inspect front and rear suspension and
steering system for damaged, loose, or missing parts
or signs of wear. Inspect power steering cables for
proper hook-up, binding, cracks, chafing, etc.
(c)Visually inspect hoses and have them replaced if
they are cracked, swollen, or deteriorated. Inspect
all pipes, fittings and clamps; replace with genuine
parts as needed. To help ensure proper operation,
a pressure test of the cooling system and pressure cap
and cleaning the outside of the radiator and air
conditioning condenser is recommended at least
once a year.(d)Inspect wiper blades for wear, cracking, or
contamination. Clean the windshield and wiper blades,
if contaminated. Replace wiper blades that are worn
or damaged. See Windshield Wiper Blade Replacement
on page 5-50 and Windshield and Wiper Blades on
page 5-84 for more information.
(e)Make sure the safety belt reminder light and safety
belt assemblies are working properly. Look for any
other loose or damaged safety belt system parts. If you
see anything that might keep a safety belt system
from doing its job, have it repaired. Have any torn or
frayed safety belts replaced. Also see Checking
the Restraint Systems on page 1-75.
(f)Lubricate all key lock cylinders, door hinges and
latches, hood hinges and latches, and trunk lid hinges
and latches. More frequent lubrication may be required
when exposed to a corrosive environment. Applying
silicone grease on weatherstrips with a clean cloth will
make them last longer, seal better, and not stick or
squeak.
(g)Visually inspect belt for fraying, excessive cracks, or
obvious damage. Replace belt if necessary.
6-8
Page 311 of 354

(h)Change automatic transmission fluid and filter if the
vehicle is mainly driven under one or more of these
conditions:
�In heavy city traffic where the outside temperature
regularly reaches 90°F (32°C) or higher.
�In hilly or mountainous terrain.
�When doing frequent trailer towing.
�Uses such as found in taxi, police, or delivery
service.
If the vehicle is not used under any of these conditions,
the fluid and filter do not require changing.
(i)Drain, flush, and refill cooling system. This service
can be complex; you should have your dealer/retailer
perform this service. See Engine Coolant on page 5-25
for what to use. Inspect hoses. Clean radiator,
condenser, pressure cap, and filler neck. Pressure test
the cooling system and pressure cap.
(j)A fluid loss in any vehicle system could indicate a
problem. Have the system inspected and repaired and
the fluid level checked. Add fluid if needed.(k)If driving regularly under dusty conditions, inspect
the filter at each engine oil change.
(l)If driving regularly under dusty conditions, the filter
may require replacement more often.
Owner Checks and Services
These owner checks and services should be performed
at the intervals speci�ed to help ensure vehicle safety,
dependability, and emission control performance.
Your dealer/retailer can assist with these checks and
services.
Be sure any necessary repairs are completed at once.
Whenever any �uids or lubricants are added to the
vehicle, make sure they are the proper ones, as shown
inRecommended Fluids and Lubricants on page 6-13.
6-9