2009 CADILLAC STS roof
[x] Cancel search: roofPage 74 of 514

Object Detection Systems...............................2-42
Ultrasonic Rear Parking
Assist (URPA)...........................................2-42
Side Blind Zone Alert (SBZA).........................2-44
Lane Departure Warning (LDW)......................2-48
OnStar
®System.............................................2-50
Universal Home Remote System......................2-53
Universal Home Remote System Operation
(With Three Round LED).............................2-54Storage Areas................................................2-60
Glove Box...................................................2-60
Cupholders..................................................2-60
Center Console Storage.................................2-60
Convenience Net..........................................2-60
Sunroof.........................................................2-60
Vehicle Personalization...................................2-61
Memory Seat, Mirrors and Steering Wheel..........2-77
Section 2 Features and Controls
2-2
Page 132 of 514

Storage Areas
Glove Box
Lift up on the glove box lever to open it.
Cupholders
The vehicle has two cupholders in the center
console area.
Center Console Storage
The vehicle has a center console storage area located
between the front seats. It includes storage areas, and
accessory power outlet(s) on the rear of the console.
Convenience Net
Use the convenience net, located in the rear, to store
small loads as far forward as possible. The net should
not be used to store heavy loads.
Sunroof
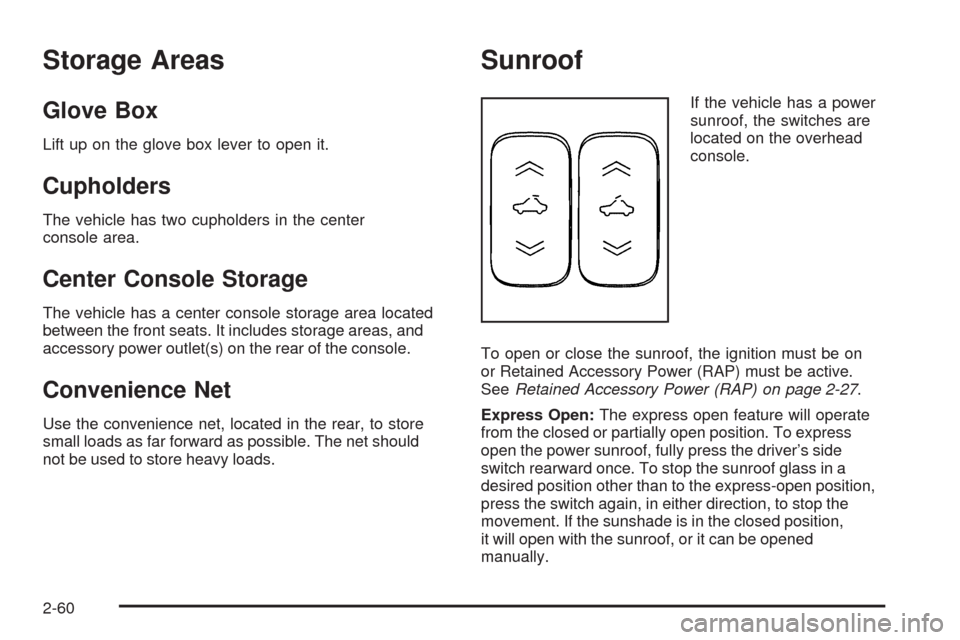
If the vehicle has a power
sunroof, the switches are
located on the overhead
console.
To open or close the sunroof, the ignition must be on
or Retained Accessory Power (RAP) must be active.
SeeRetained Accessory Power (RAP) on page 2-27.
Express Open:The express open feature will operate
from the closed or partially open position. To express
open the power sunroof, fully press the driver’s side
switch rearward once. To stop the sunroof glass in a
desired position other than to the express-open position,
press the switch again, in either direction, to stop the
movement. If the sunshade is in the closed position,
it will open with the sunroof, or it can be opened
manually.
2-60
Page 133 of 514

Vent Open:To open the power sunroof to the vent
position from the closed position, press and hold the
passenger’s side sunroof switch forward. The rear of
the sunroof panel will tilt upward to the full vent position.
The sunshade must be opened manually.
Express Close:The express close feature will operate
from the open or partially open position. To express close
the power sunroof, fully press the driver’s side switch
forward once. To stop the sunroof glass in a desired
position other than closed, press the switch again in
either direction. The sunshade must be closed manually.
Close:To close the power sunroof, operate the controls
according to one of the following:
From the open position, press and hold the driver’s
side sunroof switch forward. The sunshade must be
closed manually.
From the vent position, press and hold the
passenger’s side sunroof switch rearward.
Anti-Pinch:If an object is in the path of the sunroof
while it is closing, the anti-pinch feature will detect the
object and stop the sunroof from closing at the point
of the obstruction. The sunroof will then return to the
full-open or vent position. To close the sunroof once
it has re-opened, refer to the two options previously
described under the “Close” feature instructions.Do not keep the sunroof open for long periods of time
while the vehicle is not in use. Debris can collect in the
tracks and possibly damage the sunroof operation or
plug the water draining system.
Vehicle Personalization
The vehicle has personalization that allows you to
program certain features to a preferred setting for up to
two drivers. The back of the keyless access transmitters
are labelled 1 or 2. Additional keyless access transmitters
programmed to the vehicle, as 3 and/or 4, do not have
a number on the back and are not capable of being
personalized. The number of programmable features
varies depending upon which vehicle options are
purchased.
On all vehicles, features such as climate control settings,
radio and XM™ preset settings, exterior lighting at unlock
and remote lock unlock con�rmation, and language have
already been programmed. Your vehicle also has an
automatic door locking feature that is always on. You
cannot turn the automatic door locking feature off. See
Programmable Automatic Door Locks on page 2-14.
Some vehicles have additional features that can be
programmed including the seat, steering column, and
outside rearview mirror position.
If your vehicle has the base audio system, the following
information explains the vehicle personalization on your
vehicle.
2-61
Page 288 of 514

Backglass Antenna
The AM-FM antenna is integrated with the rear window
defogger, located in the rear window. Make sure that
the inside surface of the rear window is not scratched
and that the lines on the glass are not damaged.
If the inside surface is damaged, it could interfere with
radio reception. For proper radio reception, the antenna
connector needs to be properly attached to the post
on the glass.
If a cellular telephone antenna needs to be attached to
the glass, make sure that the grid lines for the AM-FM
antenna are not damaged. There is enough space
between the grid lines to attach a cellular telephone
antenna without interfering with radio reception.
Notice:Using a razor blade or sharp object to
clear the inside rear window may damage the rear
window antenna and/or the rear window defogger.
Repairs would not be covered by your warranty.
Do not clear the inside rear window with sharp
objects.Notice:Do not apply aftermarket glass tinting
with metallic �lm. The metallic �lm in some tinting
materials will interfere with or distort the incoming
radio reception. Any damage caused to your
backglass antenna due to metallic tinting materials
will not be covered by your warranty.
XM™ Satellite Radio Antenna
System
The XM Satellite Radio antenna is located on the roof
or the rear of the vehicle. Keep the antenna clear
of obstructions for clear radio reception.
3-134
Page 459 of 514

Fuses Usage
RDO/ONSTAR Radio, OnStar®
INT LAMP Interior Lamps
LT TRN/LDWLeft Turn Signal, Lane Departure
Warning (Option)
REAR DEFOG Rear Defogger
REAR/FOG Rear Fog Lamps (Option)
RIM Rear Integration Module
RIM /RPA
/ISRVM /CLMRear Integration Module, Rear
Parking Aid, Inside Rearview Mirror,
Column Lock Module, Power
Sounder, Active Front Steering
(AFS), Supervisory Control Module
RUN/CRNKUHBEC Run, CRNK Relay Coil,
Rear Fog Lamp Relay Coil
S/ROOF Sun Roof Module (Option)
SPARE Spare
STOP LAMPS Stop Lamps
RT TRN/SZBARight Turn Signal, Side Blind Zone
Alert (Option)
Relays Usage
DIFF PUMP Rear Differential Pump (Option)
FUEL PUMP Fuel Pump
INT LAMP Interior Lamps
REAR DEFOG Rear Defogger
REAR/FOG Rear Fog Lamps (Option)
RUN/CRNK Ignition 1
SPARE Spare
STOP LAMP Stop Lamp
Circuit
BreakersUsage
WINDOW
MTRSPower Window Motors Circuit
Breaker
Diodes Usage
TRUNK DIODE Trunk Release
Joint
ConnectorUsage
J/C Splice Pack (Blue)
5-133
Page 512 of 514

Stabilitrak®System........................................... 4-6
Start Vehicle, Remote......................................2-11
Starting the Engine.........................................2-27
Steering........................................................4-12
Steering Wheel Controls, Audio.......................3-131
Steering Wheel Controls, Memory.....................2-77
Steering Wheel, Heated..................................... 3-7
Steering Wheel, Power Tilt Wheel and
Telescopic Steering Column............................ 3-6
Storage Areas
Center Console Storage Area........................2-60
Convenience Net.........................................2-60
Cupholders.................................................2-60
Glove Box..................................................2-60
Storing the Tire Sealant and Compressor Kit.........5-94
Stuck in Sand, Mud, Ice, or Snow.....................4-23
Sun Visors.....................................................2-21
Sunroof.........................................................2-60
T
Tachometer....................................................3-57
TCS Warning Light..........................................3-63
Telescopic Steering Column, Power
Tilt Wheel.................................................... 3-6
Theft - Deterrent System..................................2-21
Theft-Deterrent, Radio....................................3-130Theft-Deterrent Systems...................................2-21
Immobilizer.................................................2-24
Immobilizer Operation...................................2-24
Time, Setting..................................................3-98
Tire
Pressure Light.............................................3-65
Tire Sealant
Storing.......................................................5-94
Tires.............................................................5-54
Aluminum or Chrome-Plated Wheels,
Cleaning...............................................5-110
Buying New Tires........................................5-74
Chains.......................................................5-81
Changing a Flat Tire....................................5-94
Cleaning...................................................5-111
Compact Spare Tire...................................5-104
Different Size..............................................5-76
High-Speed Operation..................................5-65
If a Tire Goes Flat.......................................5-84
In�ation - Tire Pressure................................5-64
Inspection and Rotation................................5-71
Installing the Spare Tire................................5-97
Lifting the Vehicle........................................5-82
Pressure Monitor Operation...........................5-68
Pressure Monitor System..............................5-66
Removing the Flat Tire.................................5-97
Removing the Spare Tire and Tools...............5-96
12