Page 17 of 248

At a glance
15Reference
Controls
Driving tips
Communications
Navigation
Entertainment
Mobility
1SOS: initiating an Emergency
Request call
*213
2 Reading lamp 91
3 Interior lamps 90
4 Reading lamp 91
5 Passenger airbag status lamp
*86
6 Control Display 16
7 Hazard warning flashers
8 Central locking system 32
9 Automatic climate control
10 Hard drive for
>Audio CD 138
> Navigation DVD for Business navigation
system
*118
11 Programmable memory keys 21
12 Changing
>Radio station 141
> Track 146 14
Parking brake 52
15 Buttons on the controller 16
For selecting the menus directly
16 Controller 16
Can be turned, pressed, or moved horizon-
tally in four directions
17 Buttons for the Dynamic Driving
Control 79
18 Switching audio sources on/off and adjust-
ing volume 138
19 Ejecting of
>Audio CD 138
> Navigation DVD for Business navigation
system
*118
Air distribution
95
Automatic air distribution and
flow rate 96
Cooling function 96
Recirculated-air mode, automatic
recirculated-air control 97
Maximum cooling 96
Air flow, residual heat
utilization 96
Defrosting windows 97
Rear window defroster 97
13 Heated seats
*43
Park Distance Control PDC*77
Close the retractable hardtop 37
Open the retractable hardtop 37
Page 19 of 248
At a glance
17Reference
Controls
Driving tips
Communications
Navigation
Entertainment
Mobility
Buttons on the controller
Operating principle
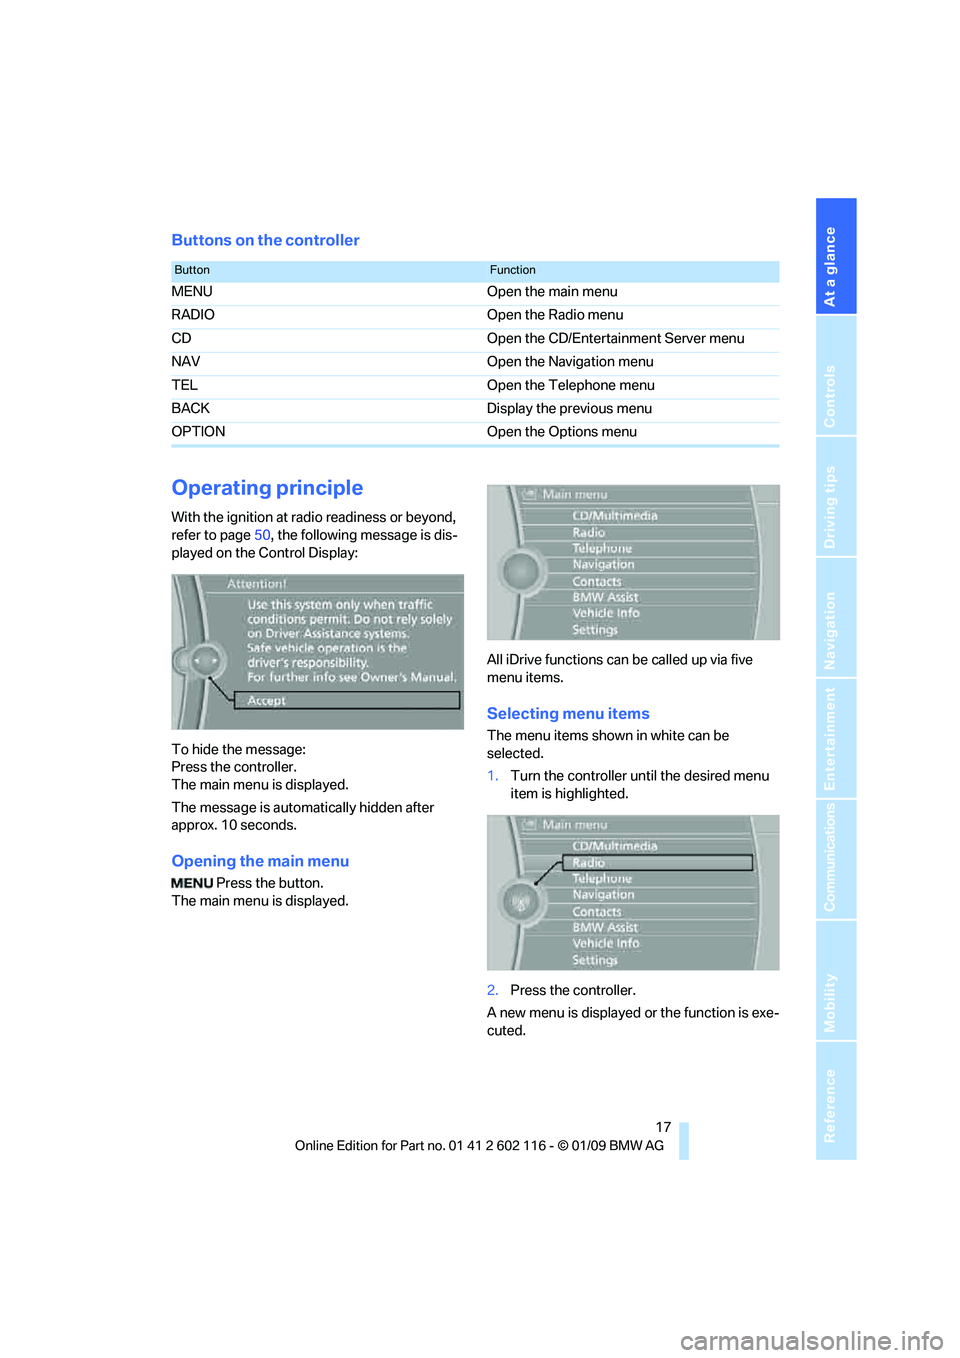
With the ignition at radio readiness or beyond,
refer to page50, the following message is dis-
played on the Control Display:
To hide the message:
Press the controller.
The main menu is displayed.
The message is automa tically hidden after
approx. 10 seconds.
Opening the main menu
Press the button.
The main menu is displayed. All iDrive functions can be called up via five
menu items.
Selecting menu items
The menu items shown in white can be
selected.
1.
Turn the controller until the desired menu
item is highlighted.
2. Press the controller.
A new menu is displayed or the function is exe-
cuted.
ButtonFunction
MENU Open the main menu
RADIO Open the Radio menu
CD Open the CD/Entertainment Server menu
NAV Open the Navigation menu
TEL Open the Telephone menu
BACK Display the previous menu
OPTION Open the Options menu
Page 21 of 248
At a glance
19Reference
Controls
Driving tips
Communications
Navigation
Entertainment
Mobility
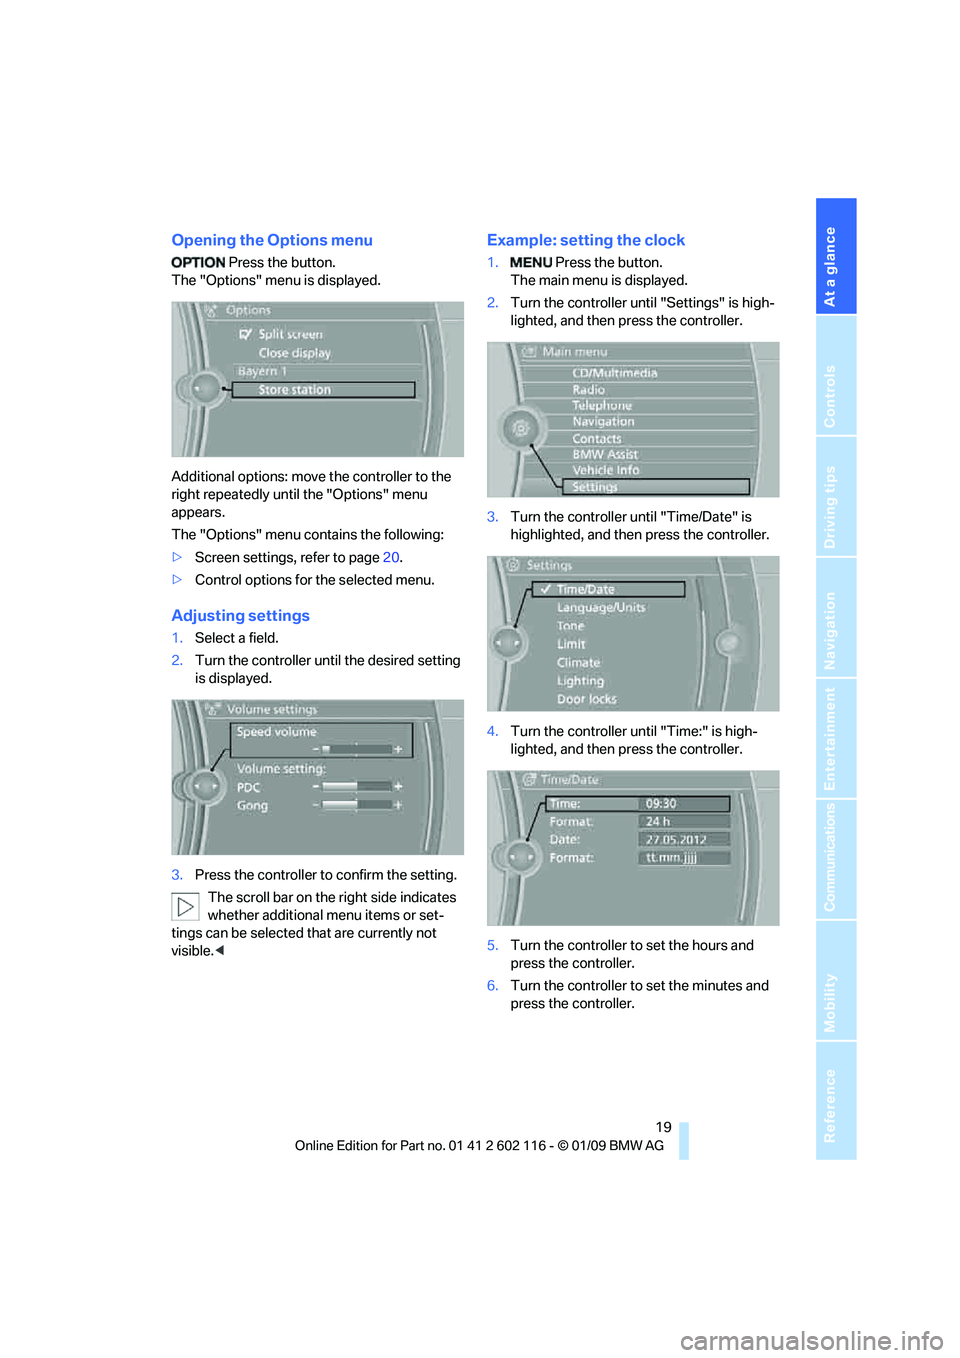
Opening the Options menu
Press the button.
The "Options" menu is displayed.
Additional options: move the controller to the
right repeatedly until the "Options" menu
appears.
The "Options" menu contains the following:
> Screen settings, refer to page 20.
> Control options for the selected menu.
Adjusting settings
1.Select a field.
2. Turn the controller unt il the desired setting
is displayed.
3. Press the controller to confirm the setting.
The scroll bar on the right side indicates
whether additional menu items or set-
tings can be selected that are currently not
visible. <
Example: setting the clock
1. Press the button.
The main menu is displayed.
2. Turn the controller unt il "Settings" is high-
lighted, and then press the controller.
3. Turn the controller un til "Time/Date" is
highlighted, and then press the controller.
4. Turn the controller until "Time:" is high-
lighted, and then press the controller.
5. Turn the controller to set the hours and
press the controller.
6. Turn the controller to set the minutes and
press the controller.
Page 23 of 248
At a glance
21Reference
Controls
Driving tips
Communications
Navigation
Entertainment
Mobility
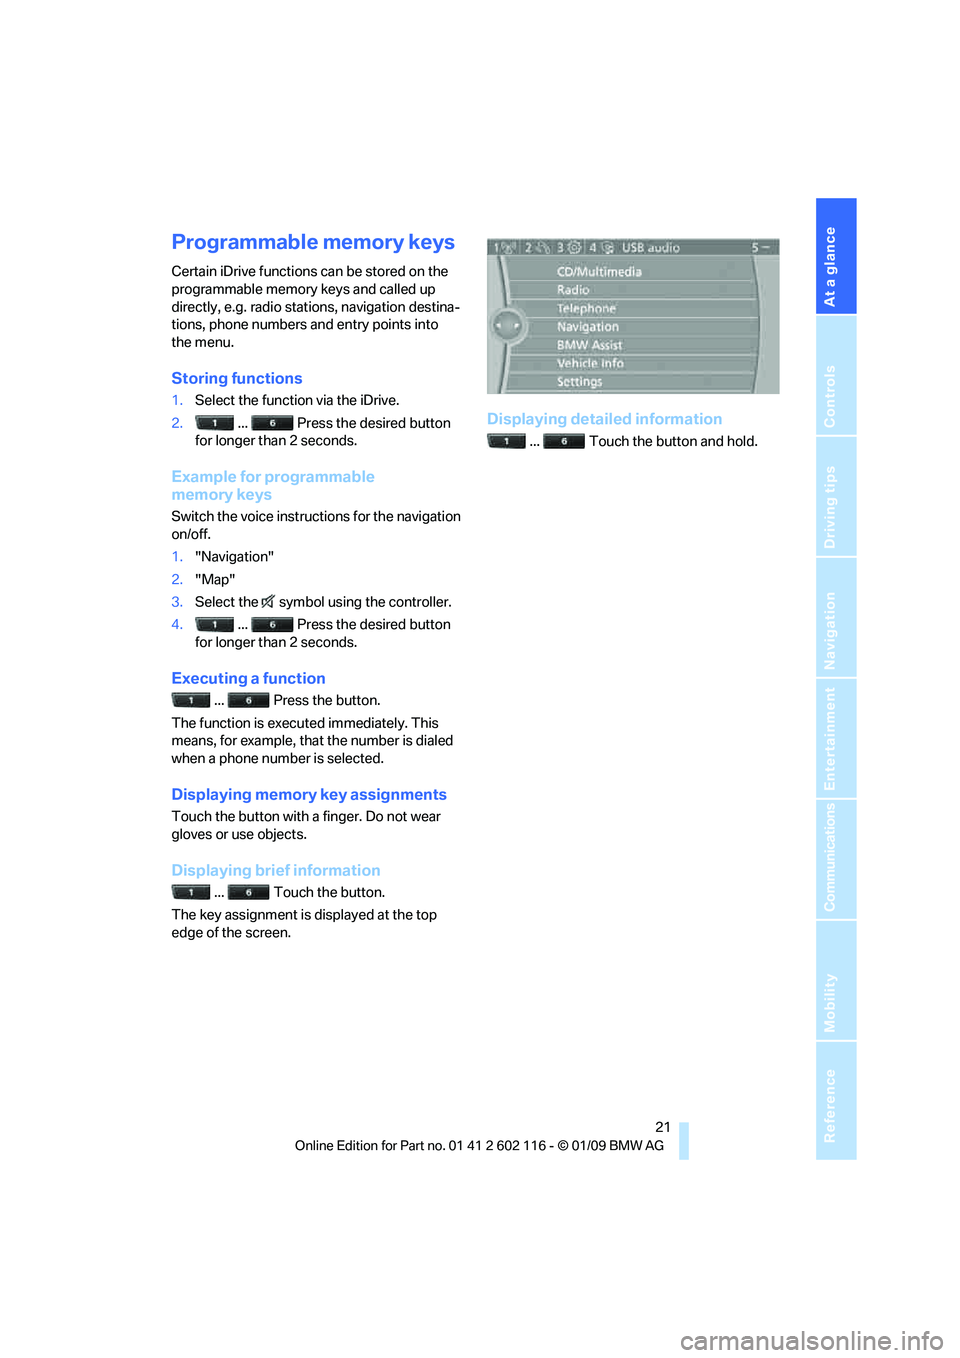
Programmable memory keys
Certain iDrive functions can be stored on the
programmable memory keys and called up
directly, e.g. radio stations, navigation destina-
tions, phone numbers and entry points into
the menu.
Storing functions
1. Select the function via the iDrive.
2. ... Press the desired button
for longer than 2 seconds.
Example for programmable
memory keys
Switch the voice instructions for the navigation
on/off.
1. "Navigation"
2. "Map"
3. Select the symbol using the controller.
4. ... Press the desired button
for longer than 2 seconds.
Executing a function
... Press the button.
The function is executed immediately. This
means, for example, that the number is dialed
when a phone number is selected.
Displaying memory key assignments
Touch the button with a finger. Do not wear
gloves or use objects.
Displaying brief information
... Touch the button.
The key assignment is displayed at the top
edge of the screen.
Displaying detailed information
... Touch the button and hold.
Page 25 of 248

At a glance
23Reference
Controls
Driving tips
Communications
Navigation
Entertainment
Mobility
Voice activation system
The concept
The voice activation system allows you to con-
trol operation of various vehicle systems with-
out removing your hands from the steering
wheel.
Individual menu items on the Control Display
can be spoken as commands. It is not neces-
sary to use the controller.
The voice activation system transforms your
oral commands into control signals for the
selected systems and provides support in the
form of instructions or questions.
the voice activation system uses a special
microphone located in the area of the steering
column.
Precondition
Via iDrive, select the language in which the
voice activation system is operating, so that the
spoken commands can be identified. Selecting
the language for iDrive, refer to page 75.
Symbols in the Owner's Manual
Saying commands
Activating voice activation system
1. Press the button on the steering wheel.
This symbol on the Control Display and
an acoustic signal indicate that the voice ac-
tivation system is ready to receive spoken
commands.
2. Say the command.
The command appears on the Control
Display.
This symbol appears on the Control Display
when you can enter additional commands.
If no further commands are possible, continue
by operating the item of equipment via iDrive.
{
...} Say the specified commands word
for word.
{{ ...}} Indicates responses of the voice acti-
vation system.
Page 27 of 248
At a glance
25Reference
Controls
Driving tips
Communications
Navigation
Entertainment
Mobility
Page 29 of 248
Controls
This chapter is intended to provide you with
information for complete control of your vehicle. All features and accessories that are useful for
driving and your safety, comfort andconvenience are described here.
Controls
Page 31 of 248

Controls
29Reference
At a glance
Driving tips
Communications
Navigation
Entertainment
Mobility
>Settings for the display on the Control Dis-
play and in the instrument cluster:
>12h/24h format of the clock, refer to
page 71
> Date format, refer to page 72
> Brightness of Control Display, refer to
page 76
> Language on the Control Display, refer
to page 75
> Units of measure for fuel consumption,
distance covered/remaining distances,
and temperature, refer to page 68
> Show visual warning for Park Distance Con-
trol PDC
*, refer to page 77
> Light settings:
>Welcome lamps, refer to page 88
> Pathway lighting, refer to page 89
> Daytime running lamps, refer to page 89
> Automatic climate control: activating/deac-
tivating AUTO program, cooling function
and automatic recirculated-air control, set-
ting temperature, air fl ow rate and distribu-
tion, refer to page 95 ff
> Entertainment:
>Audio volume, refer to page 138
> Tone control, refer to page 138
> Volume, refer to page 139
Central locking system
The concept
The central locking system functions when the
driver's door is closed.
The system simultaneously engages and
releases the locks on the following:
>Doors
> Luggage compartment lid
> Fuel filler door
> Center armrest
*
Operating from outside
>Via the remote control
> Using the door lock
> In cars with convenient access
*, via the
handles on the driver's and passenger's
doors
In addition, if the remo te control is used, the
welcome lamps, interior lamps and the door's
courtesy lamps
* are switched on or off. The
alarm system
* is also armed or disarmed.
For further details of the alarm system,
refer to
page 33.
Operating from inside
By means of the button for central locking, refer
to page 32.
In the event of a sufficiently severe accident, the
central locking system un locks automatically. In
addition, the hazard warning flashers and inte-
rior lamps come on.
Opening and closing:
Using the remote control
Persons or animals in a parked vehicle
could lock the doors from the inside. You
should therefore take the remote control with
you when you leave the ve hicle so that the latter
can be opened from outside. <
To operate the retractable hardtop with
the remote control, the doors and lug-
gage compartment lid must be closed and the
cargo bay partition must be folded down and
engaged on both sides. Refer also to page38.<
Unlocking
Press the button.
The interior lamps, the courtesy lamps
* and the
welcome lamps come on.
Setting unlocking characteristics
You can set whether only the driver's door or
the entire vehicle is to be unlocked when the
button is pressed for the first time.