2009 BMW Z4 SDRIVE30I ROADSTER low beam
[x] Cancel search: low beamPage 12 of 248
Cockpit
10
Cockpit
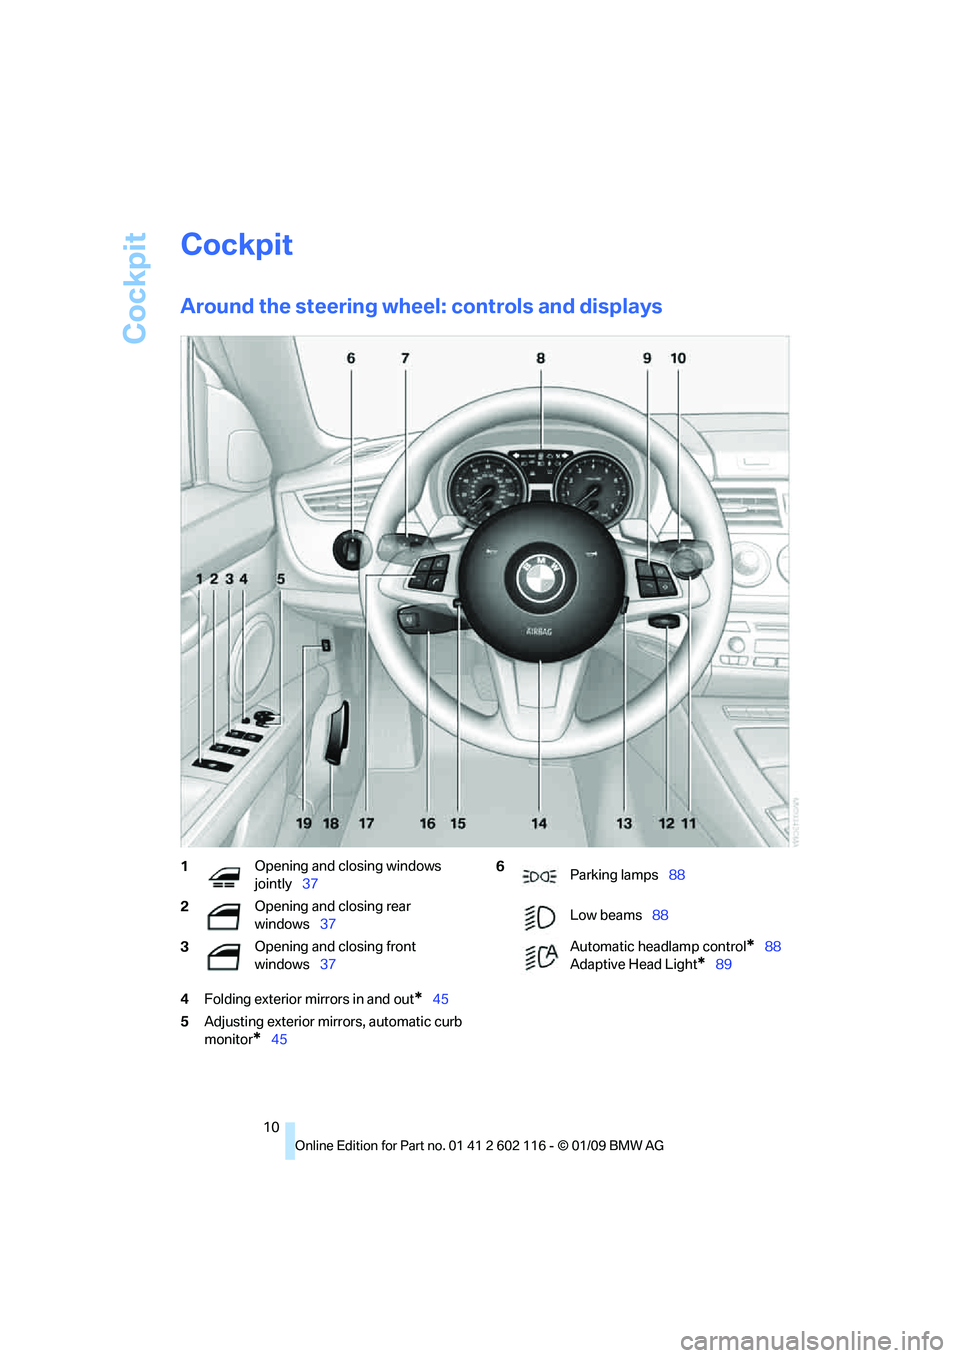
Around the steering wheel: controls and displays
4Folding exterior mirrors in and out*45
5 Adjusting exterior mirrors, automatic curb
monitor
*45
1 Opening and closing windows
jointly
37
2 Opening and closing rear
windows
37
3 Opening and closing front
windows
376
Parking lamps 88
Low beams 88
Automatic headlamp control
*88
Adaptive Head Light
*89
Page 15 of 248
At a glance
13Reference
Controls
Driving tips
Communications
Navigation
Entertainment
Mobility
Indicator and warning lamps
The concept
Indicator and warning lamps can light up in a
variety of combinations and colors.
Some lamps are checked for proper functioning
and thus come on briefly when the engine is
started or the ignition is switched on.
Explanatory text messages
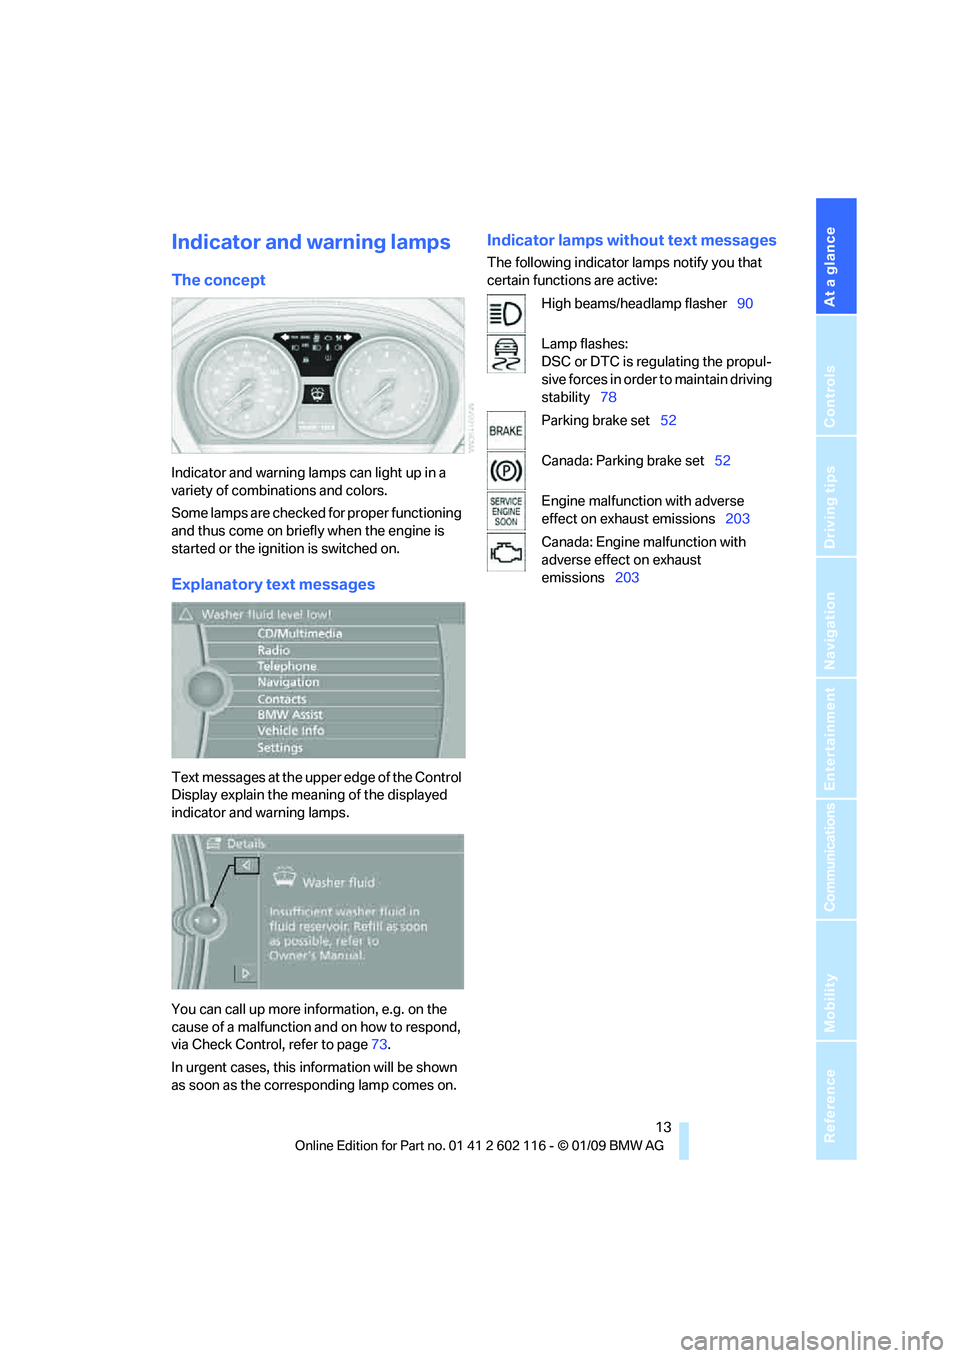
Text messages at the upper edge of the Control
Display explain the meaning of the displayed
indicator and warning lamps.
You can call up more information, e.g. on the
cause of a malfunction and on how to respond,
via Check Control, refer to page 73.
In urgent cases, this information will be shown
as soon as the corresponding lamp comes on.
Indicator lamps without text messages
The following indicator lamps notify you that
certain functions are active:
High beams/headlamp flasher 90
Lamp flashes:
DSC or DTC is regulating the propul-
sive forces in order to maintain driving
stability 78
Parking brake set 52
Canada: Parking brake set 52
Engine malfunction with adverse
effect on exhaust emissions 203
Canada: Engine malfunction with
adverse effect on exhaust
emissions 203
Page 78 of 248
Everything under control
76
Volume of the warning signals*
You can raise or lower the volume of the warn-
ing signals, e.g. the 'fasten safety belts'
reminder, relative to the entertainment sound
output. The warning signals have a fixed mini-
mum and maximum volume that cannot be
dropped below or exceeded.
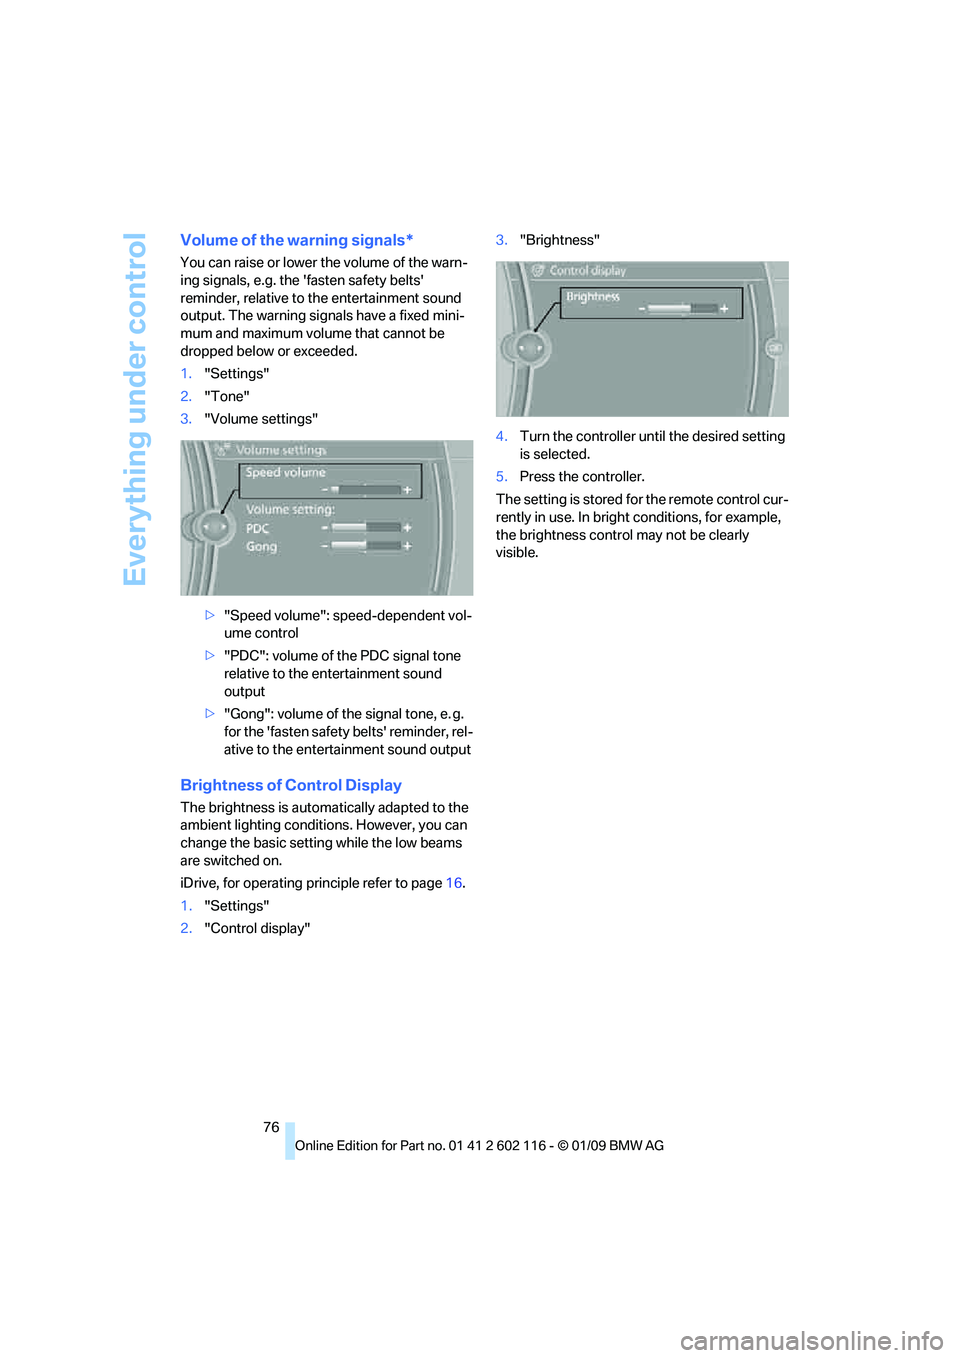
1."Settings"
2. "Tone"
3. "Volume settings"
>"Speed volume": speed-dependent vol-
ume control
> "PDC": volume of the PDC signal tone
relative to the entertainment sound
output
> "Gong": volume of the signal tone, e. g.
for the 'fasten safety belts' reminder, rel-
ative to the entertainment sound output
Brightness of Control Display
The brightness is automa tically adapted to the
ambient lighting conditio ns. However, you can
change the basic setting while the low beams
are switched on.
iDrive, for operating pr inciple refer to page16.
1. "Settings"
2. "Control display" 3.
"Brightness"
4. Turn the controller until the desired setting
is selected.
5. Press the controller.
The setting is stored fo r the remote control cur-
rently in use. In bright conditions, for example,
the brightness control may not be clearly
visible.
Page 90 of 248
Lamps
88
Lamps
Parking lamps/low beams
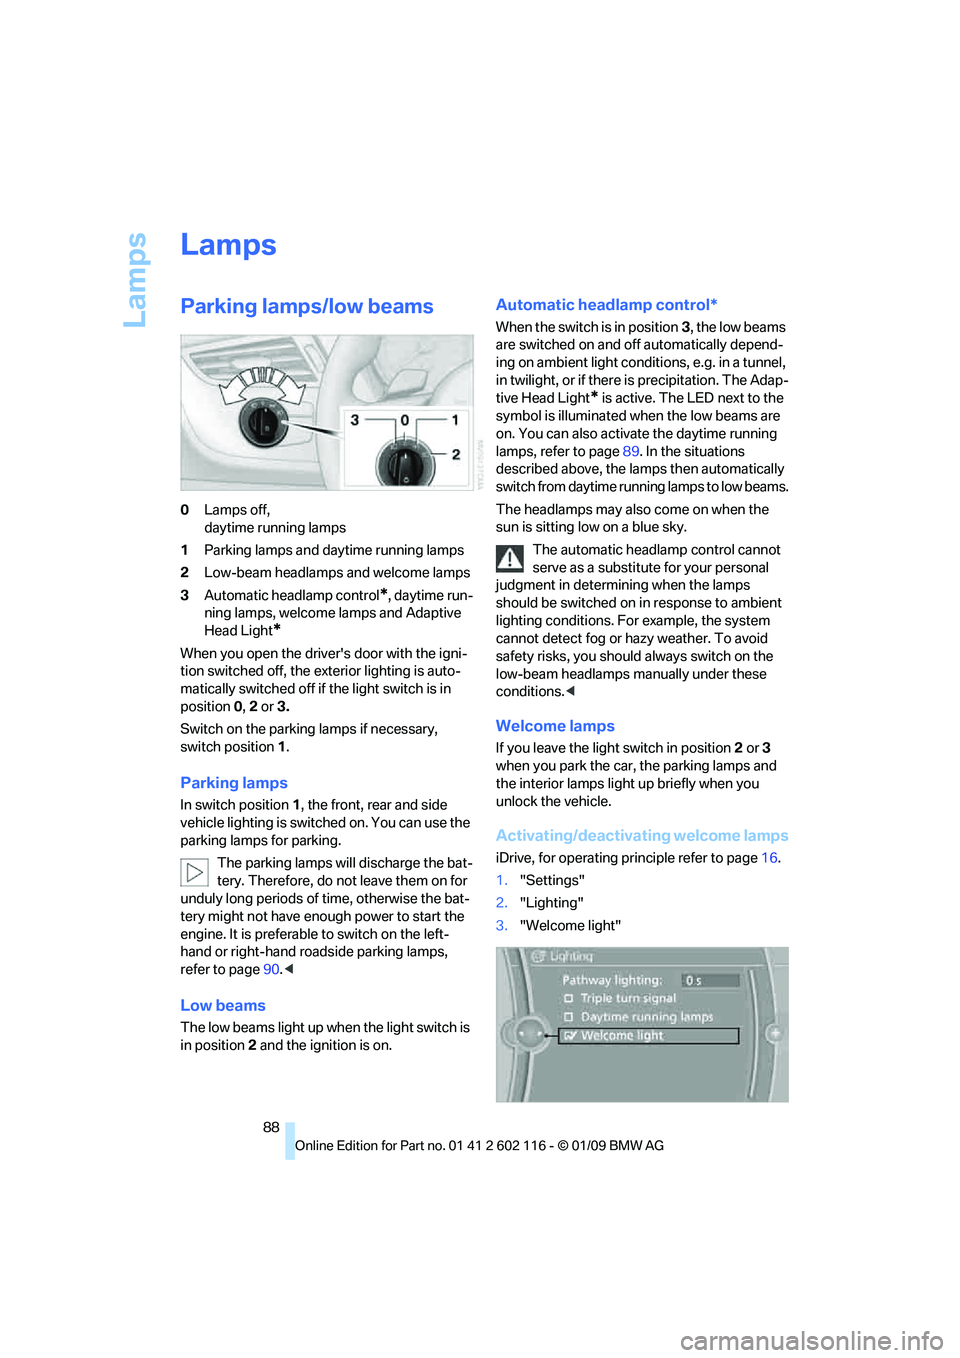
0Lamps off,
daytime running lamps
1 Parking lamps and daytime running lamps
2 Low-beam headlamps and welcome lamps
3 Automatic headlamp control
*, daytime run-
ning lamps, welcome lamps and Adaptive
Head Light
*
When you open the driver's door with the igni-
tion switched off, the exterior lighting is auto-
matically switched off if the light switch is in
position 0, 2 or 3.
Switch on the parkin g lamps if necessary,
switch position 1.
Parking lamps
In switch position 1, the front, rear and side
vehicle lighting is switch ed on. You can use the
parking lamps for parking.
The parking lamps will discharge the bat-
tery. Therefore, do not leave them on for
unduly long periods of time, otherwise the bat-
tery might not have enou gh power to start the
engine. It is preferable to switch on the left-
hand or right-hand ro adside parking lamps,
refer to page 90.<
Low beams
The low beams light up wh en the light switch is
in position 2 and the ignition is on.
Automatic headlamp control*
When the switch is in position 3, the low beams
are switched on and off automatically depend-
ing on ambient light conditions, e.g. in a tunnel,
in twilight, or if there is precipitation. The Adap-
tive Head Light
* is active. The LED next to the
symbol is illuminated when the low beams are
on. You can also activate the daytime running
lamps, refer to page 89. In the situations
described above, the la mps then automatically
switch from daytime runn ing lamps to low beams.
The headlamps may also come on when the
sun is sitting low on a blue sky. The automatic headla mp control cannot
serve as a substitute for your personal
judgment in determin ing when the lamps
should be switched on in response to ambient
lighting conditions. For example, the system
cannot detect fog or hazy weather. To avoid
safety risks, you should always switch on the
low-beam headlamps ma nually under these
conditions. <
Welcome lamps
If you leave the light switch in position 2 or 3
when you park the car, the parking lamps and
the interior lamps light up briefly when you
unlock the vehicle.
Activating/deactivating welcome lamps
iDrive, for operating pr inciple refer to page16.
1. "Settings"
2. "Lighting"
3. "Welcome light"
Page 91 of 248
Controls
89Reference
At a glance
Driving tips
Communications
Navigation
Entertainment
Mobility
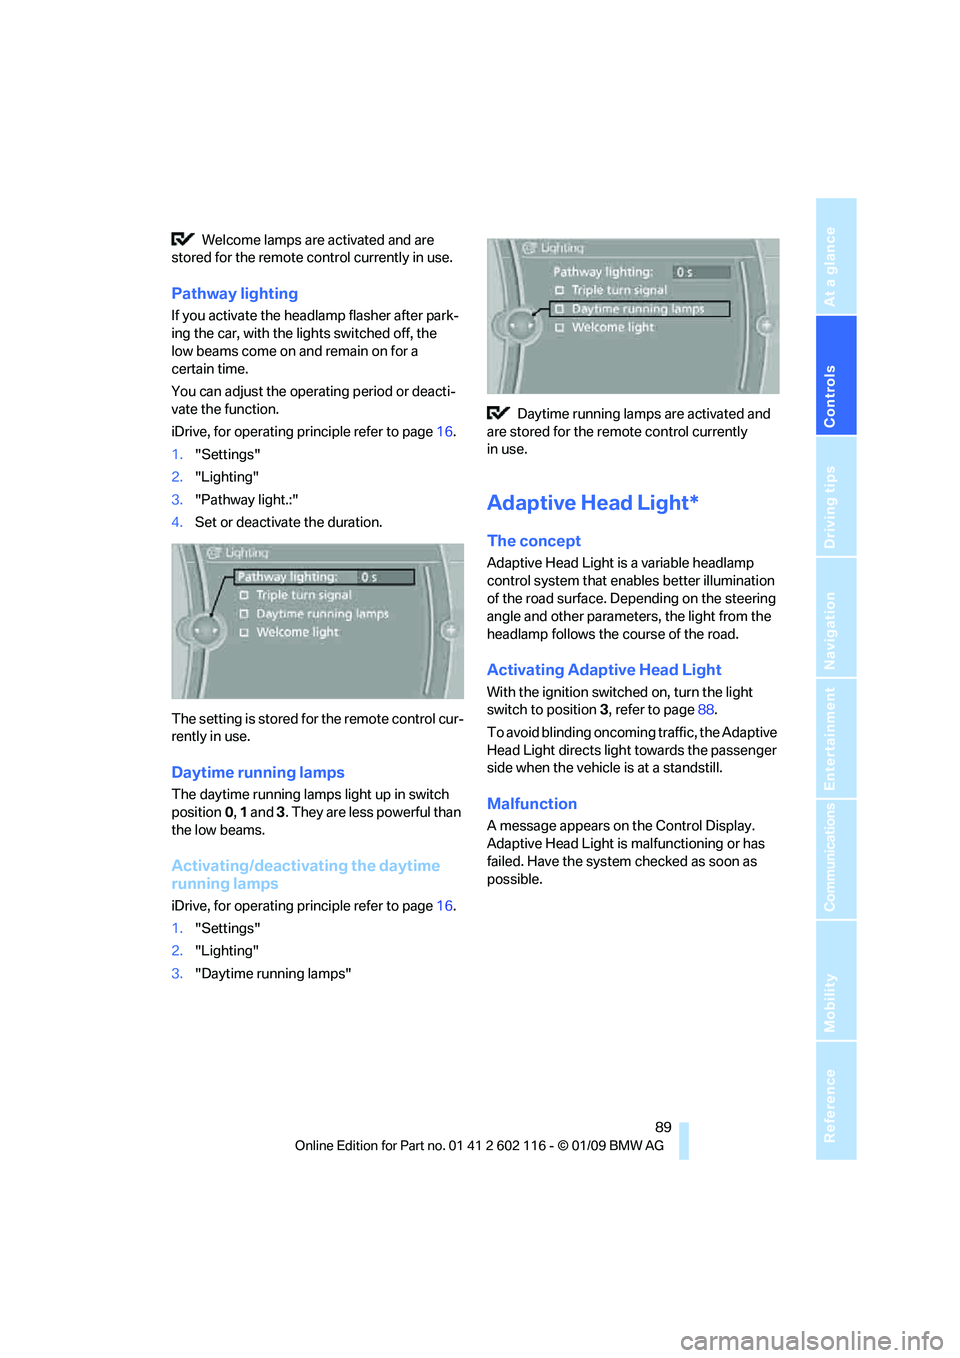
Welcome lamps are activated and are
stored for the remote control currently in use.
Pathway lighting
If you activate the head lamp flasher after park-
ing the car, with the lig hts switched off, the
low beams come on and remain on for a
certain time.
You can adjust the operating period or deacti-
vate the function.
iDrive, for operating principle refer to page 16.
1. "Settings"
2. "Lighting"
3. "Pathway light.:"
4. Set or deactivate the duration.
The setting is stored for the remote control cur-
rently in use.
Daytime running lamps
The daytime running lamps light up in switch
position 0, 1 and 3. They are less powerful than
the low beams.
Activating/deactivating the daytime
running lamps
iDrive, for operating principle refer to page 16.
1. "Settings"
2. "Lighting"
3. "Daytime running lamps" Daytime running lamps are activated and
are stored for the remote control currently
in use.
Adaptive Head Light*
The concept
Adaptive Head Light is a variable headlamp
control system that en ables better illumination
of the road surface. Depending on the steering
angle and other parameters, the light from the
headlamp follows the course of the road.
Activating Adapti ve Head Light
With the ignition switched on, turn the light
switch to position 3, refer to page 88.
To avoid blinding oncoming traffic, the Adaptive
Head Light directs light towards the passenger
side when the vehicle is at a standstill.
Malfunction
A message appears on the Control Display.
Adaptive Head Light is malfunctioning or has
failed. Have the system checked as soon as
possible.
Page 92 of 248
Lamps
90
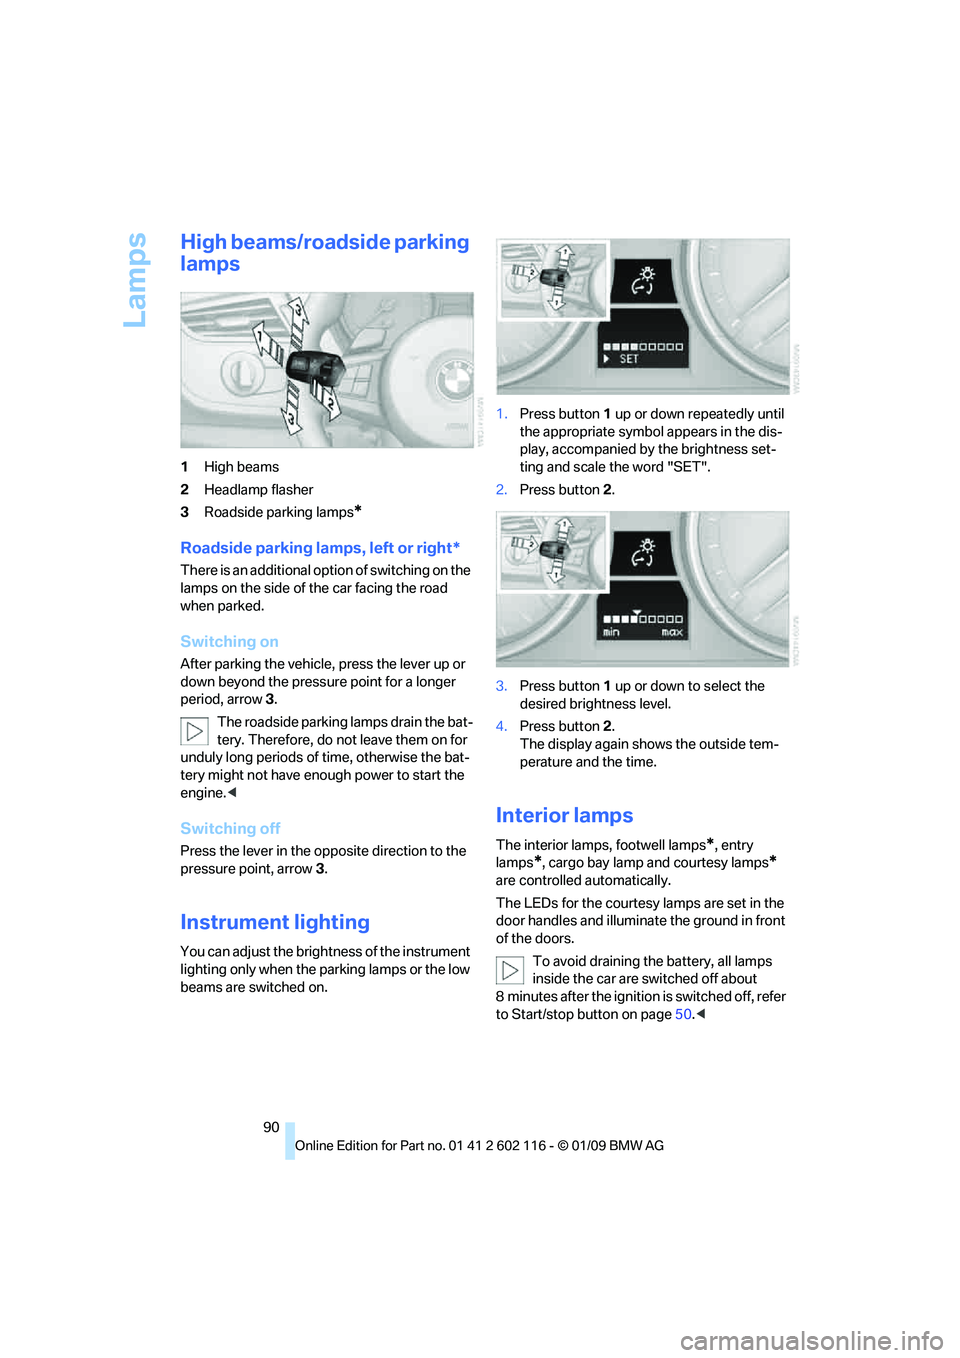
High beams/roadside parking
lamps
1High beams
2 Headlamp flasher
3 Roadside parking lamps
*
Roadside parking lamps, left or right*
There is an additional option of switching on the
lamps on the side of the car facing the road
when parked.
Switching on
After parking the vehicle, press the lever up or
down beyond the pressu re point for a longer
period, arrow 3.
The roadside parking lamps drain the bat-
tery. Therefore, do not leave them on for
unduly long periods of time, otherwise the bat-
tery might not have enou gh power to start the
engine. <
Switching off
Press the lever in the opposite direction to the
pressure point, arrow 3.
Instrument lighting
You can adjust the brightness of the instrument
lighting only when the parking lamps or the low
beams are switched on. 1.
Press button 1 up or down repeatedly until
the appropriate symbol appears in the dis-
play, accompanied by the brightness set-
ting and scale the word "SET".
2. Press button 2.
3. Press button 1 up or down to select the
desired brightness level.
4. Press button 2.
The display again shows the outside tem-
perature and the time.
Interior lamps
The interior lamps, footwell lamps*, entry
lamps
*, cargo bay lamp and courtesy lamps*
are controlled automatically.
The LEDs for the courtesy lamps
are set in the
door handles and illuminate the ground in front
of the doors.
To avoid draining the battery, all lamps
inside the car are switched off about
8 minutes after the ignition is switched off, refer
to Start/stop button on page 50.<
Page 209 of 248
Mobility
207Reference
At a glance
Controls
Driving tips
Communications
Navigation
Entertainment
Interior plastic parts
>Imitation leather surfaces
> Lamp glasses
> Display pane of instrument cluster
> Matt parts
Clean with water and solvent-free plastic
cleaner if necessary.
Fine wood parts
Clean fine wood trim and fine wood parts with a
damp cloth. Wipe dry with a soft cloth.
Safety belts
Dirty belt straps impede the reeling action and
thus have a negative impact on safety.
Do not clean with cleaning agents as
these may destroy the fabric. <
Use only a mild soapy solution, with the safety
belts clipped into their buckles. Do not allow the
reels to retract the safety belts until they are dry.
Interior sensors / cameras
To clean interior sensors and cameras, e.g. of
the High-Beam Assistant, use a lint-free cloth
moistened with glass cleaner.
Displays
To clean the displays, e.g. of the radio or instru-
ment cluster, use a display cleaning cloth or a
soft, non-abrasive, lint-free cloth.
Avoid applying excessive pressure when
cleaning the displays, otherwise damage
may occur. <
Do not use chemical or abrasive house-
hold cleaning agents. Keep all types of
fluid away from the device. Otherwise, surfaces
or electrical components may be corroded or
damaged. <
CD/DVD drives
Do not use a cleaning CD, as it may dam-
age parts of the drive. <
Vehicle storage
If your vehicle is to be decommissioned for
longer than three months, your BMW center or
a workshop that operates according to BMW
specifications will be glad to advise you.
Page 218 of 248
Giving and receiving assistance
216
Being towed
Make sure that the ignition is switched on,
refer to page50, otherwise the low-beam
headlamps, tail lamps, turn signal indicators and
windshield wipers may be unavailable.
If the electrical system fails, do not tow-start or
tow the vehicle. The electrical steering wheel
lock cannot be released and the vehicle cannot
be steered. Jump-starting, refer to page 214.
Power steering assistance is not available when
the engine is not running. Thus, braking and
steering will requir e increased effort.<
Manual transmission
Gearshift lever in neutral position.
Automatic transmission
Selector lever in position N.
Changing selector leve r positions, refer to
page 54.
Do not exceed a towing speed of 31 mph
or 50 km/h and a towing distance of
31 miles/50 km, otherwise the automatic trans-
mission may be damaged. <
7-gear sport automatic transmission
with dual clutch
Ensure that transmission lock P is not
engaged as the rear wheels will otherwise
be blocked.
When using the car wash function, refer to
page 205, note that the parking lock P is
engaged automatically after approx. 30 min-
utes, blocking the rear wheels.
If an electrical malfunction occurs or if towing
takes longer than approx. 20 minutes, manually
release the parking lock, refer to page 58.<
Do not exceed a towing speed of 31 mph
or 50 km/h and a towing distance of
31 miles/50 km, otherwise the 7-gear sport
automatic transmission may be damaged. <
Towing methods
Do not lift the vehicle by a tow fitting or
body and chassis parts, otherwise dam-
age may result. <
With a tow bar
The towing vehicle must not be lighter
than the towed vehicle, otherwise it may
be impossible to maintain control. <
The tow fittings used should be on the same
side on both vehicles. Should it prove impossi-
ble to avoid mounting the tow bar at an angle,
please observe the following:
> Clearance and maneuvering capability will
be sharply limited during cornering.
> The tow bar will generate la teral forces if it is
attached offset.
Attach the tow bar to the tow fittings only,
as attaching it to othe r parts of the vehicle
could result in damage. <
With a tow rope
When starting off in the towing vehicle, make
sure that the tow rope is taut.
To avoid jerking and the associated
stresses on vehicle components when
towing, always use nylon ropes or nylon straps.
Attach the tow rope to the tow fittings only, as
attaching it to other pa rts of the vehicle could
result in damage. <
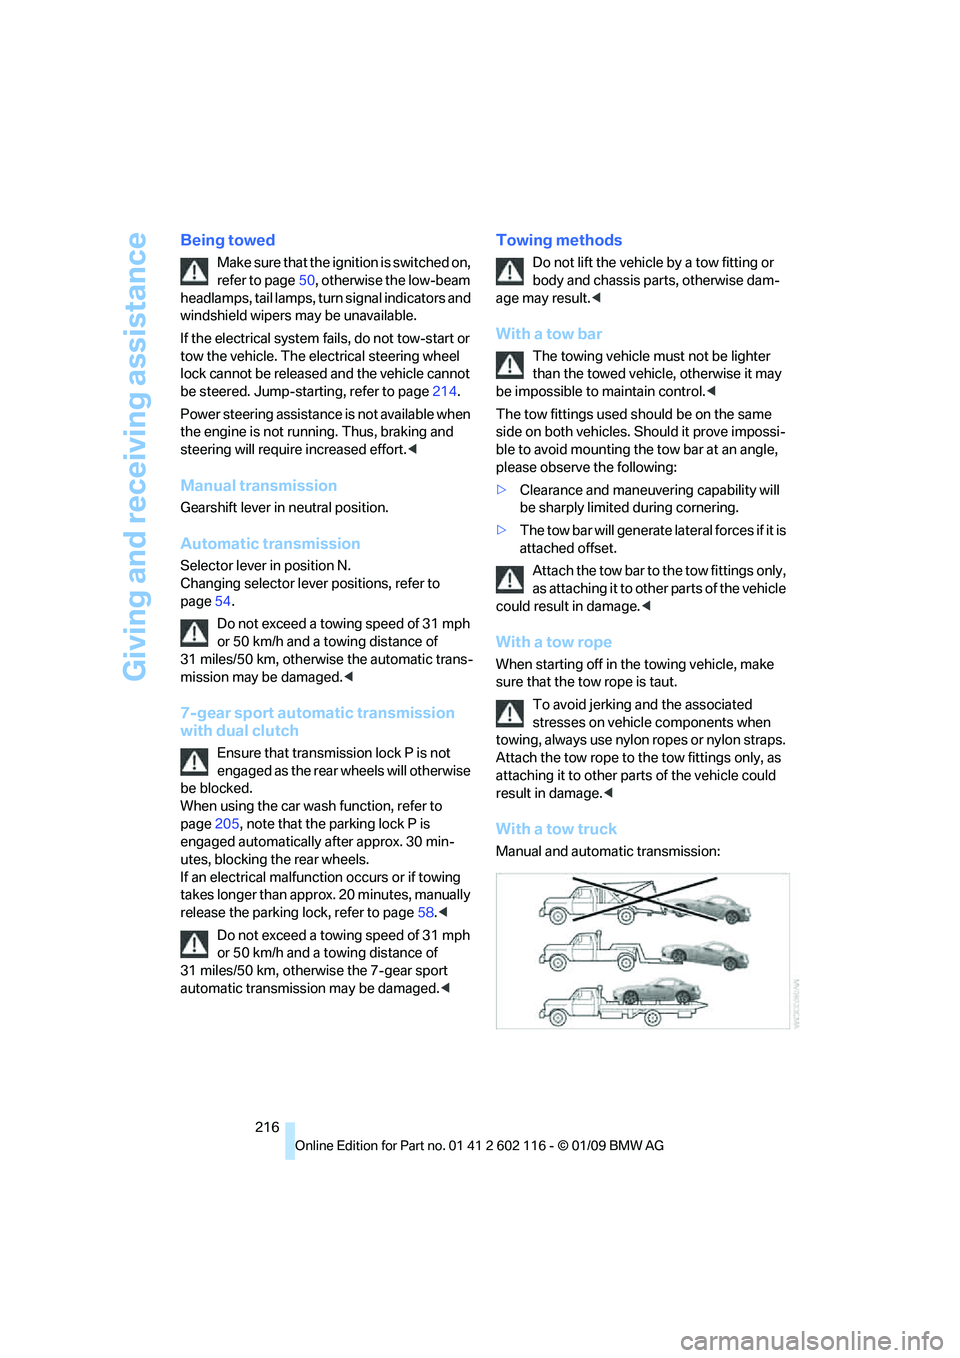
With a tow truck
Manual and automatic transmission: