2009 BMW Z4 SDRIVE30I ROADSTER wipers
[x] Cancel search: wipersPage 13 of 248
At a glance
11Reference
Controls
Driving tips
Communications
Navigation
Entertainment
Mobility
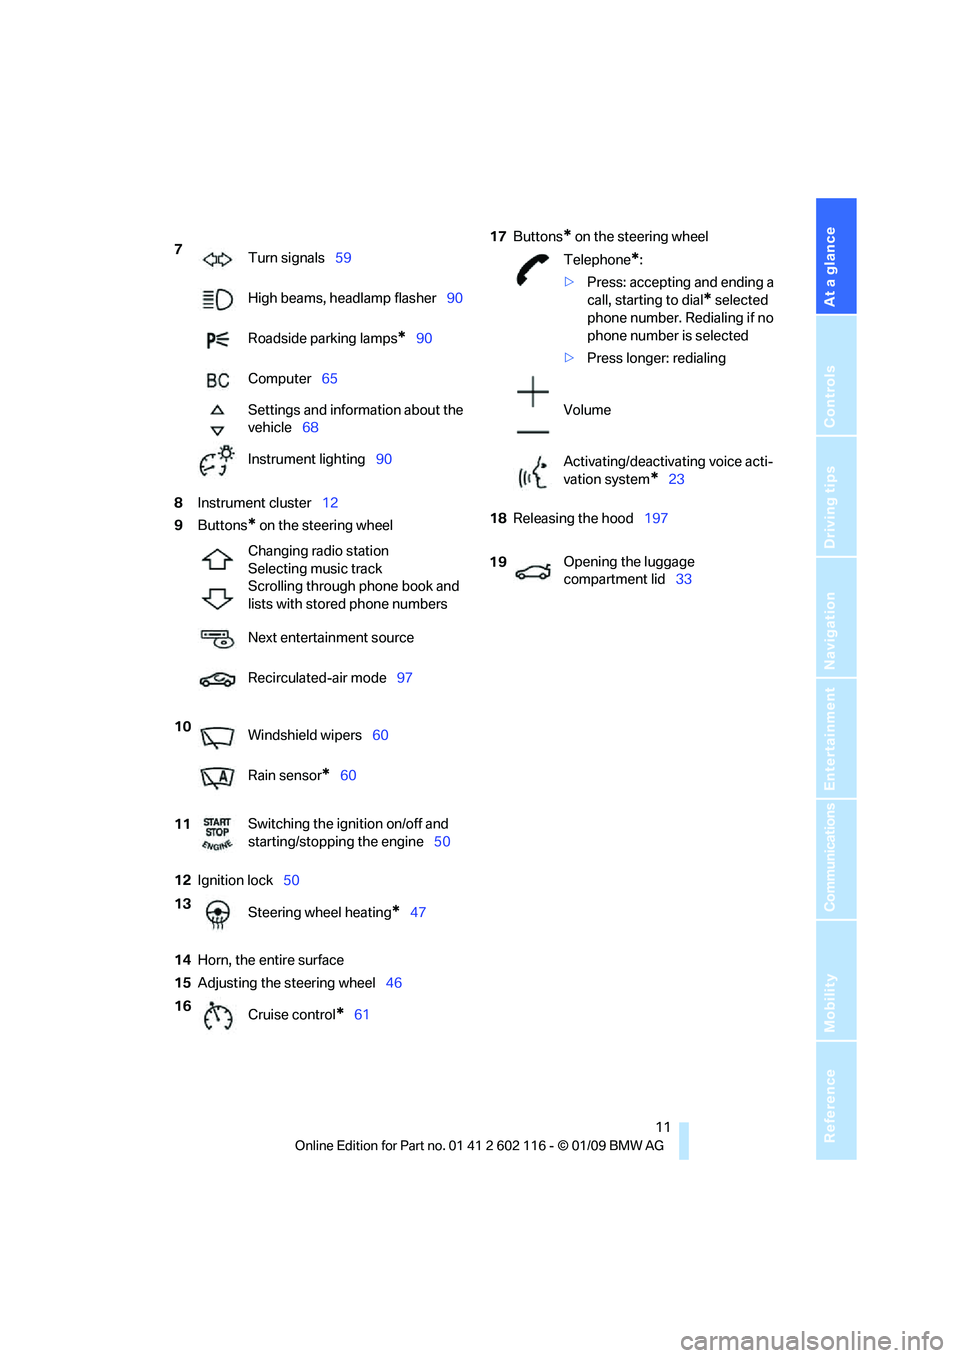
8Instrument cluster 12
9 Buttons
* on the steering wheel
12 Ignition lock 50
14 Horn, the entire surface
15 Adjusting the steering wheel 4617
Buttons
* on the steering wheel
18 Releasing the hood 197
7
Turn signals 59
High beams, headlamp flasher 90
Roadside parking lamps
*90
Computer 65
Settings and information about the
vehicle 68
Instrument lighting 90
Changing radio station
Selecting music track
Scrolling through phone book and
lists with stored phone numbers
Next entertainment source
Recirculated-air mode 97
10 Windshield wipers 60
Rain sensor
*60
11 Switching the ignition on/off and
starting/stopping the engine
50
13 Steering wheel heating
*47
16 Cruise control
*61
Telephone*:
> Press: accepting and ending a
call, starting to dial
* selected
phone number. Redialing if no
phone number is selected
> Press longer: redialing
Volume
Activating/deactivating voice acti-
vation system
*23
19 Opening the luggage
compartment lid
33
Page 62 of 248
Driving
60
Wiper system
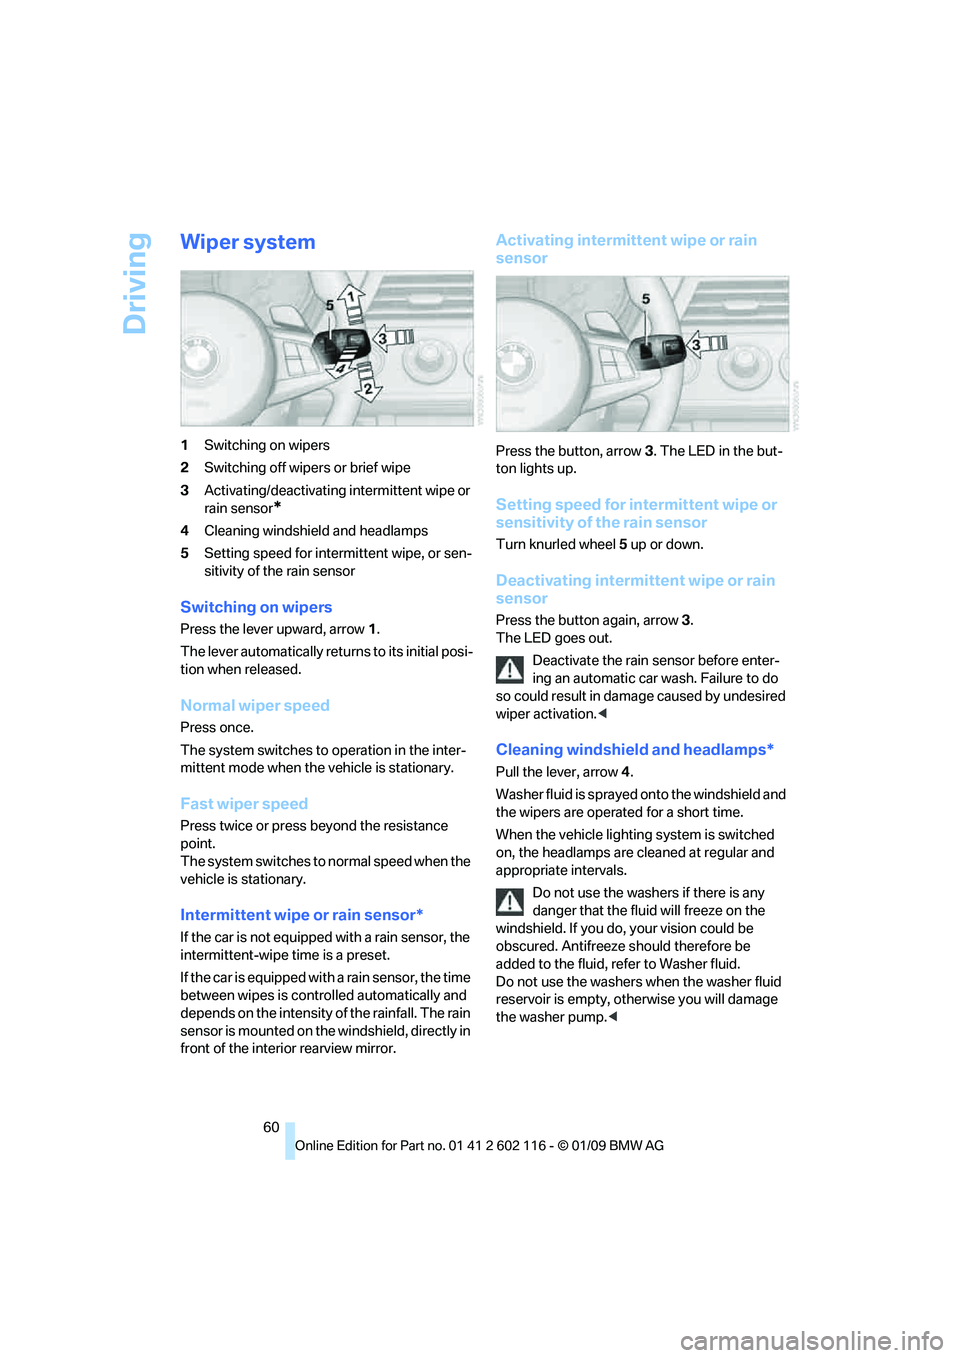
1Switching on wipers
2 Switching off wipers or brief wipe
3 Activating/deactivating intermittent wipe or
rain sensor
*
4Cleaning windshield and headlamps
5 Setting speed for intermittent wipe, or sen-
sitivity of the rain sensor
Switching on wipers
Press the lever upward, arrow 1.
The lever automatically retu rns to its initial posi-
tion when released.
Normal wiper speed
Press once.
The system switches to operation in the inter-
mittent mode when the vehicle is stationary.
Fast wiper speed
Press twice or press beyond the resistance
point.
The system switches to normal speed when the
vehicle is stationary.
Intermittent wipe or rain sensor*
If the car is not equipped with a rain sensor, the
intermittent-wipe time is a preset.
If the car is equipped with a rain sensor, the time
between wipes is contro lled automatically and
depends on the intensity of the rainfall. The rain
sensor is mounted on the windshield, directly in
front of the interior rearview mirror.
Activating intermitte nt wipe or rain
sensor
Press the button, arrow 3. The LED in the but-
ton lights up.
Setting speed for inte rmittent wipe or
sensitivity of the rain sensor
Turn knurled wheel 5 up or down.
Deactivating intermit tent wipe or rain
sensor
Press the button again, arrow 3.
The LED goes out.
Deactivate the rain sensor before enter-
ing an automatic car wash. Failure to do
so could result in damage caused by undesired
wiper activation. <
Cleaning windshield and headlamps*
Pull the lever, arrow 4.
Washer fluid is sprayed onto the windshield and
the wipers are operated for a short time.
When the vehicle lighting system is switched
on, the headlamps are cleaned at regular and
appropriate intervals. Do not use the washers if there is any
danger that the fluid will freeze on the
windshield. If you do, your vision could be
obscured. Antifreeze should therefore be
added to the fluid, refer to Washer fluid.
Do not use the washers when the washer fluid
reservoir is empty, ot herwise you will damage
the washer pump.<
Page 206 of 248
Care
204
Care
Care products
Regular cleaning and care contributes signifi-
cantly to the value retention of your BMW.
BMW recommends cleaning and caring for your
vehicle with products that are approved by
BMW for this purpose.
Your BMW center will be happy to advise you on
the products and services available for cleaning
and caring for your BMW.
Original BMW CareProducts have been
material tested, labo ratory checked and
proven in the field, and offer optimal care and
protection for your vehicle. <
Do not use cleaners that contain alcohol
or solvents as these may result in
damage. <
Cleaning agents can contain substances
that are dangerous or hazardous to your
health. Therefore, follow the warning and safety
instructions on the packaging. When cleaning
inside the vehicle, always open the doors or
windows of the vehicle. In enclosed areas, pro-
vide for sufficient ventilation. Only use products
designed for cleaning vehicles. <
Exterior care
Washing the vehicle
Especially during the winter months,
ensure that the vehicle is washed more
frequently. Heavy soiling and road salt can lead
to vehicle damage. <
After washing the vehicle, apply the
brakes briefly to dry them, otherwise
water can reduce braking efficiency over the
short term and brake discs can corrode. <
Automatic car washes
Preference should be given to cloth car washes.
Do not use high-pressure car washes,
otherwise water may drip into the vehicle
around the windows. <
Before driving into a car wash, ensure that it is
suitable for your BMW. Check the following:
> Dimensions of your vehicle, refer to
page 221.
> If necessary: fold in the exterior mirrors,
refer to page 45.
> Maximum permissible tire width.
Avoid car washes with guide rail heights
over 4 in/10 cm, otherwise there is danger
of damaging chassis parts. <
Preparations before driv ing into an automatic
car wash:
> Unscrew the rod antenna
*
>Deactivate the rain sensor* to avoid unin-
tentional activation of the wipers.
> Remove additional attachments, e.g.
spoiler or telephone an tennas, if there is a
possibility that they could be damaged.
Automatic transmission
Before driving into an automatic car wash, per-
form the following steps to ensure that the vehi-
cle can roll:
1. Insert the remote cont rol, even with conve-
nient access, into the ignition lock.
2. Move the selector lever to position N.
3. Release the parking brake.
4. Switch off the engine.
5. Leave the remote control in the ignition lock
so that the vehicle can roll.
Page 207 of 248
Mobility
205Reference
At a glance
Controls
Driving tips
Communications
Navigation
Entertainment
7-gear sport automatic transmission
with dual clutch
Before driving into an automatic car wash, per-
form the following steps to ensure that the vehi-
cle can roll:
1. Insert the remote control, even with conve-
nient access, into the ignition lock.
2. Engage transmission position N.
3. Release the parking brake.
4. Switch off the engine.
5. Leave the remote control in the ignition lock
so that the vehicle can roll.
Transmission position P is engaged:
> Automatically after approx. 30 minutes
> When you take the remo te control out of the
ignition lock
Steam jets / high -pressure washers
When using steam jets or high-pressure
washers, ensure that you maintain suffi-
cient clearance to the vehicle and do not exceed
a temperature of 60°C.
Insufficient clearance or excessive pressure or
temperature can lead to component damage or
water penetration. Follow the operating instruc-
tions of the high-pressure washer. <
When using high-pressure washers, do
not spray against the seals of the retract-
able hardtop, the sensor s and the cameras, e.g.
of the Park Distance Control or Rear View Cam-
era, for an extended period and maintain a dis-
tance of at least 12 in/30 cm. <
Manual car wash
When washing the vehicle by hand, use large
quantities of water and car shampoo if neces-
sary. Clean the vehicle with a sponge or wash-
ing brush, applying light pressure only.
Before cleaning the windshield, deacti-
vate the rain sensor or switch off the igni-
tion to prevent unintent ional activation of the
wipers. <
Observe local regulations pertaining to
washing vehicles by hand. <
Headlamps
Do not rub them dry and do not use abrasive or
corrosive cleaning agents.
Remove contamination, such as insects, by
soaking with shampoo or insect remover and
then rinsing with plenty of water.
Thaw ice with a windshield de-icer and do not
use an ice scraper.
Windows
Clean the inside and outside surfaces of the
windows and the mirrors with window cleaner.
Do not clean the mirrors with cleaners
containing quartz. <
Retractable hardtop
Proceed as you would in a normal car wash.
When you open a we t hardtop, water
drops may run into the cargo bay. If nec-
essary, remove items from the cargo bay
beforehand to avoid water stains or soiling. <
Paintwork care
Regular care contributes to value retention and
protects the paintwork against the long-term
effects of damaging substances.
Region-specific environmental influences can
damage the vehicle paintwork. Therefore, it is
important to adapt the frequency and scope of
car care accordingly.
Immediately remove aggressive materials such
as spilled fuel, oil, grease, brake fluid, tree sap or
bird droppings to prevent damage to the
paintwork.
Repairing paintwork damage
Immediately repair scratches or similar
damage, such as that caused by stones
hitting the vehicle, wher e necessary to prevent
rusting. <
BMW recommends having paintwork damage
repaired by a profession al paint repair work-
shop according to BMW specifications using
original BMW paint materials.
Page 218 of 248
Giving and receiving assistance
216
Being towed
Make sure that the ignition is switched on,
refer to page50, otherwise the low-beam
headlamps, tail lamps, turn signal indicators and
windshield wipers may be unavailable.
If the electrical system fails, do not tow-start or
tow the vehicle. The electrical steering wheel
lock cannot be released and the vehicle cannot
be steered. Jump-starting, refer to page 214.
Power steering assistance is not available when
the engine is not running. Thus, braking and
steering will requir e increased effort.<
Manual transmission
Gearshift lever in neutral position.
Automatic transmission
Selector lever in position N.
Changing selector leve r positions, refer to
page 54.
Do not exceed a towing speed of 31 mph
or 50 km/h and a towing distance of
31 miles/50 km, otherwise the automatic trans-
mission may be damaged. <
7-gear sport automatic transmission
with dual clutch
Ensure that transmission lock P is not
engaged as the rear wheels will otherwise
be blocked.
When using the car wash function, refer to
page 205, note that the parking lock P is
engaged automatically after approx. 30 min-
utes, blocking the rear wheels.
If an electrical malfunction occurs or if towing
takes longer than approx. 20 minutes, manually
release the parking lock, refer to page 58.<
Do not exceed a towing speed of 31 mph
or 50 km/h and a towing distance of
31 miles/50 km, otherwise the 7-gear sport
automatic transmission may be damaged. <
Towing methods
Do not lift the vehicle by a tow fitting or
body and chassis parts, otherwise dam-
age may result. <
With a tow bar
The towing vehicle must not be lighter
than the towed vehicle, otherwise it may
be impossible to maintain control. <
The tow fittings used should be on the same
side on both vehicles. Should it prove impossi-
ble to avoid mounting the tow bar at an angle,
please observe the following:
> Clearance and maneuvering capability will
be sharply limited during cornering.
> The tow bar will generate la teral forces if it is
attached offset.
Attach the tow bar to the tow fittings only,
as attaching it to othe r parts of the vehicle
could result in damage. <
With a tow rope
When starting off in the towing vehicle, make
sure that the tow rope is taut.
To avoid jerking and the associated
stresses on vehicle components when
towing, always use nylon ropes or nylon straps.
Attach the tow rope to the tow fittings only, as
attaching it to other pa rts of the vehicle could
result in damage. <
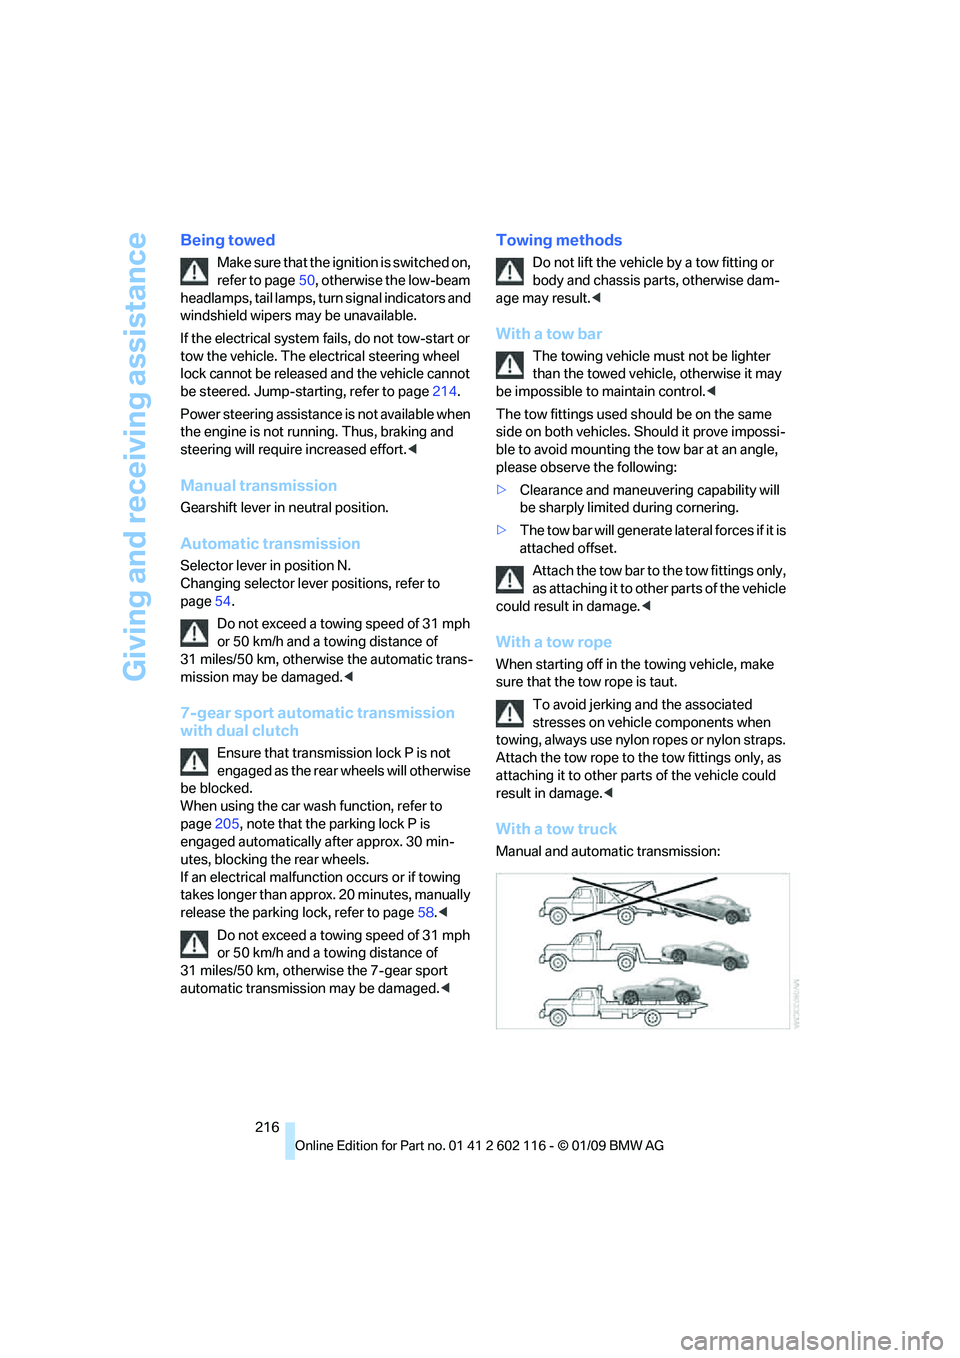
With a tow truck
Manual and automatic transmission:
Page 238 of 248
Everything from A to Z
236
Hills
112
Holders for cups 103
Home address 176
Homepage BMW 4
Hood 197
Horn 10,11
Hot exhaust system 111
Hydraulic brake assist, refer to
Dynamic Brake Control
DBC 78
Hydroplaning 111
I
IBOC, refer to High Definition
Radio 142
Ice warning, refer to Outside temperature warning 64
ID3 tag, refer to Information
about the track 147
Identification marks
– Run-Flat Tires 195
– tire coding 193
iDrive 16
– adjusting brightness 76
– changing language 75
– changing settings 75
– changing units of measure
and display format 68
– controls 16
– menu guidance 17
– operating principle 16
– overview 16
– setting the date and
time 71,72
– status information 20
iDrive operating principle 16
Ignition 50
– switched off 50
– switched on 50
Ignition key, refer to Remote control with integrated
key 28
Ignition key position 1, refer to Radio readiness 50Ignition key position 2, refer to
Ignition on 50
Ignition lock 50
Imprint 2
Indicator and warning lamps
– Tire Pressure Monitor TPM 83
Indicator and warning
lamps 13
Individual air distribution 93
Inflation pressure, refer to Tire
inflation pressure 190
Inflation pressure monitoring,
refer to Tire Pressure
Monitor TPM 82
Initializing
– after power failure 212
– compass, refer to Calibrating 101
– Flat Tire Monitor FTM 81
– radio, refer to Station, storing 142
– refer to Setting the time and date 72
Installation location
– navigation DVD drive 118
– telephone 102
Instructions for navigation
system, refer to Voice
instructions 129
Instrument cluster 12
Instrument lighting 90
In
strument panel, refer to Cockpit 10
Integrated key 28
Integrated universal remote control 98
Interactive map 124
Interior lamps 90
– remote control 30
Interior motion sensor 34
Interior rearview mirror 46
– automatic dimming
feature 46
– compass 100
Interlock, refer to Disengaging
the remote control 53Intermittent mode of the
wipers 60
Intersection, entering, navigation 120
iPod, connecting, refer to
AUX-IN port 158
iPod, connecting, refer to USB-audio interface 158
J
Jacking points211
Joystick, refer to iDrive 16
Jumpering, refer to Jump starting 214
Jump starting 214
K
Key, refer to Integrated key/
remote control 28
Keyless go, refer to
Convenient access 35
Keyless opening and closing, refer to Convenient
access 35
Key Memory, refer to Personal Profile 28
Kick-down 54
– automatic transmission with Steptronic 54
Knock control 189
L
Lamps
– automatic headlamp
control 88
– parking lamps/low beams 88
Lamps and bulbs, replacing
bulbs 208
Language, changing on Control Display 75
Lap-and-shoulder belt, refer to Safety belts 44
Lashing eyes, refer to
Securing cargo 114
Last destinations 122
Page 246 of 248
Everything from A to Z
244
Windshield wash
60
– filling capacity, reservoir 222
– nozzles 61
– reservoir for washer fluid 61
– washer fluid 61
Windshield wiper blades, changing 208
Windshield wipers, refer to
Wiper system 60
Winter tires 196
– storage 196
Wiper blade replacement 208
Wiper system 60
Word-matching principle for navigation 127
Work in the engine
compartment 197
Wrench/screwdriver, refer to Onboard tool kit 208
X
Xenon lamps
– replacing bulbs 209
Y
Your individual vehicle
– settings, refer to Personal
Profile 28