2009 BMW Z4 SDRIVE30I ROADSTER rear view mirror
[x] Cancel search: rear view mirrorPage 26 of 248
Voice activation system
24
Terminating or canceling voice
activation system
Press the button on the steering wheel or
In dialogs that call for a text of your choice, the
procedure can only be canceled using the but-
ton on the steering wheel.
Possible commands
The commands available in each case depend
on the menu item selected on the Control
Display.
Having the possible commands read aloud
For example, if "CD/DVD" is selected, the com-
mands for operating CD/Multimedia are read
aloud.
Calling up functions immediately via
short commands
Short commands enable yo u to perform certain
functions immediately, irrespective of which
menu item is selected, refer to page 223.
Example: selecting the track of a CD
1.If necessary, switch on entertainment audio
output.
2. Press the button on the steering wheel.
Setting the voice dialog
You can set whether the system should use the
standard dialog or a shorter variant. In the
shorter variant of the voice dialog, the prompts
and responses from the system are abbre-
viated.
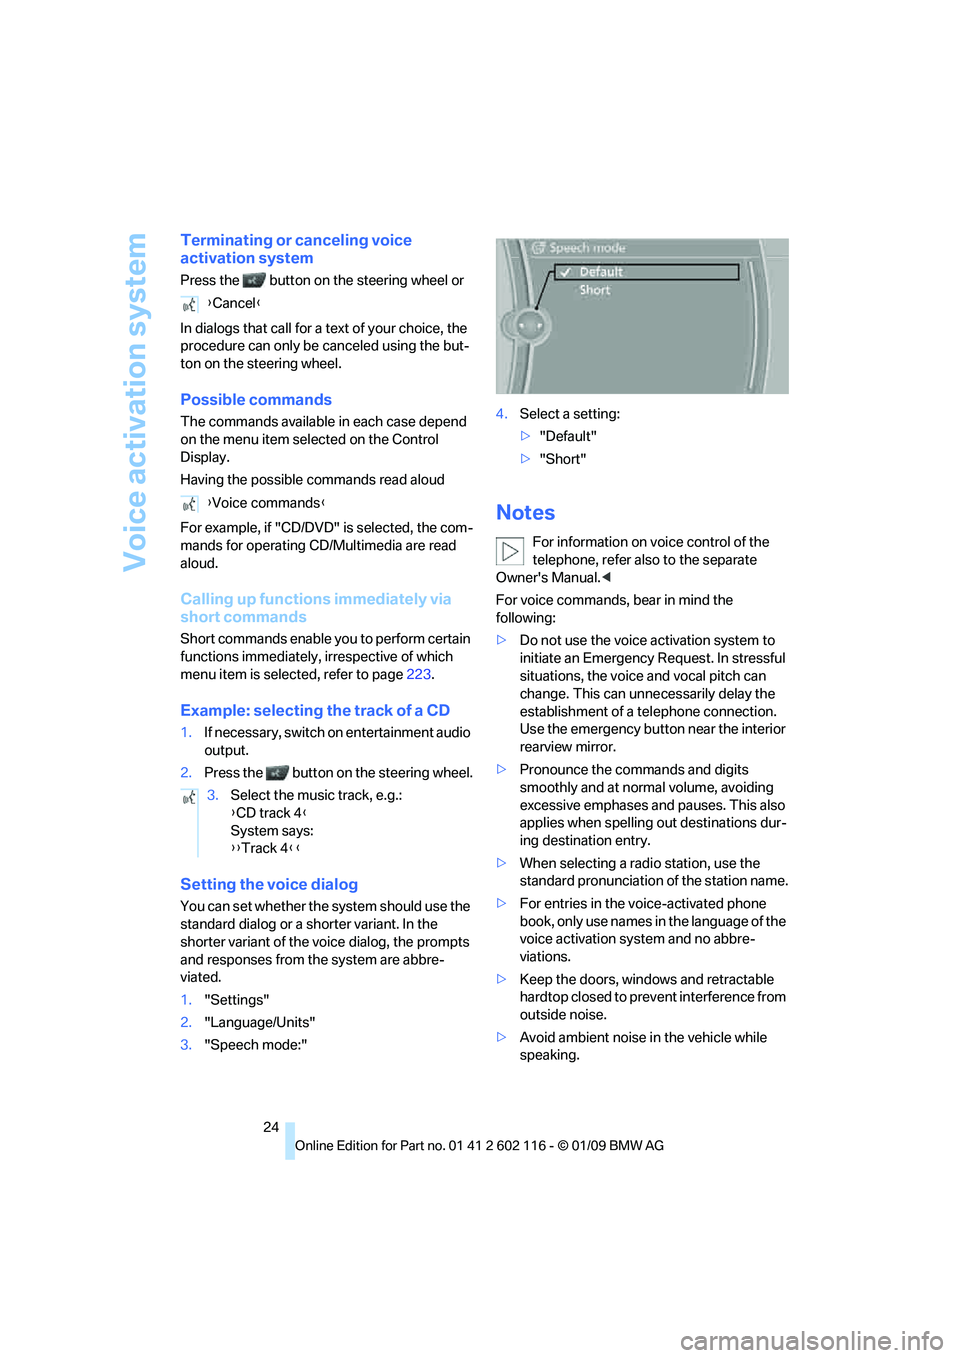
1."Settings"
2. "Language/Units"
3. "Speech mode:" 4.
Select a setting:
>"Default"
> "Short"
Notes
For information on voice control of the
telephone, refer also to the separate
Owner's Manual. <
For voice commands, bear in mind the
following:
> Do not use the voice activation system to
initiate an Emergency Request. In stressful
situations, the voice and vocal pitch can
change. This can unne cessarily delay the
establishment of a telephone connection.
Use the emergency button near the interior
rearview mirror.
> Pronounce the commands and digits
smoothly and at normal volume, avoiding
excessive emphases and pauses. This also
applies when spelling out destinations dur-
ing destination entry.
> When selecting a radio station, use the
standard pronunciation of the station name.
> For entries in the voice-activated phone
book, only use names in the language of the
voice activation system and no abbre-
viations.
> Keep the doors, windows and retractable
hardtop closed to prev ent interference from
outside noise.
> Avoid ambient noise in the vehicle while
speaking.
{
Cancel }
{ Voice commands }
3. Select the music track, e.g.:
{CD track 4 }
System says:
{{ Track 4 }}
Page 36 of 248
Opening and closing
34
Arming and disarming
When you lock or unlock the vehicle, either with
the remote control or at the door lock, the alarm
system is armed or disarmed at the same time.
You can open the lugga ge compartment lid
using the button of the remote control even
if the alarm system is armed, refer to page 30.
The lid is locked and monitored again as soon
as it is closed.
Panic mode*
You can trigger the alar m system if you find
yourself in a dangerous situation:
Press the button for at least three seconds.
To switch off the alarm: press any button.
Switching off an alarm
> Unlock the car with the remote control, refer
to page 29.
> Insert the remote contro l all the way into the
ignition lock.
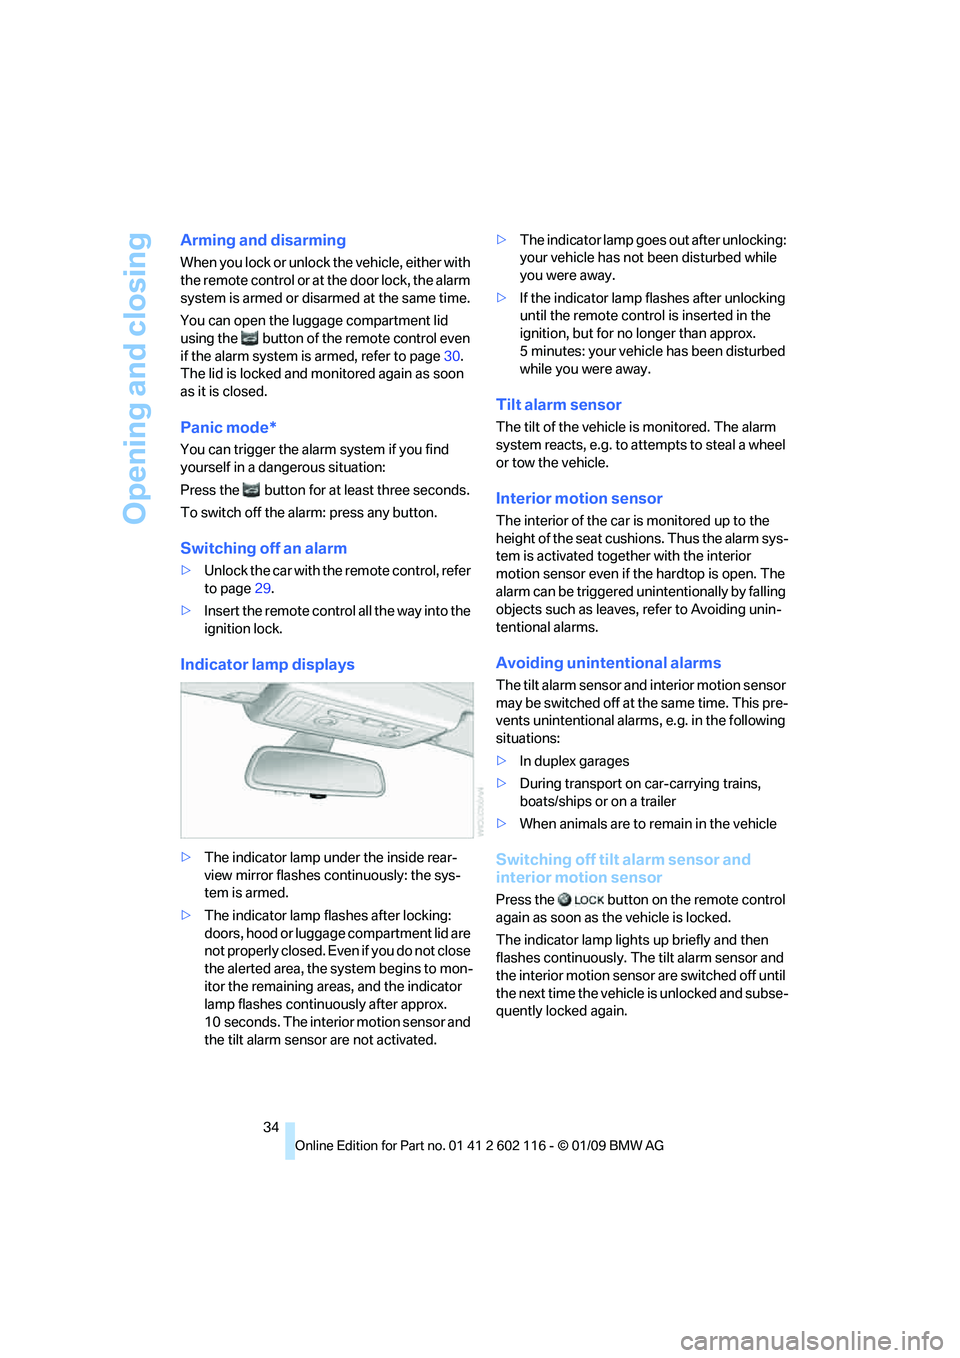
Indicator lamp displays
> The indicator lamp under the inside rear-
view mirror flashes continuously: the sys-
tem is armed.
> The indicator lamp flashes after locking:
doors, hood or luggage compartment lid are
not properly closed. Even if you do not close
the alerted area, the sy stem begins to mon-
itor the remaining area s, and the indicator
lamp flashes continuously after approx.
10 seconds. The interior motion sensor and
the tilt alarm sensor are not activated. >
The indicator lamp goes out after unlocking:
your vehicle has not been disturbed while
you were away.
> If the indicator lamp flashes after unlocking
until the remote control is inserted in the
ignition, but for no longer than approx.
5 minutes: your vehicle has been disturbed
while you were away.
Tilt alarm sensor
The tilt of the vehicle is monitored. The alarm
system reacts, e.g. to attempts to steal a wheel
or tow the vehicle.
Interior motion sensor
The interior of the car is monitored up to the
height of the seat cushions. Thus the alarm sys-
tem is activated togeth er with the interior
motion sensor even if the hardtop is open. The
alarm can be triggered unintentionally by falling
objects such as leaves, refer to Avoiding unin-
tentional alarms.
Avoiding unintentional alarms
The tilt alarm sensor and interior motion sensor
may be switched off at the same time. This pre-
vents unintentional alarms, e.g. in the following
situations:
> In duplex garages
> During transport on car-carrying trains,
boats/ships or on a trailer
> When animals are to remain in the vehicle
Switching off tilt alarm sensor and
interior motion sensor
Press the button on the remote control
again as soon as the vehicle is locked.
The indicator lamp light s up briefly and then
flashes continuously. The tilt alarm sensor and
the interior motion sensor are switched off until
the next time the vehicle is unlocked and subse-
quently locked again.
Page 48 of 248
Adjustments
46
Automatic heating
Depending on the outside temperature, both
exterior mirrors are heat ed automatically when
the engine is running or the ignition is
switched on.
Passenger-side mirror tilt function –
automatic curb monitor*
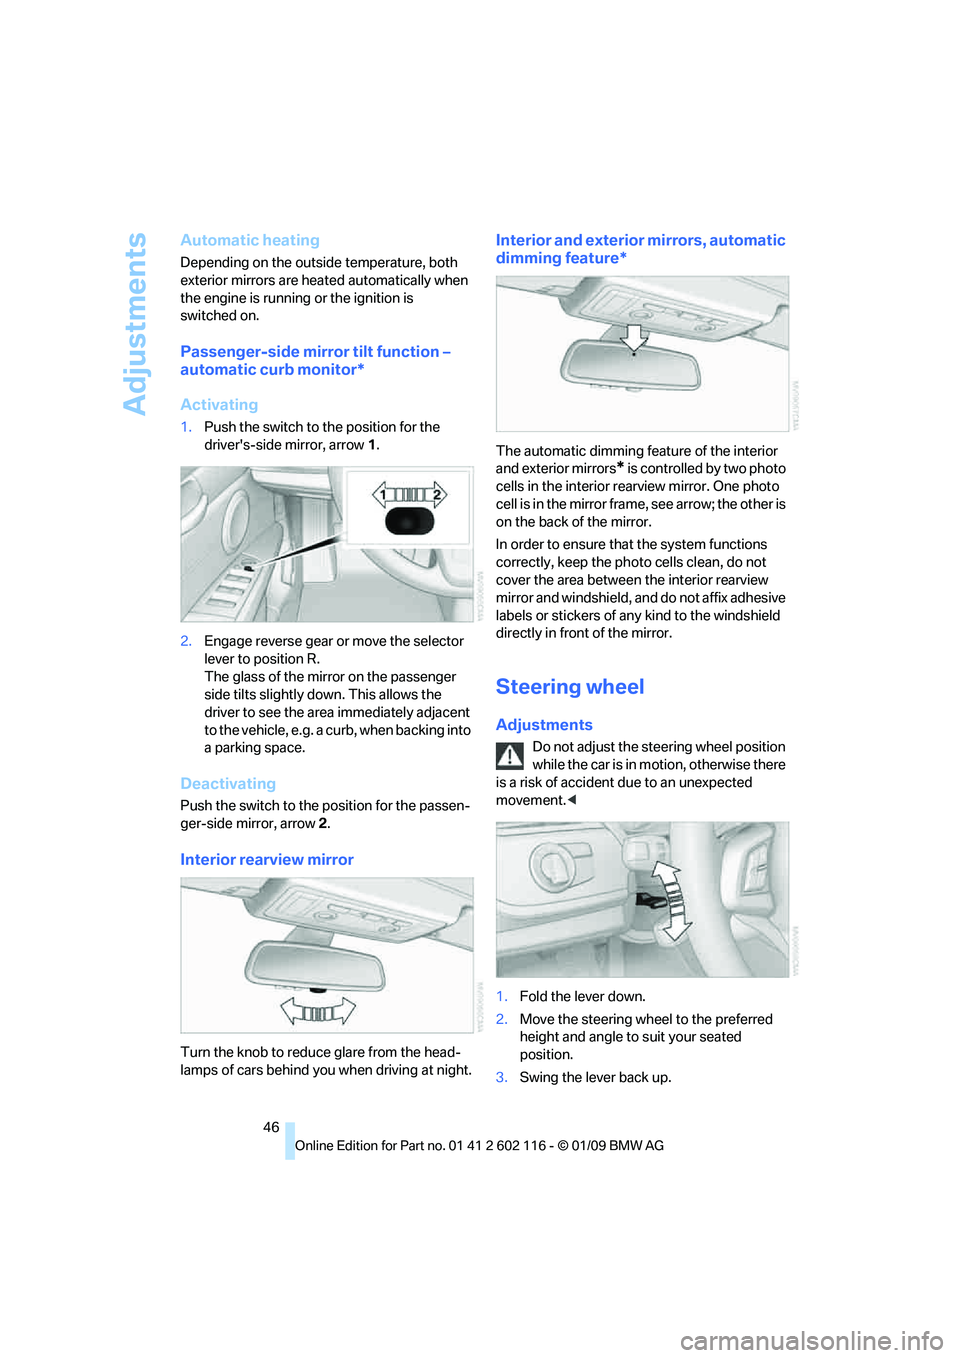
Activating
1. Push the switch to the position for the
driver's-side mirror, arrow 1.
2. Engage reverse gear or move the selector
lever to position R.
The glass of the mirror on the passenger
side tilts slightly do wn. This allows the
driver to see the area immediately adjacent
to the vehicle, e.g. a curb, when backing into
a parking space.
Deactivating
Push the switch to the position for the passen-
ger-side mirror, arrow 2.
Interior rearview mirror
Turn the knob to reduce glare from the head-
lamps of cars behind you when driving
at night.
Interior and exterior mirrors, automatic
dimming feature*
The automatic dimming feature of the interior
and exterior mirrors
* is controlled by two photo
cells in the interior rearview mirror. One photo
cell is in the mirror frame, see arrow; the other is
on the back of the mirror.
In order to ensure that the system functions
correctly, keep the photo cells clean, do not
cover the area between the interior rearview
mirror and windshield, and do not affix adhesive
labels or stickers of an y kind to the windshield
directly in front of the mirror.
Steering wheel
Adjustments
Do not adjust the steering wheel position
while the car is in mo tion, otherwise there
is a risk of accident due to an unexpected
movement. <
1. Fold the lever down.
2. Move the steering wheel to the preferred
height and angle to suit your seated
position.
3. Swing the lever back up.
Page 62 of 248
Driving
60
Wiper system
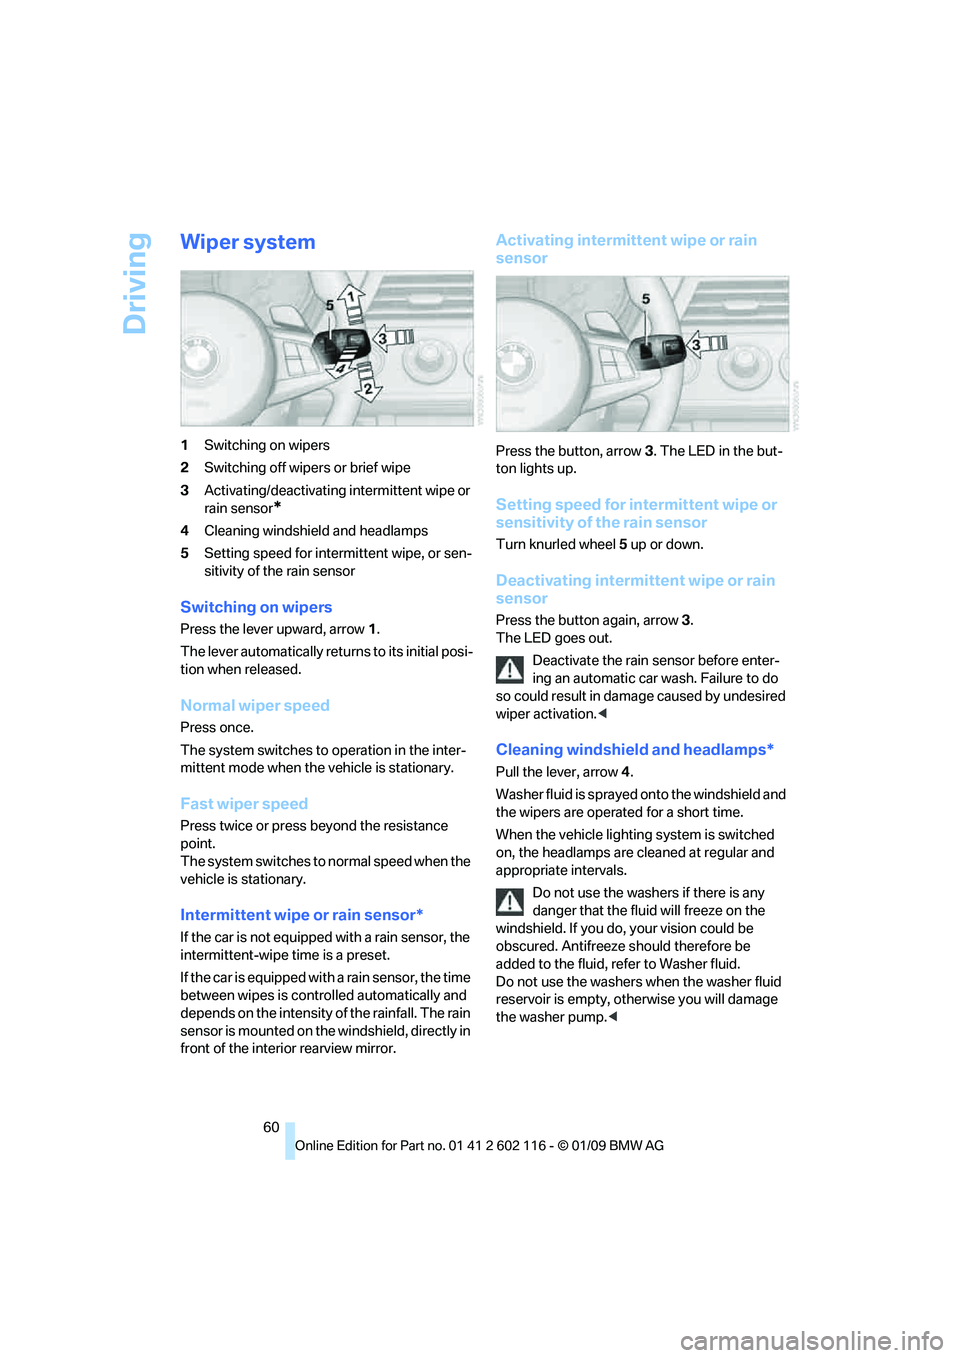
1Switching on wipers
2 Switching off wipers or brief wipe
3 Activating/deactivating intermittent wipe or
rain sensor
*
4Cleaning windshield and headlamps
5 Setting speed for intermittent wipe, or sen-
sitivity of the rain sensor
Switching on wipers
Press the lever upward, arrow 1.
The lever automatically retu rns to its initial posi-
tion when released.
Normal wiper speed
Press once.
The system switches to operation in the inter-
mittent mode when the vehicle is stationary.
Fast wiper speed
Press twice or press beyond the resistance
point.
The system switches to normal speed when the
vehicle is stationary.
Intermittent wipe or rain sensor*
If the car is not equipped with a rain sensor, the
intermittent-wipe time is a preset.
If the car is equipped with a rain sensor, the time
between wipes is contro lled automatically and
depends on the intensity of the rainfall. The rain
sensor is mounted on the windshield, directly in
front of the interior rearview mirror.
Activating intermitte nt wipe or rain
sensor
Press the button, arrow 3. The LED in the but-
ton lights up.
Setting speed for inte rmittent wipe or
sensitivity of the rain sensor
Turn knurled wheel 5 up or down.
Deactivating intermit tent wipe or rain
sensor
Press the button again, arrow 3.
The LED goes out.
Deactivate the rain sensor before enter-
ing an automatic car wash. Failure to do
so could result in damage caused by undesired
wiper activation. <
Cleaning windshield and headlamps*
Pull the lever, arrow 4.
Washer fluid is sprayed onto the windshield and
the wipers are operated for a short time.
When the vehicle lighting system is switched
on, the headlamps are cleaned at regular and
appropriate intervals. Do not use the washers if there is any
danger that the fluid will freeze on the
windshield. If you do, your vision could be
obscured. Antifreeze should therefore be
added to the fluid, refer to Washer fluid.
Do not use the washers when the washer fluid
reservoir is empty, ot herwise you will damage
the washer pump.<
Page 88 of 248
Technology for driving comfort and safety
86
Do not attempt to remove
the airbag retention
system from the vehicle. Do not modify the indi-
vidual components of the system or its wiring in
any way. This includes the upholstered covers
of the steering wheel, the dashboard and the
seats. Do not attempt to remove or dismantle
the steering wheel.
Do not touch the individual components imme-
diately after the system has been triggered,
because there is a danger of burns.
In the event of malfunctions, deactivation or
triggering of the airbag restraint system, have
the testing, repair, remo val and disposal of air-
bag generators executed only by a BMW center
or a workshop that works according to repair
procedures of BMW with correspondingly
trained personnel and th at has the required
explosives licenses. Unprofessional attempts to
work on the system could lead to failure in an
emergency or to undesi red airbag activation,
either of which could resu lt in personal injury.<
Warning notices and information about the air-
bags can also be found on the sun visors.
Automatic deactivation of the
passenger airbags
The system determines whether the passenger
seat is occupied by meas uring the resistance of
the human body. Front, knee and side airbags
on the passenger side ar e activated or deacti-
vated accordingly.
Make sure that the passenger keeps his
or her feet in the footwell; otherwise, the
passenger airbags may not function properly. <
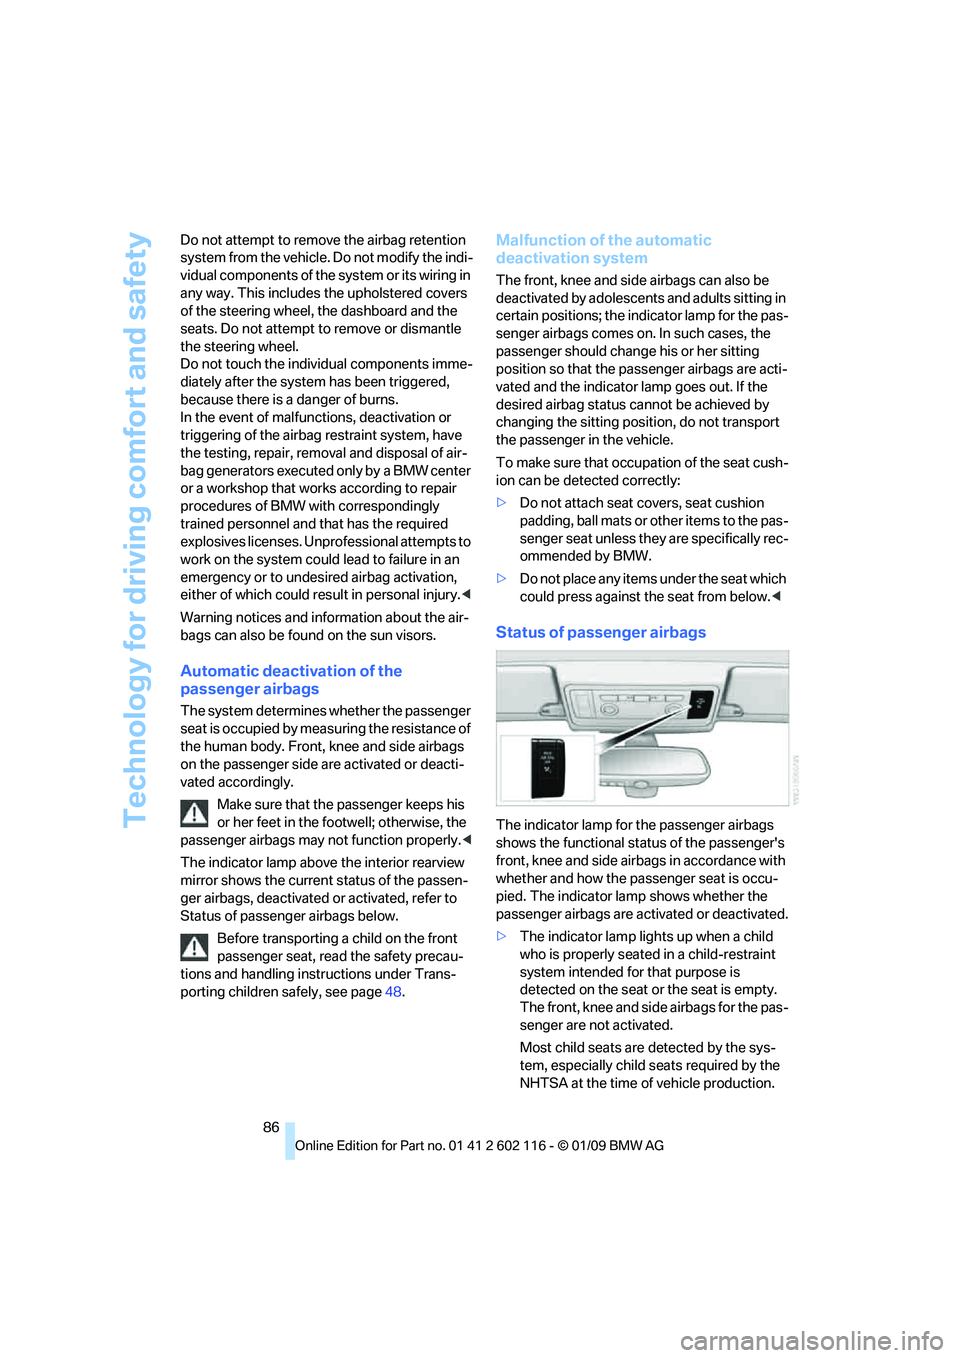
The indicator lamp above the interior rearview
mirror shows the current status of the passen-
ger airbags, deactivated or activated, refer to
Status of passenger airbags below.
Before transporting a child on the front
passenger seat, read the safety precau-
tions and handling instructions under Trans-
porting children safely, see page 48.
Malfunction of the automatic
deactivation system
The front, knee and side airbags can also be
deactivated by adolescents and adults sitting in
certain positions; the in dicator lamp for the pas-
senger airbags comes on. In such cases, the
passenger should change his or her sitting
position so that the pa ssenger airbags are acti-
vated and the indicator la mp goes out. If the
desired airbag status cannot be achieved by
changing the sitting posi tion, do not transport
the passenger in the vehicle.
To make sure that occupa tion of the seat cush-
ion can be detected correctly:
> Do not attach seat covers, seat cushion
padding, ball mats or other items to the pas-
senger seat unless they are specifically rec-
ommended by BMW.
> Do not place any items under the seat which
could press against the seat from below. <
Status of passenger airbags
The indicator lamp for the passenger airbags
shows the functional status of the passenger's
front, knee and side airbags in accordance with
whether and how the passenger seat is occu-
pied. The indicator lamp shows whether the
passenger airbags are activated or deactivated.
> The indicator lamp lights up when a child
who is properly seated in a child-restraint
system intended for that purpose is
detected on the seat or the seat is empty.
The front, knee and side airbags for the pas-
senger are not activated.
Most child seats are detected by the sys-
tem, especially child seats required by the
NHTSA at the time of vehicle production.
Page 207 of 248
Mobility
205Reference
At a glance
Controls
Driving tips
Communications
Navigation
Entertainment
7-gear sport automatic transmission
with dual clutch
Before driving into an automatic car wash, per-
form the following steps to ensure that the vehi-
cle can roll:
1. Insert the remote control, even with conve-
nient access, into the ignition lock.
2. Engage transmission position N.
3. Release the parking brake.
4. Switch off the engine.
5. Leave the remote control in the ignition lock
so that the vehicle can roll.
Transmission position P is engaged:
> Automatically after approx. 30 minutes
> When you take the remo te control out of the
ignition lock
Steam jets / high -pressure washers
When using steam jets or high-pressure
washers, ensure that you maintain suffi-
cient clearance to the vehicle and do not exceed
a temperature of 60°C.
Insufficient clearance or excessive pressure or
temperature can lead to component damage or
water penetration. Follow the operating instruc-
tions of the high-pressure washer. <
When using high-pressure washers, do
not spray against the seals of the retract-
able hardtop, the sensor s and the cameras, e.g.
of the Park Distance Control or Rear View Cam-
era, for an extended period and maintain a dis-
tance of at least 12 in/30 cm. <
Manual car wash
When washing the vehicle by hand, use large
quantities of water and car shampoo if neces-
sary. Clean the vehicle with a sponge or wash-
ing brush, applying light pressure only.
Before cleaning the windshield, deacti-
vate the rain sensor or switch off the igni-
tion to prevent unintent ional activation of the
wipers. <
Observe local regulations pertaining to
washing vehicles by hand. <
Headlamps
Do not rub them dry and do not use abrasive or
corrosive cleaning agents.
Remove contamination, such as insects, by
soaking with shampoo or insect remover and
then rinsing with plenty of water.
Thaw ice with a windshield de-icer and do not
use an ice scraper.
Windows
Clean the inside and outside surfaces of the
windows and the mirrors with window cleaner.
Do not clean the mirrors with cleaners
containing quartz. <
Retractable hardtop
Proceed as you would in a normal car wash.
When you open a we t hardtop, water
drops may run into the cargo bay. If nec-
essary, remove items from the cargo bay
beforehand to avoid water stains or soiling. <
Paintwork care
Regular care contributes to value retention and
protects the paintwork against the long-term
effects of damaging substances.
Region-specific environmental influences can
damage the vehicle paintwork. Therefore, it is
important to adapt the frequency and scope of
car care accordingly.
Immediately remove aggressive materials such
as spilled fuel, oil, grease, brake fluid, tree sap or
bird droppings to prevent damage to the
paintwork.
Repairing paintwork damage
Immediately repair scratches or similar
damage, such as that caused by stones
hitting the vehicle, wher e necessary to prevent
rusting. <
BMW recommends having paintwork damage
repaired by a profession al paint repair work-
shop according to BMW specifications using
original BMW paint materials.
Page 214 of 248
Replacing components
212
Vehicle battery
Battery care
The battery is 100 % maintenance-free, the
electrolyte will last for the life of the battery
when the vehicle is operated in a temperate cli-
mate. Your BMW center will be glad to advise in
all matters concerning the battery.
Charging the battery
Only charge the battery in the vehicle via the
terminals in the engine compartment with the
engine off. Connections, refer to Jump starting
on page 214.
Disposal
Have old batteries disposed of by your
BMW center or hand them in to a recy-
cling center. Maintain th e battery in an upright
position for transport and storage. Always
secure the battery agains t tipping over during
transport. <
Power failure
After a temporary power lo ss, the functioning of
some equipment may be limited and require
reinitialization. Individual settings may likewise
have been lost and will have to be programmed:
> Time and date
These values must be updated, refer to
page 71.
> Radio
In some cases, statio ns may have to be
stored again, refer to page 142.
> Navigation system
Operability must be waited for, refer to
page 118.
> Seat and mirror memory
The positions must be stored again, refer to
page 43.
> Inside rearview mirror with digital compass
The system must be calibrated, refer to
page 101.
Fuses
Never attempt to repa ir a blown fuse and
do not replace a defective fuse with a sub-
stitute of another color or amperage rating, oth-
erwise this could lead to a circuit overload, ulti-
mately resulting in a fire in the vehicle. <
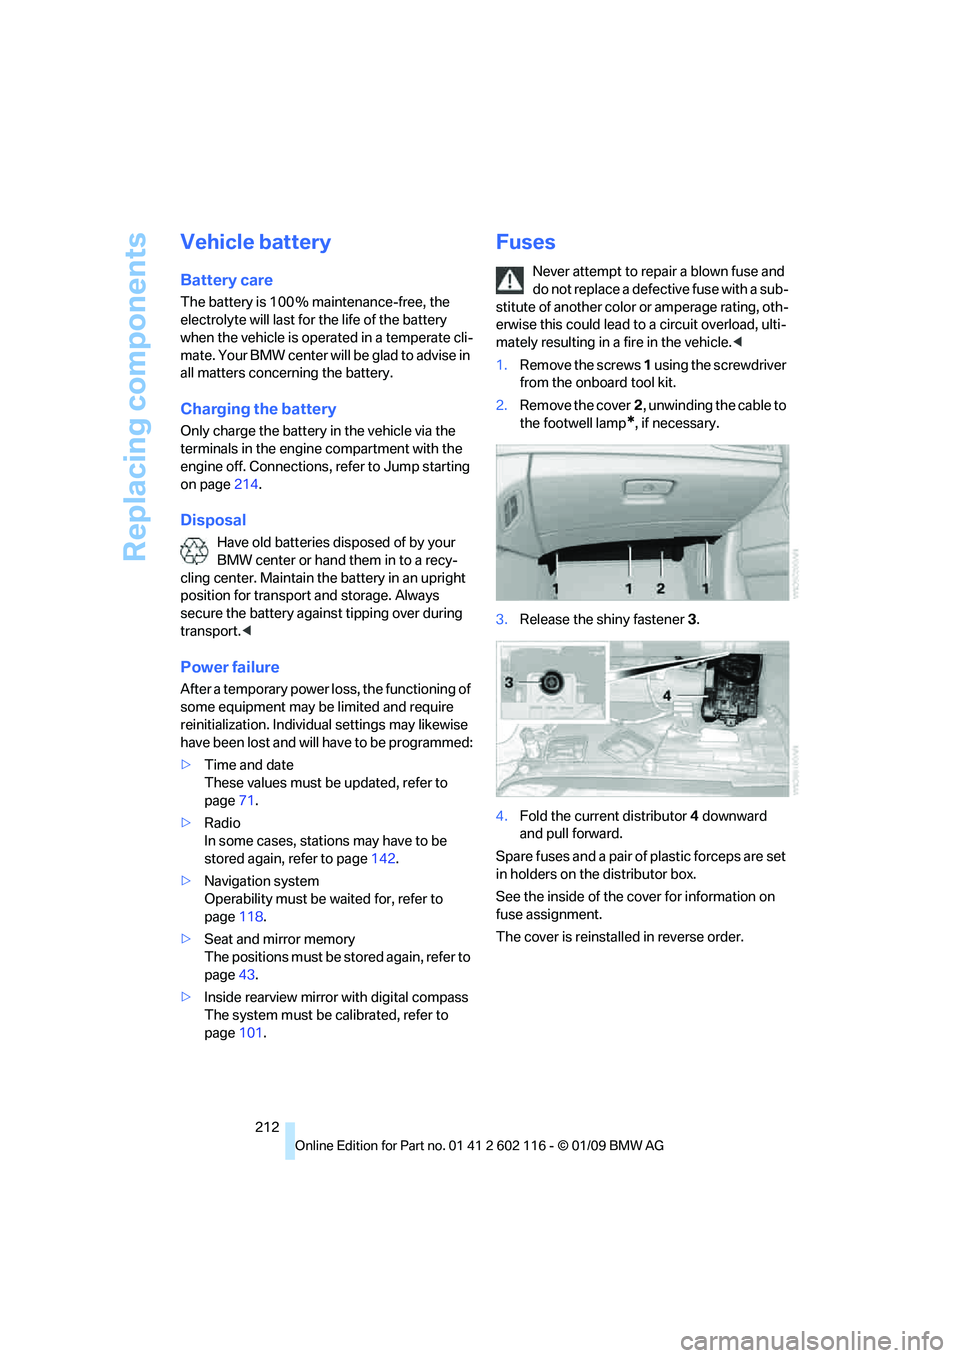
1. Remove the screws 1 using the screwdriver
from the onboard tool kit.
2. Remove the cover 2, unwinding the cable to
the footwell lamp
*, if necessary.
3. Release the shiny fastener 3.
4. Fold the current distributor 4 downward
and pull forward.
Spare fuses and a pair of plastic forceps are set
in holders on the distributor box.
See the inside of the cover for information on
fuse assignment.
The cover is reinsta lled in reverse order.
Page 238 of 248
Everything from A to Z
236
Hills
112
Holders for cups 103
Home address 176
Homepage BMW 4
Hood 197
Horn 10,11
Hot exhaust system 111
Hydraulic brake assist, refer to
Dynamic Brake Control
DBC 78
Hydroplaning 111
I
IBOC, refer to High Definition
Radio 142
Ice warning, refer to Outside temperature warning 64
ID3 tag, refer to Information
about the track 147
Identification marks
– Run-Flat Tires 195
– tire coding 193
iDrive 16
– adjusting brightness 76
– changing language 75
– changing settings 75
– changing units of measure
and display format 68
– controls 16
– menu guidance 17
– operating principle 16
– overview 16
– setting the date and
time 71,72
– status information 20
iDrive operating principle 16
Ignition 50
– switched off 50
– switched on 50
Ignition key, refer to Remote control with integrated
key 28
Ignition key position 1, refer to Radio readiness 50Ignition key position 2, refer to
Ignition on 50
Ignition lock 50
Imprint 2
Indicator and warning lamps
– Tire Pressure Monitor TPM 83
Indicator and warning
lamps 13
Individual air distribution 93
Inflation pressure, refer to Tire
inflation pressure 190
Inflation pressure monitoring,
refer to Tire Pressure
Monitor TPM 82
Initializing
– after power failure 212
– compass, refer to Calibrating 101
– Flat Tire Monitor FTM 81
– radio, refer to Station, storing 142
– refer to Setting the time and date 72
Installation location
– navigation DVD drive 118
– telephone 102
Instructions for navigation
system, refer to Voice
instructions 129
Instrument cluster 12
Instrument lighting 90
In
strument panel, refer to Cockpit 10
Integrated key 28
Integrated universal remote control 98
Interactive map 124
Interior lamps 90
– remote control 30
Interior motion sensor 34
Interior rearview mirror 46
– automatic dimming
feature 46
– compass 100
Interlock, refer to Disengaging
the remote control 53Intermittent mode of the
wipers 60
Intersection, entering, navigation 120
iPod, connecting, refer to
AUX-IN port 158
iPod, connecting, refer to USB-audio interface 158
J
Jacking points211
Joystick, refer to iDrive 16
Jumpering, refer to Jump starting 214
Jump starting 214
K
Key, refer to Integrated key/
remote control 28
Keyless go, refer to
Convenient access 35
Keyless opening and closing, refer to Convenient
access 35
Key Memory, refer to Personal Profile 28
Kick-down 54
– automatic transmission with Steptronic 54
Knock control 189
L
Lamps
– automatic headlamp
control 88
– parking lamps/low beams 88
Lamps and bulbs, replacing
bulbs 208
Language, changing on Control Display 75
Lap-and-shoulder belt, refer to Safety belts 44
Lashing eyes, refer to
Securing cargo 114
Last destinations 122