2009 BMW Z4 SDRIVE30I rear entertainment
[x] Cancel search: rear entertainmentPage 17 of 248
At a glance
15Reference
Controls
Driving tips
Communications
Navigation
Entertainment
Mobility
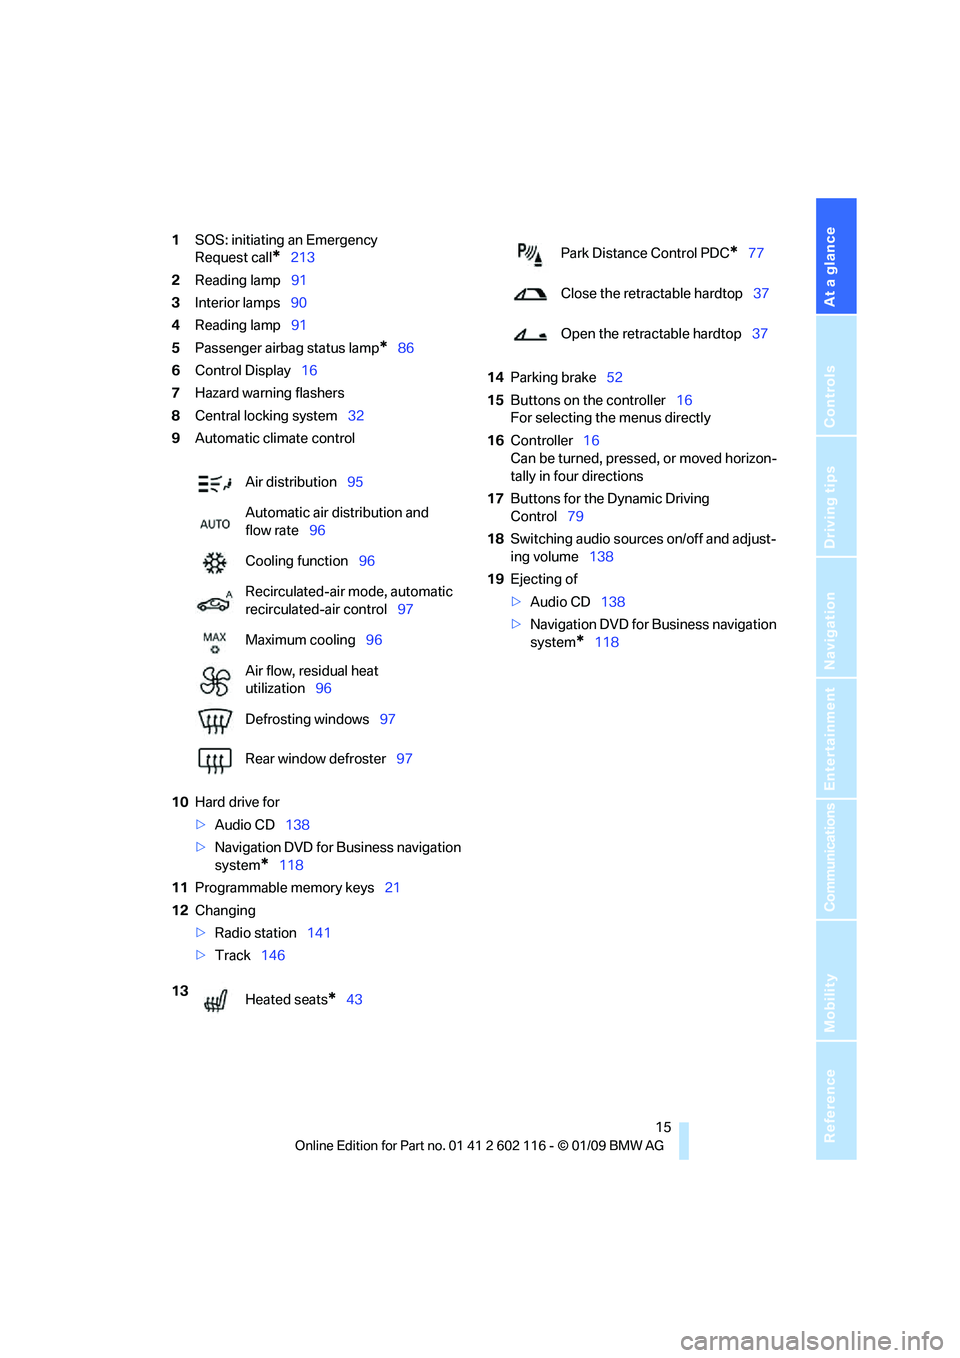
1SOS: initiating an Emergency
Request call
*213
2 Reading lamp 91
3 Interior lamps 90
4 Reading lamp 91
5 Passenger airbag status lamp
*86
6 Control Display 16
7 Hazard warning flashers
8 Central locking system 32
9 Automatic climate control
10 Hard drive for
>Audio CD 138
> Navigation DVD for Business navigation
system
*118
11 Programmable memory keys 21
12 Changing
>Radio station 141
> Track 146 14
Parking brake 52
15 Buttons on the controller 16
For selecting the menus directly
16 Controller 16
Can be turned, pressed, or moved horizon-
tally in four directions
17 Buttons for the Dynamic Driving
Control 79
18 Switching audio sources on/off and adjust-
ing volume 138
19 Ejecting of
>Audio CD 138
> Navigation DVD for Business navigation
system
*118
Air distribution
95
Automatic air distribution and
flow rate 96
Cooling function 96
Recirculated-air mode, automatic
recirculated-air control 97
Maximum cooling 96
Air flow, residual heat
utilization 96
Defrosting windows 97
Rear window defroster 97
13 Heated seats
*43
Park Distance Control PDC*77
Close the retractable hardtop 37
Open the retractable hardtop 37
Page 26 of 248

Voice activation system
24
Terminating or canceling voice
activation system
Press the button on the steering wheel or
In dialogs that call for a text of your choice, the
procedure can only be canceled using the but-
ton on the steering wheel.
Possible commands
The commands available in each case depend
on the menu item selected on the Control
Display.
Having the possible commands read aloud
For example, if "CD/DVD" is selected, the com-
mands for operating CD/Multimedia are read
aloud.
Calling up functions immediately via
short commands
Short commands enable yo u to perform certain
functions immediately, irrespective of which
menu item is selected, refer to page 223.
Example: selecting the track of a CD
1.If necessary, switch on entertainment audio
output.
2. Press the button on the steering wheel.
Setting the voice dialog
You can set whether the system should use the
standard dialog or a shorter variant. In the
shorter variant of the voice dialog, the prompts
and responses from the system are abbre-
viated.
1."Settings"
2. "Language/Units"
3. "Speech mode:" 4.
Select a setting:
>"Default"
> "Short"
Notes
For information on voice control of the
telephone, refer also to the separate
Owner's Manual. <
For voice commands, bear in mind the
following:
> Do not use the voice activation system to
initiate an Emergency Request. In stressful
situations, the voice and vocal pitch can
change. This can unne cessarily delay the
establishment of a telephone connection.
Use the emergency button near the interior
rearview mirror.
> Pronounce the commands and digits
smoothly and at normal volume, avoiding
excessive emphases and pauses. This also
applies when spelling out destinations dur-
ing destination entry.
> When selecting a radio station, use the
standard pronunciation of the station name.
> For entries in the voice-activated phone
book, only use names in the language of the
voice activation system and no abbre-
viations.
> Keep the doors, windows and retractable
hardtop closed to prev ent interference from
outside noise.
> Avoid ambient noise in the vehicle while
speaking.
{
Cancel }
{ Voice commands }
3. Select the music track, e.g.:
{CD track 4 }
System says:
{{ Track 4 }}
Page 43 of 248
Controls
41Reference
At a glance
Driving tips
Communications
Navigation
Entertainment
Mobility
Adjustments
Sitting safely
The ideal sitting position can make a vital con-
tribution to relaxed, fati gue-free driving. In con-
junction with the safe ty belts, the head
restraints and the airbags, the seated position
has a major influence on your safety in the event
of an accident. To ensu re that the safety sys-
tems operate with optimal efficiency, we
strongly urge you to observe the instructions
contained in the following section.
For additional information on transporting chil-
dren safely, refer to page 48.
Airbags
Always maintain an adequate distance
between yourself and the airbags. Always
grip the steering wheel on the rim, with your
hands in the 3 o'clock and 9 o'clock positions,
to minimize the risk of injury to the hands or
arms in the event of the airbag being triggered
off. No one and nothing is to come between the
airbags and the seat occupant.
Do not use the cover of the front airbag on the
passenger side as a st orage area. Make sure
that the passenger is sitting correctly, e.g.
keeping his or her feet or legs in the footwell
and not on the dashboard; otherwise, leg inju-
ries can occur if the front airbag deploys.
Make sure that passengers do not lean their
heads against the side airbag; otherwise, seri-
ous injuries could result if the airbag suddenly
deployed. <
Even if you follow all the instructions, injuries
resulting from contact with airbags cannot be
fully excluded, depending on the circum-
stances. The ignition and inflation noise may
provoke a mild hearing loss in extremely sensi-
tive individuals. This e ffect is usually only tem-
porary.
For airbag locations and additional information
on airbags, refer to page 85.
Safety belt
Before every drive, make sure that all occupants
wear their safety belts. Airbags complement the
safety belt as an additi onal safety device, but
they do not represent a substitute.
Your vehicle has two seats, each of which is
equipped with a safety belt.
Never allow more than one person to
wear a single safety belt. Never allow
infants or small children to ride in a passenger's
lap. Make sure that the be lt in the lap area sits
low across the hips and does not press against
the abdomen.
The safety belt must not rest against the throat,
run across sharp edges, pass over hard or frag-
ile objects or be pinched. Fasten the safety belt
so that it sits as snugly as possible against the
lap and shoulder withou t being twisted. Other-
wise the belt could slide over your hips and
injure your abdomen in the event of a frontal
collision.
Avoid wearing bulky clothing and regularly pull
the belt in the upper-bo dy area taut, otherwise
its restraining effect could be impaired. <
Safety belts, refer to page 44.
Seats
Note before adjusting
Never attempt to adjust your seat while
the vehicle is moving. The seat could
respond with unexpected movement, and the
ensuing loss of vehicle control could lead to an
accident.
On the passenger seat as well, do not incline
the backrest too far to th e rear while the vehicle
is being driven, otherwise there is a danger in
the event of an accident of sliding under the
safety belt, eliminating the protection normally
provided by the belt. <
Note the information on safety belt damage on
page 45.
Page 45 of 248
Controls
43Reference
At a glance
Driving tips
Communications
Navigation
Entertainment
Mobility
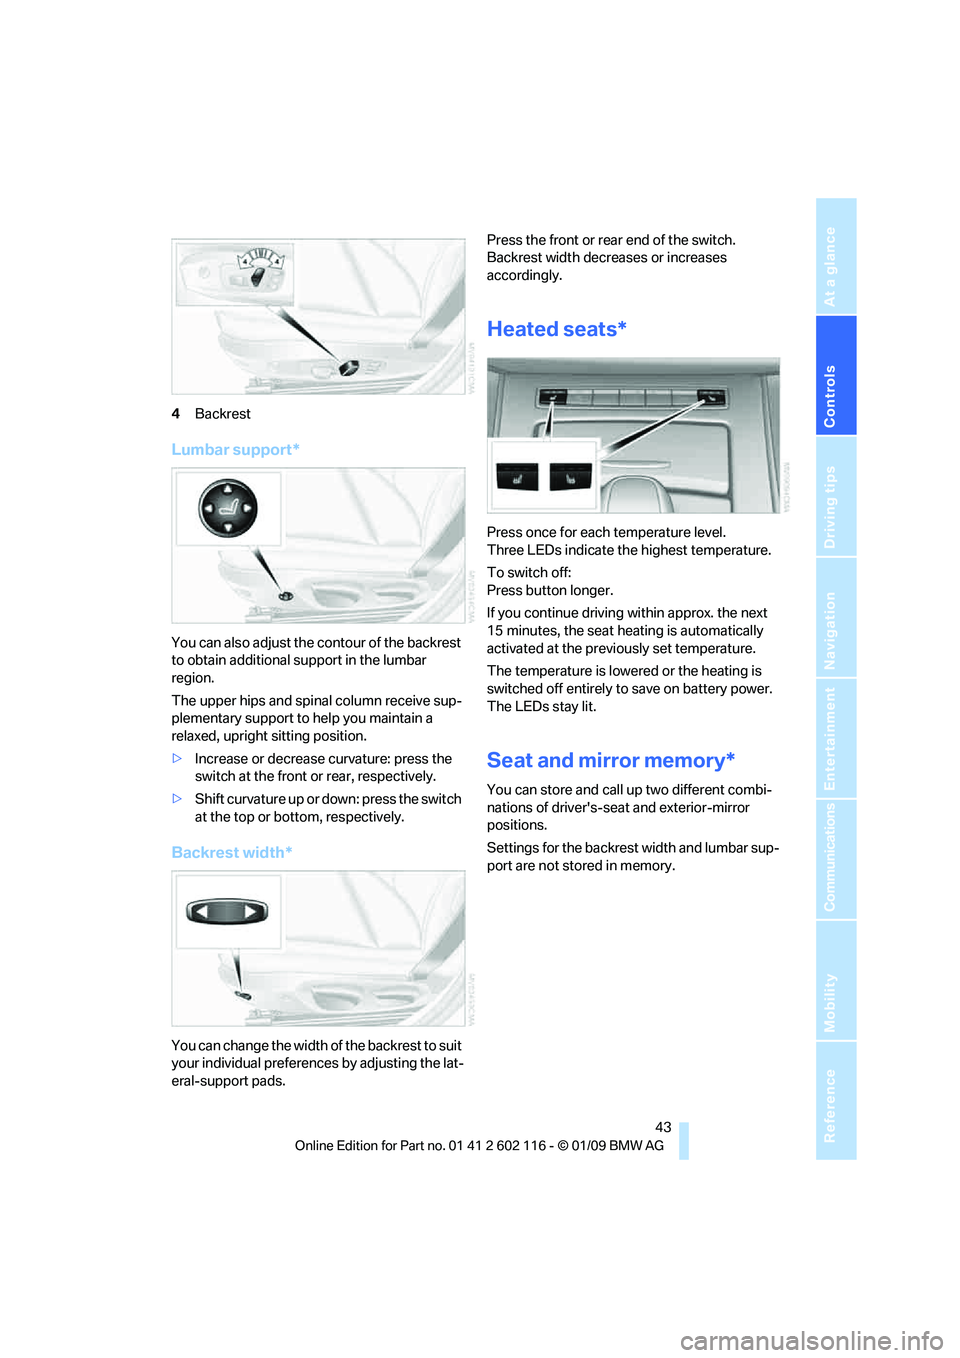
4Backrest
Lumbar support*
You can also adjust the contour of the backrest
to obtain additional support in the lumbar
region.
The upper hips and spinal column receive sup-
plementary support to help you maintain a
relaxed, upright sitting position.
> Increase or decrease curvature: press the
switch at the front or rear, respectively.
> Shift curvature up or down: press the switch
at the top or botto m, respectively.
Backrest width*
You can change the width of the backrest to suit
your individual preferences by adjusting the lat-
eral-support pads. Press the front or rear end of the switch.
Backrest width decreases or increases
accordingly.
Heated seats*
Press once for each temperature level.
Three LEDs indicate the highest temperature.
To switch off:
Press button longer.
If you continue driving
within approx. the next
15 minutes, the seat he ating is automatically
activated at the previously set temperature.
The temperature is lowered or the heating is
switched off entirely to save on battery power.
The LEDs stay lit.
Seat and mirror memory*
You can store and call up two different combi-
nations of driver's-sea t and exterior-mirror
positions.
Settings for the backrest width and lumbar sup-
port are not stored in memory.
Page 87 of 248
Controls
85Reference
At a glance
Driving tips
Communications
Navigation
Entertainment
Mobility
The TPMS malfunction indicator is combined
with the low tire pressure telltale. When the sys-
tem detects a malfunction, the telltale will flash
for approximately one minute and then remain
continuously lit. This sequence will continue
upon subsequent vehicle startups as long as
the malfunction exists. When the malfunction
indicator is illuminated, the system may not be
able to detect or signal low tire pressure as
intended. TPMS malfunctions may occur for a
variety of reasons, including the installation of
replacement or alternate tires or wheels on the
vehicle that prevent the TPMS from functioning
properly. Always check the TPMS malfunction
telltale after replacing one or more tires or
wheels on your vehicle to ensure that the
replacement or alternate tires and wheels allow
the TPMS to continue to function properly.
Servotronic*
The concept
The Servotronic varies the steering force
required to turn the wh eels depending on the
speed at which you are driving. When you are
driving at low speeds, power steering provides
more support, i. e. little effort is needed to turn
the wheels. Power steering support lessens as
your speed increases.
The system works automatically.
Malfunction
Malfunctions are displayed via Check Control
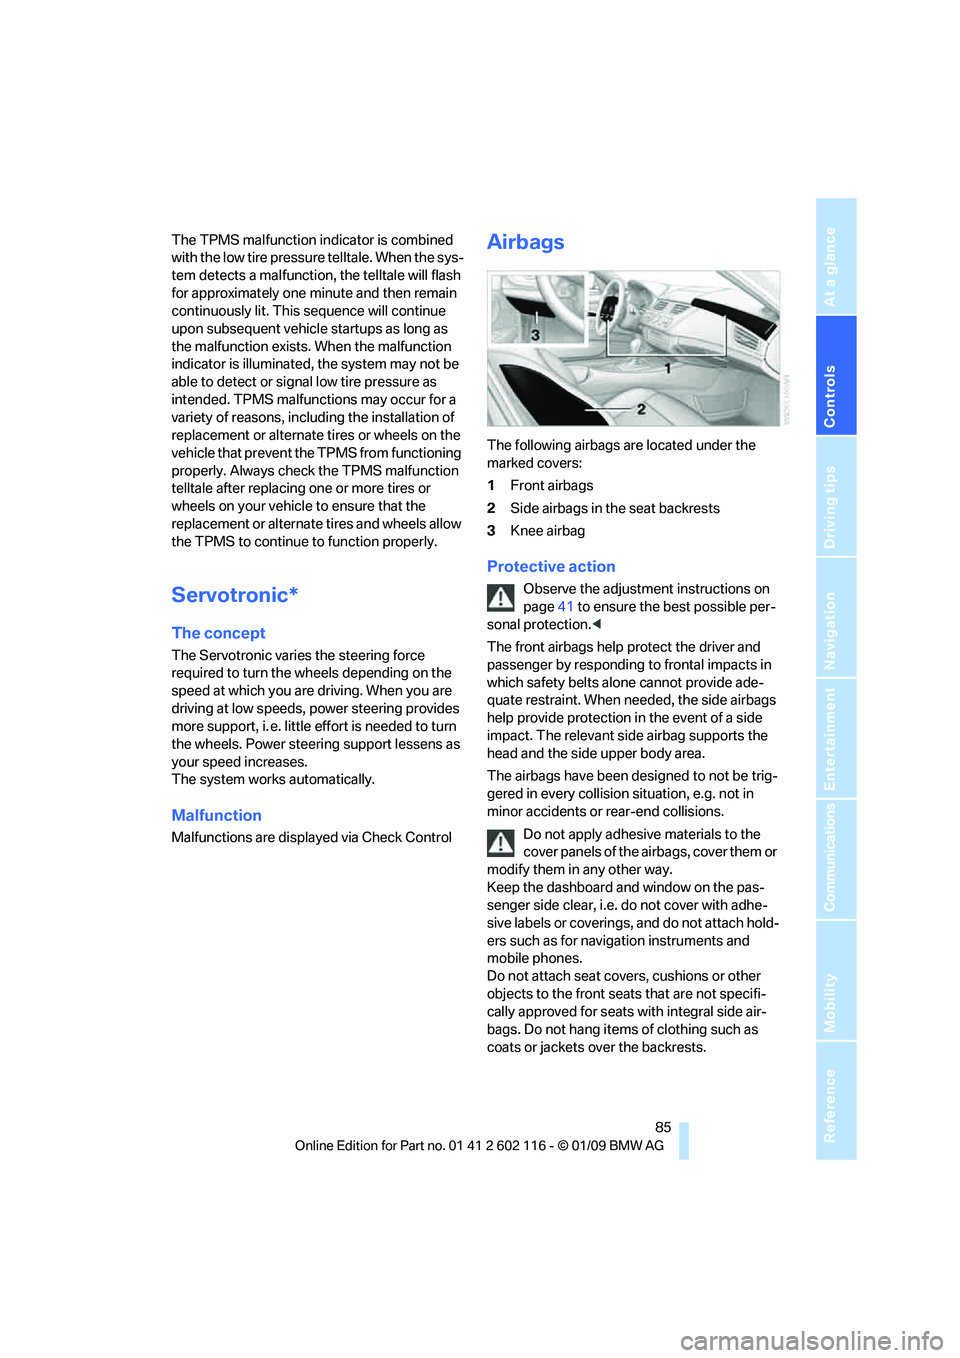
Airbags
The following airbags are located under the
marked covers:
1 Front airbags
2 Side airbags in the seat backrests
3 Knee airbag
Protective action
Observe the adjustment instructions on
page 41 to ensure the best possible per-
sonal protection. <
The front airbags help protect the driver and
passenger by responding to frontal impacts in
which safety belts alone cannot provide ade-
quate restraint. When needed, the side airbags
help provide protection in the event of a side
impact. The relevant side airbag supports the
head and the side upper body area.
The airbags have been designed to not be trig-
gered in every collision situation, e.g. not in
minor accidents or rear-end collisions.
Do not apply adhesive materials to the
cover panels of the airbags, cover them or
modify them in any other way.
Keep the dashboard and window on the pas-
senger side clear, i.e. do not cover with adhe-
sive labels or coverings, and do not attach hold-
ers such as for navigation instruments and
mobile phones.
Do not attach seat cove rs, cushions or other
objects to the front seats that are not specifi-
cally approved for seats with integral side air-
bags. Do not hang items of clothing such as
coats or jackets over the backrests.
Page 95 of 248
Controls
93Reference
At a glance
Driving tips
Communications
Navigation
Entertainment
Mobility
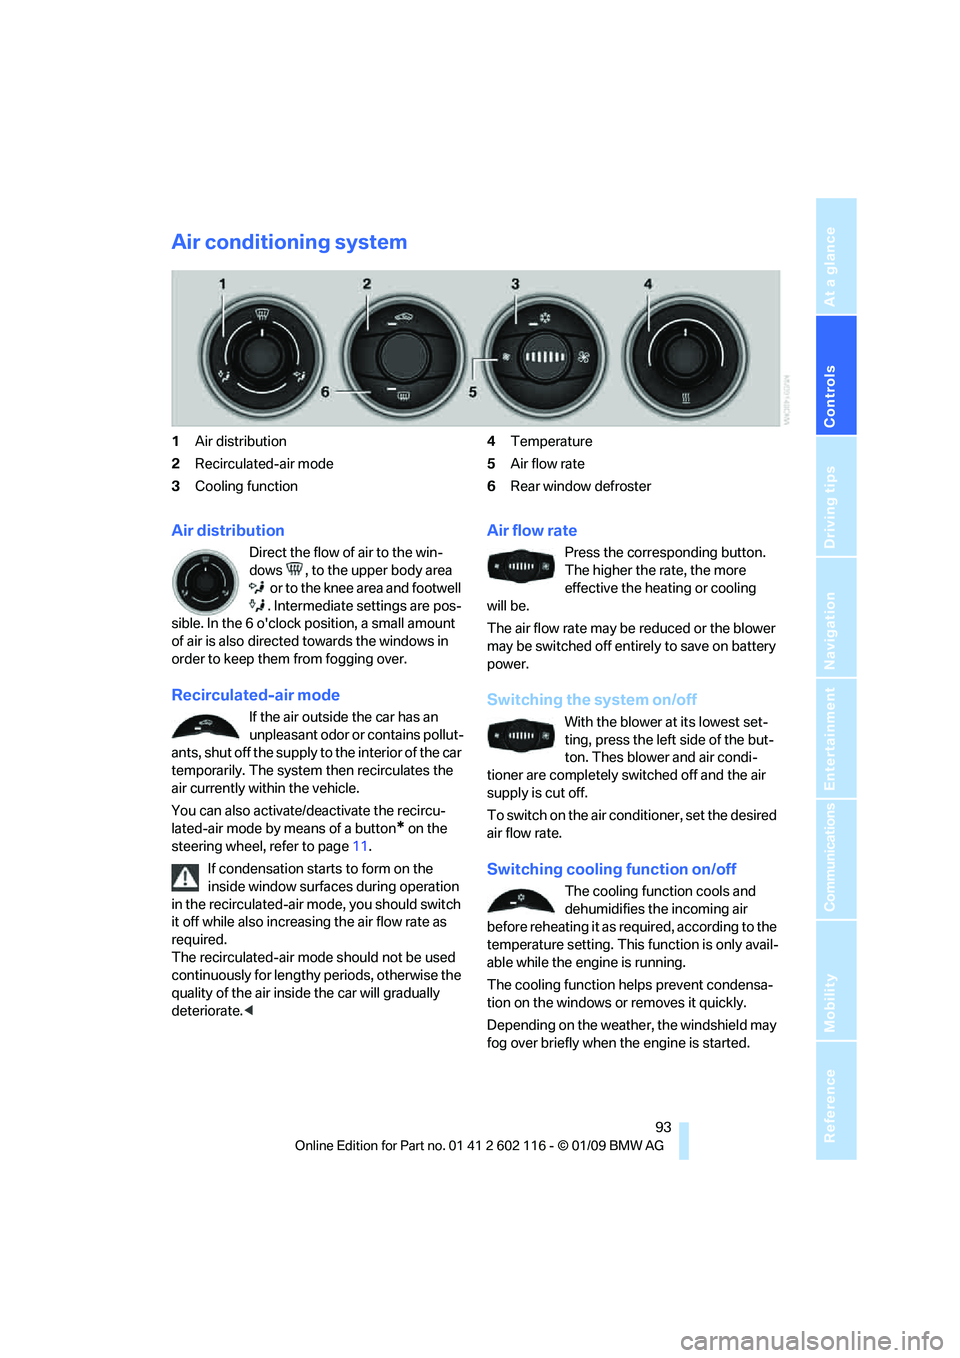
Air conditioning system
1Air distribution
2 Recirculated-air mode
3 Cooling function 4
Temperature
5 Air flow rate
6 Rear window defroster
Air distribution
Direct the flow of air to the win-
dows , to the upper body area
or to the knee area and footwell
. Intermediate settings are pos-
sible. In the 6 o'clock position, a small amount
of air is also directed towards the windows in
order to keep them from fogging over.
Recirculated-air mode
If the air outside the car has an
unpleasant odor or contains pollut-
ants, shut off the supply to the interior of the car
temporarily. The system then recirculates the
air currently within the vehicle.
You can also activate/d eactivate the recircu-
lated-air mode by means of a button
* on the
steering wheel, refer to page 11.
If condensation starts to form on the
inside window surfaces during operation
in the recirculated-air mode, you should switch
it off while also increasing the air flow rate as
required.
The recirculated-air mode should not be used
continuously for lengthy periods, otherwise the
quality of the air inside the car will gradually
deteriorate. <
Air flow rate
Press the corresponding button.
The higher the rate, the more
effective the heating or cooling
will be.
The air flow rate may be reduced or the blower
may be switched off entire ly to save on battery
power.
Switching the system on/off
With the blower at its lowest set-
ting, press the left side of the but-
ton. Thes blower and air condi-
tioner are completely switched off and the air
supply is cut off.
To switch on the air cond itioner, set the desired
air flow rate.
Switching cooling function on/off
The cooling function cools and
dehumidifies the incoming air
before reheating it as re quired, according to the
temperature setting. This function is only avail-
able while the engine is running.
The cooling function helps prevent condensa-
tion on the windows or removes it quickly.
Depending on the weathe r, the windshield may
fog over briefly when the engine is started.
Page 97 of 248
Controls
95Reference
At a glance
Driving tips
Communications
Navigation
Entertainment
Mobility
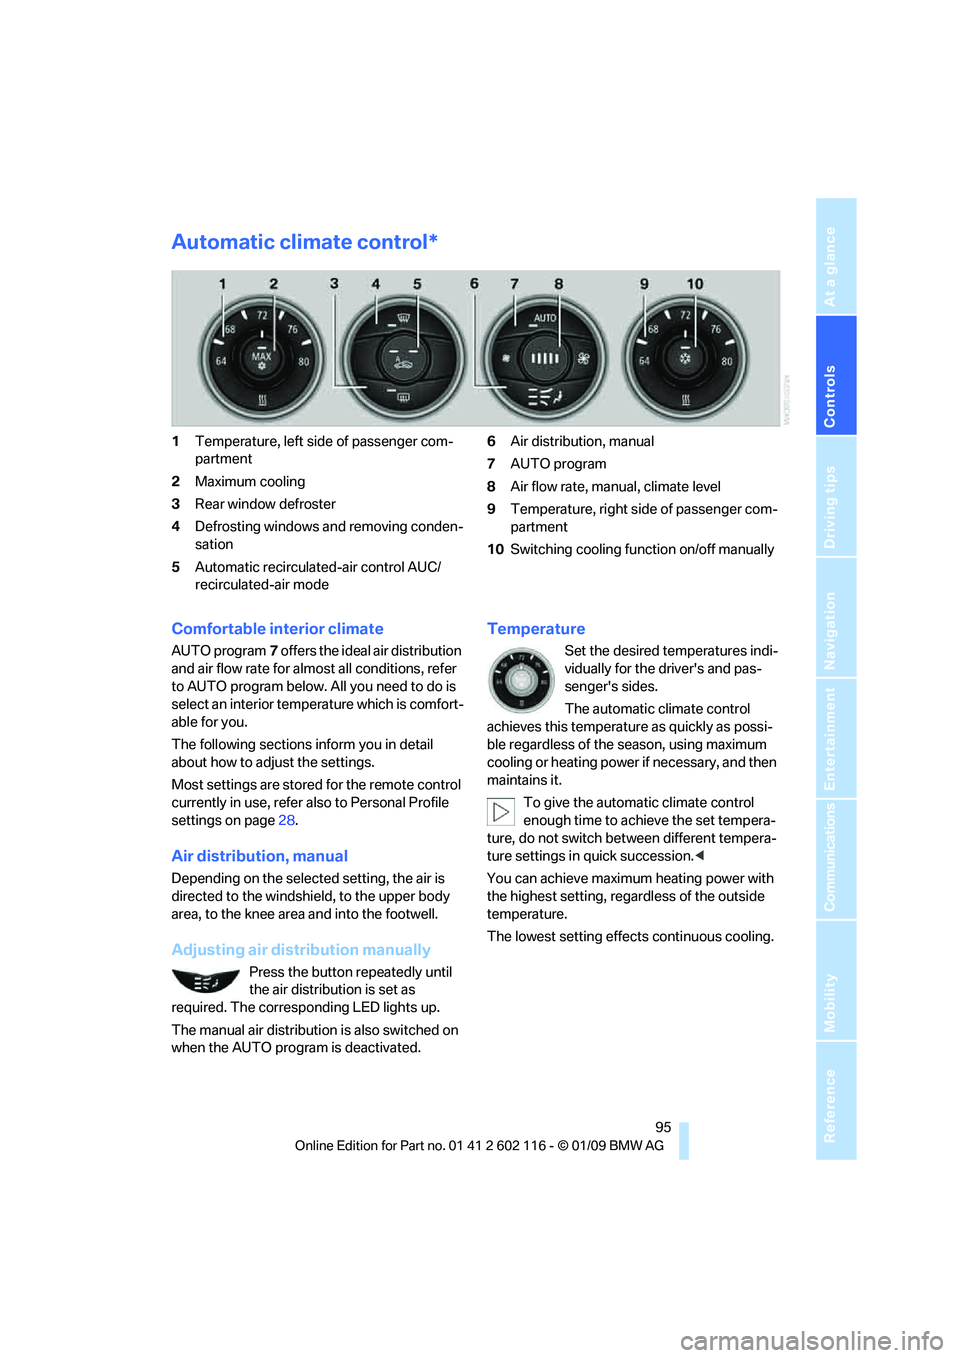
Automatic climate control*
1Temperature, left side of passenger com-
partment
2 Maximum cooling
3 Rear window defroster
4 Defrosting windows and removing conden-
sation
5 Automatic recirculated-air control AUC/
recirculated-air mode 6
Air distribution, manual
7 AUTO program
8 Air flow rate, manual, climate level
9 Temperature, right side of passenger com-
partment
10 Switching cooling function on/off manually
Comfortable interior climate
AUTO program 7 offers the ideal air distribution
and air flow rate for almost all conditions, refer
to AUTO program below. All you need to do is
select an interior temp erature which is comfort-
able for you.
The following sections inform you in detail
about how to adjust the settings.
Most settings are stored for the remote control
currently in use, refer al so to Personal Profile
settings on page 28.
Air distribution, manual
Depending on the selected setting, the air is
directed to the windshie ld, to the upper body
area, to the knee area and into the footwell.
Adjusting air distribution manually
Press the button repeatedly until
the air distribution is set as
required. The corresponding LED lights up.
The manual air distribution is also switched on
when the AUTO program is deactivated.
Temperature
Set the desired temperatures indi-
vidually for the driver's and pas-
senger's sides.
The automatic climate control
achieves this temperature as quickly as possi-
ble regardless of the season, using maximum
cooling or heating power if necessary, and then
maintains it.
To give the automatic climate control
enough time to achieve the set tempera-
ture, do not switch be tween different tempera-
ture settings in quick succession. <
You can achieve maximum heating power with
the highest setting, rega rdless of the outside
temperature.
The lowest setting effe cts continuous cooling.
Page 99 of 248
Controls
97Reference
At a glance
Driving tips
Communications
Navigation
Entertainment
Mobility
This function can be switched on
using the right button under the
following conditions:
> Up to 15 minutes after the engine has been
switched off
> Radio readiness is switched on.
> While the engine is at operating
temperature
> As long as battery voltage is sufficient
> At an outside temperature below
777/25 6
The middle LED is lit when the function is on.
Automatic recirculated-air control
AUC/recirculated-air mode
Switch on the desired operating
mode by pressing this button
repeatedly:
> LED off: outside air flows in continuously.
> Left-hand LED on, AUC mode: a sensor
detects pollutants in th e outside air. If nec-
essary, the system blocks the supply of out-
side air and recirculates the inside air. As
soon as the concentration of pollutants in
the outside air has decreased sufficiently,
the system automatically switches back to
outside air supply.
> Right-hand LED on, recirculated-air mode:
the supply of outside air is permanently
shut off. The system then recirculates the
air currently within the vehicle.
If condensation starts to form on the
inside window surfaces during operation
in the recirculated-air mode, you should switch
it off while also increasing the air flow rate as
required.
The recirculated-air mode should not be used
over an extended period of time, otherwise the
air quality inside the ca r will deteriorate contin-
uously. <
Defrosting windows and removing
condensation
Quickly removes ice and conden-
sation from the windshield and
front side windows.
Switch on the cooling function as well.
Rear window defroster
The defroster switches off auto-
matically after a certain time or
when the hardtop is opened.
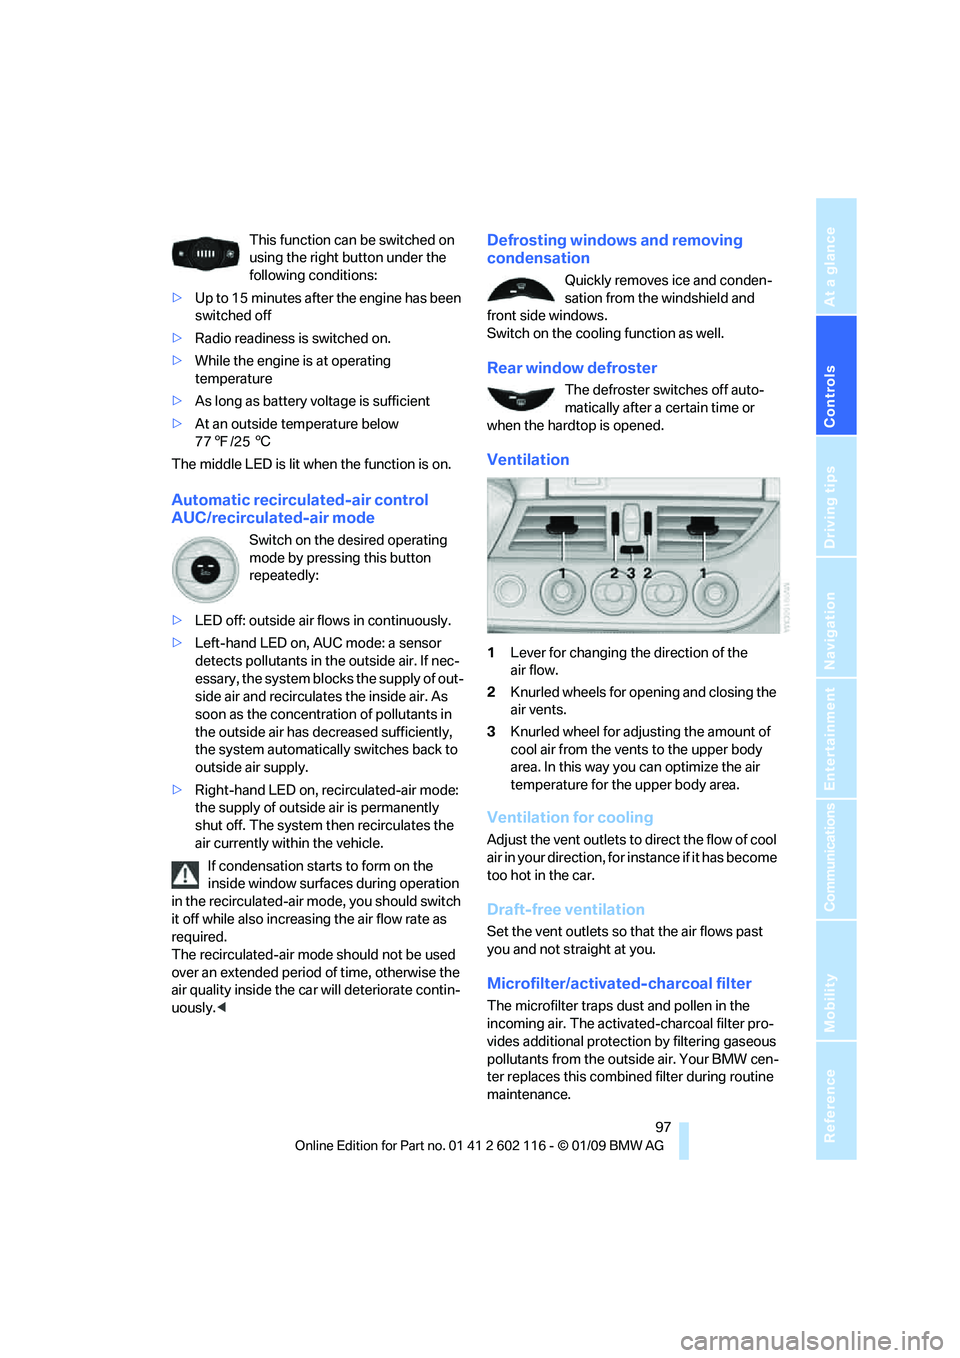
Ventilation
1 Lever for changing the direction of the
air flow.
2 Knurled wheels for opening and closing the
air vents.
3 Knurled wheel for adju sting the amount of
cool air from the vents to the upper body
area. In this way you can optimize the air
temperature for the upper body area.
Ventilation for cooling
Adjust the vent outlets to direct the flow of cool
air in your direction, for instance if it has become
too hot in the car.
Draft-free ventilation
Set the vent outlets so that the air flows past
you and not straight at you.
Microfilter/activated-charcoal filter
The microfilter traps dust and pollen in the
incoming air. The activated-charcoal filter pro-
vides additional protection by filtering gaseous
pollutants from the outs ide air. Your BMW cen-
ter replaces this combined filter during routine
maintenance.