2009 BMW Z4 SDRIVE30I remote control
[x] Cancel search: remote controlPage 38 of 248
Opening and closing
36
Starting the engine
You can start the engine or switch on the igni-
tion when a remote control is inside the vehicle.
It is not necessary to insert a remote control into
the ignition swit ch, refer to page 50.
Switching off the engine in cars with
automatic transmission
The engine can only be switched off when the
selector lever is in position P, refer to page 52.
To switch the engine off when the selector lever
is in position N, the re mote control must be in
the ignition switch.
Before driving a vehicle with automatic
transmission in to a car wash
1.Insert the remote control into the ignition
switch.
2. Depress the brake.
3. Move the selector lever to position N.
4. Switch off the engine.
The vehicle can roll.
Malfunction
Convenient access may malfunction due to
local radio waves. If this happens, open or close
the vehicle via the buttons on the remote con-
trol or using the integr ated key. To start the
engine afterward, insert the remote control into
the ignition switch.
Warning lamps
The warning lamp in the instrument
cluster lights up when you attempt to
start the engine: the engine cannot
be started. The remote co ntrol is not inside the
vehicle or is malfunctioning. Take the remote
control with you inside the vehicle or have it
checked. If necessary, insert another remote
control into the ignition switch.
The warning lamp in the instrument
cluster lights up while the engine is
running: the remote control is no
longer inside the vehicle. After the engine is
switched off, the engine can only be restarted
within approx. 10 seconds. The indicator lamp in the instrument
cluster comes on and a message
appears on the Control Display:
replace the battery in the remote control.
Replacing the battery
The remote control for convenient access con-
tains a battery that will ne ed to be replaced from
time to time.
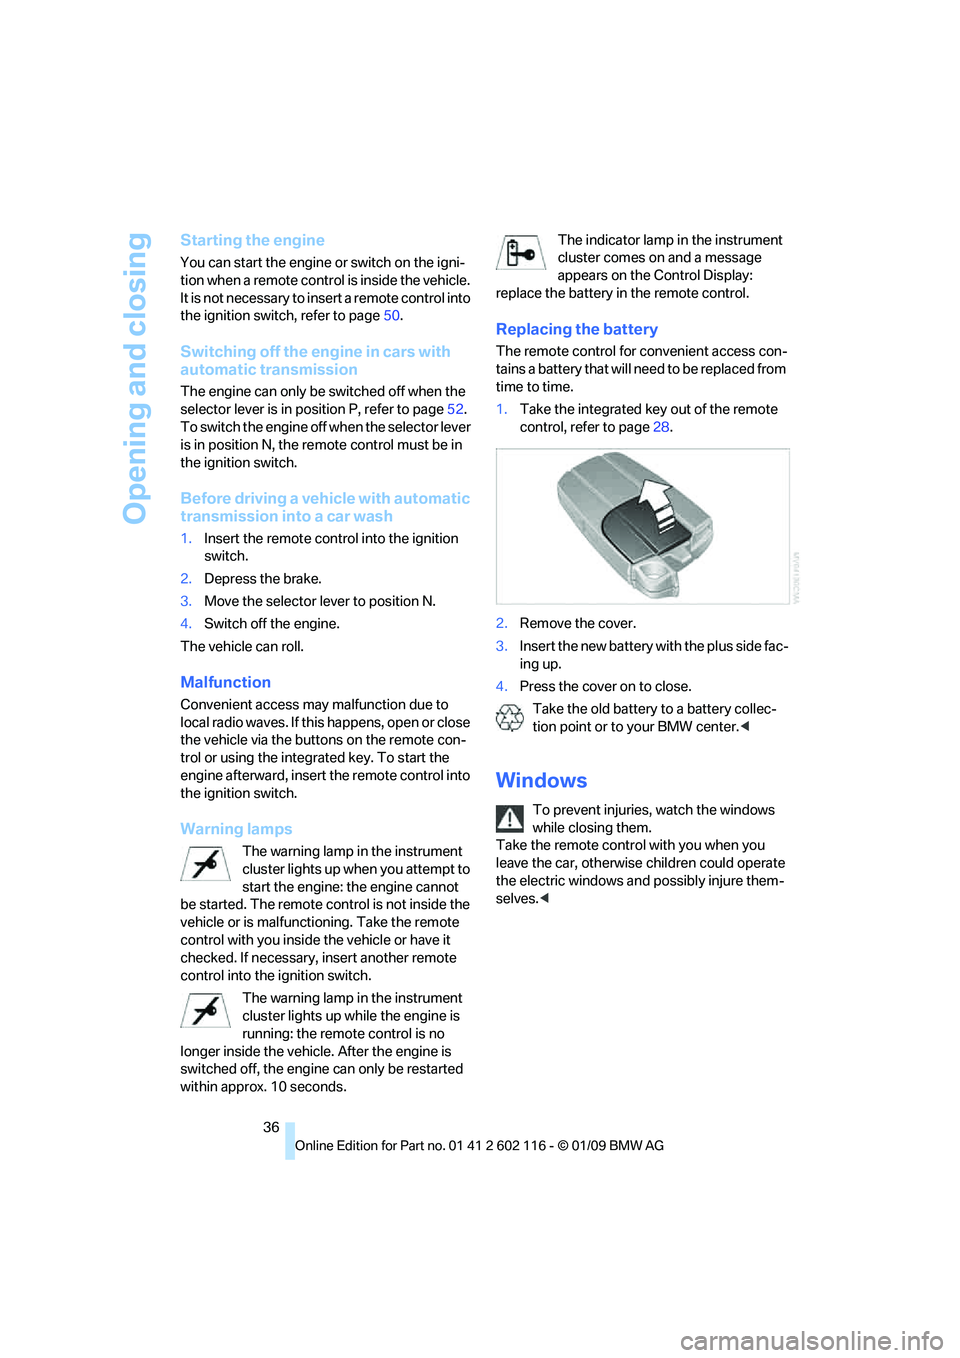
1. Take the integrated ke y out of the remote
control, refer to page 28.
2. Remove the cover.
3. Insert the new battery wi th the plus side fac-
ing up.
4. Press the cover on to close.
Take the old battery to a battery collec-
tion point or to your BMW center.<
Windows
To prevent injuries, watch the windows
while closing them.
Take the remote contro l with you when you
leave the car, otherwise children could operate
the electric windows and possibly injure them-
selves. <
Page 39 of 248
Controls
37Reference
At a glance
Driving tips
Communications
Navigation
Entertainment
Mobility
Opening, closing
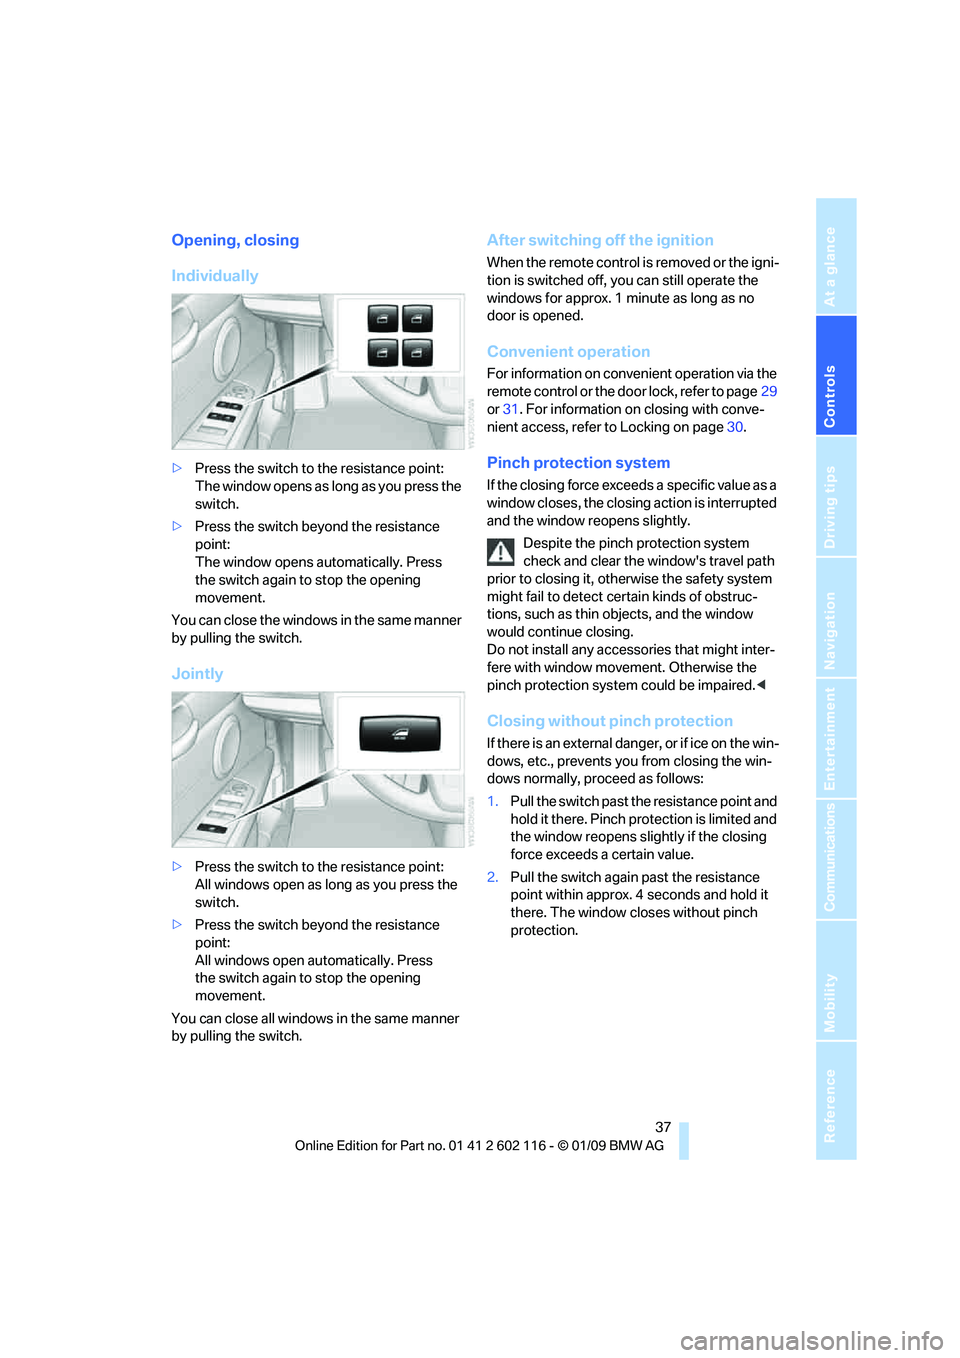
Individually
>Press the switch to the resistance point:
The window opens as long as you press the
switch.
> Press the switch beyond the resistance
point:
The window opens automatically. Press
the switch again to stop the opening
movement.
You can close the windows in the same manner
by pulling the switch.
Jointly
> Press the switch to the resistance point:
All windows open as long as you press the
switch.
> Press the switch beyond the resistance
point:
All windows open automatically. Press
the switch again to stop the opening
movement.
You can close all windows in the same manner
by pulling the switch.
After switching off the ignition
When the remote control is removed or the igni-
tion is switched off, you can still operate the
windows for approx. 1 minute as long as no
door is opened.
Convenient operation
For information on convenient operation via the
remote control or the do or lock, refer to page29
or 31 . For information on closing with conve-
nient access, refer to Locking on page 30.
Pinch protection system
If the closing force exceeds a specific value as a
window closes, the closing action is interrupted
and the window reopens slightly.
Despite the pinch protection system
check and clear the window's travel path
prior to closing it, othe rwise the safety system
might fail to detect certain kinds of obstruc-
tions, such as thin objects, and the window
would continue closing.
Do not install any accessories that might inter-
fere with window movement. Otherwise the
pinch protection system could be impaired. <
Closing without pinch protection
If there is an external danger, or if ice on the win-
dows, etc., prevents you from closing the win-
dows normally, proceed as follows:
1. Pull the switch past the resistance point and
hold it there. Pinch pr otection is limited and
the window reopens slig htly if the closing
force exceeds a certain value.
2. Pull the switch again past the resistance
point within approx. 4 seconds and hold it
there. The window closes without pinch
protection.
Page 41 of 248
Controls
39Reference
At a glance
Driving tips
Communications
Navigation
Entertainment
Mobility
Opening and closing
When the vehicle is stationary and at radio
readiness or beyond, refer to page50:
If possible, conserve the battery by only
operating the retrac table hardtop when
the engine is running.
Before closing the retrac table hardtop, remove
all foreign objects from the windshield frame as
these could prevent the hardtop from closing
properly. <
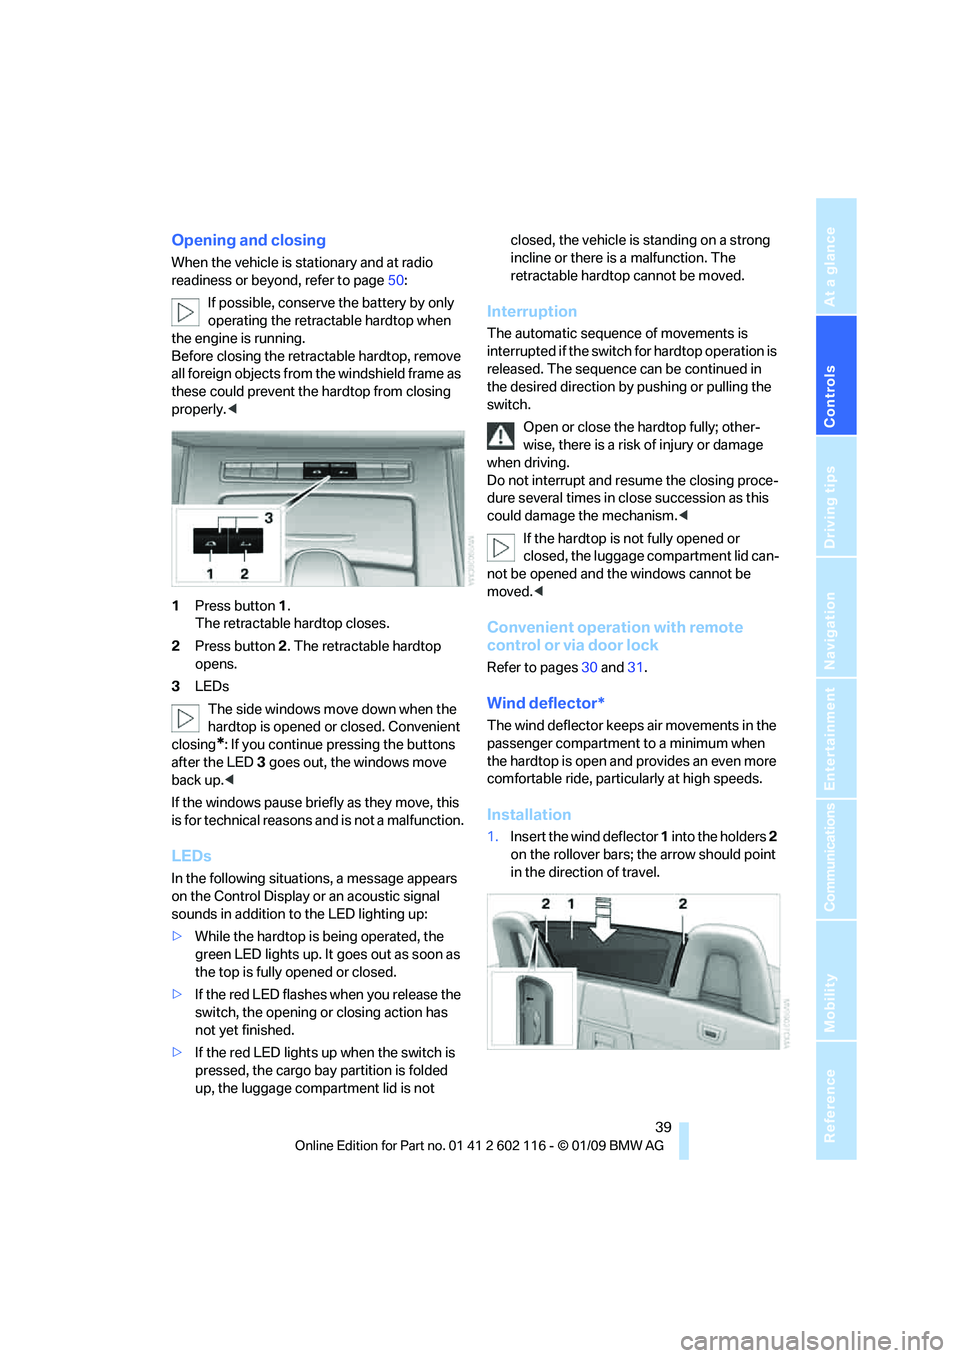
1 Press button 1.
The retractable hardtop closes.
2 Press button 2. The retractable hardtop
opens.
3 LEDs
The side windows move down when the
hardtop is opened or closed. Convenient
closing
*: If you continue pressing the buttons
after the LED 3 goes out, the windows move
back up. <
If the windows pause brie fly as they move, this
is for technical reasons and is not a malfunction.
LEDs
In the following situations, a message appears
on the Control Display or an acoustic signal
sounds in addition to the LED lighting up:
> While the hardtop is being operated, the
green LED lights up. It goes out as soon as
the top is fully opened or closed.
> If the red LED flashes when you release the
switch, the opening or closing action has
not yet finished.
> If the red LED lights up when the switch is
pressed, the cargo bay partition is folded
up, the luggage compartment lid is not closed, the vehicle is standing on a strong
incline or there is a malfunction. The
retractable hardto
p cannot be moved.
Interruption
The automatic sequence of movements is
interrupted if the switch for hardtop operation is
released. The sequence can be continued in
the desired direction by pushing or pulling the
switch.
Open or close the hardtop fully; other-
wise, there is a risk of injury or damage
when driving.
Do not interrupt and re sume the closing proce-
dure several times in cl ose succession as this
could damage the mechanism. <
If the hardtop is not fully opened or
closed, the luggage compartment lid can-
not be opened and the windows cannot be
moved. <
Convenient operation with remote
control or via door lock
Refer to pages 30 and 31.
Wind deflector*
The wind deflector keeps air movements in the
passenger compartment to a minimum when
the hardtop is open and provides an even more
comfortable ride, particul arly at high speeds.
Installation
1.Insert the wind deflector 1 into the holders 2
on the rollover bars; the arrow should point
in the direction of travel.
Page 46 of 248
Adjustments
44
Storing
1.Switch on radio readiness or the ignition,
refer to page 50.
2. Adjust the seat and exterior mirrors to the
desired positions.
3. Press the button.
The LED in the button lights up.
4. Press the desired memory button 1 or 2 : the
LED goes out.
The driver's seat and exterior mirror posi-
tions are stored for th e remote control cur-
rently in use.
Call-up
Do not call up memory while you are driv-
ing, otherwise unexpected seat move-
ment could result in an accident. <
Convenience mode
1.Unlock and open the driver's door or switch
on radio readiness, refer to page 50.
2. Briefly press the desired memory
button 1or 2.
The adjusting procedure is halted immediately
when you touch a seat adjustment switch or
one of the memory buttons.
Safety feature
1. Close the driver's door and switch the igni-
tion on or off, refer to page 50.
2. Press the desired memory button 1 or 2
and keep it pressed until the adjustment
process has been completed.
If the button was pressed accidentally:
Press the button again; the LED goes out.
Call-up with the remote control
The driver's seat position last stored is stored
for the remote control currently in use.
You can select whether the seat should be reset
to that position.
When this Personal Profile function is
used, first make sure that the footwell
behind the driver's seat is free of obstacles.
Failure to do so could re sult in damage to the
objects if the seat were to move rearward. <
The adjusting procedure is halted immediately
when you touch a seat adjustment switch or
one of the memory buttons.
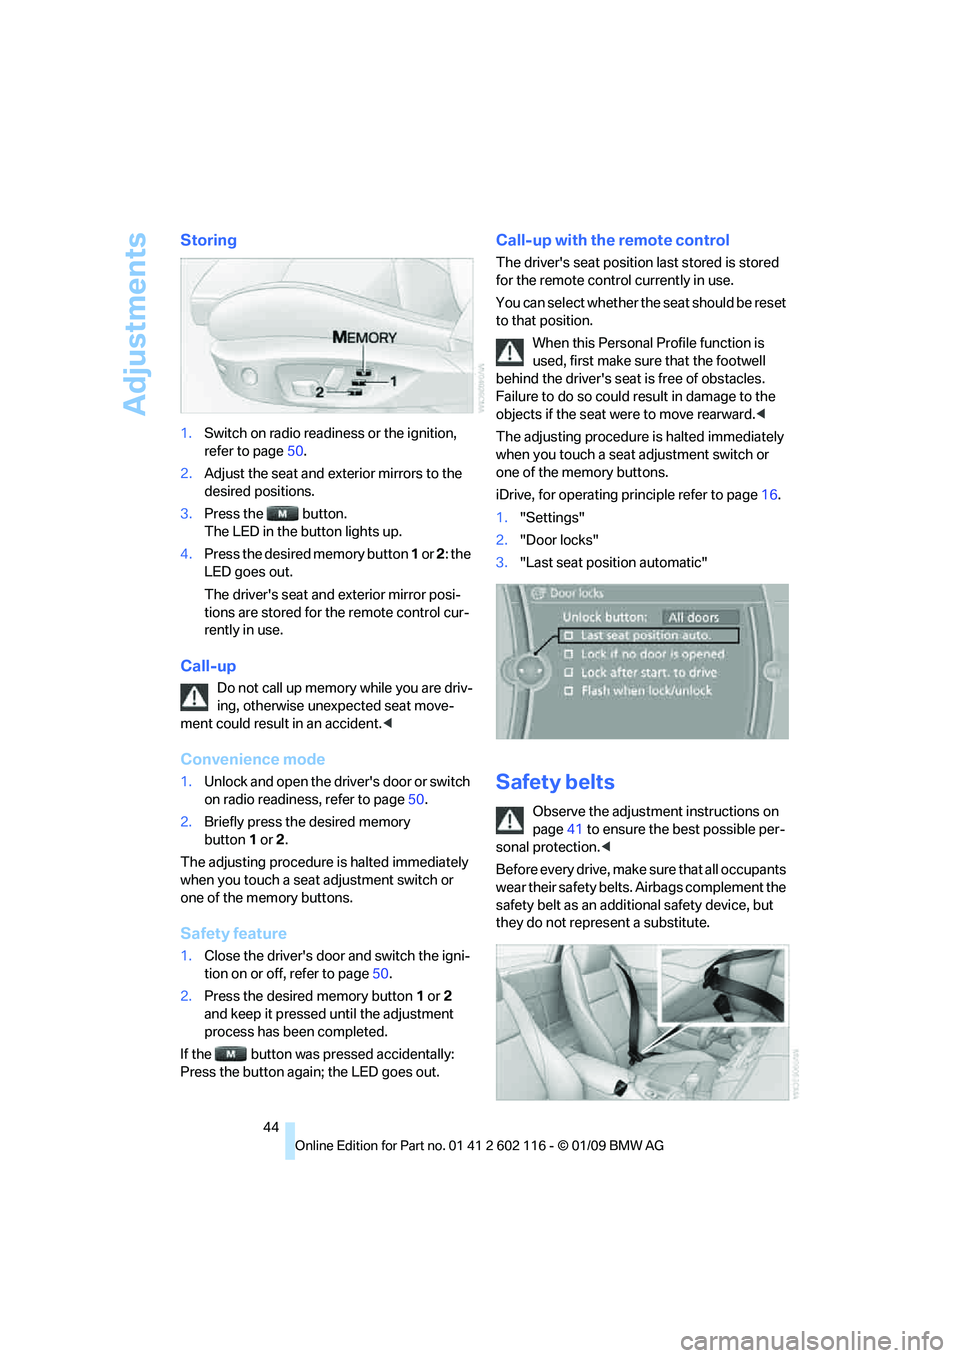
iDrive, for operating pr inciple refer to page16.
1. "Settings"
2. "Door locks"
3. "Last seat position automatic"
Safety belts
Observe the adjustment instructions on
page 41 to ensure the best possible per-
sonal protection. <
Before every drive, make sure that all occupants
wear their safety belts. Airbags complement the
safety belt as an additi onal safety device, but
they do not repres ent a substitute.
Page 47 of 248
Controls
45Reference
At a glance
Driving tips
Communications
Navigation
Entertainment
Mobility
Closing
Make sure you hear the latch plate engage in
the belt buckle.
The upper belt anchor is suitable for adults of
any stature as long as the seat is adjusted prop-
erly, refer to page 41.
Opening
1. Grasp the belt firmly.
2. Press the red button in the buckle.
3. Guide the belt into its reel.
Fasten safety belts reminder for driver
and passenger*
The indicator lamp comes on and an
acoustic signal sounds. In addition, a
message appears on the Control Dis-
play. Check whether the safety belt
has been fastened correctly.
The 'Fasten safety belts' reminder is issued as
long as the driver's safe ty belt has not been fas-
tened. In some country- specific versions, the
'Fasten safety belts' remi nder is also activated
at road speeds above approx. 5 mph or 8 km/h if
the passenger's safety belt is not fastened, if
objects are placed on the passenger seat, or if
driver or passenger unfasten their safety belts.
Damage to safety belts
If the safety belts are damaged or
stressed in an accident: have the belt sys-
tem, including any belt tensioners or child-
restraint systems, replaced and the belt
anchors checked. Have this work done only by
your BMW center or at a workshop that works
according to BMW repair procedures with cor-
respondingly trained perso nnel. Otherwise, it is
not guaranteed that the safety devices will func-
tion properly. <
Mirrors
Exterior mirrors
The passenger's mirror is more convex
than the driver's mirror. The objects seen
in the mirror are closer than they appear. Do not
gauge your distance from traffic behind you on
the basis of what you see in the mirror; other-
wise there is an increased risk of an accident. <
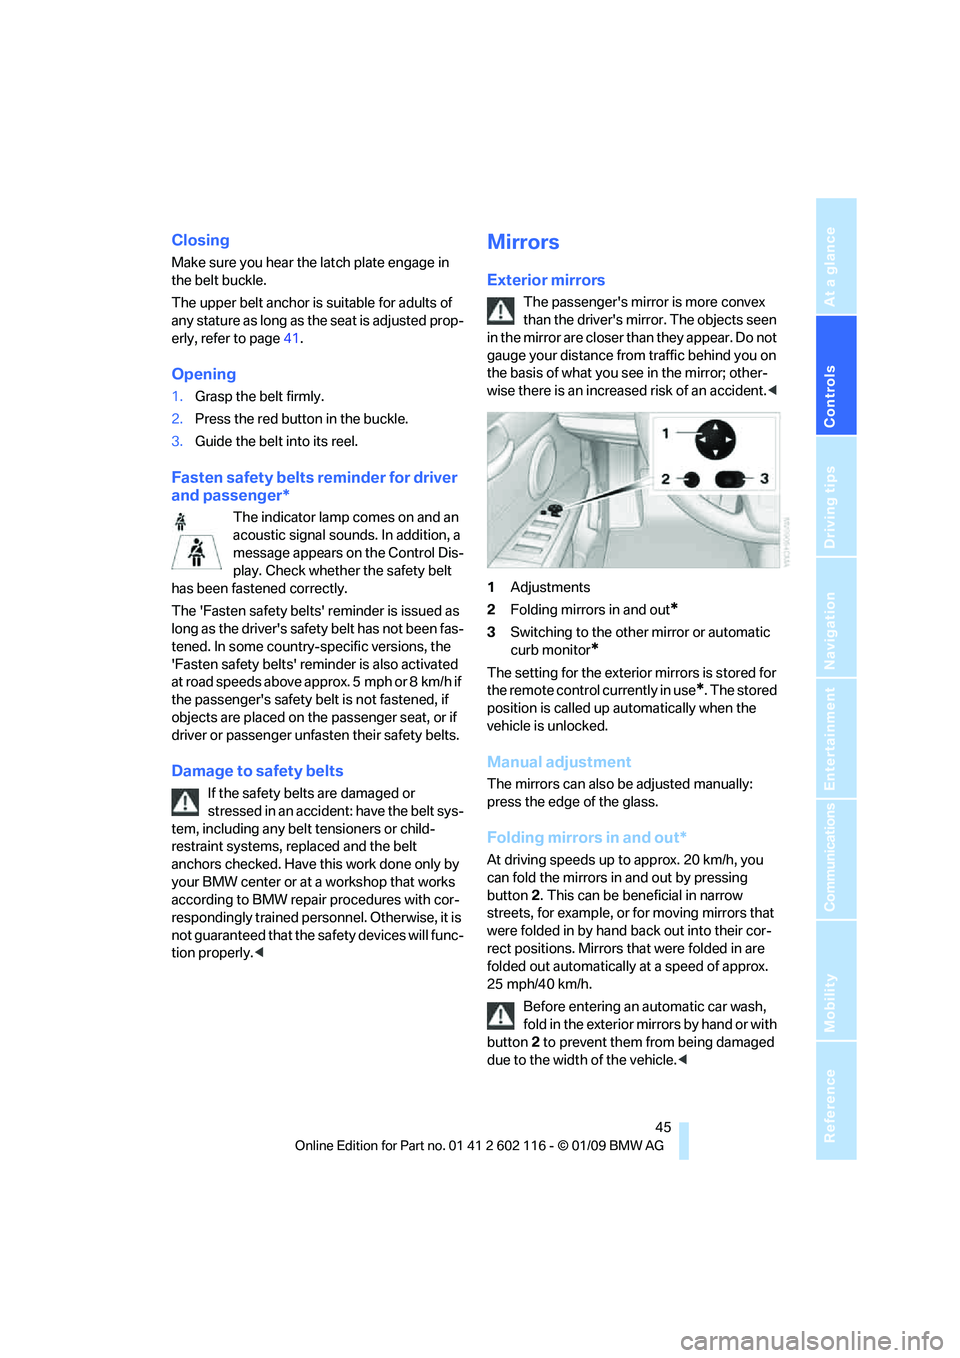
1 Adjustments
2 Folding mirrors in and out
*
3Switching to the other mirror or automatic
curb monitor
*
The setting for the exterior mirrors is stored for
the remote control currently in use
*. The stored
position is called up automatically when the
vehicle is unlocked.
Manual adjustment
The mirrors can also be adjusted manually:
press the edge of the glass.
Folding mirrors in and out*
At driving speeds up to approx. 20 km/h, you
can fold the mirrors in and out by pressing
button 2. This can be beneficial in narrow
streets, for example, or for moving mirrors that
were folded in by hand back out into their cor-
rect positions. Mirrors that were folded in are
folded out automatically at a speed of approx.
25 mph/40 km/h.
Before entering an automatic car wash,
fold in the exterior mi rrors by hand or with
button 2 to prevent them from being damaged
due to the width of the vehicle. <
Page 52 of 248

Driving
50
Driving
Ignition lock
Insert the remote control into the
ignition lock
Inserting the remote control all the way into the
ignition lock.
>Radio readiness is switched on.
Individual electrical consumers can operate.
Convenient access*
If the car is equipped wi th convenient access,
only insert the remote control into the ignition
lock under special circ umstances, refer to
page 35.
Removing the remote control from the
ignition lock
Do not forcibly pull the remote control out
of the ignition lock as this may cause
damage. <
Before removing the remote control, push it all
the way in to release the locking mechanism.
> The ignition is switched off if it was on.
Automatic transmission
You can only take out the remote control if
transmission position P is engaged: Interlock
Start/stop button
Pressing the start/stop button switches radio
readiness or the ignition on or off.
The engine is started when you press the
start/stop button and depress the clutch if
the car has manual transmission, or the brake if
the car has automatic transmission. <
Radio readiness
Individual electrical consumers can operate.
The time and the outside temperature are dis-
played in the instrument cluster.
Radio readiness is switched off automatically:
> When the remote cont rol is removed from
the ignition lock
> In cars with convenient access
*, by touch-
ing the surface above th e door lock, refer to
Locking on page 35
Ignition on
All electrical consumers can operate. The
odometer and trip odometer are displayed in
the instrument cluster.
When the engine is off, please switch off
the ignition and any unnecessary electri-
cal consumers in order to preserve the
battery. <
Radio readiness and ignition off
All indicator and warnin g lamps as well as dis-
plays in the instrument cluster go out.
Page 53 of 248
Controls
51Reference
At a glance
Driving tips
Communications
Navigation
Entertainment
Mobility
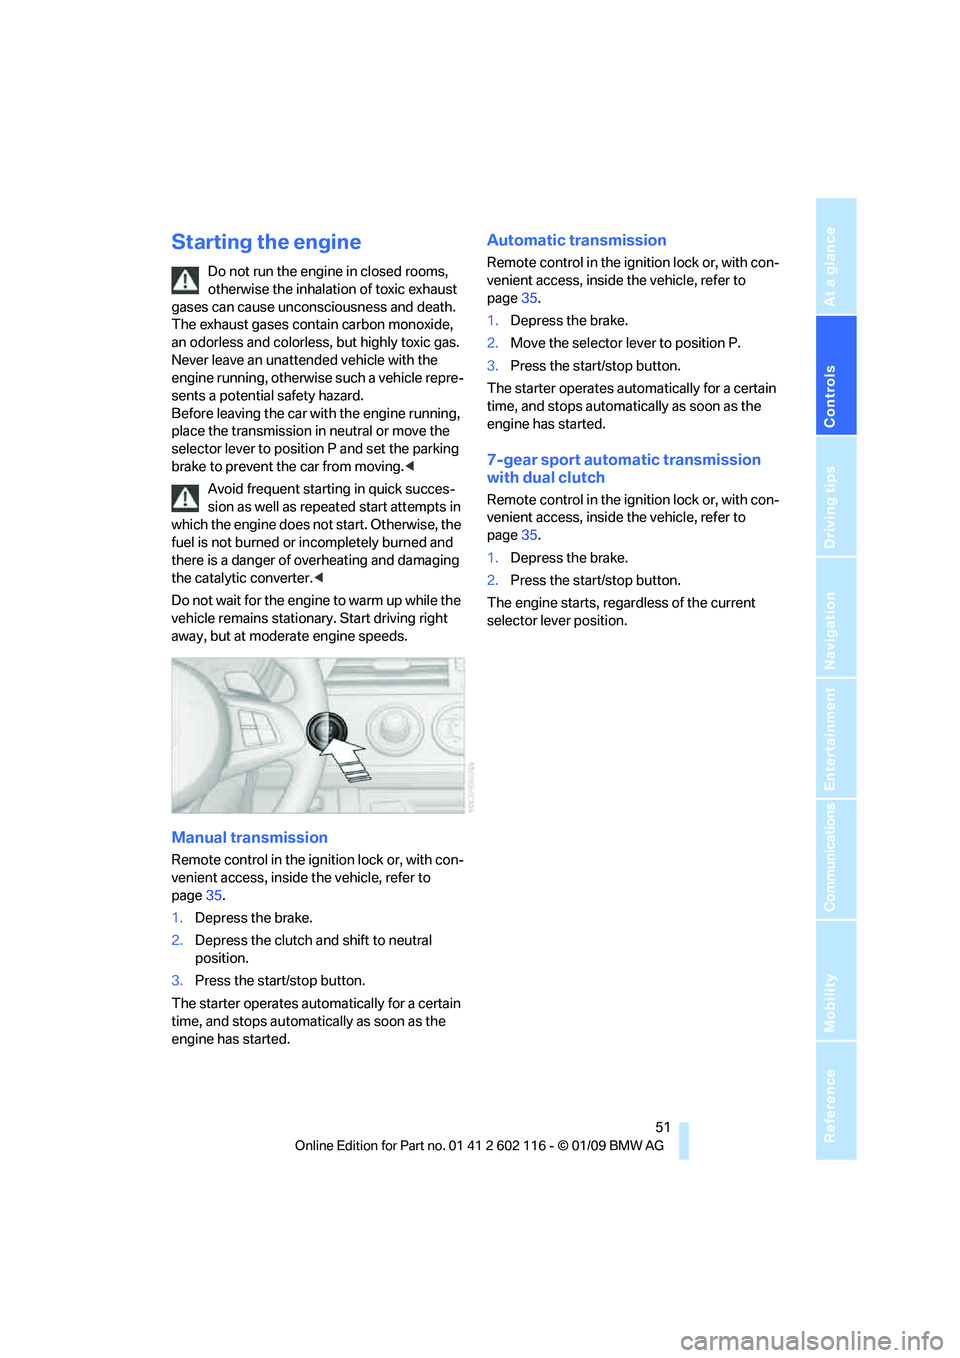
Starting the engine
Do not run the engine in closed rooms,
otherwise the inhalation of toxic exhaust
gases can cause unconsciousness and death.
The exhaust gases contain carbon monoxide,
an odorless and colorless, but highly toxic gas.
Never leave an unattended vehicle with the
engine running, otherwis e such a vehicle repre-
sents a potential safety hazard.
Before leaving the car wi th the engine running,
place the transmission in neutral or move the
selector lever to position P and set the parking
brake to prevent the car from moving. <
Avoid frequent starting in quick succes-
sion as well as repeat ed start attempts in
which the engine does no t start. Otherwise, the
fuel is not burned or incompletely burned and
there is a danger of overheating and damaging
the catalytic converter. <
Do not wait for the engine to warm up while the
vehicle remains stationary. Start driving right
away, but at moderate engine speeds.
Manual transmission
Remote control in the ignition lock or, with con-
venient access, inside the vehicle, refer to
page 35.
1. Depress the brake.
2. Depress the clutch and shift to neutral
position.
3. Press the start/stop button.
The starter operates automatically for a certain
time, and stops automatically as soon as the
engine has started.
Automatic transmission
Remote control in the ignition lock or, with con-
venient access, inside the vehicle, refer to
page 35.
1. Depress the brake.
2. Move the selector lever to position P.
3. Press the start/stop button.
The starter operates automatically for a certain
time, and stops automatically as soon as the
engine has started.
7-gear sport automatic transmission
with dual clutch
Remote control in the ignition lock or, with con-
venient access, inside the vehicle, refer to
page 35.
1. Depress the brake.
2. Press the start/stop button.
The engine starts, regardless of the current
selector lever position.
Page 54 of 248
Driving
52
Switching off the engine
Always take the remote control with you
when you leave the vehicle.
Set the parking brake firmly when parking; oth-
erwise, the vehicle could roll. <
Manual transmission
1.With the car at a standstill, press the start/
stop button.
2. Shift into first gear or reverse.
3. Set the parking brake.
4. Removing the remote control from the igni-
tion lock, refer to page 50.
Automatic transmission
1. With the car at a stan dstill, move the selec-
tor lever to position P.
2. Press the start/stop button.
3. Set the parking brake.
4. Removing the remote control from the igni-
tion lock, refer to page 50.
7-gear sport automatic transmission
with dual clutch
1. With the car at a stan dstill, engage trans-
mission position P.
2. Press the start/stop button.
3. Set the parking brake.
4. Removing the remote control from the igni-
tion lock, refer to page 50.
Parking brake
The concept
Your BMW is equipped with an electromechan-
ical parking brake that can be set and released
by using a button.
The parking brake is primarily used to prevent
the vehicle from rolling when it is parked.
When the vehicle is stationary, the parking
brake acts on the rear wheels via an electrome-
chanical mechanism. When the vehicle is rolling
or being driven, the parking brake acts on the disc brakes of the front and rear wheels via the
hydraulic brake system.
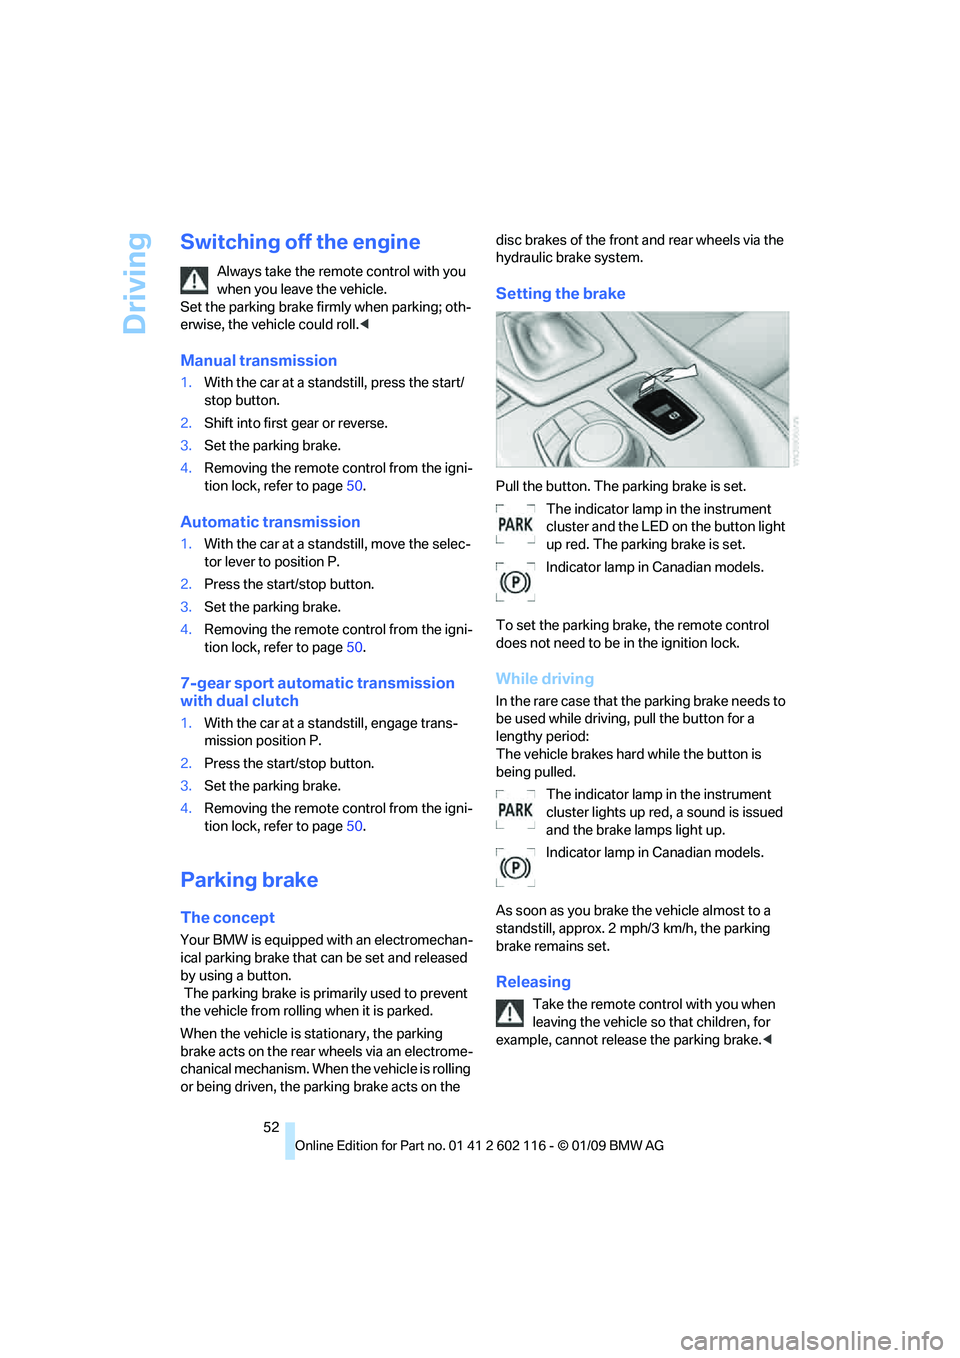
Setting the brake
Pull the button. The parking brake is set.
The indicator lamp in the instrument
cluster and the LED on the button light
up red. The parking brake is set.
Indicator lamp in Canadian models.
To set the parking brake, the remote control
does not need to be in the ignition lock.
While driving
In the rare case that the parking brake needs to
be used while driving, pull the button for a
lengthy period:
The vehicle brakes hard while the button is
being pulled. The indicator lamp in the instrument
cluster lights up red, a sound is issued
and the brake lamps light up.
Indicator lamp in Canadian models.
As soon as you brake the vehicle almost to a
standstill, approx. 2 mph/3 km/h, the parking
brake remains set.
Releasing
Take the remote cont rol with you when
leaving the vehicle so that children, for
example, cannot release the parking brake. <