2009 BMW M3 SEDAN headlamp
[x] Cancel search: headlampPage 89 of 246
Controls
87Reference
At a glance
Driving tips
Communications
Navigation
Entertainment
Mobility
Malfunction
The LED next to the symbol for automatic head-
lamp control flashes. Adaptive Head Light is
malfunctioning or has failed. Have the system
checked as soon as possible.
High beams/roadside parking
lamps
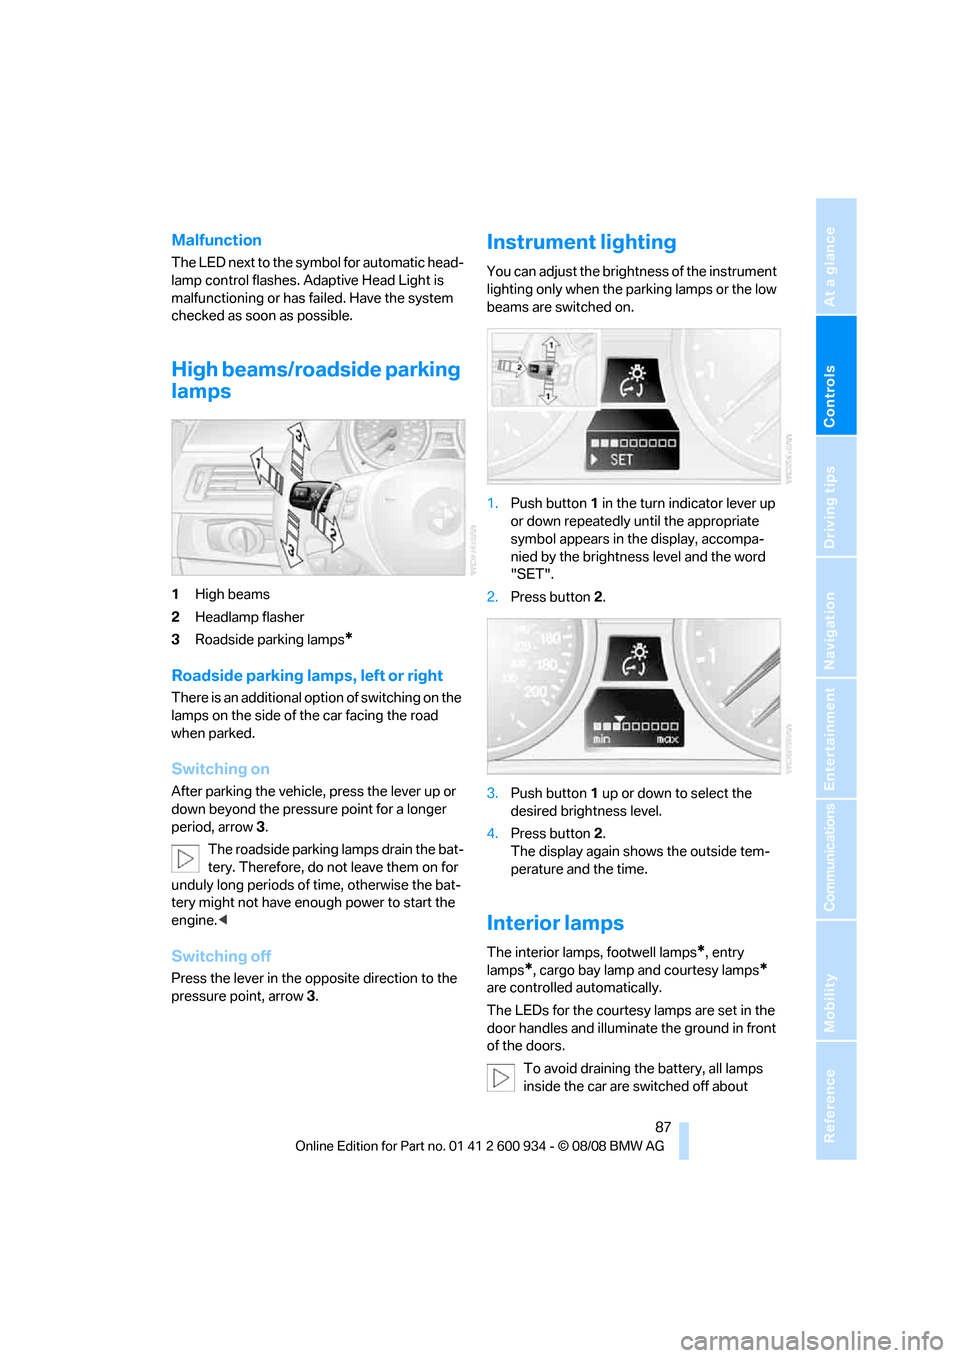
1High beams
2Headlamp flasher
3Roadside parking lamps
*
Roadside parking lamps, left or right
There is an additional option of switching on the
lamps on the side of the car facing the road
when parked.
Switching on
After parking the vehicle, press the lever up or
down beyond the pressure point for a longer
period, arrow 3.
The roadside parking lamps drain the bat-
tery. Therefore, do not leave them on for
unduly long periods of time, otherwise the bat-
tery might not have enough power to start the
engine.<
Switching off
Press the lever in the opposite direction to the
pressure point, arrow 3.
Instrument lighting
You can adjust the brightness of the instrument
lighting only when the parking lamps or the low
beams are switched on.
1.Push button 1 in the turn indicator lever up
or down repeatedly until the appropriate
symbol appears in the display, accompa-
nied by the brightness level and the word
"SET".
2.Press button 2.
3.Push button 1 up or down to select the
desired brightness level.
4.Press button 2.
The display again shows the outside tem-
perature and the time.
Interior lamps
The interior lamps, footwell lamps*, entry
lamps
*, cargo bay lamp and courtesy lamps*
are controlled automatically.
The LEDs for the courtesy lamps
are set in the
door handles and illuminate the ground in front
of the doors.
To avoid draining the battery, all lamps
inside the car are switched off about
ba8_E90M3_cic.book Seite 87 Dienstag, 19. August 2008 11:51 11
Page 195 of 246

Mobility
193Reference
At a glance
Controls
Driving tips
Communications
Navigation
Entertainment
Important parts of the engine compartment
1Expansion tank for coolant, refer to
page196
2Washer fluid filler neck for headlamp clean-
ing system and window washer system,
refer to page603Jump-starting connection, refer to
page211
4Filler neck for engine oil, refer to Adding
engine oil
Engine oil
The engine oil consumption is dependent on
driving style and driving conditions.
Checking oil level
Your car is equipped with an electronic oil-level
monitor.
The oil level can be displayed when the engine
is warm. Continuous short distance travel or a
very sporty driving style may make measure-
ment impossible.
Display in the instrument cluster
1Oil level
2Maximum mark
3Minimum mark
4Computer button
ba8_E90M3_cic.book Seite 193 Dienstag, 19. August 2008 11:51 11
Page 202 of 246
Care
200
Manual car wash
When washing the vehicle by hand, use large
quantities of water and car shampoo if neces-
sary. Clean the vehicle with a sponge or wash-
ing brush, applying light pressure only.
Before cleaning the windshield, deacti-
vate the rain sensor or switch off the igni-
tion to prevent unintentional activation of the
wipers.<
Observe local regulations pertaining to
washing vehicles by hand.<
Headlamps
Do not rub them dry and do not use abrasive or
corrosive cleaning agents.
Remove contamination, such as insects, by
soaking with shampoo or insect remover and
then rinsing with plenty of water.
Thaw ice with a windshield de-icer and do not
use an ice scraper.
Windows
Clean the inside and outside surfaces of the
windows and the mirrors with window cleaner.
Do not clean the mirrors with cleaners
containing quartz.<
Wiper blades
Clean with soapy water and replace regularly to
avoid streaking.
Wax and preservative residue and con-
tamination on the window can lead to
streaking when operating the windshield wip-
ers, leading to premature wear of the wiper
blades and causing the rain sensor to malfunc-
tion.<
Paintwork care
Regular care contributes to value retention and
protects the paintwork against the long-term
effects of damaging substances.
Region-specific environmental influences can
damage the vehicle paintwork. Therefore, it is
important to adapt the frequency and scope of
car care accordingly.Immediately remove very aggressive sub-
stances, e.g. spilled fuel, oil, grease, tree
resin or bird droppings, to prevent damage to
the paintwork.<
Repairing paintwork damage
Immediately repair scratches or similar
damage, such as that caused by stones
hitting the vehicle, where necessary to prevent
rusting.<
BMW recommends having paintwork damage
repaired by a professional paint repair work-
shop according to BMW specifications using
original BMW paint materials.
Preservation
A preservation treatment is necessary when
water no longer beads off of the clean paintwork
surface. Only use products for paintwork pres-
ervation that contain carnauba or synthetic
waxes.
Rubber seals
Treat only with water or rubber care products.
Do not use silicon-containing care prod-
ucts on rubber seals, otherwise noise and
damage could occur.<
Chrome parts
Carefully clean vehicle parts, such as the radia-
tor grill, door handles or window frames, with
copious quantities of water and a shampoo
additive. For additional treatment, use a chrome
polish.
Light-alloy wheels
For technical reasons, dust is generated during
braking that is deposited on the light-alloy
wheels. Remove the dust regularly using acid-
free rim cleaner.
Do not use aggressive, acidic, strongly
alkaline and abrasive cleaning agents or
steam jets over 1407/606, otherwise dam-
age may occur.<
ba8_E90M3_cic.book Seite 200 Dienstag, 19. August 2008 11:51 11
Page 205 of 246
Mobility
203Reference
At a glance
Controls
Driving tips
Communications
Navigation
Entertainment
Replacing components
Onboard tool kit
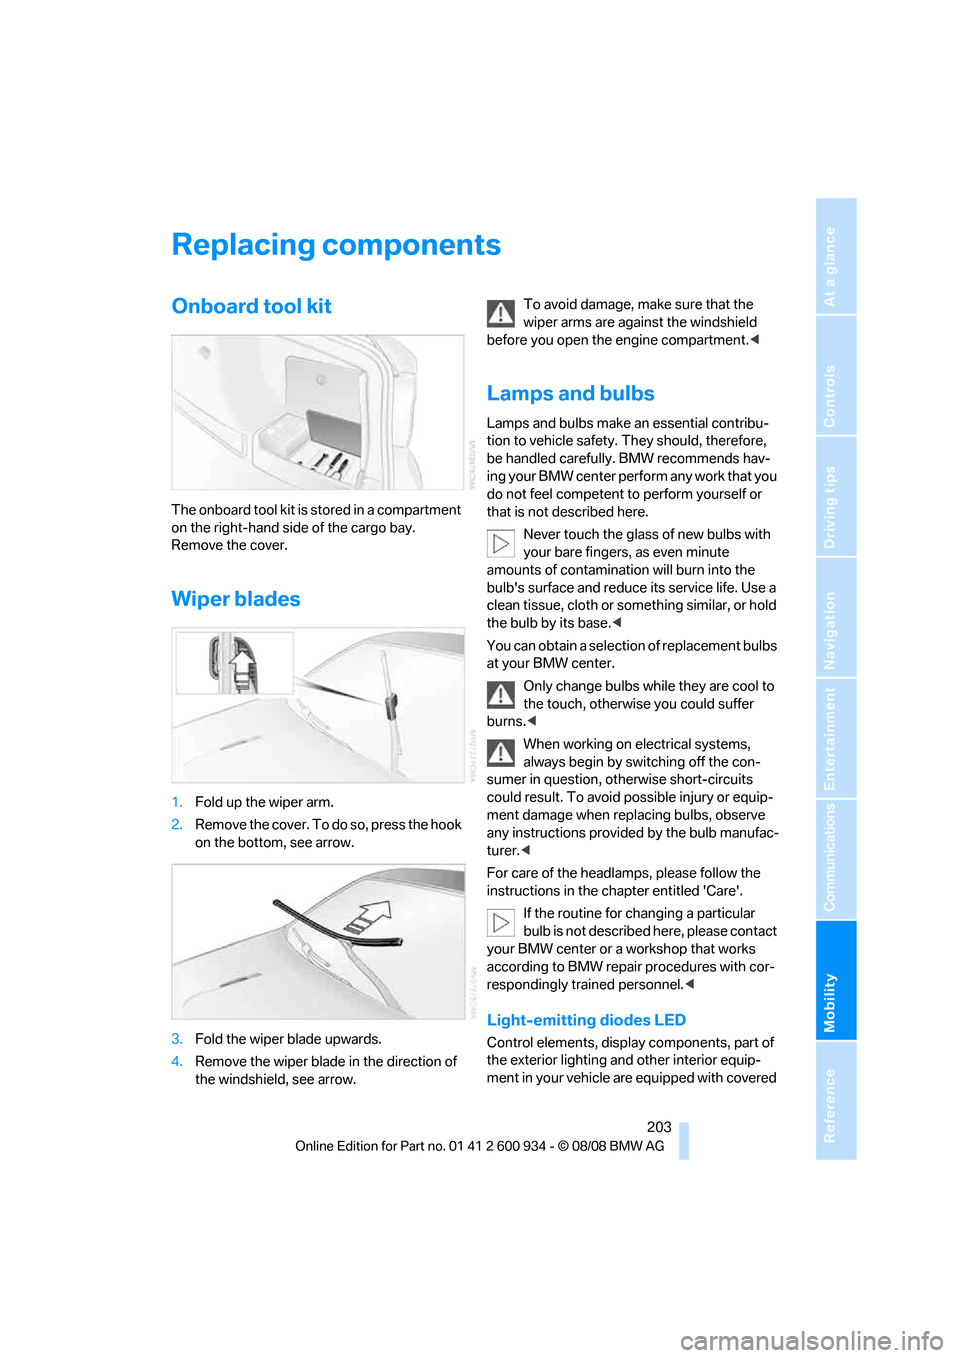
The onboard tool kit is stored in a compartment
on the right-hand side of the cargo bay.
Remove the cover.
Wiper blades
1.Fold up the wiper arm.
2.Remove the cover. To do so, press the hook
on the bottom, see arrow.
3.Fold the wiper blade upwards.
4.Remove the wiper blade in the direction of
the windshield, see arrow.To avoid damage, make sure that the
wiper arms are against the windshield
before you open the engine compartment.<
Lamps and bulbs
Lamps and bulbs make an essential contribu-
tion to vehicle safety. They should, therefore,
be handled carefully. BMW recommends hav-
ing your BMW center perform any work that you
do not feel competent to perform yourself or
that is not described here.
Never touch the glass of new bulbs with
your bare fingers, as even minute
amounts of contamination will burn into the
bulb's surface and reduce its service life. Use a
clean tissue, cloth or something similar, or hold
the bulb by its base.<
You can obtain a selection of replacement bulbs
at your BMW center.
Only change bulbs while they are cool to
the touch, otherwise you could suffer
burns.<
When working on electrical systems,
always begin by switching off the con-
sumer in question, otherwise short-circuits
could result. To avoid possible injury or equip-
ment damage when replacing bulbs, observe
any instructions provided by the bulb manufac-
turer.<
For care of the headlamps, please follow the
instructions in the chapter entitled 'Care'.
If the routine for changing a particular
bulb is not described here, please contact
your BMW center or a workshop that works
according to BMW repair procedures with cor-
respondingly trained personnel.<
Light-emitting diodes LED
Control elements, display components, part of
the exterior lighting and other interior equip-
ment in your vehicle are equipped with covered
ba8_E90M3_cic.book Seite 203 Dienstag, 19. August 2008 11:51 11
Page 206 of 246
Replacing components
204 light-emitting diodes as light sources. These
light-emitting diodes, which operate using a
concept similar to that applied in conventional
lasers, are officially designated as Class 1 light-
emitting diodes.
Do not remove the covers or expose the
eyes directly to the unfiltered light source
for several hours, otherwise this could cause
irritation to the retina.<
Xenon lamps
These bulbs have a very long service life and are
highly unlikely to fail.
Have any work on the xenon lamp system,
including bulb replacements, performed
only by a BMW center or a workshop that works
according to BMW repair procedures with cor-
respondingly trained personnel. Otherwise, if
such work is carried out improperly, the high
voltage in the system presents the danger of
fatal injuries.<
Accessing the bulbs
1.Switch off the lamps and take the remote
control out of the ignition lock.
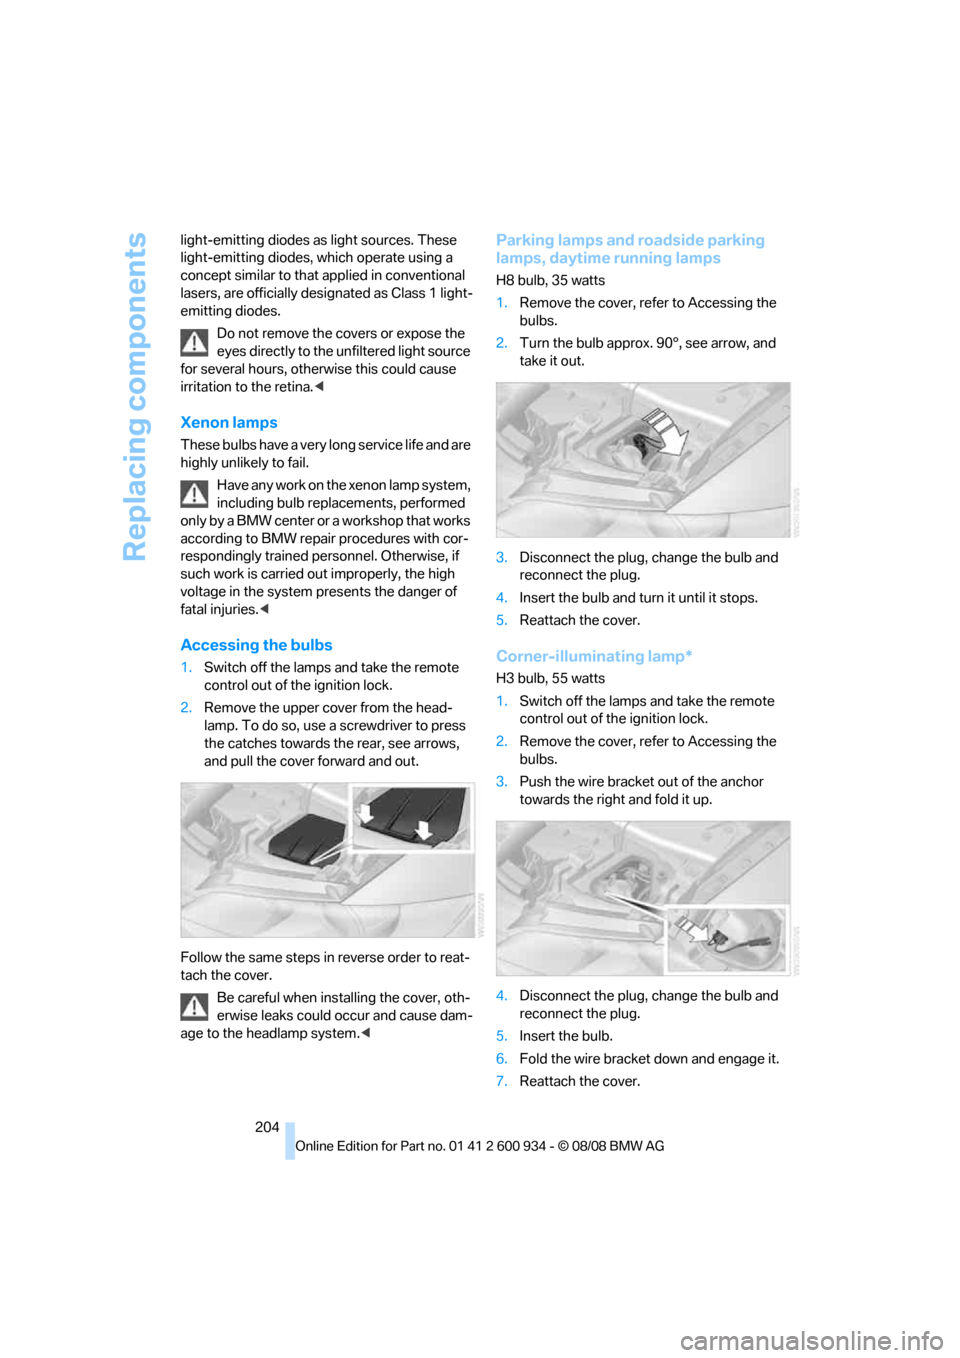
2.Remove the upper cover from the head-
lamp. To do so, use a screwdriver to press
the catches towards the rear, see arrows,
and pull the cover forward and out.
Follow the same steps in reverse order to reat-
tach the cover.
Be careful when installing the cover, oth-
erwise leaks could occur and cause dam-
age to the headlamp system.<
Parking lamps and roadside parking
lamps, daytime running lamps
H8 bulb, 35 watts
1.Remove the cover, refer to Accessing the
bulbs.
2.Turn the bulb approx. 90°, see arrow, and
take it out.
3.Disconnect the plug, change the bulb and
reconnect the plug.
4.Insert the bulb and turn it until it stops.
5.Reattach the cover.
Corner-illuminating lamp*
H3 bulb, 55 watts
1.Switch off the lamps and take the remote
control out of the ignition lock.
2.Remove the cover, refer to Accessing the
bulbs.
3.Push the wire bracket out of the anchor
towards the right and fold it up.
4.Disconnect the plug, change the bulb and
reconnect the plug.
5.Insert the bulb.
6.Fold the wire bracket down and engage it.
7.Reattach the cover.
ba8_E90M3_cic.book Seite 204 Dienstag, 19. August 2008 11:51 11
Page 215 of 246

Mobility
213Reference
At a glance
Controls
Driving tips
Communications
Navigation
Entertainment
headlamps, tail lamps, turn signal indicators and
windshield wipers may be unavailable.
Power steering assistance is not available when
the engine is not running. Thus, braking and
steering will require increased effort.<
Manual transmission
Gearshift lever in neutral position.
M dual clutch transmission with
Drivelogic
Ensure that the parking lock P is not
engaged as the rear wheels will otherwise
be blocked.
When using the car wash function, refer to
page51, note that the parking lock P is
engaged automatically after approx. 30 min-
utes, blocking the rear wheels.
If an electrical malfunction occurs or if towing
takes longer than approx. 20 minutes, manually
release the parking lock, refer to page54.<
When towing, do not exceed a maximum
speed of 30 mph/50 km/h and a maxi-
mum distance of 30 miles/50 km, otherwise the
transmission can be damaged.<
BMW recommends transporting the vehicle on
a tow truck with a flat bed.
Towing methods
Do not lift the vehicle by a tow fitting or
body and chassis parts, otherwise dam-
age may result.<
With a tow bar
The towing vehicle must not be lighter
than the towed vehicle, otherwise it may
be impossible to maintain control.<
The tow fittings used should be on the same
side on both vehicles. Should it prove impossi-
ble to avoid mounting the tow bar at an angle,
please observe the following:
>Clearance and maneuvering capability will
be sharply limited during cornering.
>The tow bar will generate lateral forces if it is
attached offset.Attach the tow bar to the tow fittings only,
as attaching it to other parts of the vehicle
could result in damage.<
With a tow rope
When starting off in the towing vehicle, make
sure that the tow rope is taut.
To avoid jerking and the associated
stresses on vehicle components when
towing, always use nylon ropes or nylon straps.
Attach the tow rope to the tow fittings only, as
attaching it to other parts of the vehicle could
result in damage.<
With a tow truck
Manual transmission:
Have the BMW transported with a tow truck
with a so-called lift bar or on a flat bed.
Do not tow the vehicle with just the rear axle
raised as this may cause the steering to turn.
M dual clutch transmission:
Have the BMW transported with a tow truck
with a so-called lift bar or on a flat bed.
Tow-starting
If possible, do not tow-start the vehicle but
jump-start the engine, refer to page211. Vehi-
ba8_E90M3_cic.book Seite 213 Dienstag, 19. August 2008 11:51 11
Page 222 of 246
Technical data
220
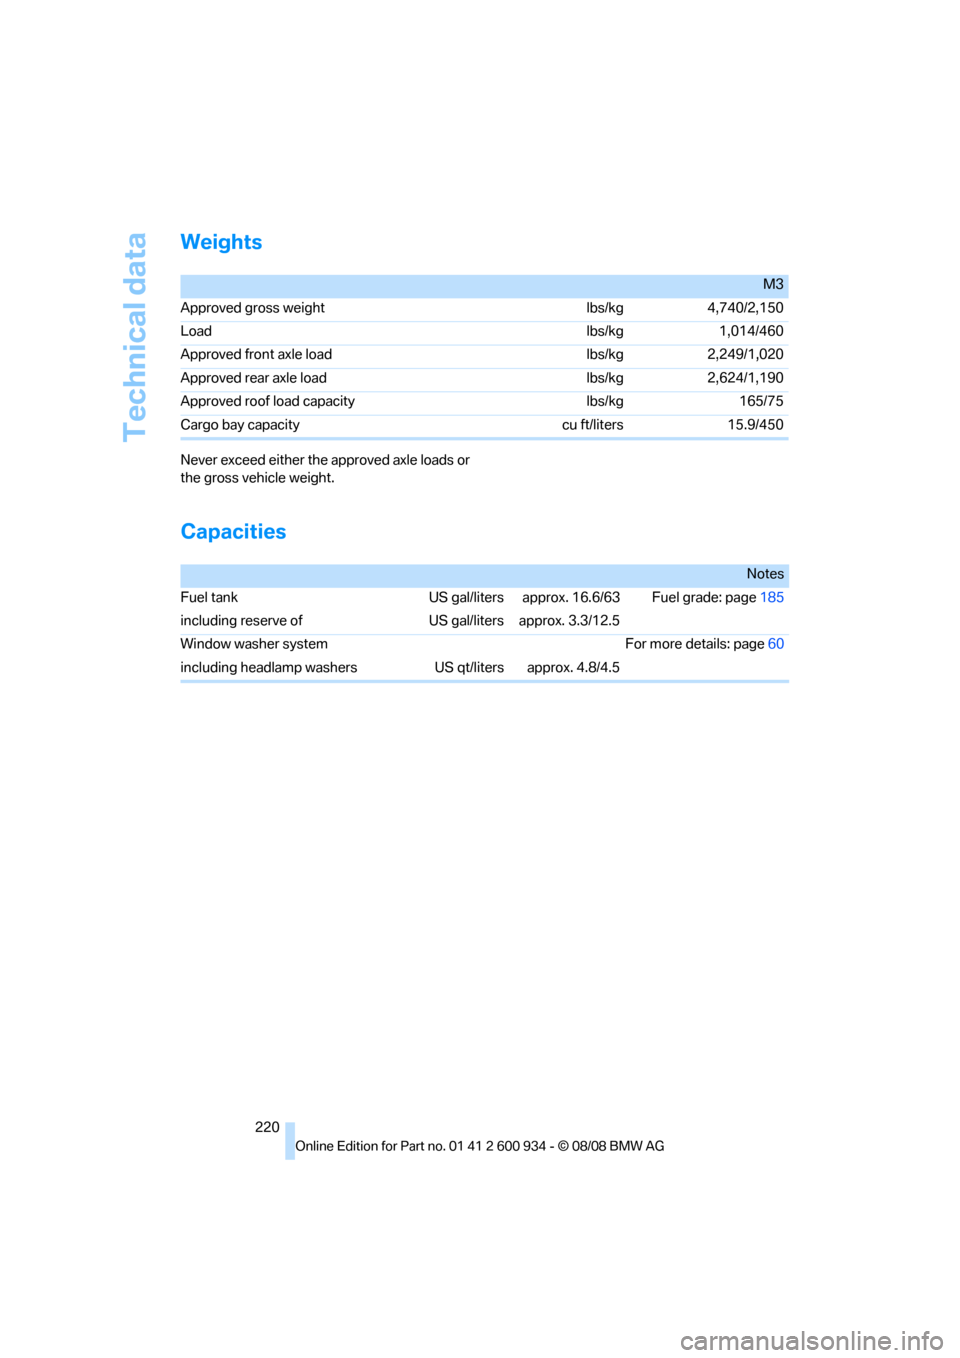
Weights
Never exceed either the approved axle loads or
the gross vehicle weight.
Capacities
M3
Approved gross weight lbs/kg 4,740/2,150
Load lbs/kg 1,014/460
Approved front axle load lbs/kg 2,249/1,020
Approved rear axle load lbs/kg 2,624/1,190
Approved roof load capacity lbs/kg 165/75
Cargo bay capacity cu ft/liters 15.9/450
Notes
Fuel tank US gal/liters approx. 16.6/63 Fuel grade: page185
including reserve of US gal/liters approx. 3.3/12.5
Window washer system For more details: page60
including headlamp washers US qt/liters approx. 4.8/4.5
ba8_E90M3_cic.book Seite 220 Dienstag, 19. August 2008 11:51 11
Page 230 of 246

Everything from A - Z
228
Everything from A - Z
Index
"..." Identifies Control Display
texts used to select
individual functions and
refers you to the page where
these texts can be found.
A
ABS Antilock Brake
System76
Acceleration assistant, refer to
Launch Control57
Accident, refer to Sending an
Emergency Request210
Activated-charcoal filter for
automatic climate control92
Adaptive brake light
– brake force display82
Adaptive Head Light86
Additives
– coolant196
Address, entering117,123
Address for navigation
– entering117,123
Adjusting temperature inside
the car, refer to Automatic
climate control90
Adjusting the thigh support38
Adjusting the tone during
audio operation, refer to
Tone control136
Airbags82
– indicator/warning lamp84
– sitting safely37
Air conditioning mode
– automatic climate control90
– ventilation92
Air distribution
– automatic90
Air flow rate91
Airing, refer to Ventilation92
Air pressure, refer to Tire
inflation pressure186Air recirculation, refer to
Recirculated-air mode91
Air supply
– automatic climate control90
– ventilation92
Air vents89
AKI, refer to Fuel
specifications184
Alarm system31
– avoiding unintentional
alarms32
– interior motion sensor32
– switching off an alarm32
– tilt alarm sensor32
Album information for
music153
Albums of music
collection153
All-season tires, refer to
Winter tires190
AM, waveband139
Ambient air, refer to
Recirculated-air mode91
Antenna for mobile phone162
Antifreeze
– coolant196
– washer fluid60
Antilock Brake System
ABS
76
Anti-theft alarm system, refer
to Alarm system31
Anti-theft system27
Approved axle loads, refer to
Weights220
Approved gross vehicle
weight, refer to Weights220
Armrest, refer to Center
armrest98
Arrival time, refer to
Computer64
Ashtray
– front99
– rear100Assistance systems, refer to
Driving stability control
systems76
AUC Automatic recirculated-
air control91
Audio136
– controls136
– switching on/off136
– tone control136
– volume136
Audio device, external98
Automatic
– air distribution90
– air flow rate90
– cruise control60
– headlamp control85
Automatic car washes199
Automatic climate control89
– automatic air distribution90
Automatic curb monitor43
Automatic recirculated-air
control AUC91
Automatic Service
Request179
Automatic transmission with
Steptronic
– towing212
– tow-starting212
AUTO program for automatic
climate control90
AUX-IN port155
Average fuel consumption64
– setting the units65
Avoid highways in
navigation127
Avoiding unintentional
alarms32
Axle loads, refer to
Weights220
ba8_E90M3_cic.book Seite 228 Dienstag, 19. August 2008 11:51 11