2009 BMW 650I CONVERTIBLE fog light
[x] Cancel search: fog lightPage 109 of 272

Controls
107Reference
At a glance
Driving tips
Communications
Navigation
Entertainment
Mobility
>If the high-beam assistant has switched on
the high beams, but you wish to use the low
beams, just switch on the low beams with
the turn signal lever. This deactivates the
high-beam assistant.
In order to reactivate the system, briefly
press the turn signal lever in the high-beam
direction.
>If the high-beam assistant has switched on
the low beams, but you wish to use the high
beams, simply switch on the high beams as
usual. This deactivates the system and it is
up to you to switch back to low beams.
In order to reactivate the system, briefly
press the turn signal lever in the high-beam
direction.
>When the low beams are on, use the head-
lamp flasher as usual.
System limits
The high-beam assistant is designed to
maximize the amount of time that high
beams can be safely used and to quickly switch
back to low beams when traffic approaches.
The system cannot completely replace driver
intervention when unusual conditions are
encountered. For this reason, switch to low
beams when circumstances so dictate. Failure
to do so can pose a safety risk.<
Below are a few examples of situations in which
the system may not react or may only function
to a limited degree, requiring personal interven-
tion:
>in extremely unfavorable weather condi-
tions such as fog or heavy precipitation
>in sensing road users with poor inherent
illumination such as pedestrians, cyclists,
equestrians, horse-drawn vehicles, railroad
or shipping traffic close to the road, and at
deer crossings
>in tight curves, on steep crests or dips, with
cross-traffic, or with partially hidden
oncoming traffic on divided highways
>in poorly illuminated areas and in the pres-
ence of highly reflective signs
>in the low speed range>when the windshield is fogged up, dirty or
covered with stickers, decals etc. in the area
of the inside rearview mirror
>when the sensor is dirty. Clean the sensor
on the front side of the inside rearview mir-
ror with a cloth slightly moistened with glass
cleaner
Moreover, no system can operate without limi-
tations. High-beam assistant operation is sub-
ject to conditions that may reduce the system's
ability to recognize the difference between
actual vehicle head lamps or tail lamps and, for
example, highly reflective signs, markers, and
streetlights. To be on the safe side, the system
may periodically interpret these situations as
conditions that require low beams. Below are
some of the situations in which premature
switching to low beams can occur:
>approaching large and/or highly reflective
signs
>approaching certain lights, such as drive-
way lighting and porch lights
>approaching certain traffic signals
>approaching large reflective markers
In these situations, the system may interpret
the above conditions as a vehicle ahead requir-
ing a switch to low beams. When the conditions
return to normal, the system will reactivate the
high beams.
The high-beam assistant cannot replace the
driver's responsibility for complying with state
laws on high-beam switching or for adapting to
visibility and traffic conditions.
Switching off via iDrive
iDrive, for operating principle refer to page16.
1.Press the button.
This opens the start menu.
2.Press the controller to open the menu.
3.Select "Settings" and press the controller.
4.Select "Vehicle / Tires" and press the con-
troller.
Page 110 of 272

Lamps
108 5.Change to upper field if necessary. Turn the
controller until "Lighting" is selected and
press the controller.
6.Select "High-beam assistant" and press
the controller.
High-beam assistant is switched off.
The setting is stored for the remote control cur-
rently in use.
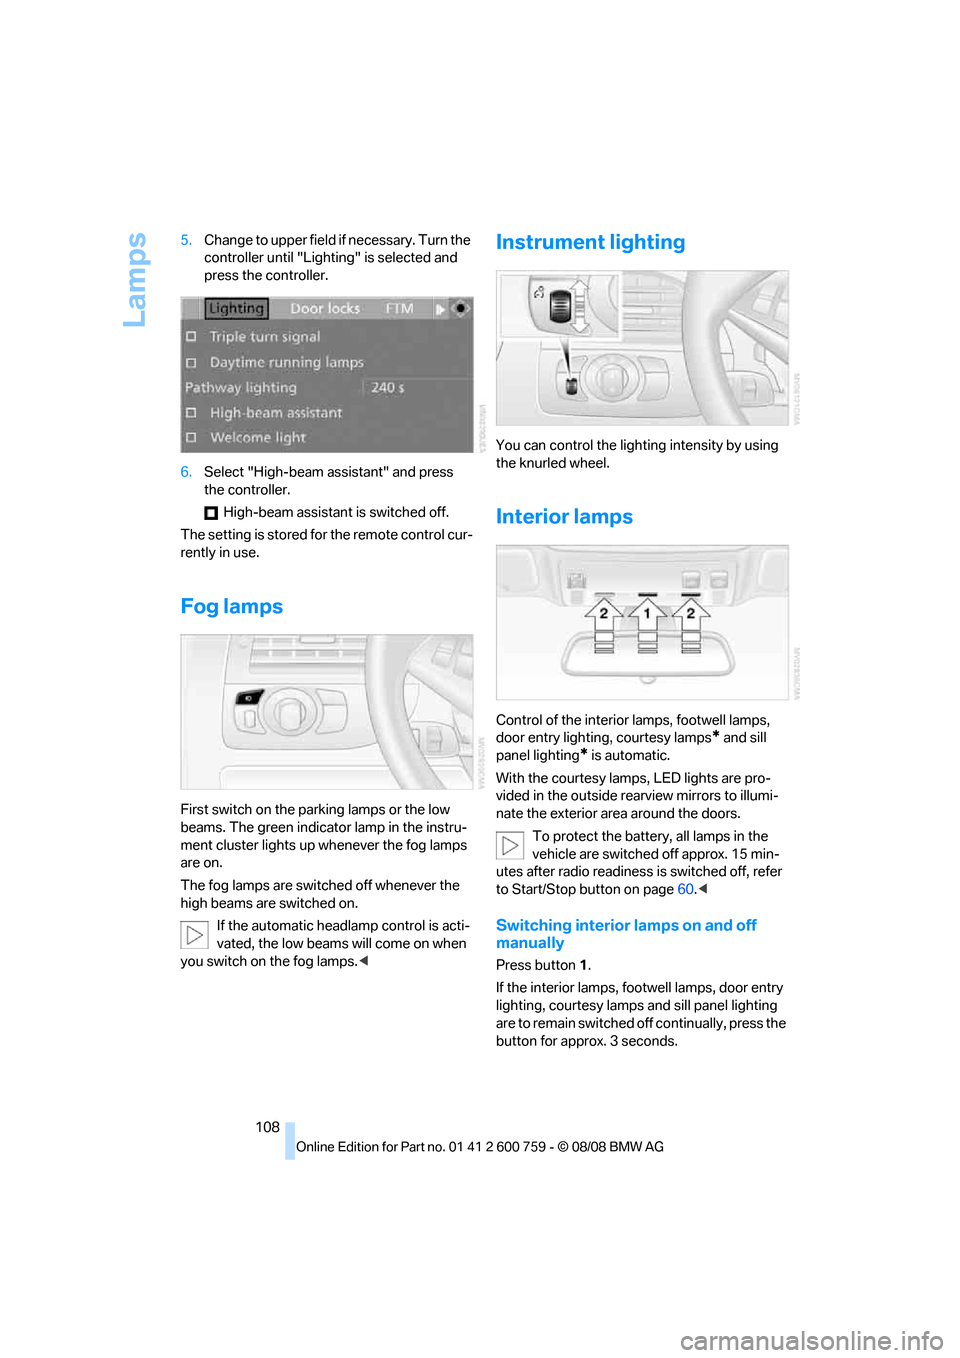
Fog lamps
First switch on the parking lamps or the low
beams. The green indicator lamp in the instru-
ment cluster lights up whenever the fog lamps
are on.
The fog lamps are switched off whenever the
high beams are switched on.
If the automatic headlamp control is acti-
vated, the low beams will come on when
you switch on the fog lamps.<
Instrument lighting
You can control the lighting intensity by using
the knurled wheel.
Interior lamps
Control of the interior lamps, footwell lamps,
door entry lighting, courtesy lamps
* and sill
panel lighting
* is automatic.
With the courtesy lamps,
LED lights are pro-
vided in the outside rearview mirrors to illumi-
nate the exterior area around the doors.
To protect the battery, all lamps in the
vehicle are switched off approx. 15 min-
utes after radio readiness is switched off, refer
to Start/Stop button on page60.<
Switching interior lamps on and off
manually
Press button 1.
If the interior lamps, footwell lamps, door entry
lighting, courtesy lamps and sill panel lighting
are to remain switched off continually, press the
button for approx. 3 seconds.
Page 156 of 272

Destination guidance
154 3.Select "Traffic Info" and press the control-
ler.
First the traffic information along the planned
route is shown sorted according to the distance
to the current vehicle position.
Depiction of traffic information in map
view
The traffic information symbols are shown in
the map view up to a scale of 100 miles/200 km.
The section of the route affected by a traffic
report as well as the number for the type of inci-
dent are displayed and hidden. This occurs as a
function of the scale selected.
Displaying detailed traffic information
Select a traffic information item from the list and
press the controller.
To exit from the menu:
Select the arrow and press the controller.
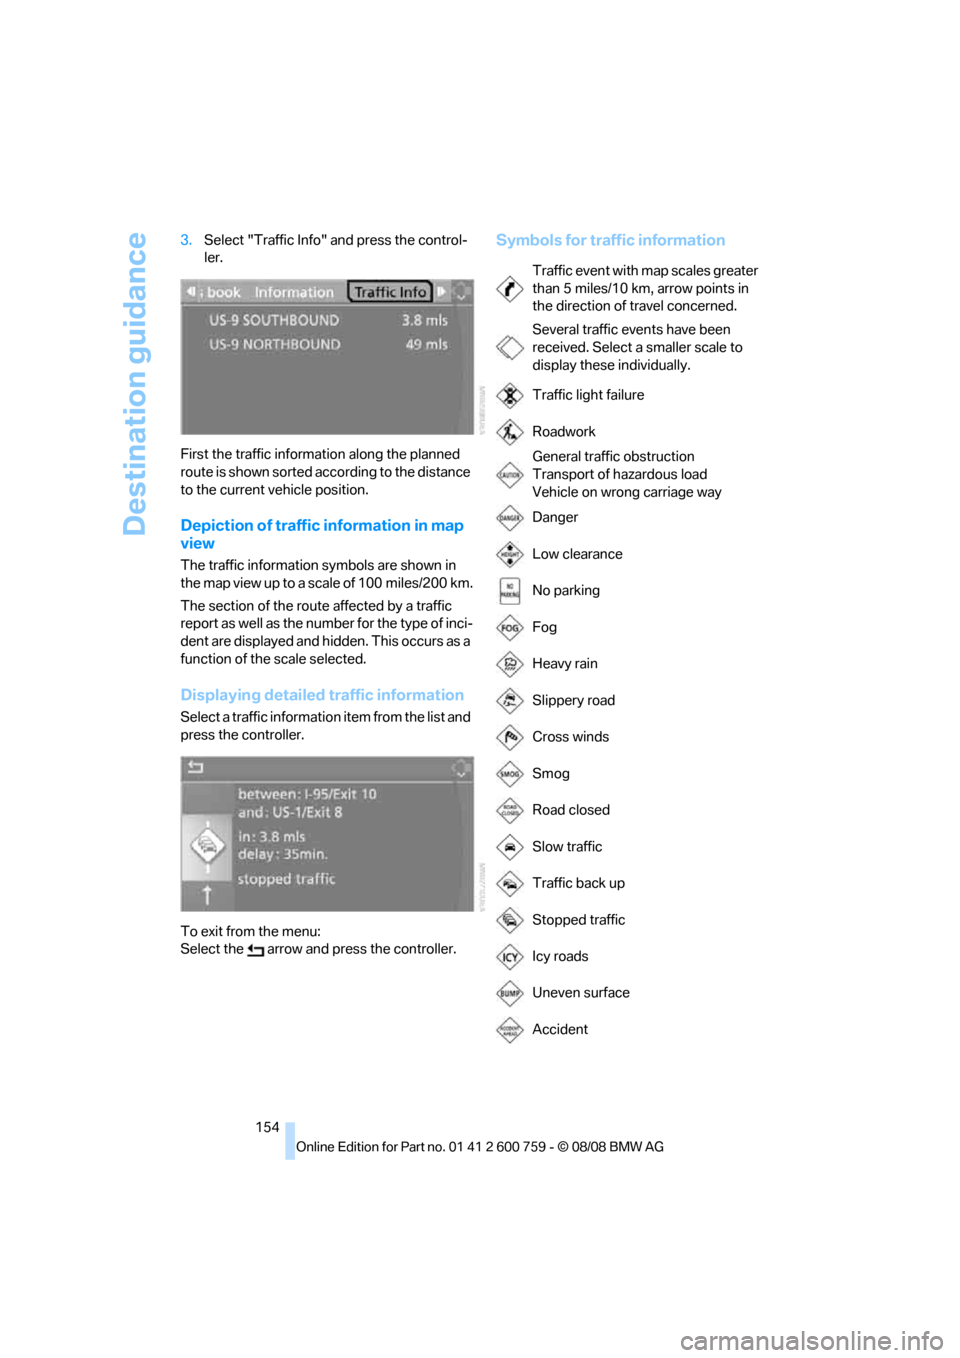
Symbols for traffic information
Traffic event with map scales greater
than 5 miles/10 km, arrow points in
the direction of travel concerned.
Several traffic events have been
received. Select a smaller scale to
display these individually.
Traffic light failure
Roadwork
General traffic obstruction
Transport of hazardous load
Vehicle on wrong carriage way
Danger
Low clearance
No parking
Fog
Heavy rain
Slippery road
Cross winds
Smog
Road closed
Slow traffic
Traffic back up
Stopped traffic
Icy roads
Uneven surface
Accident
Page 234 of 272

Replacing components
232 Do not remove the covers, and never
stare into the unfiltered light for several
hours, as irritation of the retina could result.<
Xenon lamps
The service life of these bulbs is very long and
the probability of a failure is very low, provided
that they are not switched on and off an unusual
number of times. If one of these bulbs should
nevertheless fail, it is possible to continue driv-
ing with great caution using the fog lamps, pro-
vided traffic laws in your area do not prohibit
this.
Have work on the xenon lighting system
performed only by your BMW center or a
workshop that works according to BMW repair
procedures with correspondingly trained per-
sonnel. Due to the high voltage present in the
system, there is a danger of fatal injuries when
work is carried out improperly.<
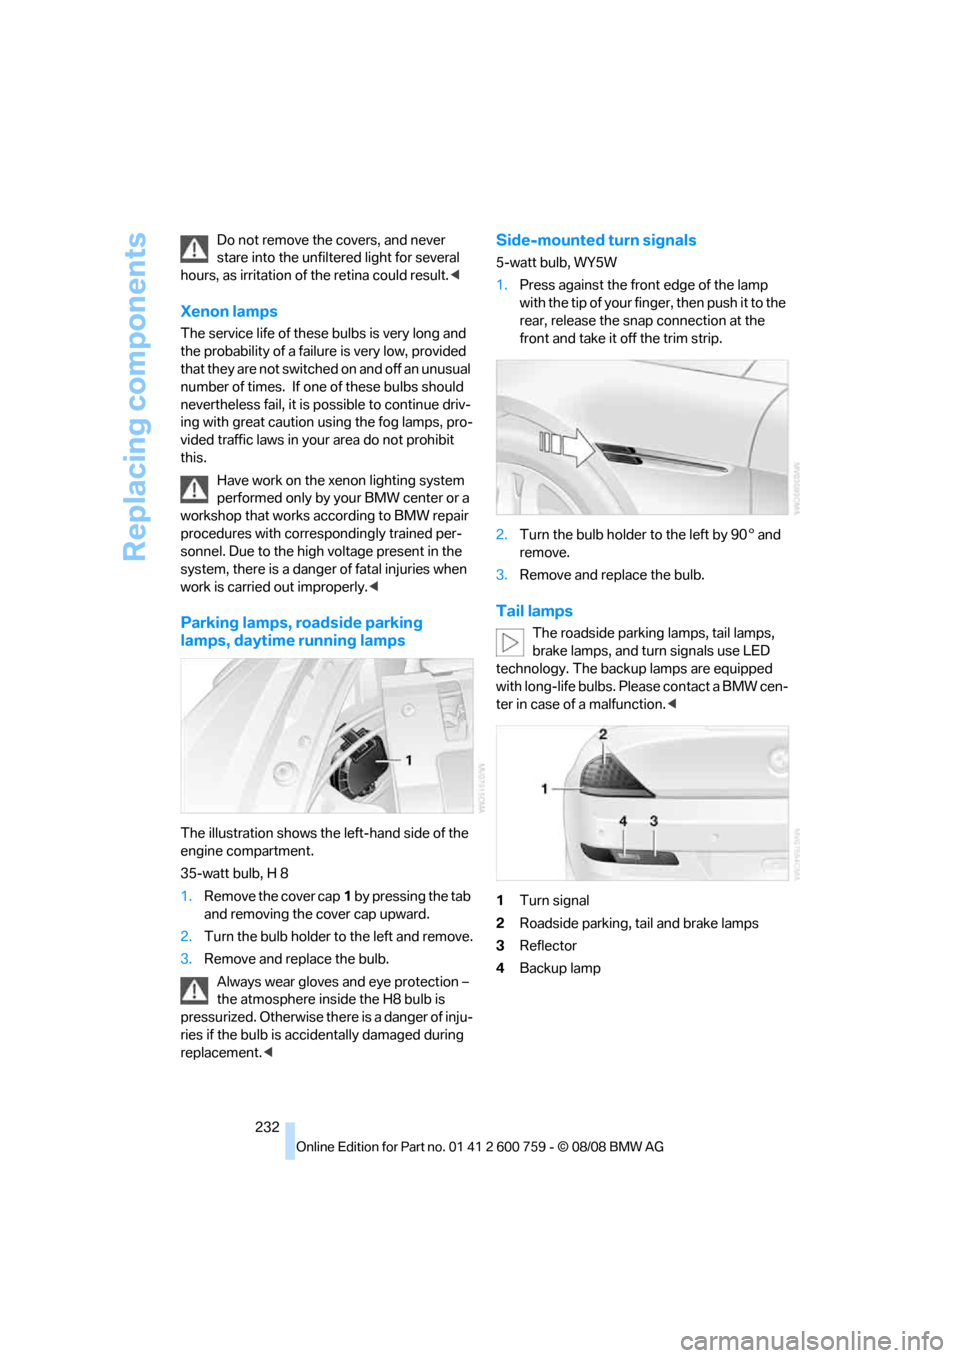
Parking lamps, roadside parking
lamps, daytime running lamps
The illustration shows the left-hand side of the
engine compartment.
35-watt bulb, H 8
1.Remove the cover cap1 by pressing the tab
and removing the cover cap upward.
2.Turn the bulb holder to the left and remove.
3.Remove and replace the bulb.
Always wear gloves and eye protection –
the atmosphere inside the H8 bulb is
pressurized. Otherwise there is a danger of inju-
ries if the bulb is accidentally damaged during
replacement.<
Side-mounted turn signals
5-watt bulb, WY5W
1.Press against the front edge of the lamp
with the tip of your finger, then push it to the
rear, release the snap connection at the
front and take it off the trim strip.
2.Turn the bulb holder to the left by 905 and
remove.
3.Remove and replace the bulb.
Tail lamps
The roadside parking lamps, tail lamps,
brake lamps, and turn signals use LED
technology. The backup lamps are equipped
with long-life bulbs. Please contact a BMW cen-
ter in case of a malfunction.<
1Turn signal
2Roadside parking, tail and brake lamps
3Reflector
4Backup lamp
Page 260 of 272

Everything from A to Z
258
I
IBOC, refer to High Definition
Radio168
Ice on roads, refer to Outside
temperature warning76
ID3 tag, refer to Information on
track176
Identification mark
– recommended tire
brands219
– run-flat tires218
– tire coding216
iDrive16
– assistance window21
– changing date and time84
– changing language86
– changing menu page20
– changing settings84
– changing units of measure
and display type86
– confirming selection or
entry20
– controller16
– controls16
– displays, menus18
– operating principle18
– selecting menu item20
– setting brightness85
– start menu18
– status information21
– symbols19
Ignition60
– switched off61
– switched on60
Ignition key, refer to Keys/
remote control30
Ignition key position 1, refer to
Radio readiness60
Ignition key position 2, refer to
Ignition on60
Ignition lock60
– starting engine with comfort
access39
i menu18
Imprint2Indicator/warning lamps
– ABS Antilock Brake
System90
– active steering95
– airbags97
– brake system90
– DSC13,89
– DTC13,90
– Flat Tire Monitor92
– fog lamps13,108
– handbrake13,62
– safety belt warning54
– TPM Tire Pressure
Monitor93
Indicator and warning lamps
– overview13
Indicator lighting, refer to
Instrument lighting108
Inflation pressure, refer to Tire
inflation pressure214
Inflation pressure monitoring,
refer to Flat Tire Monitor90
Inflation pressure monitoring,
refer to Tire Pressure
Monitor92
Info menu18
Information
– on another location142
– on current position142
– on destination location142
"Information" in
navigation142
Information menu, refer to
imenu18
"Information on
destination"144
"Info sources"79
Initializing
– Flat Tire Monitor91
– radio, refer to Storing
stations166
– refer to Power failure233
– seat, mirror and steering
wheel memory51
– time and date84
"Input map"141
Installation location
– CD changer178
– drive for navigation DVD134Instructions for navigation
system, refer to Voice
instructions151
Instrument cluster12
Instrument lighting108
Instrument panel, refer to
Cockpit10
Integrated key30
Integrated universal remote
control117
Interesting destination for
navigation142
"Interim time"84
Interior lamps108
– switching on with remote
control33
Interior motion sensor38
– switching off38
Interior rearview mirror,
automatic dimming
feature56
Intermittent mode of the
wipers66
J
Jacking points233
Joystick, refer to iDrive16
Jumpering, refer to Jump
starting236
Jump starting236
K
Keyless-Go, refer to Comfort
access38
Keyless opening and closing,
refer to Comfort access38
Key Memory, refer to Personal
Profile30
"Keypad"196
Keys30
– key-related settings, refer to
Personal Profile30
– spare key30
Kick-down, Sport automatic
transmission63
Knee airbags95
Knock control213