2009 BMW 330D lock
[x] Cancel search: lockPage 179 of 268
177
Entertainment
Reference
At a glance
Controls
Driving tips
Communications
Navigation
Mobility
Selecting an entry
The connection to the phone number of the
selected entry is established.
Redialing
To redial the phone number dialed last:
Notes
Important for voice commands
For voice commands, bear in mind the follow-
ing:
> Pronounce the commands smoothly and at
normal volume, avoiding excessive empha-
ses and pauses.
> Keep the doors, windows and glass roof
closed to prevent interference from outside
noise.
> Avoid ambient noise in the vehicle while
speaking.
Inserting/removing the snap-
in adapter
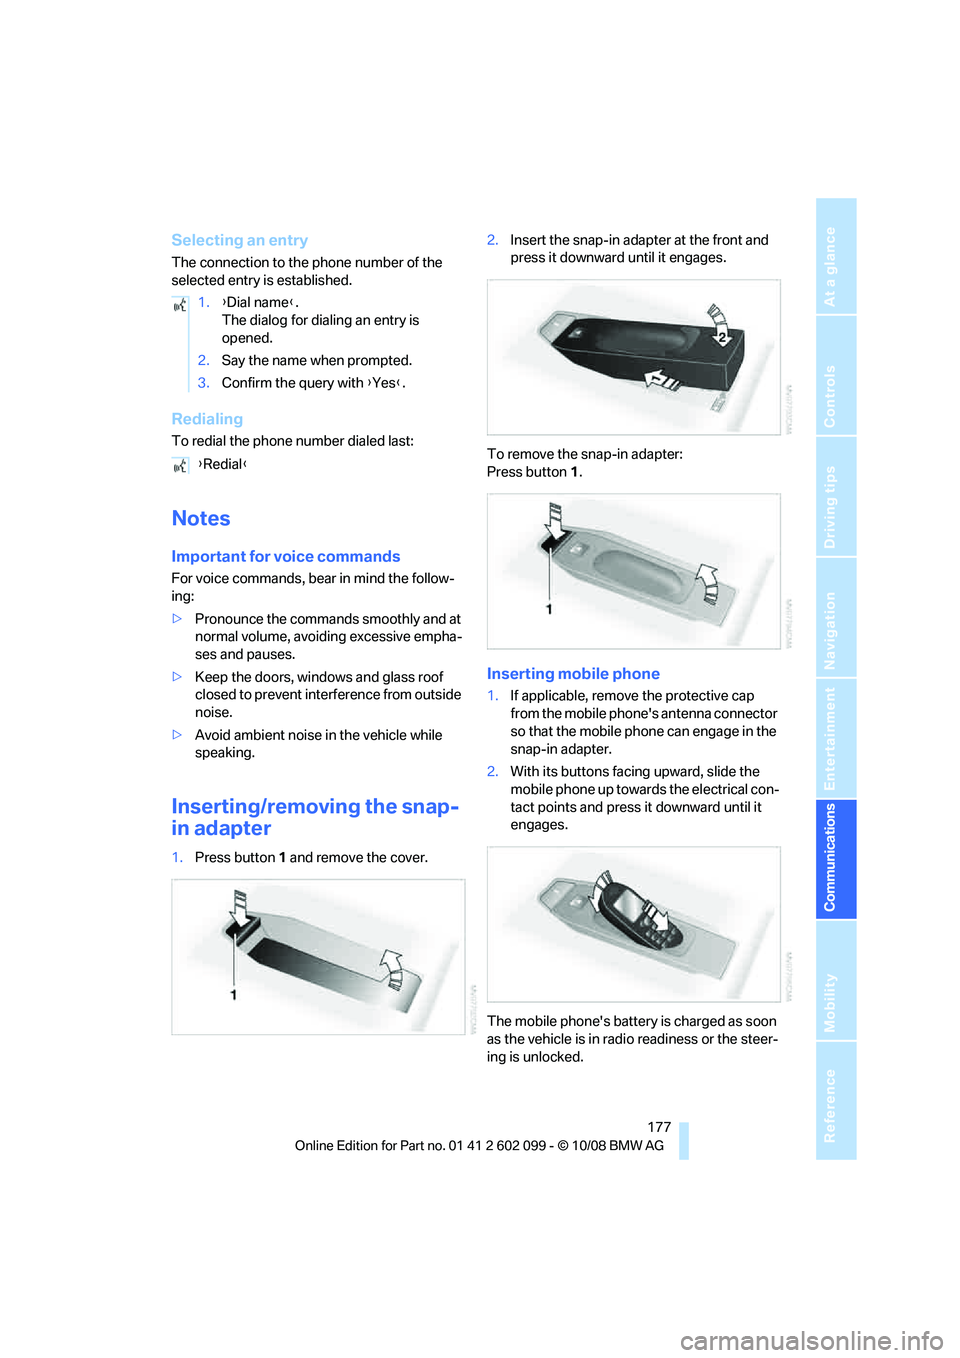
1.Press button 1 and remove the cover. 2.
Insert the snap-in adapter at the front and
press it downward until it engages.
To remove the snap-in adapter:
Press button 1 .
Inserting mobile phone
1.If applicable, remove the protective cap
from the mobile phone's antenna connector
so that the mobile phone can engage in the
snap-in adapter.
2. With its buttons facing upward, slide the
mobile phone up towards the electrical con-
tact points and press it downward until it
engages.
The mobile phone's battery is charged as soon
as the vehicle is in radi o readiness or the steer-
ing is unlocked.
1.
{Dial name }.
The dialog for dialing an entry is
opened.
2. Say the name when prompted.
3. Confirm the query with {Yes }.
{ Redial }
ba8_E9091_cic.book Seite 177 Mittwoch, 29. Oktober 2008 2:59 14
Page 187 of 268
185
Entertainment
Reference
At a glance
Controls
Driving tips
Communications
Navigation
Mobility
Settings
Suppressing cookies
1. Open "Options".
2. "Suppress cookies"
Suppressing pop-ups
1.Open "Options".
2. "Suppress pop-ups"
Suppressing safety warnings
1.Open "Options".
2. "Block HTTPS pop-ups"
Activating TeleService*
If the services are not displayed, they may need
to be activated.
1."BMW Assist"
2. "Activate TeleService"
Customer Relations
Contact Customer Relations for information on
all aspects of your vehicle.
Vehicle equipped with BMW Assist or
TeleService
1."BMW Assist"
2. "Customer Relations"
3. "Start service"
A voice connection is established to Customer
Relations.
Vehicle not equipped with BMW Assist
or TeleService
1. "BMW Assist"
2. "Customer Relations"
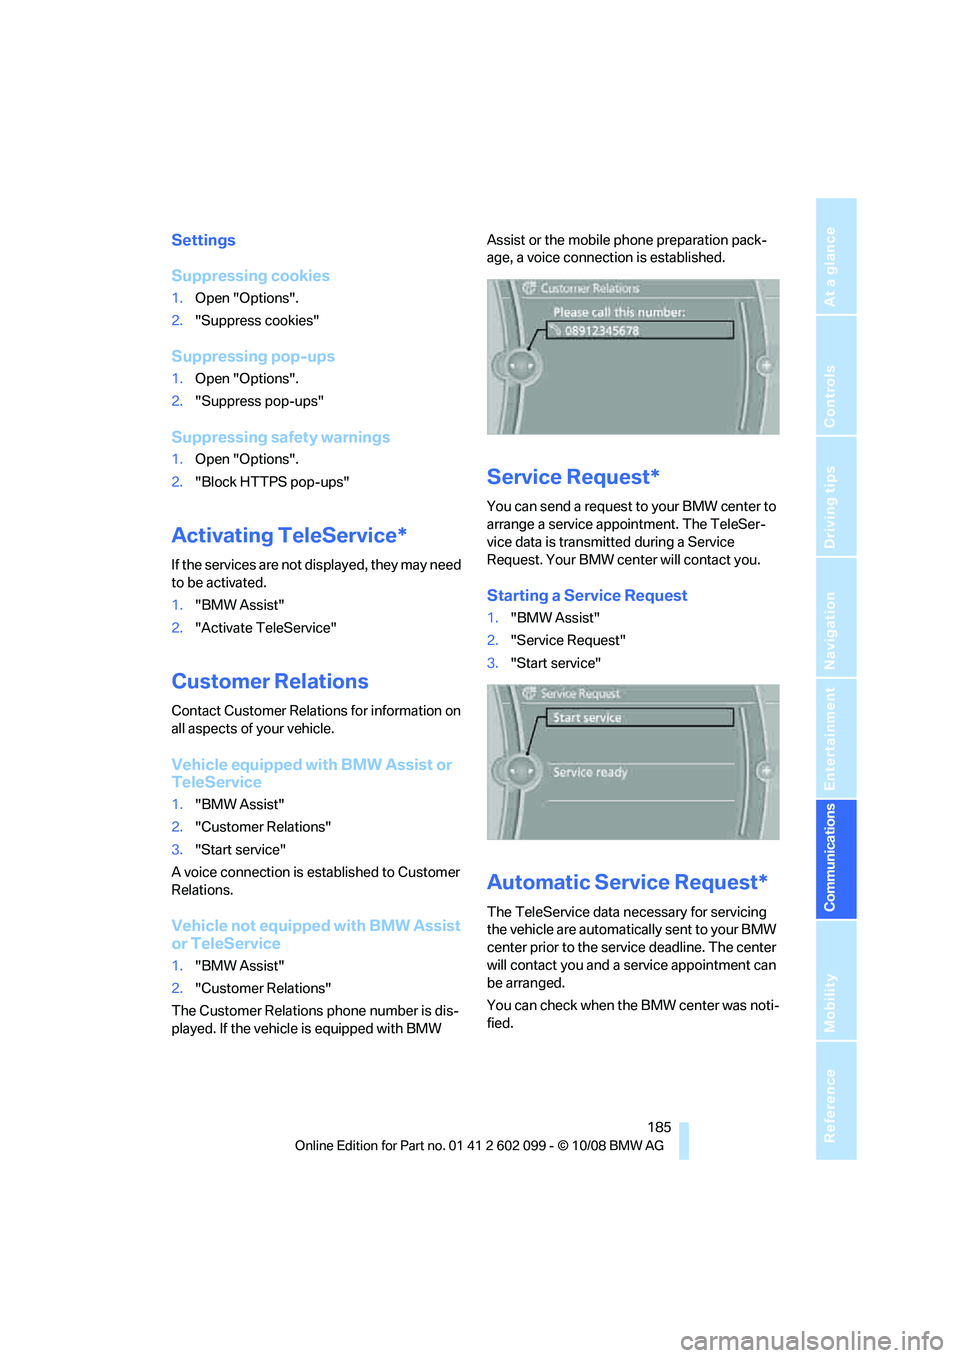
The Customer Relations phone number is dis-
played. If the vehicle is equipped with BMW Assist or the mobile phone preparation pack-
age, a voice connection is established.
Service Request*
You can send a request to your BMW center to
arrange a service appointment. The TeleSer-
vice data is transmitted during a Service
Request. Your BMW center will contact you.
Starting a Service Request
1.
"BMW Assist"
2. "Service Request"
3. "Start service"
Automatic Service Request*
The TeleService data ne cessary for servicing
the vehicle are automatically sent to your BMW
center prior to the service deadline. The center
will contact you and a service appointment can
be arranged.
You can check when the BMW center was noti-
fied.
ba8_E9091_cic.book Seite 185 Mittwoch, 29. Oktober 2008 2:59 14
Page 192 of 268
Refueling
190
Refueling
Always switch off the engine before refu-
eling, otherwise, fuel cannot be added to
the tank and a messag e will be displayed.<
Take all precautionary measures and ob-
serve all applicable regulations when han-
dling fuel. Do not carry any spare fuel containers
in your vehicle. They can develop a leak and
cause an explosion or cause a fire in the event of
an accident. <
Fuel filler door
Opening
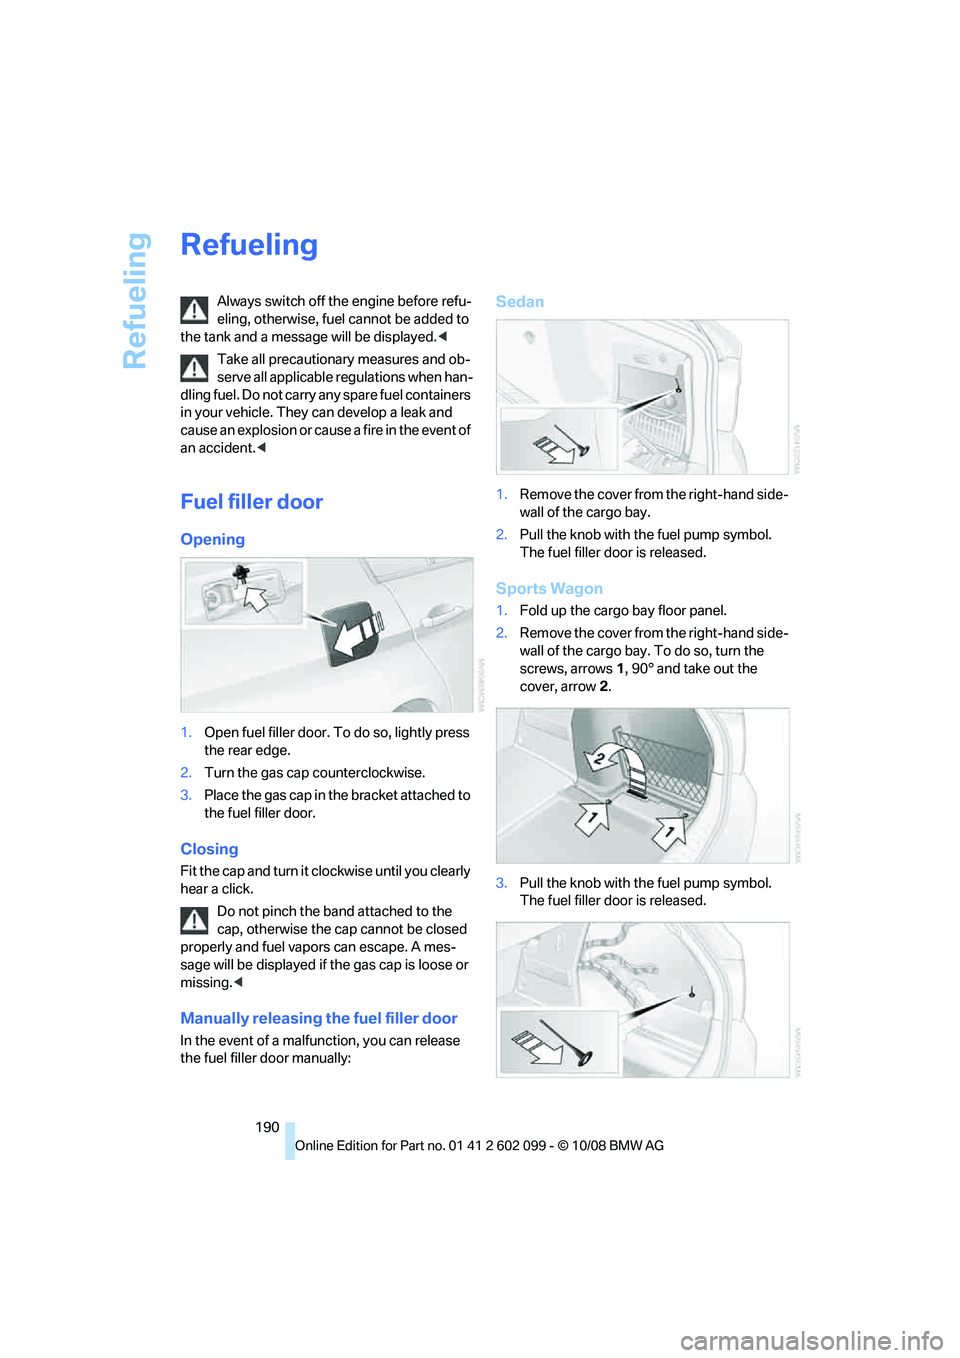
1.Open fuel filler door. To do so, lightly press
the rear edge.
2. Turn the gas cap counterclockwise.
3. Place the gas cap in th e bracket attached to
the fuel filler door.
Closing
Fit the cap and turn it cl ockwise until you clearly
hear a click.
Do not pinch the band attached to the
cap, otherwise the cap cannot be closed
properly and fuel vapors can escape. A mes-
sage will be displayed if the gas cap is loose or
missing. <
Manually releasing the fuel filler door
In the event of a malfunction, you can release
the fuel filler door manually:
Sedan
1.Remove the cover from the right-hand side-
wall of the cargo bay.
2. Pull the knob with the fuel pump symbol.
The fuel filler door is released.
Sports Wagon
1.Fold up the cargo bay floor panel.
2. Remove the cover from the right-hand side-
wall of the cargo bay. To do so, turn the
screws, arrows 1, 90° and take out the
cover, arrow 2.
3. Pull the knob with the fuel pump symbol.
The fuel filler door is released.
ba8_E9091_cic.book Seite 190 Mittwoch, 29. Oktober 2008 2:59 14
Page 217 of 268
Mobility
215Reference
At a glance
Controls
Driving tips
Communications
Navigation
Entertainment
You can also call BMW of North America at
1-800-831-1117 or visit the website
www.bmwusa.com to obtain this information.Do not use oil additives, as these may
cause engine damage. <
Alternative oil types
If exceptionally none of the approved oils hap-
pens to be available, sm all quantities of other
oils may be used when adding oil between oil
changes. However, the corresponding con-
tainer must be labeled with one of the following
oil specifications:
Gasoline engines
> Preferred: BMW Longlife-01,
BMW Longlife-01 FE or BMW Longlife-04
> Alternatively: BMW Longlife-98, API SM or
higher
Diesel engines
BMW Longlife-04
Viscosity ratings
Viscosity is a measure of an oil's flow rating and
is categorized in SAE classes.
Selecting the appropriate SAE class depends
on the regional climatic conditions in which you
normally drive your BMW.
Approved oils belong to the 0W-40,
0W-30, 5W-40 and 5W-30 SAE
classes. <
These oils can be used fo r driving at all outside
temperatures.
Coolant
Do not add coolant to the cooling system
when the engine is hot. Escaping coolant
can cause burns. <
Coolant consists of half water and half additive.
Not all commercially availa ble additives are suit-
able for your BMW. Ask your BMW center for
suitable additives. Only use suitable additives, otherwise en-
gine damage may re
sult. Because addi-
tives are harmful to your health, it is important to
follow the instructions on the containers. <
Comply with the appropriate environ-
mental protection regulations when dis-
posing of coolant additives. <
Checking coolant level
1.Do not open the engine hood before the en-
gine has cooled down.
2. Turn the cap of the expansion tank a little
counterclockwise to allow any accumulated
pressure to escape, then continue turning
to open.
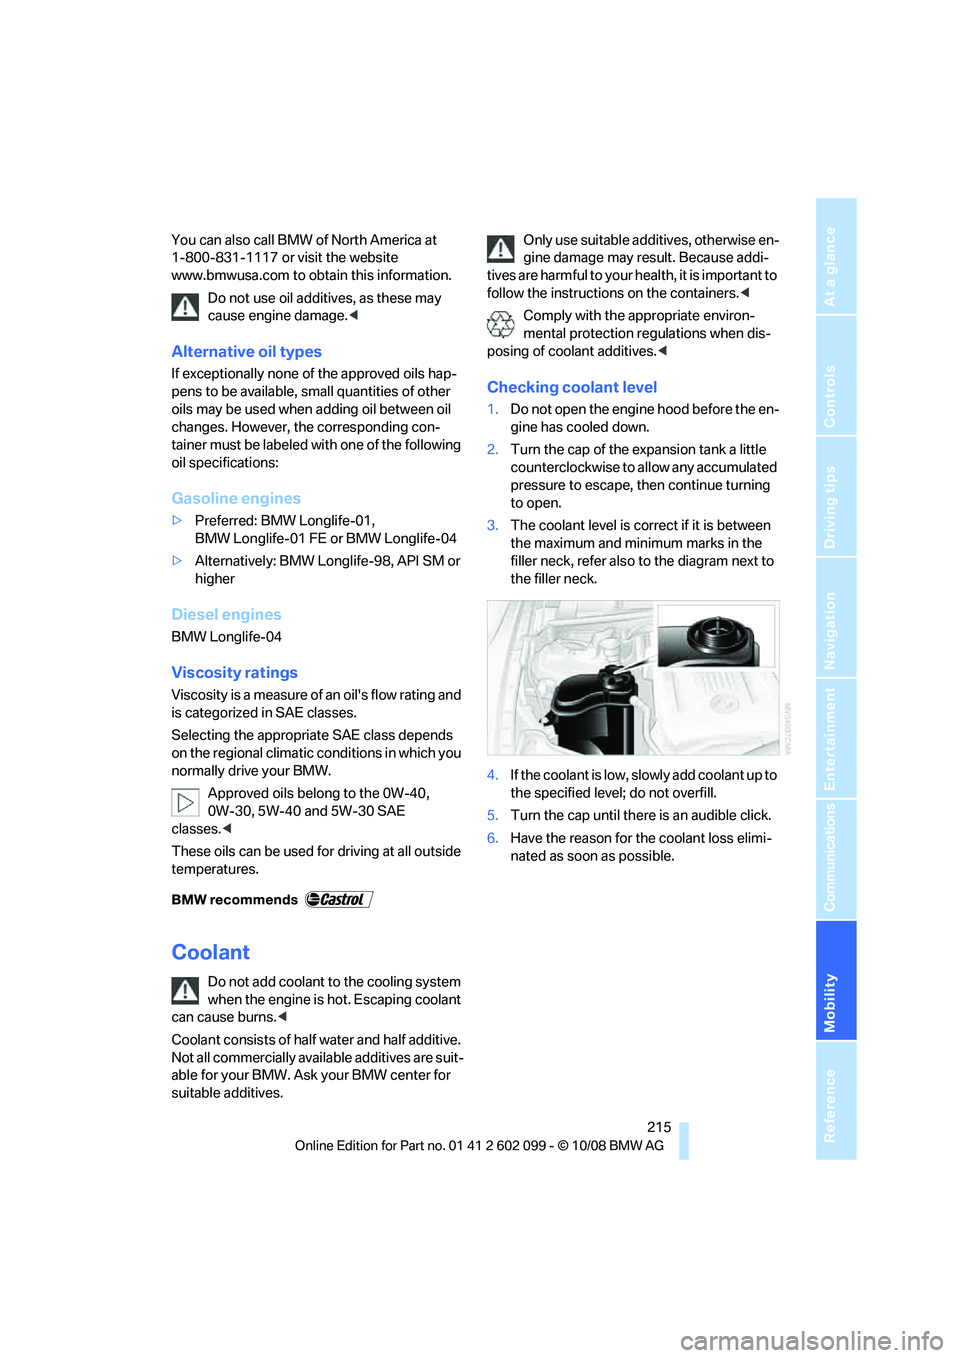
3. The coolant level is corr ect if it is between
the maximum and minimum marks in the
filler neck, refer also to the diagram next to
the filler neck.
4. If the coolant is low, slowly add coolant up to
the specified level; do not overfill.
5. Turn the cap until there is an audible click.
6. Have the reason for the coolant loss elimi-
nated as soon as possible.
ba8_E9091_cic.book Seite 215 Mittwoch, 29. Oktober 2008 2:59 14
Page 220 of 268

Care
218
Care
Care products
Regular cleaning and care contributes signifi-
cantly to the value retention of your BMW.
BMW recommends cleaning and caring for your
vehicle with products that are approved by
BMW for this purpose.
Your BMW center will be happy to advise you on
the products and services available for cleaning
and caring for your BMW.
Original BMW CareProducts have been
material tested, labo ratory checked and
proven in the field, and offer optimal care and
protection for your vehicle. <
Do not use cleaners that contain alcohol
or solvents as these may result in dam-
age.<
Cleaning agents can contain substances
that are dangerous or hazardous to your
health. Therefore, follow the warning and safety
instructions on the packaging. When cleaning
inside the vehicle, always open the doors or
windows of the vehicle. In enclosed areas, pro-
vide for sufficient ventilation. Only use products
designed for cleaning vehicles. <
Exterior care
Washing the vehicle
Especially during the winter months,
ensure that the vehicle is washed more
frequently. Heavy soiling and road salt can lead
to vehicle damage. <
After washing the vehicle, apply the
brakes briefly to dry them, otherwise
water can reduce braking efficiency over the
short term and the brake discs can corrode. <
Automatic car washes
Preference should be given to cloth car washes.
Before driving into a car wash, ensure that it is
suitable for your BMW. Check the following: >
Dimensions of your vehicle, refer to
page 239
> If necessary: fold in the exterior mirrors,
refer to page 47
> Maximum permissible tire width
Preparations before driv ing into an automatic
car wash:
> Unscrew the rod antenna
*.
> Deactivate the rain sensor
* to prevent unin-
tentional wiping.
> Sports Wagon: deactivate the rear window
wiper and protect it against damage. If nec-
essary, ask the operator of the car wash
about protective measures you should take.
> Remove additional attachments, e.g.
spoiler or telephone an tennas, if there is a
possibility that they could be damaged.
Automatic transmission
Before driving into an automatic car wash, per-
form the following steps to ensure that the vehi-
cle can roll:
1. Insert the remote cont rol, even with conve-
nient access, into the ignition lock.
2. Move the selector lever to position N.
3. Release the parking brake.
4. Switch off the engine.
5. Leave the remote control in the ignition lock
so that the vehicle can roll.
Steam jets / high -pressure washers
When using steam jets or high-pressure
washers, ensure that you maintain suffi-
cient clearance to the vehicle and do not exceed
a temperature of 140 7/60 6.
Insufficient clearance or excessive pressure or
temperature can lead to component damage or
water penetration. Follow the operating instruc-
tions of the high-pressure washer. <
When using high-pressure washers, do
not spray against the sensors and cam-
ba8_E9091_cic.book Seite 218 Mittwoch, 29. Oktober 2008 2:59 14
Page 226 of 268
Replacing components
224
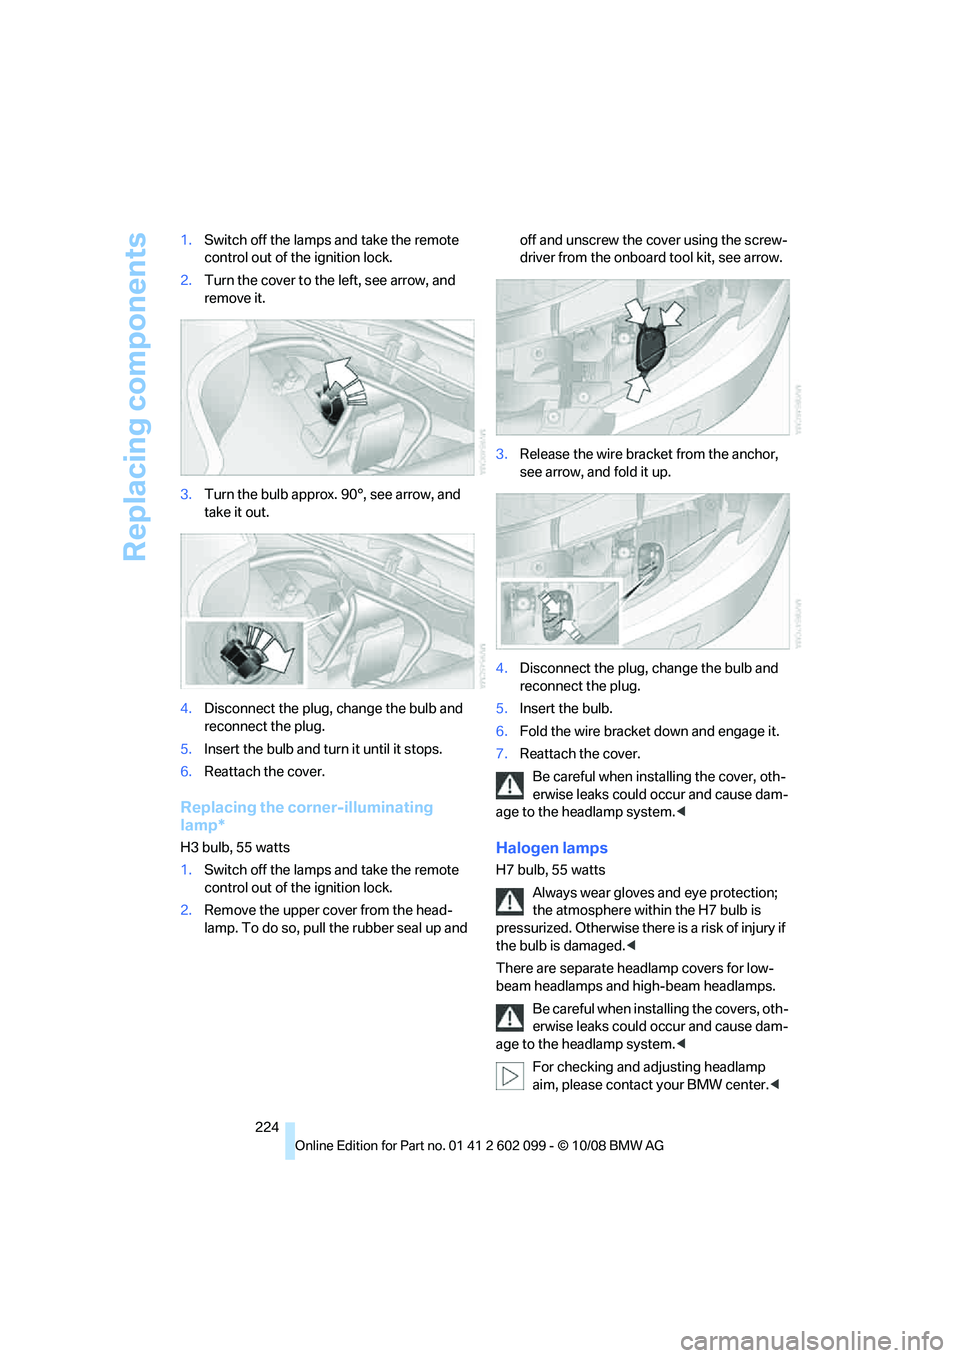
1.
Switch off the lamps and take the remote
control out of the ignition lock.
2. Turn the cover to the left, see arrow, and
remove it.
3. Turn the bulb approx. 90°, see arrow, and
take it out.
4. Disconnect the plug, change the bulb and
reconnect the plug.
5. Insert the bulb and turn it until it stops.
6. Reattach the cover.
Replacing the corner-illuminating
lamp*
H3 bulb, 55 watts
1.Switch off the lamps and take the remote
control out of the ignition lock.
2. Remove the upper cover from the head-
lamp. To do so, pull the rubber seal up and off and unscrew the cover using the screw-
driver from the onboar
d tool kit, see arrow.
3. Release the wire bracket from the anchor,
see arrow, and fold it up.
4. Disconnect the plug, change the bulb and
reconnect the plug.
5. Insert the bulb.
6. Fold the wire bracket down and engage it.
7. Reattach the cover.
Be careful when installing the cover, oth-
erwise leaks could occur and cause dam-
age to the headlamp system.
Always wear gloves and eye protection;
the atmosphere within the H7 bulb is
pressurized. Otherwise there is a risk of injury if
the bulb is damaged. <
There are separate headlamp covers for low-
beam headlamps and high-beam headlamps.
Be careful when inst alling the covers, oth-
erwise leaks could occur and cause dam-
age to the headlamp system. <
For checking and adjusting headlamp
aim, please contact your BMW center. <
ba8_E9091_cic.book Seite 224 Mittwoch, 29. Oktober 2008 2:59 14
Page 227 of 268
Mobility
225Reference
At a glance
Controls
Driving tips
Communications
Navigation
Entertainment
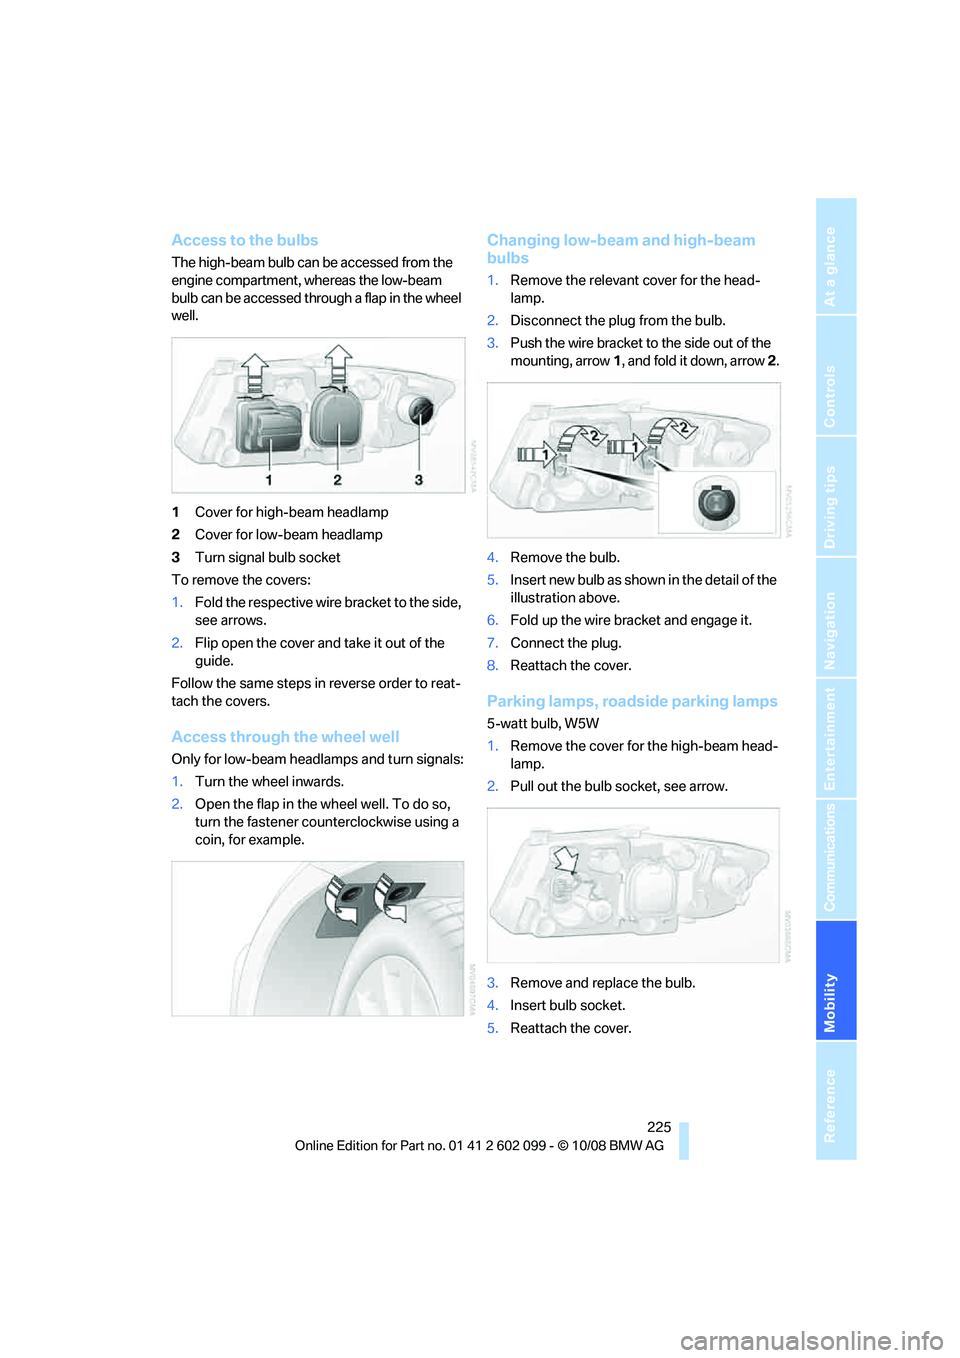
Access to the bulbs
The high-beam bulb can be accessed from the
engine compartment, whereas the low-beam
bulb can be accessed through a flap in the wheel
well.
1Cover for high-beam headlamp
2 Cover for low-beam headlamp
3 Turn signal bulb socket
To remove the covers:
1. Fold the respective wire bracket to the side,
see arrows.
2. Flip open the cover and take it out of the
guide.
Follow the same steps in reverse order to reat-
tach the covers.
Access through the wheel well
Only for low-beam head lamps and turn signals:
1. Turn the wheel inwards.
2. Open the flap in the wheel well. To do so,
turn the fastener counterclockwise using a
coin, for example.
Changing low-beam and high-beam
bulbs
1.Remove the relevant cover for the head-
lamp.
2. Disconnect the plug from the bulb.
3. Push the wire bracket to the side out of the
mounting, arrow 1, and fold it down, arrow 2.
4. Remove the bulb.
5. Insert new bulb as show n in the detail of the
illustration above.
6. Fold up the wire bracket and engage it.
7. Connect the plug.
8. Reattach the cover.
Parking lamps, roadside parking lamps
5-watt bulb, W5W
1.Remove the cover for the high-beam head-
lamp.
2. Pull out the bulb socket, see arrow.
3. Remove and replace the bulb.
4. Insert bulb socket.
5. Reattach the cover.
ba8_E9091_cic.book Seite 225 Mittwoch, 29. Oktober 2008 2:59 14
Page 229 of 268
Mobility
227Reference
At a glance
Controls
Driving tips
Communications
Navigation
Entertainment
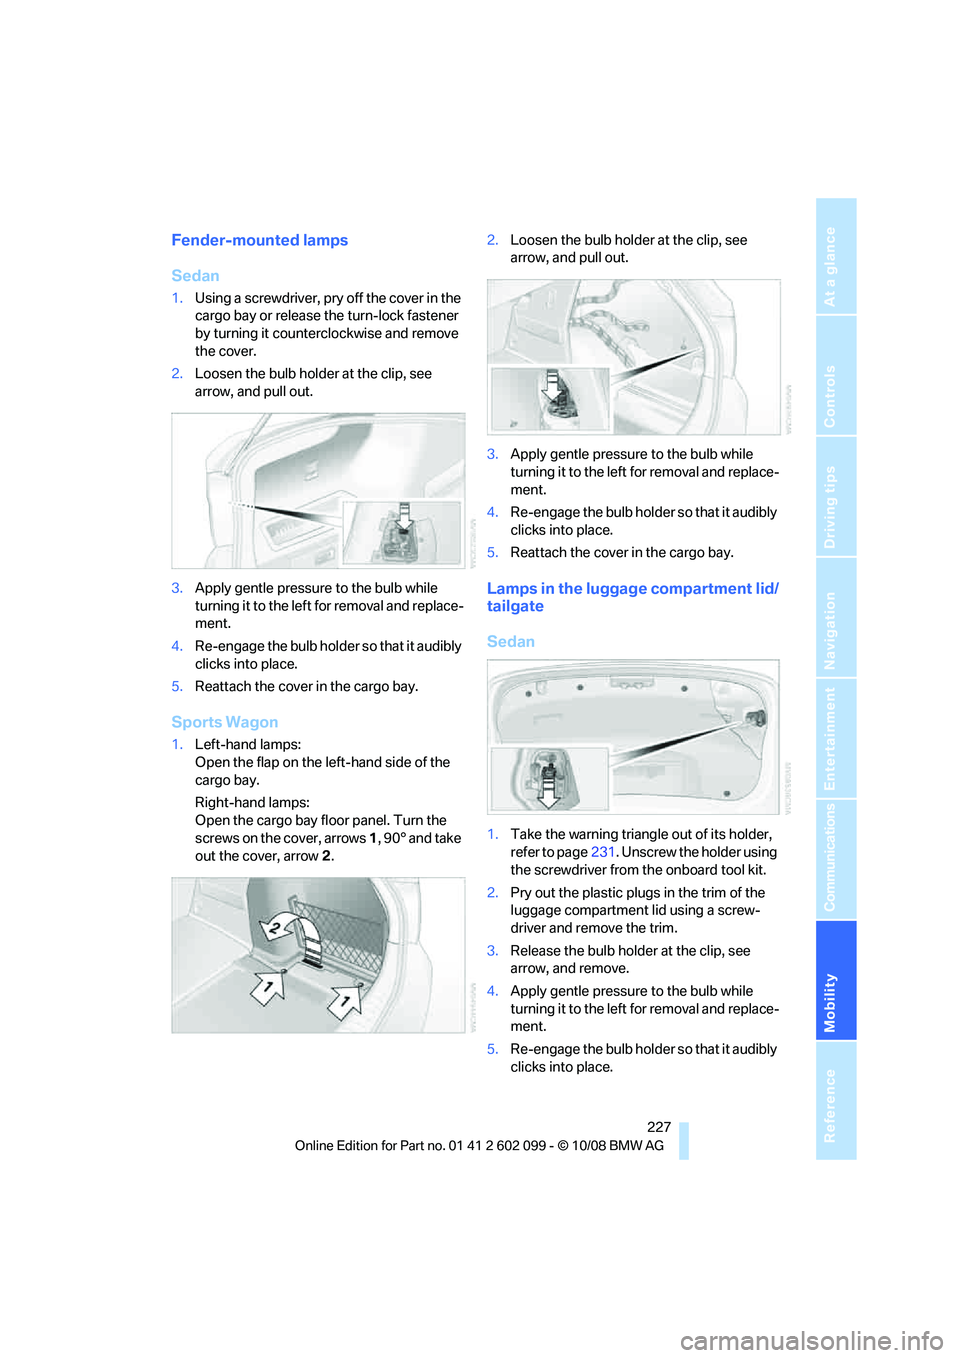
Fender-mounted lamps
Sedan
1.Using a screwdriver, pry off the cover in the
cargo bay or release the turn-lock fastener
by turning it counterclockwise and remove
the cover.
2. Loosen the bulb holder at the clip, see
arrow, and pull out.
3. Apply gentle pressure to the bulb while
turning it to the left for removal and replace-
ment.
4. Re-engage the bulb holder so that it audibly
clicks into place.
5. Reattach the cover in the cargo bay.
Sports Wagon
1.Left-hand lamps:
Open the flap on the left-hand side of the
cargo bay.
Right-hand lamps:
Open the cargo bay floor panel. Turn the
screws on the cover, arrows 1, 90° and take
out the cover, arrow 2. 2.
Loosen the bulb holder at the clip, see
arrow, and pull out.
3. Apply gentle pressure to the bulb while
turning it to the left for removal and replace-
ment.
4. Re-engage the bulb holder so that it audibly
clicks into place.
5. Reattach the cover in the cargo bay.
Lamps in the luggage compartment lid/
tailgate
Sedan
1.Take the warning triang le out of its holder,
refer to page 231. Unscrew the holder using
the screwdriver from the onboard tool kit.
2. Pry out the plastic plugs in the trim of the
luggage compartment lid using a screw-
driver and remove the trim.
3. Release the bulb holder at the clip, see
arrow, and remove.
4. Apply gentle pressure to the bulb while
turning it to the left for removal and replace-
ment.
5. Re-engage the bulb holder so that it audibly
clicks into place.
ba8_E9091_cic.book Seite 227 Mittwoch, 29. Oktober 2008 2:59 14