2009 AUDI S8 ECO
[x] Cancel search: ECOPage 3 of 408

Introduction
Thank you for choosing an Audi A8 -we value your trust in us.
Your new Audi A8 incorporates the newest technology as well as numerous features designed for
your comfort, convenience and safety. We recommend you read your Owner 's Manual thoroughly
so that you can quickly become acquainted with your Audi.
In addition to explaining how the different features work, we also give you many useful tips and
information concerning your safety and that of your passengers, how to care for your vehicle and
maintain your vehicle's value.
We hope you enjoy driving your Audi A$ and we wish you safe and pleasant motoring .
AUDI AG
Page 4 of 408
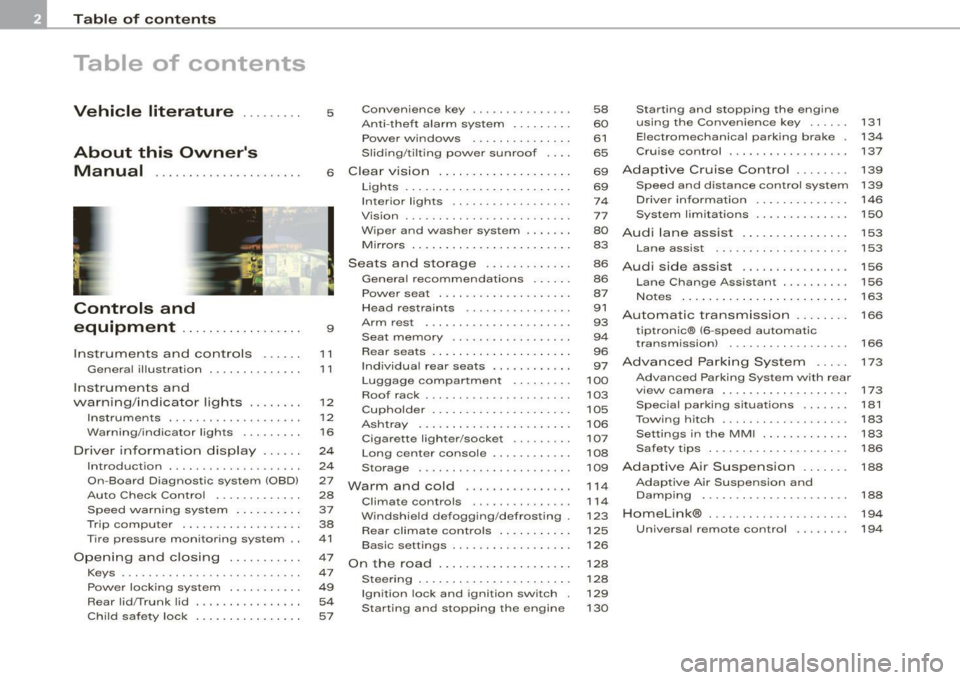
Table of contents
Table of contents
Vehicle literature ........ .
About this Owner's Manual .............. ...... . .
Controls and
equipment .. .. .... ..... ... . .
Inst rumen ts and con trols ..... .
Genera l ill ustration ............. .
Instruments and
warning/indica tor lig hts ....... .
Instruments .............. ..... .
Warning/indicator lights ........ .
Driver in forma tio n d isplay ..... .
Introduct ion ............... .... .
On-Board Diagnostic system (OBD)
Auto Check Control ............ .
Speed warning system ... .... .. .
Trip computer ..... ... .. ..... .. .
Tire pressure monitoring system ..
Opening and closing .......... .
Keys ...... ...... ... .. . ··· ·· ··· ·
Powe r locking system .......... .
Rear lid/Trunk lid ............. .. .
Ch ild safe ty lock . ... ..... ... ... . 5 Convenience key
.............. .
Anti-theft a larm system ..... ... .
Power w indows ... ... ... .... . .
S lid ing/ti lt ing power sunroof ... .
6 Clear vision ... .... .. ... .. .... . .
9
11
1 1
12
12
1 6
24
2 4
27
28
37
38
41
47
47
49
54
57 Lights
... ............. .. .. .. .. .
Interior lights ...... ... .. ... ... .
V is ion ................. .... ... .
W iper and washer system ...... .
Mirrors .... ... ......... ..... . . .
Seats and sto rage ..... .... ... .
Genera l recommendat ions ..... .
Powe r seat . ... ... ......... ... .
Head restraints ....... ....... . .
Arm rest .................... . .
Seat memory ... .. ... ... ... ... .
Rear sea ts . ... ... . .. ... ... .. .. .
Ind ividua l rear seats ........ ... .
Luggage compartment ..... •.. .
Roof rack ........... .... ... ... .
Cupho lder .................... .
As htray . ... ... ... ......... ... .
Cigarette lighter/socket ........ .
Long center console ........... .
Storage . ... ..... ... ... .. ... .. .
Warm and cold ............... .
Climate controls .............. .
W indshield defogging/defrosting .
Rear climate controls .. .. ... ... .
Basic settings .............. ... .
On the road ... ... . .. ... .. ... .. .
Stee ring . ...... .... ........ ... .
Ignition lock and ignition switch .
Starting and stopping the engine 58
Starting and stopping the engine
60 using the Conven ience key ... .. .
61 Electromechanical parking brake .
65 Cru ise control ....... ... ....... .
69
Adapt ive Cruise Control ....... .
131
134
137
139
69 Speed and distance control system 139
74 Drive r informat ion . . . . . . . . . . . . . . 146
77 System limita tions . . . . . . . . . . . . . . 150
80
Audi lane assist . . . . . . . . . . . . . . . . 153
83 Lane assist . . . . . . . . . . . . . . . . . . . . 153
86
A udi side assist . . . . . . . . . . . . . . . . 156
86
87
91
93
9 4
96
97
100
103
105
106
107
108
109
1 14
11 4
123
125
126
128
128
129
130 Lane Change
Assistant ......... .
No tes ........ ...... ........ .. .
Automatic transmission ....... .
tiptron ic® (6-speed automatic
transm ission) ................. .
Advanced Parking System .... .
Advanced Parking System with rear
v iew camera .................. .
Specia l parking situations .... .. .
Towing hitch ......... ... ...... .
Settings in the MM I .. ... .. .... . .
Safety t ips .............. ...... .
Adaptive Air Suspension ...... .
Adaptive Air Suspension and
Damping ..... ................ .
Homelink® .................. .. .
Universa l remote control ....... . 156
163
166
166
173
173
181
183
183
186
188
188
19
4
19 4
Page 5 of 408

Safety first ........ ... ... .. .
Driving Safely ................. .
General notes ... .............. .
Proper occupant seating positions
Driver and passenger s ide footwell
Peda l area ..... ..... ....... ... .
Stowing luggage .............. .
Reporting Safety Defects ..... .. .
Safety belts .............. ... .. .
Genera l notes ....... .......... .
Why safety be lts? .. ...... ..... .
Safety belts .. .. .. .... ... .. ... .
Safety belt pretensioners ...... .
Airbag system ..... ... ... .. ... .
Important thing s to know .. •....
Front airbags .. ... ..... ..... .. .
Monitoring the Advanced Airbag
System ..... ... .. ....... .. ... .
Knee airbags ................. .
Side a irbags .... ..... ........ . .
Side curtain airbags ........... . 199
200
200
202
206
206 207
209
211
211
212
215
218
220
220
224
231
236
239
242
Child Safety . . . . . . . . . . . . . . . . . . . . 245
Impor tant things to know . . . . . . . 245
Child safety seats . . . . . . . . . . . . . . 250
Insta lling a ch ild safety seat . . . . . 255
Addit ional Information . . . . . . . . . . 258
Lower anchorages and tether for
children (LATCH) . . . . . . . . . . . . . . . . 260
Vehicle operation . . . . . . . . 269
Intelligent technology . . . . . . . . . . 270
Notice about data recorded by
vehicle control modules . . . . . . . . .
270
Elect ronic Stabilizat ion Program
(ESP) . . . . . . . . . . . . . . . . . . . . . . . . . .
270
Braking . . . . . . . . . . . . . . . . . . . . . . . . 272
Servotronic® -advanced power
steer ing system . . . . . . . . . . . . . . . . 275
Driv ing w it h your quattro® . . . . . . 275
Energy management . . . . . . . . . . . . 276
Driving and environment . . . . . . . 279
The first 1,000 mi les ( 1,500 km) and
afterwards . . . . . . . . . . . . . . . . . . . . .
279
Cata lytic converter . . . . . . . . . . . . . 280
Avoid damaging the vehicle . . . . . 281
Operate your vehicle economically
and minimize pollution . . . . . . . . . .
281
Trai ler towing . . . . . . . . . . . . . . . . . . 284
Driv ing w ith a trailer . . . . . . . . . . . . 284
Trai ler towing tips . . . . . . . . . • . . . . 286
Table of contents
Vehicle care ....... ... ... ... 289
Cleaning and protection ........ 290
General information . . . . . . . . . . . . . 290
Care of exte rior . . . . . . . . . . . . . . . . . 290
Care of inte rior . . . . . . . . . . . . . . . . . 297
Fuel supply and filling your fuel
tank . . . . . . . . . . . . . . . . . . . . . . . . . . . . 303
Gasoline . . . . . . . . • . . . . • . . . . . . . . . 303
Fuel tank . . . . . . . . . . . . . . . . . . . . . . . 304
Checking and filling . . . . . . . . . . . . 308
Engine hood . . . . . . . . . . . . . . . . . . . 308
Engine compartment . . . . . . . . . . . . 3 10
Engine oil . . . . . . . . . . . . . . . . . . . . . . 311
Eng ine cooling system . . . . . . . . . . 3 16
Brake fluid . . . . . . . . . . . . . • . . . . . . . 319
Battery . . . . . . . . . . . . . . . . . . . . . . . . 320
W indshield/headlight washer
container . . . . . . . . . . . . . . . . . . . . . . 325
Tires and wheels . . . . . . . . . . . . . . . 326
Tires ... ... ... .... .. ... ... .... .. 326
Vehicle care I I irechnical data
Page 7 of 408

Vehicle literature
In addition to this Owner's Manual, your Audi comes with the
• MMI Operating Instructions
• Warranty
& Maintenance booklet.
If you are missing one of these publications, or if you believe that
the informat ion is not comp lete, contact your authorized Audi
dea ler for assistance .
MMI Operating Instructions
contain detailed description of the Audi Multi Media Interface (MMD
including the navigation system, the sound system and the hand
held phone .
The Warranty & Maintenance booklet
explains how you can keep your Audi in top driving condition by
having it serviced regu lar ly and contains detailed information about
the warranties covering your Audi. Always have the booklet with you
when you take your vehicle to an authori zed Audi dea ler for service.
Your Audi Service Adviser will record each schedu led service and
can answer any ques tions y ou may have regarding how to maintain
your vehicle.
In Canada,
the vehicle literature is a lso avai lable in French. To obtain a copy,
co ntact your dealer or write to :
Au Canada, on peut se procurer un exemplaire en fran9ais de ce
document aupres du concessionna ire ou de:
Volkswagen Canada Inc .
Cl ient Assistance
Assistance a la Clientele
777 Bay ly Street, West,
Ajax , Ontario L 1 S 7G7
Controls and equip
ment Safety first Vehicle operation
V
ehi cle litera tur e
If you sell your Audi
a ll l iterature should be left in the vehicle to make the Warranty terms
as well as all operating, safety and ma intenance information avail
able to the next owner .
If you change your address or if you bought this
Audi used
be sure to send in a "Notice of Address Change"/ "Notice of Used
Car Purchase" post card. This card can be found in the Warranty
&
Ma intenance booklet or obtained from your authorized Aud i dealer.
It i s in your own int ere st t hat we are able to contact you should the
need arise .•
Vehicle care Do-it-yourself service Technical data
Page 14 of 408

Instruments and warning /indicator lights
Instruments and warning/indicator lights
Instruments
Instrument cluster and controls
The instrument cluster is your central source of informa
tion.
F ig . 2 Overview of the instrume nt cluster
CD Coolant temperature gauge ..................... .
0 Tachometer with time and date display .. ......... .
G) Warning/indicator lights .. ... .... ... ... ...... .. .
© Driver information system ..... ... .... ...... .... .
© Speedome ter with odometer ..... .... ..... ... .. .
© Fuel gauge . ..... ..... ... ... ..... ..... .... ... . .
G) Reset button for trip odometer ........... ... .... .
12
13 , 13
16
24
14
14
14
© I CH ECK] button ............. ..... .... ... ...... .
® Ins trument cluster illumination . ......... ........ .
[ i ] Tips
15
15
The illumination for the instrument cluster lights up whenever you
switch on the ignition with the vehicle headlights off. As the
daylight fades, the instrument cluster illumination likewise dims
automatically and will go out complete ly when the outside light is
very low . Th is feature is meant to remind you to switch on the head
lights when outside light conditions become poor. •
Engine coolant temperature gauge
The engine coolant gauge~ fig. 2 CD only works when the ignition
is on. To prevent damage to your engine, please note the following
important points:
Engine cold
As long as the needle remains at the left end of the gauge, the
engine still has not reached its operating temperature. Avoid high
engine speeds, heavy engine loads and heavy throttle applications.
Normal temperature
When the engine has reached its operating temperature, the needle
will move into the midd le of the gauge and remain there. If the
engine is working hard at high outside temperatures, the needle
may go furthe r to the right. This is no need to worry as long as the
J_ warning light in the instrument cluster does not illuminate.
Warning light in the instrument cluster -L
When the-•-warning light starts to flash, this can mean one of two
things: either the coo lant temperature is too high , or the coolant
level is too low~ page 31 . .,_
Page 16 of 408

Instruments and warning /indicator lights
[ i J Tips
• The digital clock and the odometer are turned on for about 30
seconds when the driver's door is opened.
• When the ignition is turned off, the odometer reading and the
digital clock with date display can be switched on for about
30 seconds by pressing the
I CHECK) button => page 15, fig. 5. •
Speedometer with odometer
The speedometer shows you the vehicle speed, and the
odometer shows you how many miles (kilometers) you
have driven.
Fig . 4 Instrument
c luster Odometer and
reset button
The odometer and trip odometer are located inside the speedom
eter.
• USA models -Miles
• Canada models -Kilometers
You can switch the display from miles to kilometers and vice versa
via the MMI.
Lower odometer
The lower odometer shows the total number of miles (kilometers)
driven. Upper
odometer (trip odometer )
The upper odometer shows the total number of mil·es (kilometers)
driven since you last reset the odometer to zero. You can use this
odometer when you wan t to keep track of how many miles (kilome
ters) you have driven for a single trip or errand. The last d igit indi
cates 1/10 of a mile (100 meters) .
You can reset the trip odometer to zero by pressing the Reset button
(0.0).
Malfunction message
If there is a malfunction somewhere in the instrument cluster, dEF
wi ll appear in the trip odometer and will stay on. Contact your
authori zed Audi dealer to have the prob lem corrected .
Immobilizer
When you switch on the ignition, the data chip inside the key is
"read" by the immobilizer system.
If an unauthorized key is inserted into the ignition lock, the word
SAFE will come on and stay on. You will not be able to start the
vehicle=>
page 49.
[ i J Tips
• The digita l clock and the odometer are turned on for about 30
seconds when the driver's door is opened.
• When the ignition is turned off, the odometer reading and the
digital clock with date display can be switched on for about
30 seconds by pressing the
I CHECK) button=> page 15, fig. 5. •
Fuel gauge
The fuel gauge only works when the ignition is on.
The fuel tank holds about 23 .8 gallons (90 liters). When the needle
reaches the reserve mark, the=>
page 35 symbol appears in the
instrument cluster display as well as the message
Please refuel. .,_
Page 17 of 408

There is still approximately 2.4 gallons (9 liters) of fuel left. This
message is meant to remind you to
refuel.
(D Note
Never run the tank completely dry. An irregular supp ly of fuel can
cause engine misfiring and fuel could enter the exhaust system . The
cata lytic converter could then overheat and be damaged. •
[ CHECK] button
You can perform different functions with this button .
Fig. 5 CHECK button in
the instrument cluster
Th e [ CHECK] button performs the following functions:
Switching on the clock and odometer
With the ignition turned off, the odometer reading and the digital
clock with date display can be sw itched on for about 30 seconds by
pressing the
I C HE CK I button ~ fig. 5 .
Starting the Auto-Check sequence
The Auto -Check system ~ page 28 constantly monitors certain indi
vidual functions and components of the vehicle when the ignition is
turned on and when the vehicle is moving.
With the ignition turned on, you can start the "Auto -Check
sequence" by pressing the !CHECK] button. You can perform an
Contro ls and eq uip
ment
Instruments and warning /indicator lights
Auto-Check sequence when the vehicle is stationary and the ignition
is turned on or when the vehicle is moving not faster than 3 mph
(5 km/h).
Calling up the driver information
A yellow or red symbol appears in the instrument cluster disp lay,
usually with a driver message. The driver message display disap
pears after about 5 seconds . The driver message can be displayed
again by briefly pressing the !CHECK ] button .
Setting the speed warning
By pressing the [ CHECKJ but ton briefly , you can set threshold 1 of
the speed warning while you are driving~
page 37. By maintaining
pressure on the [ CHECK] button, you delete the warning
threshold. •
Instrument cluster illumination
The basic brightness of the illumination for the instru
ments, the center console and the display can be
adjusted.
Fig . 6 Instr ument
c luster illumination
Press the"+" button to increase the brightness during
the hours of darkness.
~
Vehicle care I I irechnical data
Page 18 of 408

Instruments and warning /indicator lights
- Press the"-" button to decrease the brightness during
the hours of darkness.
A light sensor in the instrument cluster controls the illumination for
the instrument cluster, the center console and the displays . In a
bright environment, using the buttons to change the brightness has
no effect .
[ i ] Tips
The illumination for the instrument cluster lights up whenever you
switch on the ignition with the
vehicle headlights off. As the
daylight fades, the instrument cluster illumination likewise dims
automatically and will go out completely when the outside light is
very low. This feature is meant to remind you to switch on the head
lights when outside light conditions become poor. •
Warning/indicator lights
Overview
The warning/indicator lights indicate different functions
or a possible malfunction.
iNiii i·i i· i hii
Fig. 7 Instrument cluster with warning/indicator lights
Your vehicle is equipped with several important warning and indi
cator lights to help you monitor the continued reliab le operation of
your vehic le => & .
0
Electronic power control
Generator
=> page 18
=> page 18
Electronic Stabilization Program (ESP) => page 18