2009 AUDI S6 warning light
[x] Cancel search: warning lightPage 78 of 398

Clear vision
& WARNING
Broken glass of automatic dimming mirror can cause electrolyte
fluid leakage. Electrolyte fluid can irritate skin, eyes, and respira
tory system .
• Repeated or prolonged exposure to electrolyte can cause irrita
tion to the respiratory system, especially among people with
asthma or other respiratory conditions. Get fresh air immediately
by leaving the vehicle or, if that is not possible, open windows and
doors all the way.
• If electrolyte gets into the eyes, flush them thoroughly with
large amounts of clean water for at least 15 minutes; medical
attention is recommended.
• If electrolyte contacts skin, flush affected area with clean water
for at least 15 minutes and then wash affected area with soap and
water; medical attention is recommended. Thoroughly wash
affected clothing and shoes before reuse.
• If swallowed and person is conscious, rinse mouth with water
for at least 15 minutes. Do not induce vomiting unless instructed
to do so by medical professional. Get medical attention immedi
ately.
0 Note
Liquid electrolyte leaked from a broken mirror glass will damage any
plastic surfaces it comes in contact with . Clean up spilled electrolyte
immediately with clear water and a sponge .
[ i ] Tips
• If you switch off the automatic dimming function on the inside
mirror, automatic dimming of the outside mirrors will likewise be
disabled.
• Check to make sure there are no objects preventing light from
reaching the inside mirror. •
Do not attach any stickers to the windshield in front of the light
sensor, as this would interfere with the automatic operation of the
headlights and the automatic dimming of the inside mirror.
• Be aware that automatic dimming of the inside mirror can only
operate properly if the rear window sun blind * is retracted .•
Outside mirrors
The outside mirrors are electrically adjusted.
Adjusting the outside mirrors
Fig. 70 Forward
section of driver's
armrest: power mirror
controls
Turn the adjusting knob to position (D => fig. 70 to adjust
the outside mirror on the driver's side.
Turn the adjusting knob to position
@ to adjust the
outside mirror on the passenger side .
Press the knob in the appropriate direction to move the
mirror surface so that you have a good view to the rear .
Heated mirrors
- Turn the knob to position
@.
Folding both outside mirrors flat*
- Turn the knob to® ·
Page 79 of 398
Depending on the outside temperature, the mirror surfaces are
heated unti l the ignition is switched off -even if the knob is no
longer in posi tion
@ .
We recommend folding * the outside mirrors flat to he lp when
par king your ve hicle or when maneuvering in very tight spaces .
Memory setting for the outside mirrors*
When the seat position is saved in the memory, the position of the
outside mirrors is saved at the same time~
page 84.
If the position o f the mi rror surface is changed o n a ti lted mirror, this
new pos ition wi ll be automatically saved to th e remote key when th e
vehicle is taken out o f reverse gear.
Tilting the passenger 's side out side mirror (on ly with
seat memory )
When you move the selector lever into R (Reverse), the mirror on the
front passenger's d oor (knob t urn ed to@ ~
page 76, fig. 70) will tilt
s lightly downward. This make is easier for you to see the curb when
you are backing into a parking space .
The mirror returns to its initia l position as soon as reverse gear is
disengaged and vehic le speed is above about 9 mph (15 km/h). The
mirror also returns to its initia l position if the switch is moved to the
driver's outside mirror
0 or the ignition is switched off.
Automatic anti -glare for the outside mirror s*
The outside mir ro rs dim at the same time as the inside mirro r. When
the ign ition is switched on, the mirrors automat ically dim
depending on the amount of light striking the mirrors (such as head
lights shining into the vehicle from the rear).
When you turn on the interior light, or wh en you move the selector
lever int o
R (Reverse), the ant i- g lare function stops a nd the mirro rs
return to their original condition (not darkened).
Controls and equip
ment
Cl ea r vision
0 Note
• Curved ( i.e . convex) mirror sur faces increase your fie ld o f view .
Remember that vehicles or other objects w ill appear smal ler and
f arther away than when seen in a flat mirror. If you use th is mi rror to
estimate distances of fol lowing vehicles when changing lan es, you
cou ld esti mate incor rect ly a nd cause an acc ident .
• I f the mirror housing is moved un intentionally (for example,
wh ile pa rking your veh ic le), then you must first fold the mirror elec
trically . Do not readjust the mirror housing manually. You cou ld
damage the motor which controls the mirror.
[ i ] Tips
If t here s hould be a malfunct io n in the electrica l system, you ca n
sti ll adjust the outside mirrors by pressing the edge of the mirror .•
Ap plies to vehicles: wit h automatic dimm in g for ou tsi de m irr ors
Automatic dimming for outside mirrors
The outside mirr ors are d immed t oge the r with the au tomati c
dimming of the inside mirror. When the ignition is switched on , the
mir ro rs darken automat ically depending on the light s triking the m
(e.g . headlights from the rear) .
When the interior lighting is switched on and when reverse gear is engaged, the mi rrors are switched back to the ir or iginal br ightness
(not dimmed).
_& WARNING
Broken glass of automatic dimming mirror can cause electrolyte
fluid leakage . Electrolyte fluid c an irritate skin , eyes , and respira
tory system .
• Repeated or prolonged exposure to electrolyte can c ause irrita -
tion to the respiratory system , e specially among people with .,_
I • •
Page 80 of 398

Clear vision
& WARNING (continued)
asthma or other respiratory conditions. Get fresh air immediately
by leaving the vehicle or, if that is not possible, open windows and
doors all the way.
• If electrolyte gets into the eyes, flush them thoroughly with
large amounts of clean water for at least 15 minutes ; medical
attention is recommended.
• If electrolyte contacts skin, flush affected area with clean water
for at least 15 minutes and then wash affected area with soap and
water; medical attention is recommended . Thoroughly wash
affected clothing and shoes before reuse.
• If swallowed and person is conscious, rinse mouth with water
for at least 15 minutes. Do not induce vomiting unless instructed
to do so by medical professional . Get medical attention immedi
ately.
0 Note
Electrolyte leaking from a broken mirro r glass attacks the vehicle
paint and plastic surfaces. Clean up spilled electrolyte immediately
with clear water and a sponge.
[ i] Tips
• If automatic dimming for the inside mirror is switched off, the
outside mirrors are also not dimmed automatically.
• Automatic dimming for the mirror only operates properly if the
sunshade* for the rear window is retracted, or the light striking the
inside mirror is not hindered by other objects. •
Digital compass
Applies to vehicles: with digital compass
Activating or deactivating the compass
The direction is displayed on the interior rear view mirror.
Fig . 71 Inside rear
view mirror : digital
compass activated
- To activate or deactivate, hold the@ button down until
the red display appears or disappears.
The digital compass only works with the ignition turned on. The
directions are displayed as initials:
N (North), NE (Northeast), E
(East), SE (Southeast), S (South), SW (Southwest), W (West), NW
(Northwest).
[ i] Tips
To avoid inaccurate directions, do not allow any r emote controls,
electrical systems, or metal parts close to the mirror. •
Page 82 of 398
Seats and storage
Seats and storage
General recommendations
Why is your seat adjustment so important?
The safety belts and the airbag system can only provide
maximum protection if the front seats are correctly
adjusted.
There are various ways of adjusting the front seats to provide safe
and comfortable support for the driver and the front passenger.
Adjust your seat properly so that :
• you can easily and quickly reach all the switches and controls in
the instrument panel
• your body is properly supported thus reducing physical stress
and fatigue
• the safety belts and airbag system can offer maximum protec
tion=>
page 215.
In the following sections , you will see exactly how you can best
adjust your seats.
There are special regulations and instructions for installing a child safety seat on the front passenger's seat. Always follow the informa
tion regarding child safety provided in=>
page 238, "Child Safety".
L1}. WARNING
Incorrect seating position of the driver and all other passengers
can result in serious personal injury.
• Always keep your feet on the floor when the vehicle is in motion
- never put your feet on top of the instrument panel, out of the
window or on top of the seat cushion. This applies especially to
the passengers. If your seating position is incorrect, you increase
the risk of injury in the case of sudden braking or an accident. If
& WARNING (continued)
the airbag inflates and the seating position is incorrect, this could
result in personal injury or even death.
• It is important for both the driver and front passenger to keep
a distance of at least 10 inches (25 cm) between themselves and
the steering wheel and/or instrument panel. If you're sitting any closer than this, the airbag system cannot protect you properly. In
addition, the front seats and head restraints must be adjusted to
your body height so that they can give you maximum protection.
• Always try to keep as much distance as possible between your
self and the steering wheel or instrument panel.
• Do not adjust the driver's or front passenger's seat while the
vehicle is moving. Your seat may move unexpectedly, causing
sudden loss of vehicle control and personal injury.
If you adjust
your seat while the vehicle is moving, you are out of position. •
Driver's seat
The correct seat position is important for safe and relaxed
driving.
We recommend that you adjust the driver's seat in the
following manner:
- Adjust the seat in fore and aft direction so that you can
easily push the pedals to the floor while keeping your
knees slightly bent=>&, in "Why is your seat adjustment
so important?".
Adjust the seatback so that when you sit with your back
against the seatback, you can still grasp the top of the
steering wheel. _..
Page 88 of 398
Seats and storage Rear window shelf
You can place light articles of clothing on the rear
window shelf behind the seatback.
& WARNING
Whenever you are driving, do not leave any hard objects on the
rear window shelf or allow your pet to sit on the shelf. These could
become a hazard for vehicle occupants in the event of sudden
braking or a crash!
[ i] Tips
• A vent slot is located between the shelf and the rear window. Do
not block the vent with any items you may place on the rear window
shelf.
• Do not plac e bulky items on the rear window sh elf as they would
restrict or block the driver's vision through the rear view mirror. •
Head restraints
Adjusting head restraints, front seats
The head restraints must be adjusted properly to provide
protection.
Fig. 79 Front seats
head restraints
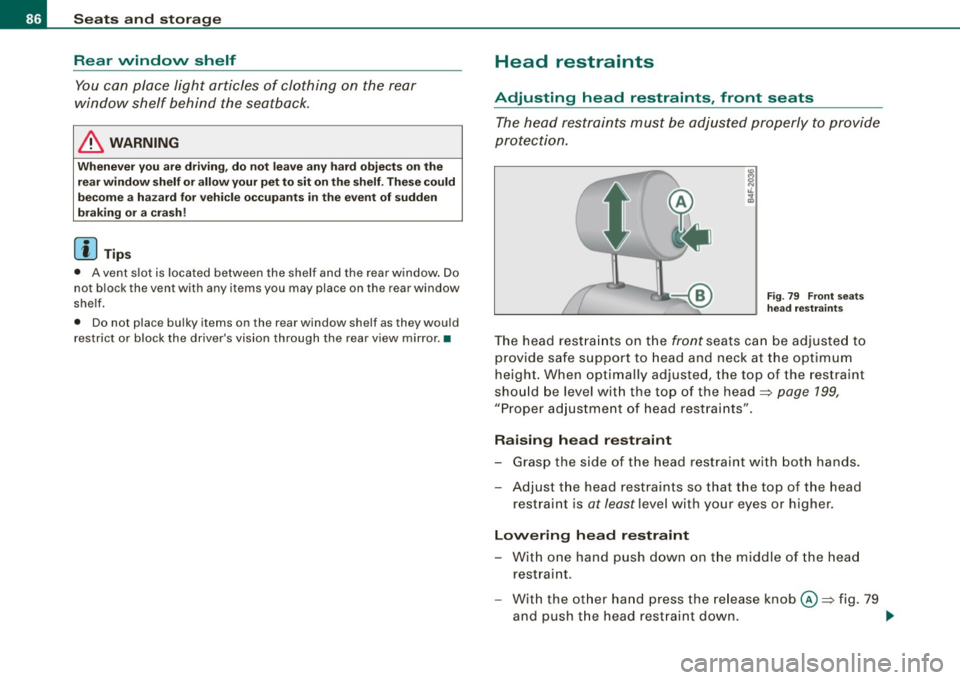
The head restraints on the front seats can be adjusted to
provide safe support to head and neck at the optimum
height. When optimally adjusted, the top of the restraint
should be level with the top of the head~
page 199,
"Proper adjustment of head restraints" .
Raising head restraint
-Grasp the side of the head restraint with both hands.
- Adjust the head restraints so that the top of the head
restraint is
at least level with your eyes or higher.
Lowering head restraint
-With one hand push down on the middle of the head
restraint .
- With the other hand press the release knob@~ fig. 79
and push the head restraint down. .,
Page 92 of 398
Seats and storage
Fastening eyelets
The luggage compartment is equipped with four tie-down
eyelets to secure luggage and other items.
Fig . 84 Luggage
compartment
fastening eyelets
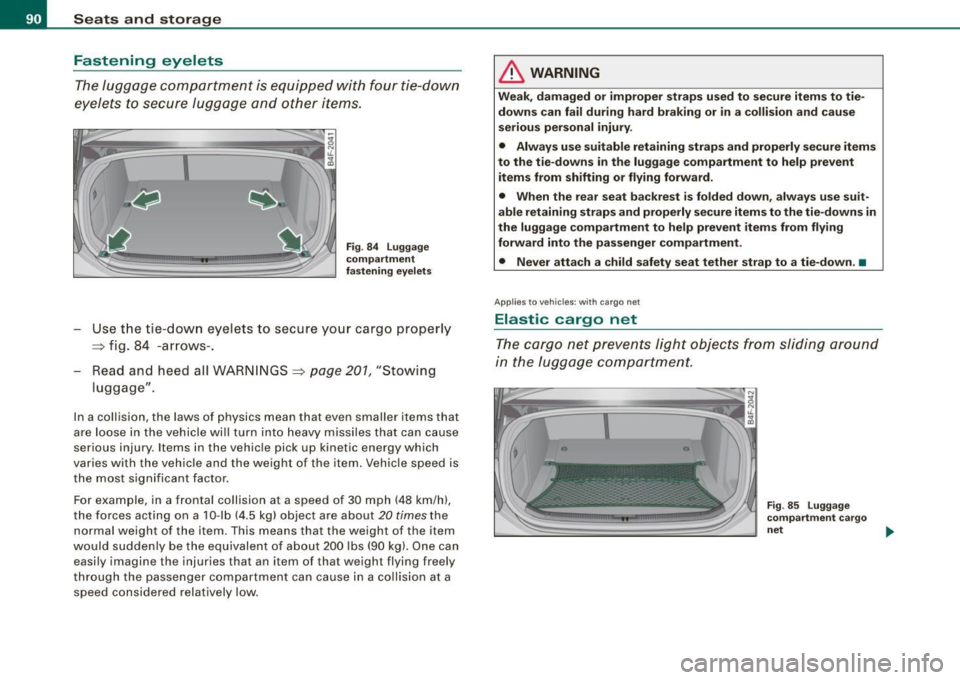
- Use the t ie -down eyelets to secure your cargo proper ly
~ fig. 84 -arrows -.
Read and heed all WARNINGS
~ page 201, "Stowing
luggage" .
In a collision , the laws o f physics mean that even smaller items that
are loose in the vehicle will turn into heavy missiles that can cause
serious injury . Items in the vehicle pick up k inetic energy which
varies with the vehicle and the weight of the item. Vehicle speed is
the most signifi cant facto r.
For example, in a frontal collision at a speed of 30 mph (48 km /h),
the forces acting on a 10-lb (4.5 kg) object are about
20 times the
normal weight of the it em. This means that the we ight of the item
would suddenly be the equivalent of about 200 lbs (90 kg). One can easily imagine the injur ies that an i tem o f that weigh t flying freely
through the passenger compartment can cause in a collision at a speed considered relatively low .
& WARNING
Weak, damaged or improper straps used to secure items to tie
downs can fail during hard braking or in a collision and cause
serious personal injury .
• Always use suitable retaining straps and properly secure items
to the tie-downs in the luggage compartment to help prevent
items from shifting or flying forward.
• When the rear seat backrest is folded down, always use suit
able retaining straps and properly secure items to the tie-downs in
the luggage compartment to help prevent items from flying
forward into the passenger compartment.
• Never attach a child safety seat tether strap to a tie-down. •
Applies to vehicles: with cargo net
Elastic cargo net
The cargo net prevents light objects from sliding around
in the luggage compartment.
Fig . 85 Luggage
compartment cargo
net ..,,
Page 93 of 398

Fig. 86 Luggage
compartment cargo
net attached to
mounting hooks*
Securing objects to the luggage compartment
floor with the net
- Lay out the cargo net in the luggage compartment.
- Engage all four hooks into the fastening eyelets
=:> page 90, fig. 85.
- Place objects to be secured under the net.
Configuring the net to restrain small objects
-Lay out the cargo net in the luggage compartment.
- Engage the hooks on the cargo net in the fastening
eyelets in the floor at the rear of the luggage compart
ment :::::> fig. 86.
- Pull down the mounting hooks -arrows-located below
the base of the rear window.
- Connect each loop on the net to the corresponding hook
as illustrated .
- Place items inside the net.
Con tro ls and eq uip
ment
Seats and storage
Mounting hooks*
There are two mounting hooks under the base of the rear window
inside the luggage compartment . You can attach the cargo net as
well as light objects to these hooks.
The mounting hooks are spring-loaded and will return to their normal position when not in use.
& WARNING
For strength-related reasons, the mounting hooks can only be
used to secure objects weighing up to 10 lb. (5 kg). Heavier objects
will not be adequately secured -there is a risk of injury .•
Left-side compartment
The DVD player for the navigation system* is in the left
side storage comportment.
Vehicle care I I
Fig . 87 Luggage
compartment: storage
compartment for DVD
player .,._
irechnical data
Page 95 of 398
& WARNING
• The ski sack is intended only for the transportation of skis and
other light objects. To reduce the risk of serious personal injury
never transport heavy or pointed objects in the ski sack.
• When braking rapidly or during an accident the load could be
displaced and cause injury to occupants.
• Sharp edges on the load must be covered for protection.
Always fasten the belt tightly around the sack and its contents
=> page 92, fig. 90.
[ i J Tips
Never stow the ski sack away if it's wet or damp (for example, snow
melting from skis) . Let it dry completely before you stow it away .•
Roof rack
First things first
A roof rack can be fitted to carry additional luggage on
the roof.
-Always read and follow the instructions provided by the
roof rack manufacturer when the roof rack system must
be installed.
If you are transporting luggage or other objects on the roof, please
note the following:
• Your vehicle has specially designed aerodynamic roof rails . Only
install a roof rack specifically designed for your model. Contact the
nearest Audi dealer for information on approved modular roof racks
for your vehicle.
• These approved roof racks are the basis for a complete roof rack
system. Additional attachments for the basic roof rack are neces-
Controls and equip
ment
Seats and storage
sary to safely transport luggage, bicycles, surf boards, skis or small
boats. All necessary hardware for these systems is available at your
authorized Audi dealer.
• We recommend that you keep the installation instructions for
your roof rack system together with your Owner's literature in the
vehicle.
When should the roof rack be removed?
• Before going through an automatic car wash (it is best to ask the
car wash operator for advice).
• When not in use , to reduce fuel consumption, wind noise and to
guard against theft.
& WARNING
• Use of an unapproved roof rack or incorrect mounting of an
approved roof rack can cause the roof rack or the items attached
to it to fall off the roof onto the road.
• Objects falling from the roof of a vehicle can cause a crash and
personal injury.
• Only mount the system between the markings shown in
=> page 94, fig. 91.
• The roof rack system must be installed exactly according to the
instructions provided.
0 Note
• Your vehicle warranty does not cover any damages to the vehicle
caused by using roof racks or mounting structures not approved by
Audi for your vehicle. The same applies to damage resulting from incorrect roof rack installation .
• Always check the roof rack mountings and hardware before each
trip and during a trip to make sure everything is securely tightened.
If necessary, retighten the mountings and check the entire system
from time to time . .,,
I • •