2009 Acura TSX light
[x] Cancel search: lightPage 3 of 170
Navigation System3
Table of Contents
Edit Waypoint Search Area ...........107
Guidance Mode.......... ....................108
Clock Adjustment ........................109
Auto Daylight.................................109
Auto Time Zone..............................110
Daylight Savings Time (DST) Selection
(Change DST Schedul e) .............110
Time Adjustment ............................110
Vehicle.........................................111
Off-road Tracking ...... ....................111
Correct Vehicle Position ...............111
Verbal Reminder ............................112
Color ............................................112
Map Color......................................113
Menu Color ....................................113
Switching Display Mode Manually .......... ..........................113
Switching Display Mode Automatically .............................114
AcuraLink/Messages ...................115
Traffic & Weather Status.............115
System Information .....................116
Rearview Camera .......................116
Rearview Camera Brightness Adjustment ..................................116
System Initialization .................117
System Initialization ....................117 Entering the Secur
ity Code ..........117
GPS Initialization ........................118
Map Matching..............................118
System Limitations ..................119
Database Limitations...............121
Client Assistance ......................123
Reporting Errors ..........................123
Acura Automobile Client Services.....................................123
Visiting Your Dealer ...................124
Obtaining a Navigation Update DVD .........................................124
Changing the DVD ......................125
PC Card........................................125
Coverage Areas ........................126
Map Coverage..............................126
U.S. Detailed Cover age Areas .......126
Canada Detailed Coverage Areas...........................................131
Operation in Alaska and Hawaii.......................................138
Alaska ............................................138
Hawaii............................................138
Information Screen Differences .....139 Shipping a Vehicle To or From
Hawaii ........................................140
Frequently Asked Questions ...141
Troubleshooting .......................149
Glossary ....................................150
Glossary .......................................150
Voice Command Index ............153
Global Commands .......................153
Navigation General Commands...153
Navigation Display Commands ...154
Find Place Commands .................155
Climate Control Commands ........156
Temperature Voice Commands ...157
Radio Voice Commands ..............157
CD Voice Commands ..................158
DVD Voice Commands ...............159
AUX Voice Commands ...............159
INFO Screen Voice Commands ................................160
SETUP Screen (Main Setup) Commands ................................160
On-Screen Commands .................161
On-Screen Spelling Assist ..............161
Index .........................................165
2009 TSX
Page 6 of 170
6Navigation System
While driving, do not look at the screen
or operate the system controls for more
than a second or so at a time, and only
after deciding you can do so safely. Pull
to the side of the road if you need more
time to look at the screen or operate the
controls. The navigation system is designed to
provide route information to help you
reach your destination. However, this
route guidance may sometimes conflict
with current road conditions such as
street closures, road construction,
detours, and out-of-date map data.
Additionally, the system itself has
certain limitations (see page119).
Therefore, you must verify the audio
and visual route information provided
by the system by caref
ully observing the
roadway, signs and signals, etc. If you
are unsure, proceed with caution.
Always use your own good judgment,
and obey traffic laws while driving.
Map Overview
Current Street
The current street on which your vehicle
is appears at the bottom of the map
screen (see page19). A message saying
“Not on a digitized road” may appear
instead when you drive half a mile away
from a mapped road. For more details,
see Off-road Tracking on page69.
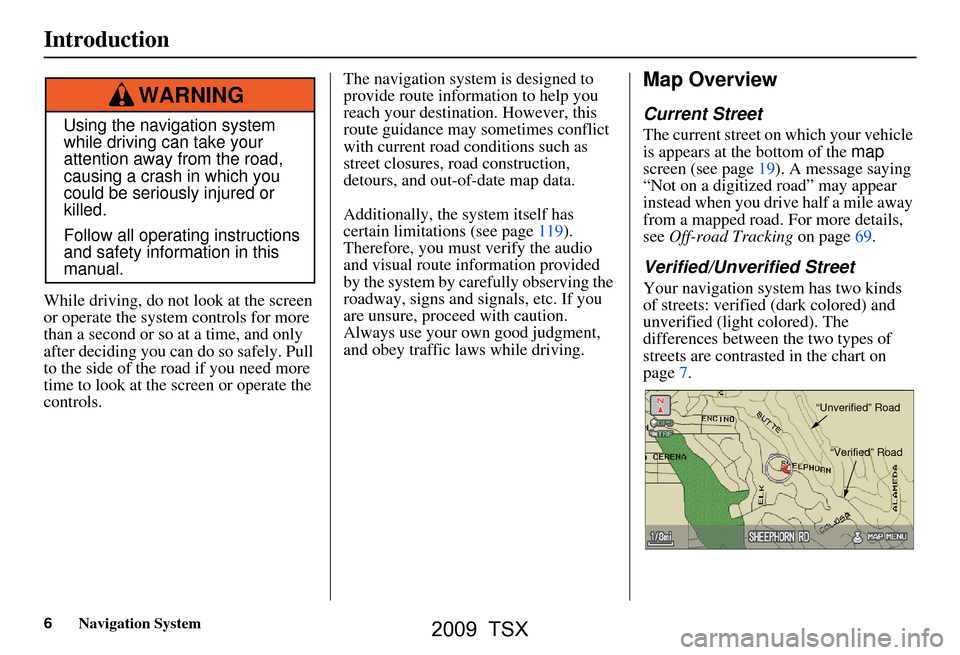
Verified/Unverified Street
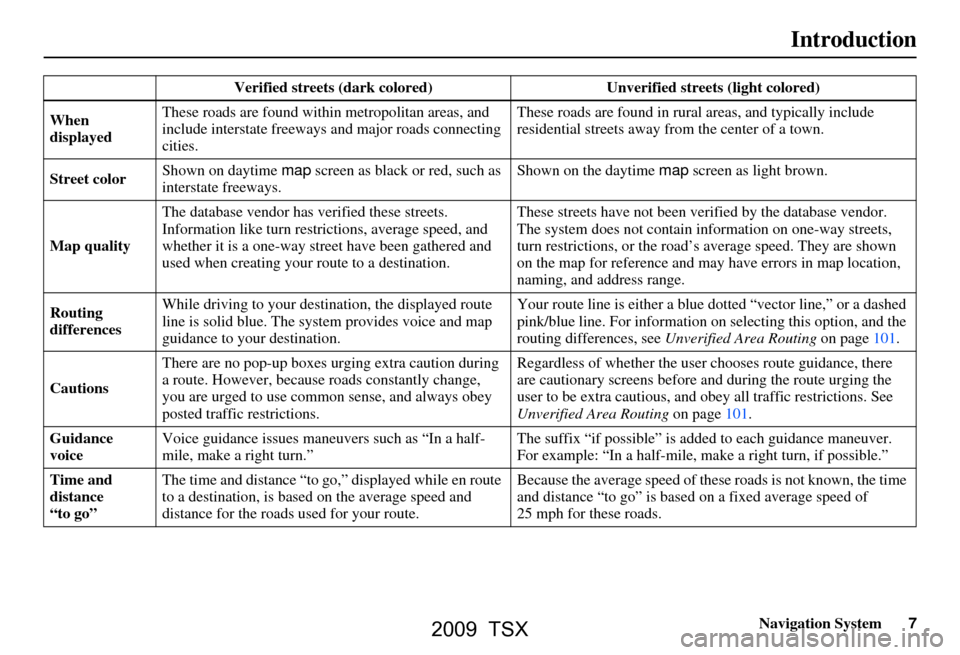
Your navigation system has two kinds
of streets: verified (dark colored) and
unverified (light colored). The
differences between the two types of
streets are contrasted in the chart on
page7.
Using the navigation system
while driving can take your
attention away from the road,
causing a crash in which you
could be seriously injured or
killed.
Follow all operating instructions
and safety information in this
manual.
WARNING
“Unverified” Road
“Verified” Road
Introduction
2009 TSX
Page 7 of 170
Navigation System7
Introduction
Verified streets (dark colored) Unverified streets (light colored)
When
displayed These roads are found within metropolitan areas, and
include interstate freeways
and major roads connecting
cities. These roads are found in rural
areas, and typically include
residential streets away fr om the center of a town.
Street color Shown on daytime
map screen as black or red, such as
interstate freeways. Shown on the daytime
map screen as light brown.
Map quality The database vendor has
verified these streets.
Information like turn restri ctions, average speed, and
whether it is a one-way street have been gathered and
used when creating your route to a destination. These streets have not
been verified by the database vendor.
The system does not contain in formation on one-way streets,
turn restrictions, or the road’s average speed. They are shown
on the map for reference and may have errors in map location,
naming, and address range.
Routing
differences While driving to your destin
ation, the displayed route
line is solid blue. The syst em provides voice and map
guidance to your destination. Your route line is either a blue
dotted “vector line,” or a dashed
pink/blue line. For information on selecting this option, and the
routing differences, see Unverified Area Routing on page101.
Cautions There are no pop-up boxes urging extra caution during
a route. However, because
roads constantly change,
you are urged to use common sense, and always obey
posted traffic restrictions. Regardless of whether the user
chooses route guidance, there
are cautionary screens before and during the route urging the
user to be extra cautious, and obey all traffic restrictions. See
Unverified Area Routing on page101.
Guidance
voice Voice guidance issues maneuvers such as “In a half-
mile, make a right turn.” The suffix “if possible” is adde
d to each guidance maneuver.
For example: “In a half-mile, ma ke a right turn, if possible.”
Time and
distance
“to go” The time and distance “to go,
” displayed while en route
to a destination, is based on the average speed and
distance for the roads used for your route. Because the average speed of thes
e roads is not known, the time
and distance “to go” is based on a fixed average speed of
25 mph for these roads.
2009 TSX
Page 11 of 170
Navigation System11
Getting Started
Display Mode button
Switches the display between Day
mode, Night mode, and OFF. See
page113.
AUDIO button
Press to display the audio screen.
For more information on audio system
features, see the Audio section of the
vehicle Owner’s manual.
Other buttons
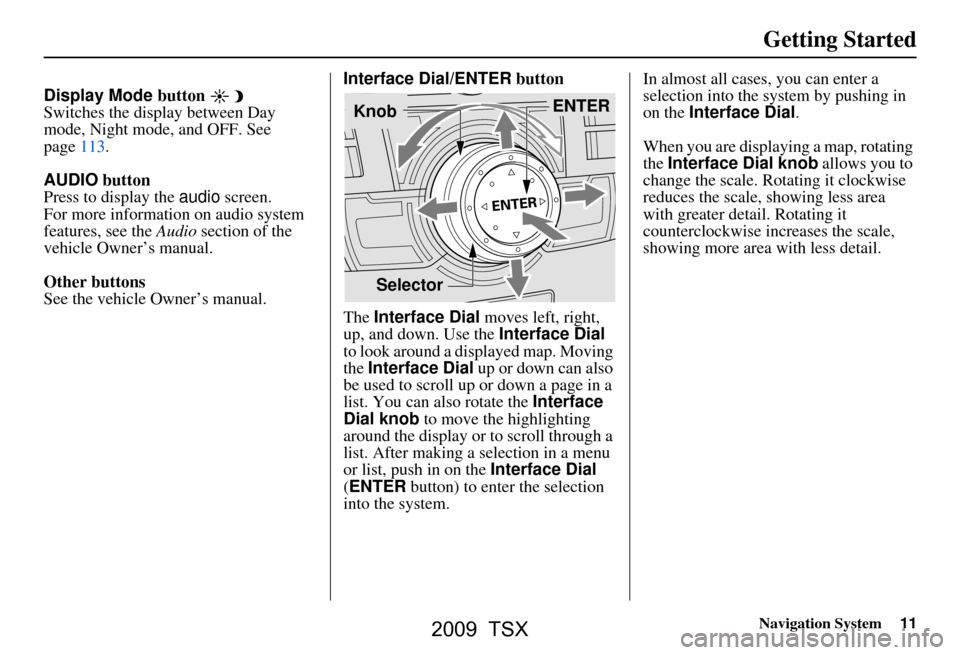
See the vehicle Owner’s manual. Interface Dial/ENTER
button
The Interface Dial moves left, right,
up, and down. Use the Interface Dial
to look around a displayed map. Moving
the Interface Dial up or down can also
be used to scroll up or down a page in a
list. You can also rotate the Interface
Dial knob to move the highlighting
around the display or to scroll through a
list. After making a selection in a menu
or list, push in on the Interface Dial
(ENTER button) to enter the selection
into the system. In almost all cases
, you can enter a
selection into the system by pushing in
on the Interface Dial .
When you are displaying a map, rotating
the Interface Dial knob allows you to
change the scale. Rotating it clockwise
reduces the scale, showing less area
with greater detail. Rotating it
counterclockwise increases the scale,
showing more area with less detail.
Selector ENTER
Knob
2009 TSX
Page 13 of 170
Navigation System13
Getting Started
Voice Control Basics
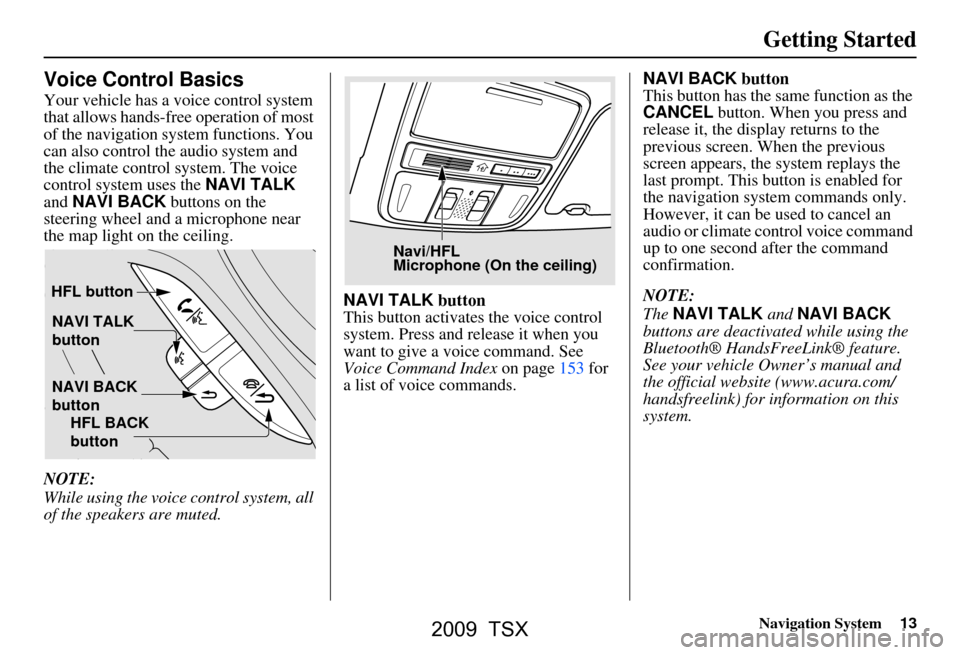
Your vehicle has a voice control system
that allows hands-free operation of most
of the navigation system functions. You
can also control the audio system and
the climate control system. The voice
control system uses the NAVI TALK
and NAVI BACK buttons on the
steering wheel and a microphone near
the map light on the ceiling.
NOTE:
While using the voice control system, all
of the speakers are muted. NAVI TALK
button
This button activates the voice control
system. Press and release it when you
want to give a voice command. See
Voice Command Index on page153 for
a list of voice commands. NAVI BACK
button
This button has the same function as the
CANCEL button. When you press and
release it, the disp lay returns to the
previous screen. When the previous
screen appears, the system replays the
last prompt. This button is enabled for
the navigation system commands only.
However, it can be used to cancel an
audio or climate control voice command
up to one second after the command
confirmation.
NOTE:
The NAVI TALK and NAVI BACK
buttons are deactivated while using the
Bluetooth® HandsFreeLink® feature.
See your vehicle Owner’s manual and
the official websit e (www.acura.com/
handsfreelink) for information on this
system.
NAVI TALK
button
NAVI BACK
button
HFL button
HFL BACK
button
Navi/HFL
Microphone (On the ceiling)
2009 TSX
Page 15 of 170
Navigation System15
Getting Started
Lower the A/C fan speed during
voice recognition operation, and
adjust the airflow from both the
dashboard and side vents so they do
not blow against the microphone on
the ceiling.
If more than one pe rson is speaking at
the same time, the system may
misinterpret your command.
After pressing and releasing the NAVI TALK button, wait for the
beep, then give a voice command.
Give a voice command in a clear, natural speaking voice without
pausing between words.
If the system cannot recognize your command because of background
noise, speak louder.
If you are still having trouble with the voice control sy stem, refer to Voice
Command Help on the INFO
screen ( Other).
NOTE:
The voice control system can be used
only in the driver’s seat because the
microphone unit removes noises from
the front passenger’s side.Selecting an Item (Button)
on the Screen
On most screens, there are items that
can be selected (like buttons with titles
such as OK or Return ). To select an
item on any screen, do one of the
following:
Use the voice control system and say the name of the desired item. Almost
all selectable items on the screen,
including some listed items, are
recognized by the voice control
system.
Move the highlighting to the desired item with the Interface Dial or its
knob , then push in on the Interface
Dial .
Tip:
If items are grayed out, this means that
they cannot be selected.
Selecting an Item in a List
To scroll through a list, do one of the
following:
Rotate the Interface Dial knob to
scroll one item at a time.
Use the voice control system to scroll page by page. For example, to scroll
up, say “Up” or “Previous.” To scroll
down, say “Next” or “Down.”
Move the Interface Dial up or down
to scroll through the list page by
page.
If you cannot find the desired name, or
have made an error, return to the
previous screen by pressing the
CANCEL or the NAVI BACK button.
To select the desired item in the list, do
one of the following:
Use the voice control system, and say the item number of the desired item.
Rotate the Interface Dial knob to
move the highlighting to the item,
then push in on the Interface Dial.
2009 TSX
Page 16 of 170
16Navigation System
Getting Started
Entering Information
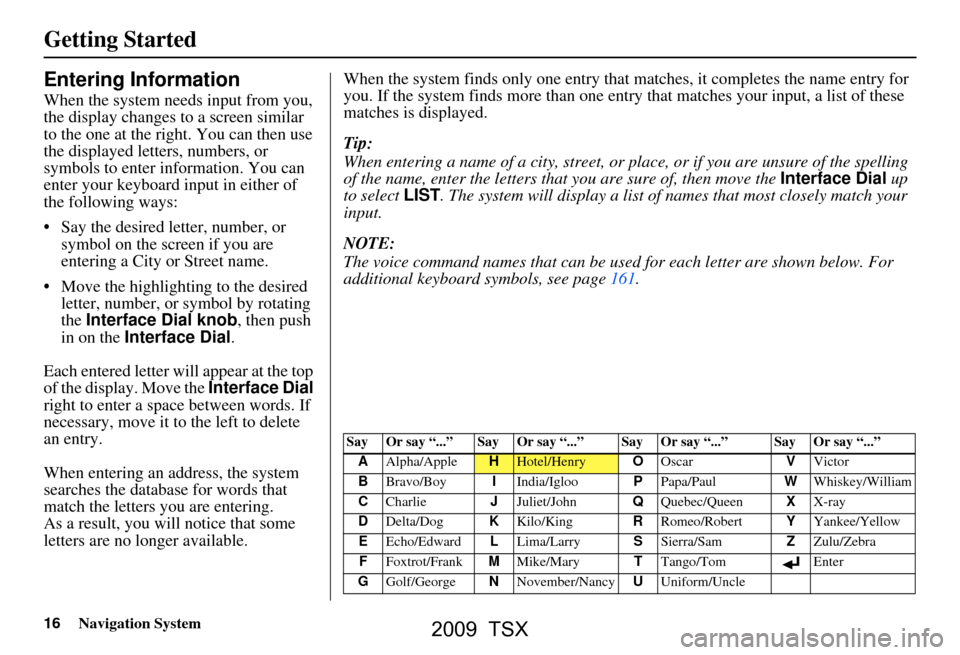
When the system needs input from you,
the display changes to a screen similar
to the one at the right. You can then use
the displayed letters, numbers, or
symbols to enter information. You can
enter your keyboard input in either of
the following ways:
Say the desired letter, number, or symbol on the screen if you are
entering a City or Street name.
Move the highlighting to the desired letter, number, or symbol by rotating
the Interface Dial knob , then push
in on the Interface Dial .
Each entered letter will appear at the top
of the display. Move the Interface Dial
right to enter a space between words. If
necessary, move it to the left to delete
an entry.
When entering an address, the system
searches the database for words that
match the letters you are entering.
As a result, you will notice that some
letters are no longer available. When the system find
s only one entry that matches, it completes the name entry for
you. If the system finds more than one entry that matches your input, a list of these
matches is displayed.
Tip:
When entering a name of a city, street, or place, or if you are unsure of the spelling
of the name, enter the letters that you are sure of, then move the Interface Dial up
to select LIST. The system will display a list of names that most closely match your
input.
NOTE:
The voice command names that can be used for each letter are shown below. For
additional keyboard symbols, see page161.
Say Or say “...” Say Or say “...” Say Or say “...” Say Or say “...”
A Alpha/Apple
HHotel/Henry OOscar VVictor
B Bravo/Boy IIndia/Igloo PPapa/Paul WWhiskey/William
C Charlie JJuliet/John QQuebec/Queen XX-ray
D Delta/Dog KKilo/King RRomeo/Robert YYankee/Yellow
E Echo/Edward LLima/Larry SSierra/Sam ZZulu/Zebra
F Foxtrot/Frank MMike/Mary TTango/Tom Enter
G Golf/George NNovember/Nancy UUniform/Uncle
2009 TSX
Page 21 of 170
Navigation System21
Getting Started
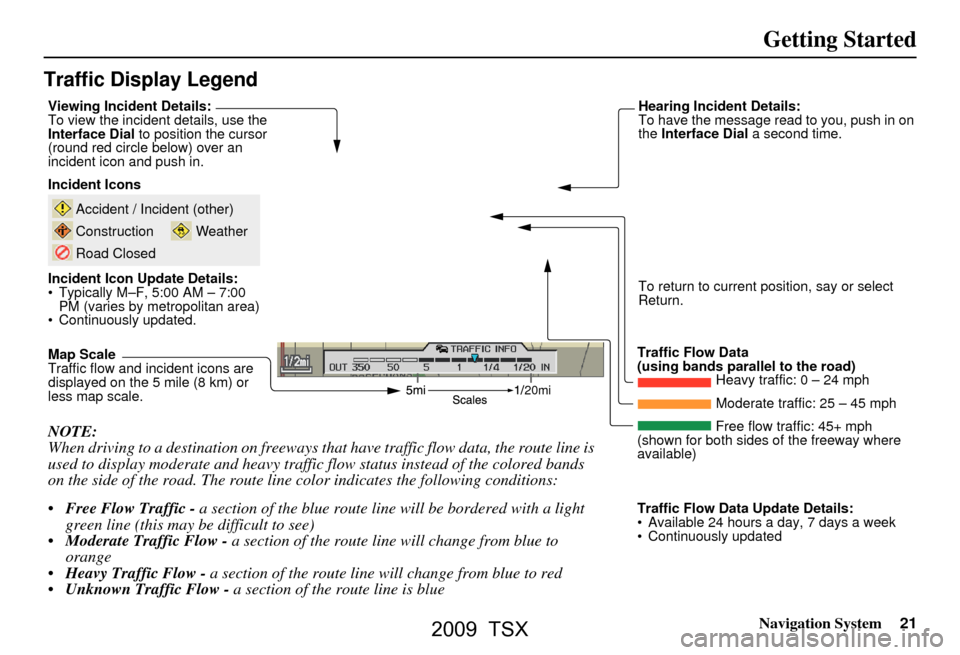
Traffic Display Legend
20mi
NOTE:
When driving to a destination on freeways that have traffic flow data, the route line is
used to display moderate and heavy traffic flow status instead of the colored bands
on the side of the road. The route line color indicates the following conditions:
Free Flow Traffic - a section of the blue route line will be bordered with a light
green line (this may be difficult to see)
Moderate Traffic Flow - a section of the route line will change from blue to
orange
Heavy Traffic Flow - a section of the route line will change from blue to red
Unknown Traffic Flow - a section of the route line is blue
Map Scale
Traffic flow and incident icons are
displayed on the 5 mile (8 km) or
less map scale.
Incident Icons
Incident Icon Update Details:
Typically M–F, 5:00 AM – 7:00
PM (varies by metropolitan area)
Continuously updated.
Accident / Incident (other)
Construction
Road Closed
Weather
Traffic Flow Data
(using bands parallel to the road) Heavy traffic: 0 – 24 mph
Moderate traffic: 25 – 45 mph
Free flow traffic: 45+ mph
(shown for both sides of the freeway where
available)
Viewing Incident Details:
To view the incident
details, use the
Interface Dial to position the cursor
(round red circle below) over an
incident icon and push in. Hearing Incident Details:
To have the message read to you, push in on
the
Interface Dial a second time.
To return to current position, say or select
Return.
Traffic Flow Data Update Details:
Available 24 hours a day, 7 days a week
Continuously updated
2009 TSX