2009 Acura TSX ad blue
[x] Cancel search: ad bluePage 51 of 170
Navigation System51
Driving to Your Destination
Driving to Your Destination
A route typically has three phases.
Initial route calculation ( Calculate
route to screen) (see page51).
Change the route while en route (see page73).
Resume the route when restarting the engine (see Continue Trip Screen on
page78).
Calculate Route to Screen
Say or select OK. The system calculates
the route using the method shown on the
screen (see Map Screen on page54).
NOTE:
Prior to departure, you can set areas to avoid. The system then includes
them in its calculations for the
destination you have entered. See
Edit Avoid Area on page105.
For information on the available voice commands, see Voice
Command Index on page153. Further selections from the
Calculate
route to screen include:
ADD TO Address Book
Allows you to add the destination to
your Address Book. See By Address
Book on page32.
NOTE:
If EDIT Address Book is displayed,
the destination is alre ady stored in your
Address Book. You can edit the address
in your Address Book by selecting this
button. For informatio n on editing your
Address Book, see Address Book on
page93.
ADD TO Today’s Destinations
Allows you to add the destination to
your Today’s Destinations list. See By
Today’s Destinations on page48.
NOTE:
If the button is grayed out, the Today’s
Destinations list is already full (five
destinations have been stored).
CALL
Dials the number on the screen when
available. See Bluetooth®
HandsFreeLink® on page18.
2009 TSX
Page 53 of 170
Navigation System53
Viewing the Routes
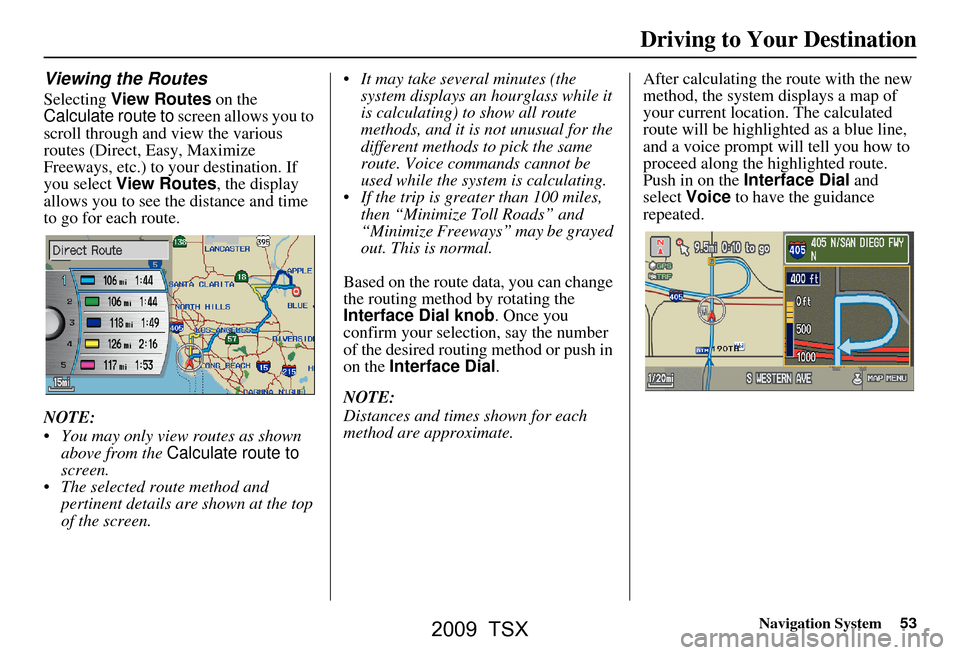
Selecting View Routes on the
Calculate route to screen allows you to
scroll through and view the various
routes (Direct, Easy, Maximize
Freeways, etc.) to your destination. If
you select View Routes , the display
allows you to see the distance and time
to go for each route.
NOTE:
You may only view routes as shown above from the Calculate route to
screen.
The selected route method and pertinent details are shown at the top
of the screen. It may take several minutes (the
system displays an hourglass while it
is calculating) to show all route
methods, and it is not unusual for the
different methods to pick the same
route. Voice commands cannot be
used while the system is calculating.
If the trip is greater than 100 miles, then “Minimize Toll Roads” and
“Minimize Freeways” may be grayed
out. This is normal.
Based on the route data, you can change
the routing method by rotating the
Interface Dial knob. Once you
confirm your selection, say the number
of the desired routing method or push in
on the Interface Dial .
NOTE:
Distances and times shown for each
method are approximate. After calculating the route with the new
method, the system displays a map of
your current locatio
n. The calculated
route will be highlighted as a blue line,
and a voice prompt will tell you how to
proceed along the highlighted route.
Push in on the Interface Dial and
select Voice to have the guidance
repeated.
Driving to Your Destination
2009 TSX
Page 54 of 170
54Navigation System
Driving to Your Destination
Viewing the Destination Map
Selecting View Dest. Map displays a
map of the destination vicinity. Press the
CANCEL or NAVI BACK button to
return. You can view the destination
map anytime while en route by saying,
“Display destination map.”
Map Screen
When you select OK on the Calculate
route to screen, the map screen
appears, showing your highlighted route
in real time.
Route Line
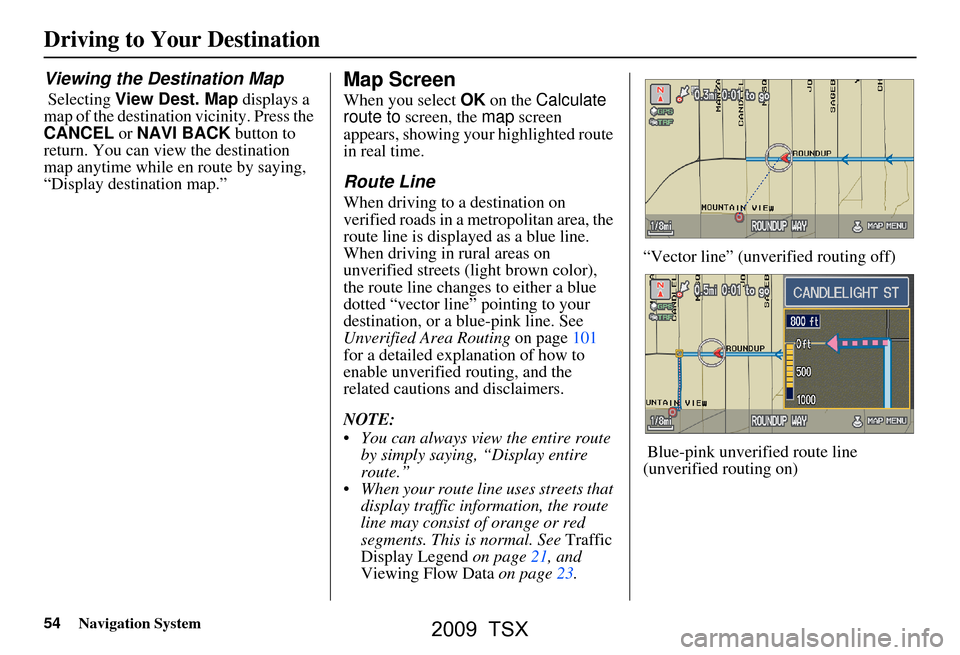
When driving to a destination on
verified roads in a metropolitan area, the
route line is displayed as a blue line.
When driving in rural areas on
unverified streets (light brown color),
the route line changes to either a blue
dotted “vector line” pointing to your
destination, or a blue-pink line. See
Unverified Area Routing on page101
for a detailed explanation of how to
enable unverified routing, and the
related cautions and disclaimers.
NOTE:
You can always view the entire route by simply saying, “Display entire
route.”
When your route line uses streets that display traffic information, the route
line may consist of orange or red
segments. This is normal. See Traffic
Display Legend on page21, and
Viewing Flow Data on page23. “Vector line” (unverified routing off)
Blue-pink unverified route line
(unverified routing on)
2009 TSX
Page 55 of 170
Navigation System55
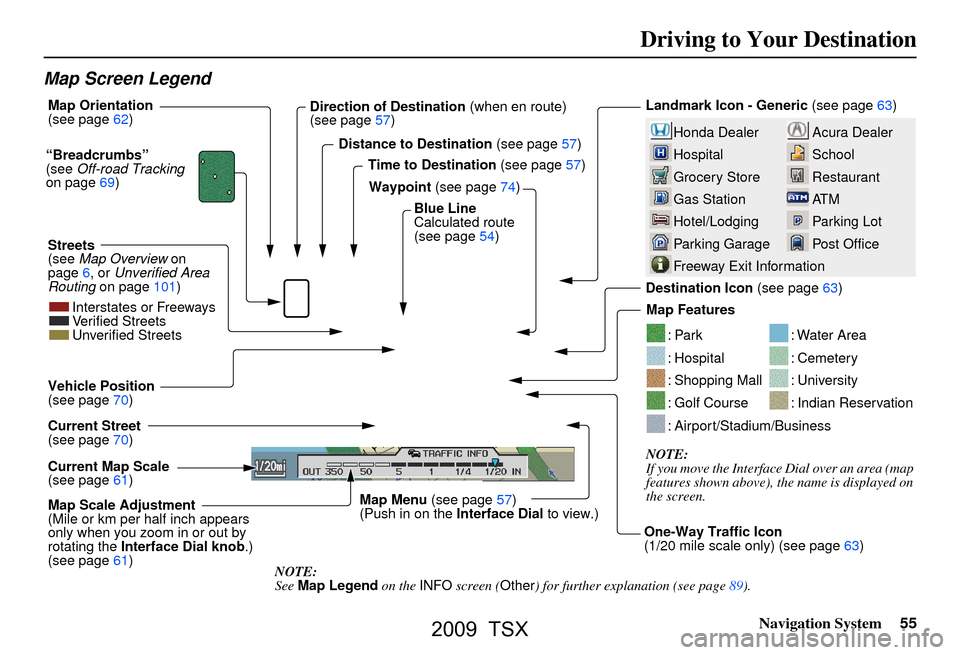
Map Screen Legend
Acura Dealer
School
Restaurant
AT M
Parking Lot
Post OfficeHonda Dealer
Hospital
Grocery Store
Gas Station
Hotel/Lodging
Parking Garage
Freeway Exit Information
Landmark Icon - Generic (see page 63)
Destination Icon (see page
63)
Map Features
NOTE:
If you move the Interface Dial over an area (map
features shown above), the name is displayed on
the screen.
: Par k
: Hospital
: Shopping Mall
: Golf Course
: Water Area
: Cemetery
: University
: Indian Reservation
: Airport/Stadium/Business
Map Scale Adjustment
(Mile or km per half inch appears
only when you zoom in or out by
rotating the Interface Dial knob .)
(see page
61)
NOTE:
See Map Legend on the INFO screen ( Other) for further explanation (see page
89 ).
Current Map Scale
(see page
61) Current Street
(see page70) Vehicle Position
(see page70)
“Breadcrumbs”
(see
Off-road Tracking
on page 69) Direction of Destination
(when en route)
(see page57)
Map Orientation
(see page 62)
Distance to Destination
(see page 57)
Time to Destination
(see page 57)
Waypoint
(see page 74)
Blue Line
Calculated route
(see page
54)
Map Menu
(see page 57)
(Push in on the Interface Dial to view.)
One-Way Traffic Icon
(1/20 mile scale only) (see page
63) Streets
(see Map Overview on
page 6, or Unverified Area
Routing on page 101)
Interstates or Freeways
Verified Streets
Unverified Streets
Driving to Your Destination
2009 TSX
Page 67 of 170
Navigation System67
Showing Icons on the Map
Selecting Show Icon on Map from
the Map menu (see page57) displays
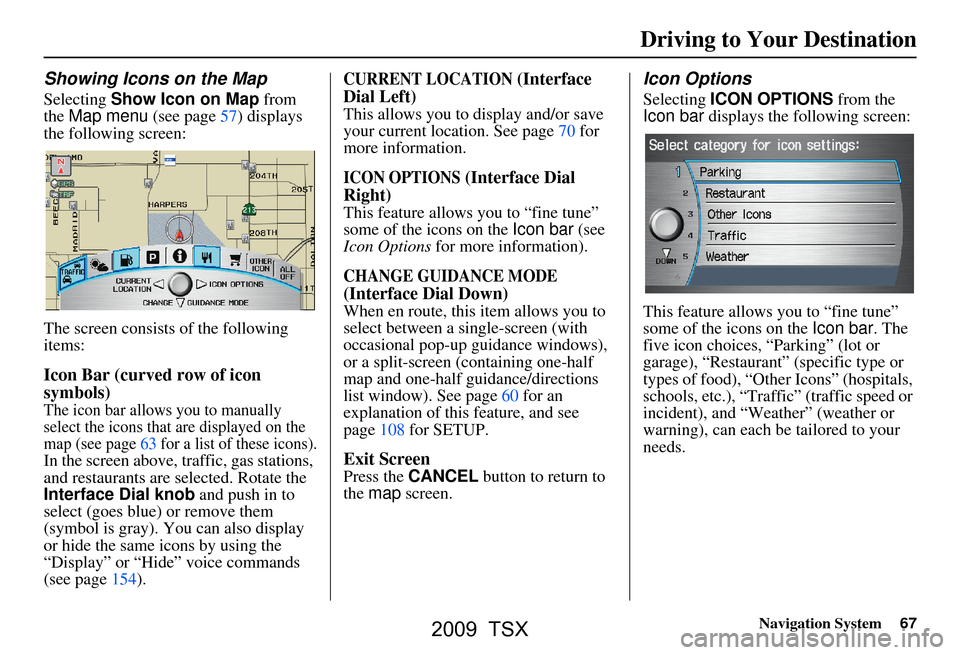
the following screen:
The screen consists of the following
items:
Icon Bar (curved row of icon
symbols)
The icon bar allows you to manually
select the icons that are displayed on the
map (see page63 for a list of these icons).
In the screen above, traffic, gas stations,
and restaurants are selected. Rotate the
Interface Dial knob and push in to
select (goes blue) or remove them
(symbol is gray). You can also display
or hide the same icons by using the
“Display” or “Hide” voice commands
(see page154).
CURRENT LOCATION (Interface
Dial Left)
This allows you to display and/or save
your current location. See page70 for
more information.
ICON OPTIONS (Interface Dial
Right)
This feature allows you to “fine tune”
some of the icons on the Icon bar (see
Icon Options for more information).
CHANGE GUIDANCE MODE
(Interface Dial Down)
When en route, this item allows you to
select between a single-screen (with
occasional pop-up guidance windows),
or a split-screen (containing one-half
map and one-half guidance/directions
list window). See page60 for an
explanation of this feature, and see
page108 for SETUP.
Exit Screen
Press the CANCEL button to return to
the map screen.
Icon Options
Selecting ICON OPTIONS from the
Icon bar displays the following screen:
This feature allows you to “fine tune”
some of the icons on the Icon bar. The
five icon choices, “Parking” (lot or
garage), “Restaurant” (specific type or
types of food), “Other Icons” (hospitals,
schools, etc.), “Traffic” (traffic speed or
incident), and “Weather” (weather or
warning), can each be tailored to your
needs.
Driving to Your Destination
2009 TSX
Page 68 of 170
68Navigation System
Driving to Your Destination
For instance, let’s assume that your
school is not displayed on the map, and
you want to make sure that your settings
are correct. You would do the
following:
First, you would ensure that the “OTHER ICON” button on the Icon
bar is blue (see Icon Bar on page67).
Second, you select ICON OPTIONS
and verify that the school option is
also on (blue). This procedure is
explained below.
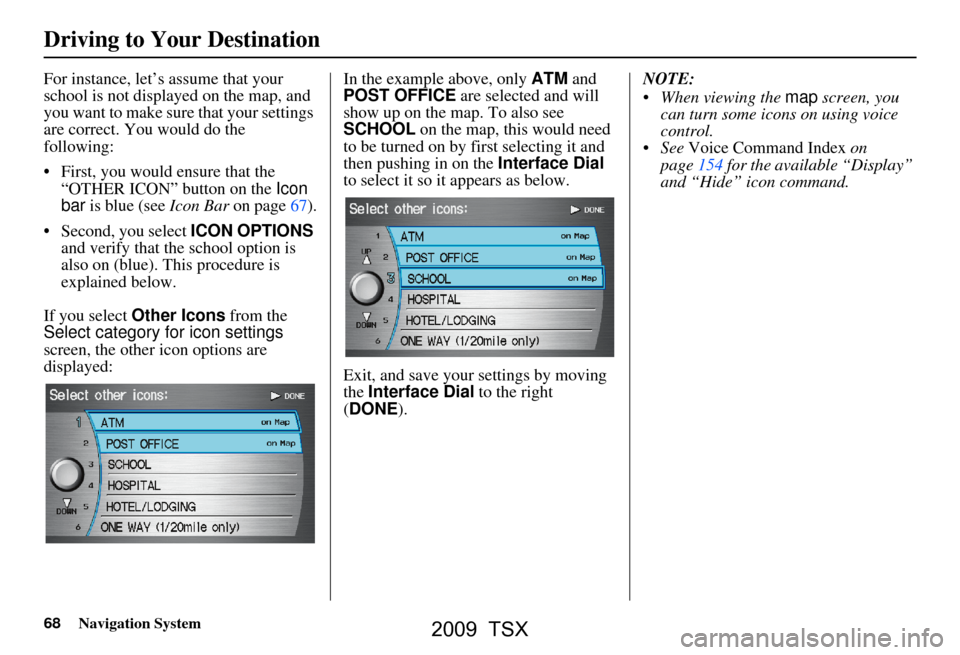
If you select Other Icons from the
Select category for icon settings
screen, the other icon options are
displayed: In the example above, only
ATM and
POST OFFICE are selected and will
show up on the map. To also see
SCHOOL on the map, this would need
to be turned on by first selecting it and
then pushing in on the Interface Dial
to select it so it appears as below.
Exit, and save your settings by moving
the Interface Dial to the right
(DONE ). NOTE:
When viewing the
map screen, you
can turn some icons on using voice
control.
See Voice Command Index on
page154 for the available “Display”
and “Hide” icon command.
2009 TSX
Page 78 of 170
78Navigation System
Continue Trip Screen
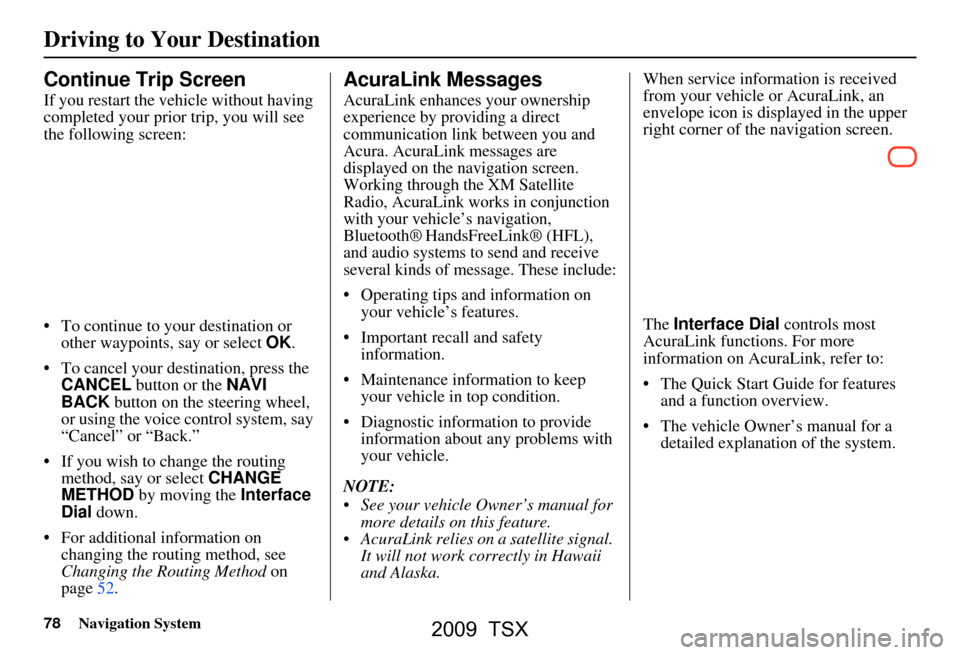
If you restart the vehicle without having
completed your prior trip, you will see
the following screen:
To continue to your destination or other waypoints, say or select OK.
To cancel your destination, press the CANCEL button or the NAVI
BACK button on the steering wheel,
or using the voice control system, say
“Cancel” or “Back.”
If you wish to change the routing method, say or select CHANGE
METHOD by moving the Interface
Dial down.
For additional information on changing the routing method, see
Changing the Routing Method on
page52.
AcuraLink Messages
AcuraLink enhances your ownership
experience by providing a direct
communication link between you and
Acura. AcuraLink messages are
displayed on the navigation screen.
Working through the XM Satellite
Radio, AcuraLink works in conjunction
with your vehicle’s navigation,
Bluetooth®
HandsFreeLink® (HFL),
and audio systems to send and receive
several kinds of message. These include:
Operating tips and information on your vehicle’s features.
Important recall and safety information.
Maintenance information to keep your vehicle in top condition.
Diagnostic information to provide information about any problems with
your vehicle.
NOTE:
See your vehicle Owner’s manual for more details on this feature.
AcuraLink relies on a satellite signal. It will not work correctly in Hawaii
and Alaska. When service information is received
from your vehicle or AcuraLink, an
envelope icon is displayed in the upper
right corner of the navigation screen.
The
Interface Dial controls most
AcuraLink functions. For more
information on AcuraLink, refer to:
The Quick Start Guide for features and a function overview.
The vehicle Owner’s manual for a detailed explanation of the system.
Driving to Your Destination
2009 TSX
Page 79 of 170
Navigation System79
Information Features
The INFO function consists of two main
screens. To display the INFO screen
(Main Info ), say “Information” or press
the INFO button. To change it to the
INFO screen ( Other), select the “Other”
tab. You can switch screens by selecting
the tab.
You can use the voice control system to
select any item on the INFO screen.
NOTE:
If some items appear to be grayed out and cannot be selected, it is because
you did not select OK on the initial
Disclaimer screen (see System Start-
up on page17), or there is no phone
paired to the system (see Bluetooth®
HandsFreeLink® on page18).
For information on the available voice commands, see Voice
Command Index on page153.INFO Screen (Main Info)
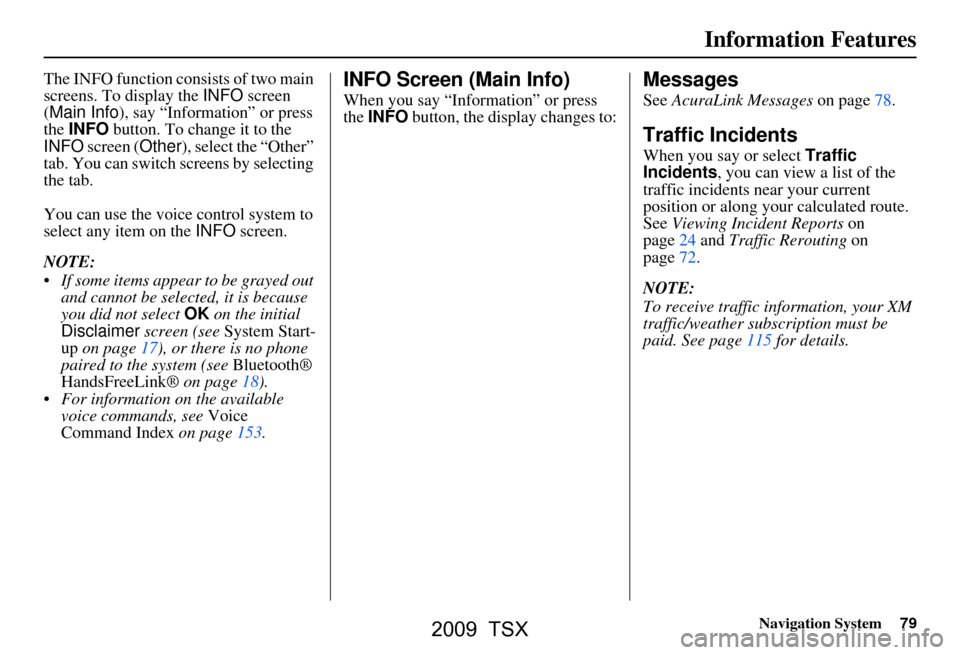
When you say “Information” or press
the INFO button, the display changes to:
Messages
See AcuraLink Messages on page78.
Traffic Incidents
When you say or select Traffic
Incidents, you can view a list of the
traffic incidents near your current
position or along your calculated route.
See Viewing Incident Reports on
page24 and Traffic Rerouting on
page72.
NOTE:
To receive traffic information, your XM
traffic/weather subscription must be
paid. See page11 5 for details.
2009 TSX