2009.5. PEUGEOT 3008 window
[x] Cancel search: windowPage 57 of 290
76
ALARM
System which protects and provides a
deterrent against the theft of your vehi-
cle. It provides two types of protection,
exterior and interior, as well as an anti-
tamper function.
Locking the vehicle with full alarm
� �D�o� �n�o�t� �m�a�k�e� �a�n�y� �m�o�d�i�fi� �c�a�-
tions to the alarm system, this
could cause malfunctions. To be effective, this deactivation
must be carried out each time
the ignition is switched off.
Reactivation of the interior
volumetric protection
� Unlock the vehicle using the unlock-
ing button on the remote control.
� Relock the vehicle using the remote
control.
The alarm is activated again with both
types of protection; the indicator lamp
on button A switches off.
Locking the vehicle with exterior protection alarm only
Activation
� Switch off the ignition and get out of
the vehicle.
� Lock or deadlock the vehicle using
the locking button on the remote
control.
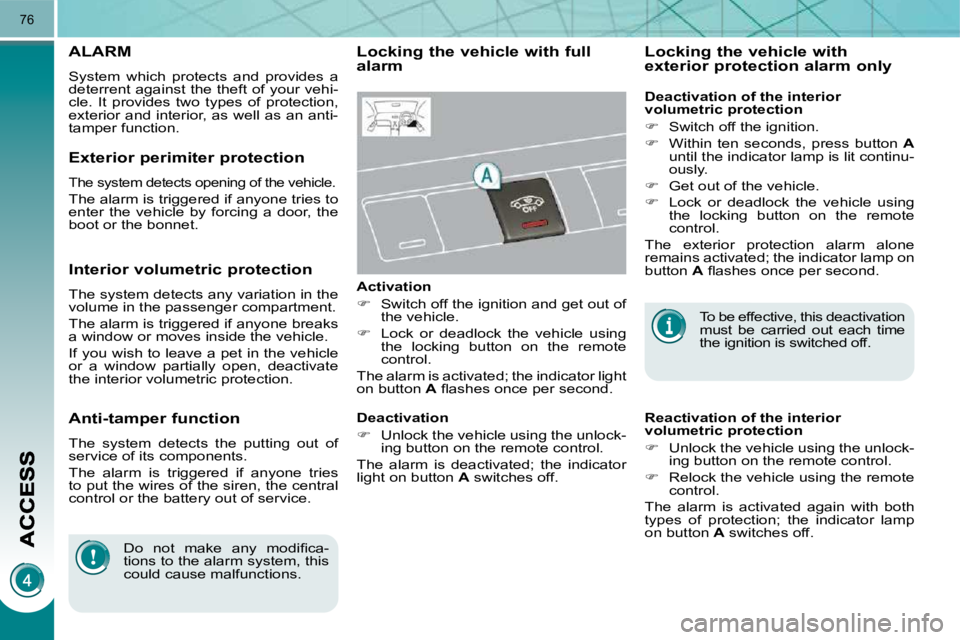
The alarm is activated; the indicator light
on button A� � �fl� �a�s�h�e�s� �o�n�c�e� �p�e�r� �s�e�c�o�n�d�.� �
Exterior perimiter protection
The system detects opening of the vehicle.
The alarm is triggered if anyone tries to
enter the vehicle by forcing a door, the
boot or the bonnet.
Interior volumetric protection
The system detects any variation in the
volume in the passenger compartment.
The alarm is triggered if anyone breaks
a window or moves inside the vehicle.
If you wish to leave a pet in the vehicle
or a window partially open, deactivate
the interior volumetric protection.
Anti-tamper function
The system detects the putting out of
service of its components.
The alarm is triggered if anyone tries
to put the wires of the siren, the central
control or the battery out of service. Deactivation
� Unlock the vehicle using the unlock-
ing button on the remote control.
The alarm is deactivated; the indicator
light on button A switches off. Deactivation of the interior
volumetric protection
� Switch off the ignition.
� Within ten seconds, press button A
until the indicator lamp is lit continu-
ously.
� Get out of the vehicle.
� Lock or deadlock the vehicle using
the locking button on the remote
control.
The exterior protection alarm alone
remains activated; the indicator lamp on
button A� � �fl� �a�s�h�e�s� �o�n�c�e� �p�e�r� �s�e�c�o�n�d�.�
Page 59 of 290
78
The electric window controls
remain operational for ap-
proximately 45 seconds after
the ignition is switched off or until the
vehicle is locked after a front door is
opened.
If one of the passenger windows can-
not be operated from the driver's door
control pad, carry out the operation
from the control pad of the passenger
door concerned, and vice versa.
ELECTRIC WINDOWS
System intended to open or close a win-
dow manually or automatically. Fitted
with a safety auto-reverse system and
a system for deactivation in the event of
misuse of the rear controls.
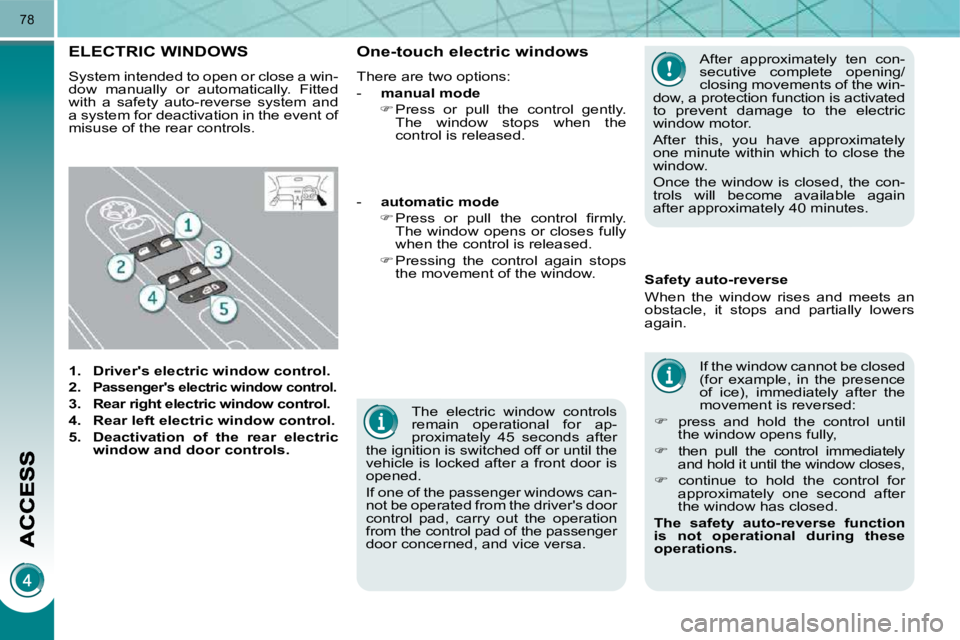
1. Driver's electric window control.
2.
Passenger's electric window control.
3. Rear right electric window control.
4. Rear left electric window control.
5. Deactivation of the rear electric
window and door controls. If the window cannot be closed
(for example, in the presence
of ice), immediately after the
movement is reversed:
� press and hold the control until
the window opens fully,
� then pull the control immediately
and hold it until the window closes,
� continue to hold the control for
approximately one second after
the window has closed.
The safety auto-reverse function
is not operational during these
operations.
Safety auto-reverse
When the window rises and meets an
obstacle, it stops and partially lowers
again.
-
automatic mode
� � � �P�r�e�s�s� �o�r� �p�u�l�l� �t�h�e� �c�o�n�t�r�o�l� �fi� �r�m�l�y�.�
The window opens or closes fully
when the control is released.
� Pressing the control again stops
the movement of the window.
One-touch electric windows
There are two options:
- manual mode
� Press or pull the control gently.
The window stops when the
control is released. After approximately ten con-
secutive complete opening/
closing movements of the win-
dow, a protection function is activated
to prevent damage to the electric
window motor.
After this, you have approximately
one minute within which to close the
window.
Once the window is closed, the con-
trols will become available again
after approximately 40 minutes.
Page 60 of 290
79
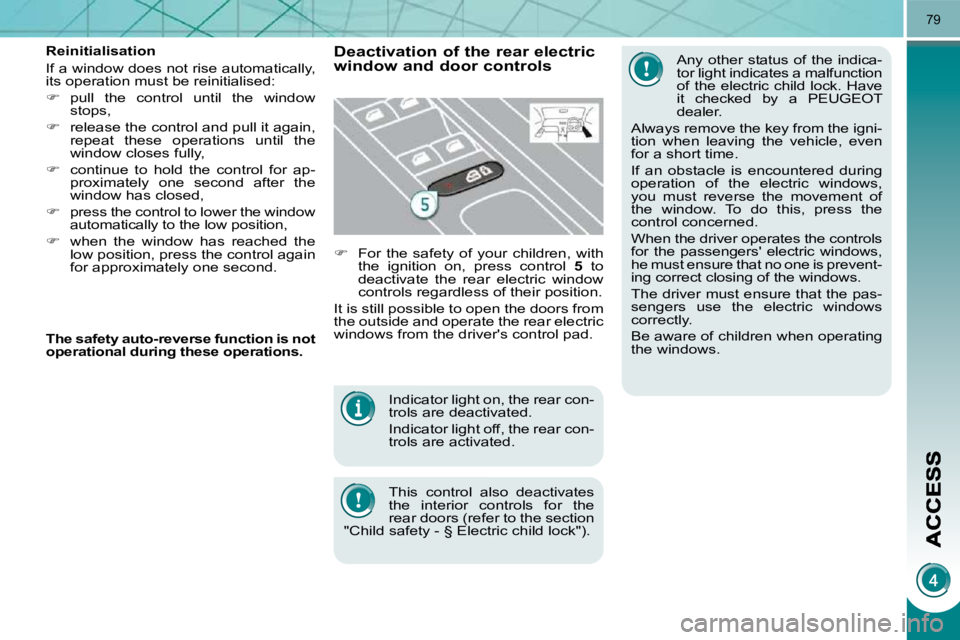
Indicator light on, the rear con-
trols are deactivated.
Indicator light off, the rear con-
trols are activated.
This control also deactivates
the interior controls for the
rear doors (refer to the section
"Child safety - § Electric child lock").
Reinitialisation
If a window does not rise automatically,
its operation must be reinitialised:
� pull the control until the window
stops,
� release the control and pull it again,
repeat these operations until the
window closes fully,
� continue to hold the control for ap-
proximately one second after the
window has closed,
� press the control to lower the window
automatically to the low position,
� when the window has reached the
low position, press the control again
for approximately one second. Any other status of the indica-
tor light indicates a malfunction
of the electric child lock. Have
it checked by a PEUGEOT
dealer.
Always remove the key from the igni-
tion when leaving the vehicle, even
for a short time.
If an obstacle is encountered during
operation of the electric windows,
you must reverse the movement of
the window. To do this, press the
control concerned.
When the driver operates the controls
for the passengers' electric windows,
he must ensure that no one is prevent-
ing correct closing of the windows.
The driver must ensure that the pas-
sengers use the electric windows
correctly.
Be aware of children when operating
the windows.
Deactivation of the rear electric window and door controls
� For the safety of your children, with
the ignition on, press control 5 to
deactivate the rear electric window
controls regardless of their position.
It is still possible to open the doors from
the outside and operate the rear electric
windows from the driver's control pad.
The safety auto-reverse function is not
operational during these operations.
Page 81 of 290
LAYOUT
107
Torch
This is a removable light, incorporated
in the boot wall, which can be used to
light the boot or as a torch.
Operation
This torch operates with NiMH type ac-
cumulators.
It has an operating autonomy of approx-
imately 45 minutes and charges while
you are driving. Use
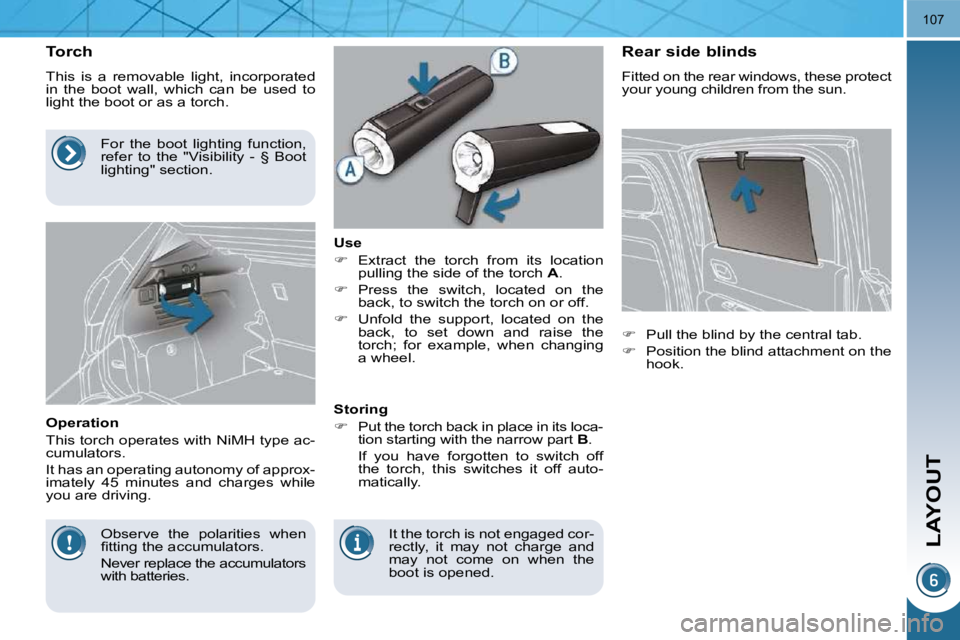
� Extract the torch from its location
pulling the side of the torch A .
� Press the switch, located on the
back, to switch the torch on or off.
� Unfold the support, located on the
back, to set down and raise the
�t�o�r�c�h�;� �f�o�r� �e�x�a�m�p�l�e�,� �w�h�e�n� �c�h�a�n�g�i�n�g�
a wheel.
Storing
� Put the torch back in place in its loca-
tion starting with the narrow part B .
If you have forgotten to switch off the torch, this switches it off auto-
matically. Rear side blinds
Fitted on the rear windows, these protect
your young children from the sun.
� Pull the blind by the central tab.
� Position the blind attachment on the
hook.
Observe the polarities when
�fi� �t�t�i�n�g� �t�h�e� �a�c�c�u�m�u�l�a�t�o�r�s�.�
Never replace the accumulators
with batteries. It the torch is not engaged cor-
rectly, it may not charge and
may not come on when the
boot is opened.
For the boot lighting function,
refer to the "Visibility - § Boot
lighting" section.
Page 97 of 290
LAYOUT
107
Torch
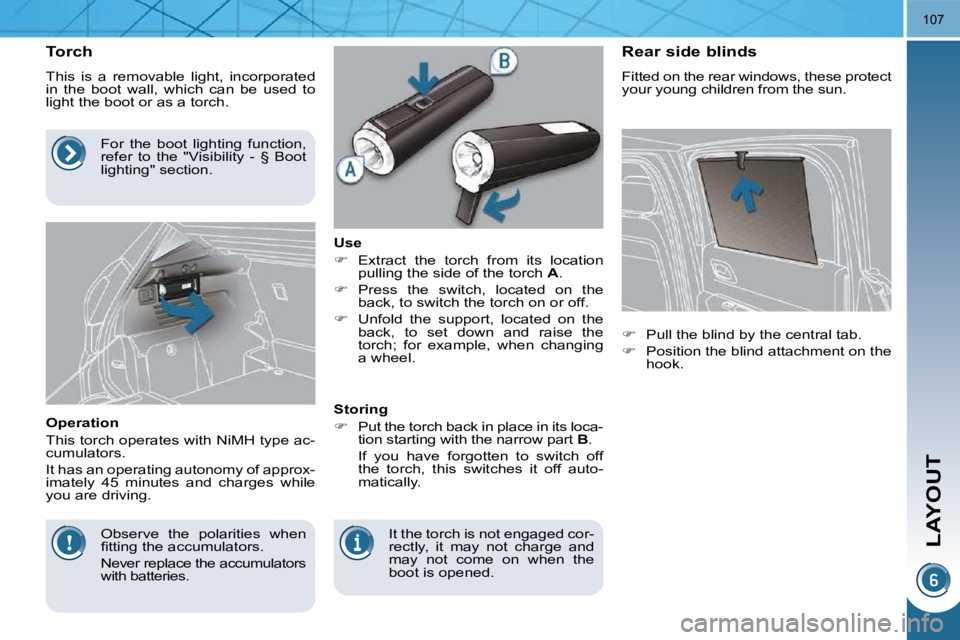
This is a removable light, incorporated
in the boot wall, which can be used to
light the boot or as a torch.
Operation
This torch operates with NiMH type ac-
cumulators.
It has an operating autonomy of approx-
imately 45 minutes and charges while
you are driving. Use
� Extract the torch from its location
pulling the side of the torch A .
� Press the switch, located on the
back, to switch the torch on or off.
� Unfold the support, located on the
back, to set down and raise the
�t�o�r�c�h�;� �f�o�r� �e�x�a�m�p�l�e�,� �w�h�e�n� �c�h�a�n�g�i�n�g�
a wheel.
Storing
� Put the torch back in place in its loca-
tion starting with the narrow part B .
If you have forgotten to switch off the torch, this switches it off auto-
matically. Rear side blinds
Fitted on the rear windows, these protect
your young children from the sun.
� Pull the blind by the central tab.
� Position the blind attachment on the
hook.
Observe the polarities when
�fi� �t�t�i�n�g� �t�h�e� �a�c�c�u�m�u�l�a�t�o�r�s�.�
Never replace the accumulators
with batteries. It the torch is not engaged cor-
rectly, it may not charge and
may not come on when the
boot is opened.
For the boot lighting function,
refer to the "Visibility - § Boot
lighting" section.
Page 102 of 290

LAYOUT
107
Torch
This is a removable light, incorporated
in the boot wall, which can be used to
light the boot or as a torch.
Operation
This torch operates with NiMH type ac-
cumulators.
It has an operating autonomy of approx-
imately 45 minutes and charges while
you are driving. Use
� Extract the torch from its location
pulling the side of the torch A .
� Press the switch, located on the
back, to switch the torch on or off.
� Unfold the support, located on the
back, to set down and raise the
�t�o�r�c�h�;� �f�o�r� �e�x�a�m�p�l�e�,� �w�h�e�n� �c�h�a�n�g�i�n�g�
a wheel.
Storing
� Put the torch back in place in its loca-
tion starting with the narrow part B .
If you have forgotten to switch off the torch, this switches it off auto-
matically. Rear side blinds
Fitted on the rear windows, these protect
your young children from the sun.
� Pull the blind by the central tab.
� Position the blind attachment on the
hook.
Observe the polarities when
�fi� �t�t�i�n�g� �t�h�e� �a�c�c�u�m�u�l�a�t�o�r�s�.�
Never replace the accumulators
with batteries. It the torch is not engaged cor-
rectly, it may not charge and
may not come on when the
boot is opened.
For the boot lighting function,
refer to the "Visibility - § Boot
lighting" section.
Page 108 of 290
CHILD SAFETY
111
ADVICE ON CHILD SEATS
The incorrect installation of a child
seat in a vehicle compromises the
child's protection in the event of an
accident.
� �R�e�m�e�m�b�e�r� �t�o� �f�a�s�t�e�n� �t�h�e� �s�e�a�t� �b�e�l�t�s� �o�r�
the child seat harnesses keeping the
slack in relation to the child's body to
a minimum, even for short journeys.
When installing a child seat using the
seat belt, ensure that the seat belt is
tightened correctly on the child seat
�a�n�d� �t�h�a�t� �i�t� �s�e�c�u�r�e�s� �t�h�e� �c�h�i�l�d� �s�e�a�t� �fi� �r�m�l�y�
on the seat of your vehicle.
For optimum installation of the "for-
wards-facing" child seat, ensure that
the back of the child seat is in contact
with the back of the vehicle's seat
and that the head restraint does not
cause any discomfort.
If the head restraint has to be
removed, ensure that it is stored or
attached securely to prevent it from
being thrown around the vehicle in
the event of sharp braking. Installing a booster seat
The chest part of the seat belt must
be positioned on the child's shoulder
without touching the neck.
Ensure that the lap part of the seat
belt passes correctly over the child's
thighs.
PEUGEOT recommends the use of
�a� �b�o�o�s�t�e�r� �s�e�a�t� �w�h�i�c�h� �h�a�s� �a� �b�a�c�k�,� �fi� �t�-
ted with a seat belt guide at shoulder
level.
As a safety precaution, do not leave:
- one or more children alone and
unsupervised in a vehicle,
- a child or an animal in a vehicle which is exposed to the sun, with
the windows closed,
- the keys within reach of children inside the vehicle. To prevent accidental opening of
the doors and rear windows, use
�t�h�e� �"�C�h�i�l�d� �l�o�c�k�"�.�
Take care not to open the rear win-
dows by more than one third.
To protect young children from the
�r�a�y�s� �o�f� �t�h�e� �s�u�n�,� �fi� �t� �s�i�d�e� �b�l�i�n�d�s� �o�n� �t�h�e�
rear windows.
� �C�h�i�l�d�r�e�n� �u�n�d�e�r� �t�h�e� �a�g�e� �o�f� �1�0� �m�u�s�t�
not travel in the "forwards-facing"
position on the front passenger seat,
unless the rear seats are already oc-
cupied by other children, cannot be
used or are absent.
� �D�i�s�a�r�m� �t�h�e� �p�a�s�s�e�n�g�e�r� �a�i�r� �b�a�g� �w�h�e�n�
a "rearwards-facing" child seat is in-
stalled on the front seat.
Otherwise, the child would risk be-
ing seriously injured or killed if the air
�b�a�g� �w�e�r�e� �t�o� �i�n�fl� �a�t�e�.� �
Page 112 of 290
CHILD SAFETY
115
This system is independent
and in no circumstances does
it take the place of the central
locking control.
� �C�h�e�c�k� �t�h�e� �s�t�a�t�u�s� �o�f� �t�h�e� �c�h�i�l�d� �l�o�c�k�
each time you switch on the ignition.
Always remove the key from the igni-
tion when leaving the vehicle, even
for a short time.
In the event of a serious impact, the
electric child lock is deactivated auto-
matically to permit the exit of the rear
passengers.
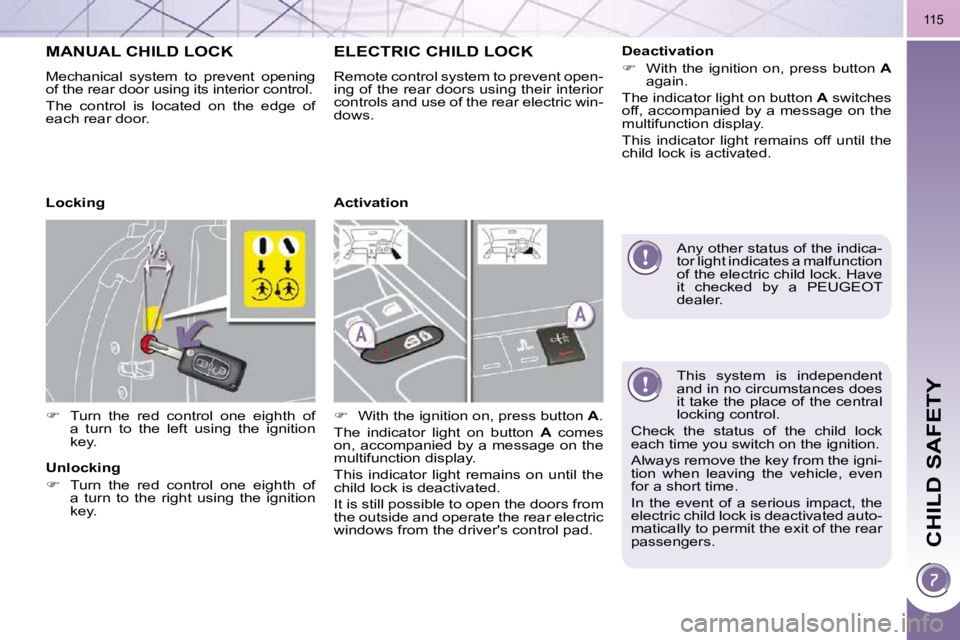
MANUAL CHILD LOCK
� �M�e�c�h�a�n�i�c�a�l� �s�y�s�t�e�m� �t�o� �p�r�e�v�e�n�t� �o�p�e�n�i�n�g�
of the rear door using its interior control.
The control is located on the edge of
each rear door.
� Turn the red control one eighth of
a turn to the left using the ignition
key.
ELECTRIC CHILD LOCK
� �R�e�m�o�t�e� �c�o�n�t�r�o�l� �s�y�s�t�e�m� �t�o� �p�r�e�v�e�n�t� �o�p�e�n�-
ing of the rear doors using their interior
controls and use of the rear electric win-
dows.
� With the ignition on, press button A .
The indicator light on button A comes
on, accompanied by a message on the
multifunction display.
This indicator light remains on until the
child lock is deactivated.
It is still possible to open the doors from
the outside and operate the rear electric
windows from the driver's control pad.
Locking
Unlocking
� Turn the red control one eighth of
a turn to the right using the ignition
key. Activation
Deactivation
� With the ignition on, press button A
again.
The indicator light on button A switches
off, accompanied by a message on the
multifunction display.
This indicator light remains off until the
child lock is activated.
Any other status of the indica-
tor light indicates a malfunction
of the electric child lock. Have
it checked by a PEUGEOT
dealer.