Page 23 of 80
INSTRUMENT AND CONTROL FUNCTIONS
3-8
3
NOTE:�
The oil change indicator will come
on at the initial 1000 km (600 mi),
5000 km (3000 mi) after the initial
1000 km (600 mi) and every 6000
km (3600 mi) thereafter.
�
If the engine oil is changed before
the oil change indicator comes on
(i.e. before the periodic oil change
interval has been reached), the in-
dicator must be reset after the oil
change for the next periodic oil
change to be indicated at the cor-
rect time. After resetting, the indi-
cator will come on for two seconds.
If the indicator does not come on,repeat the procedure.
EAU12347
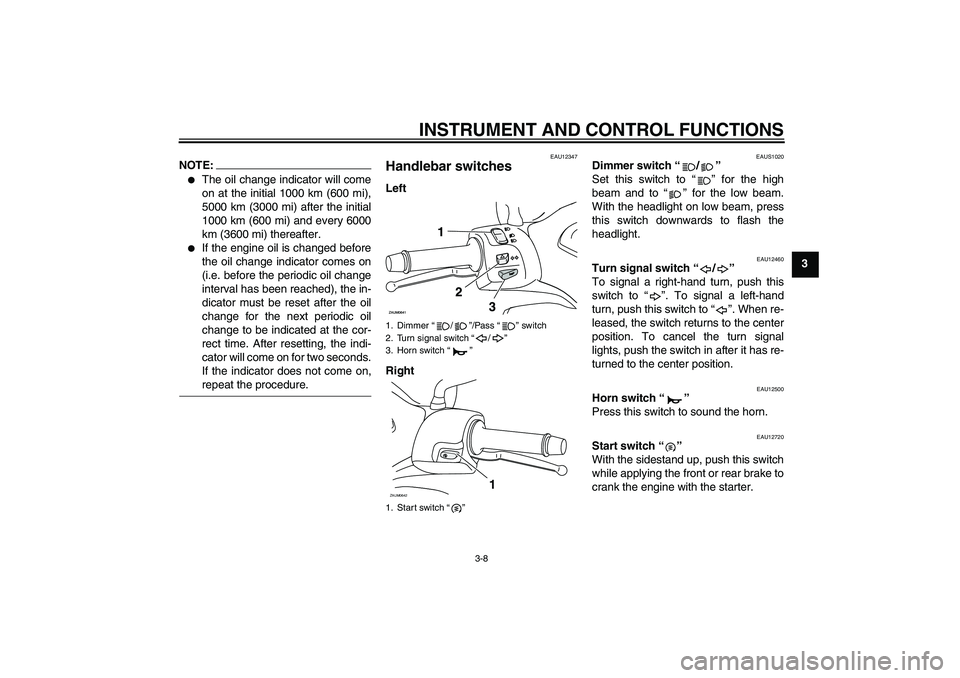
Handlebar switches Left
Right
EAUS1020
Dimmer switch “/”
Set this switch to “” for the high
beam and to “” for the low beam.
With the headlight on low beam, press
this switch downwards to flash the
headlight.
EAU12460
Turn signal switch “/”
To signal a right-hand turn, push this
switch to “”. To signal a left-hand
turn, push this switch to “”. When re-
leased, the switch returns to the center
position. To cancel the turn signal
lights, push the switch in after it has re-
turned to the center position.
EAU12500
Horn switch “”
Press this switch to sound the horn.
EAU12720
Start switch “”
With the sidestand up, push this switch
while applying the front or rear brake to
crank the engine with the starter.
1. Dimmer “/”/Pass “” switch
2. Turn signal switch “/”
3. Horn switch “”
1. Start switch “”ZAUM0642
1
U16PE0E0.book Page 8 Tuesday, May 8, 2007 10:26 AM
Page 62 of 80
PERIODIC MAINTENANCE AND MINOR REPAIR
6-24
6
CAUTION:
ECA10640
Do not use a fuse of a higher amper-
age rating than recommended to
avoid causing extensive damage to
the electrical system and possibly afire.
3. Turn the key to “ON” and turn on
the electrical circuit in question to
check if the device operates.
4. If the fuse immediately blows
again, have a Yamaha dealer
check the electrical system.
EAUM2180
Replacing a headlight bulb This model is equipped with quartz bulb
headlights. If a headlight bulb burns
out, replace it as follows.
To replace a high beam headlight
bulb
1. Remove cowling A. (See page
6-5.)
2. Remove the headlight bulb cover.
3. Unhook the headlight bulb holder
by turning it counterclockwise, and
then remove the defective bulb.
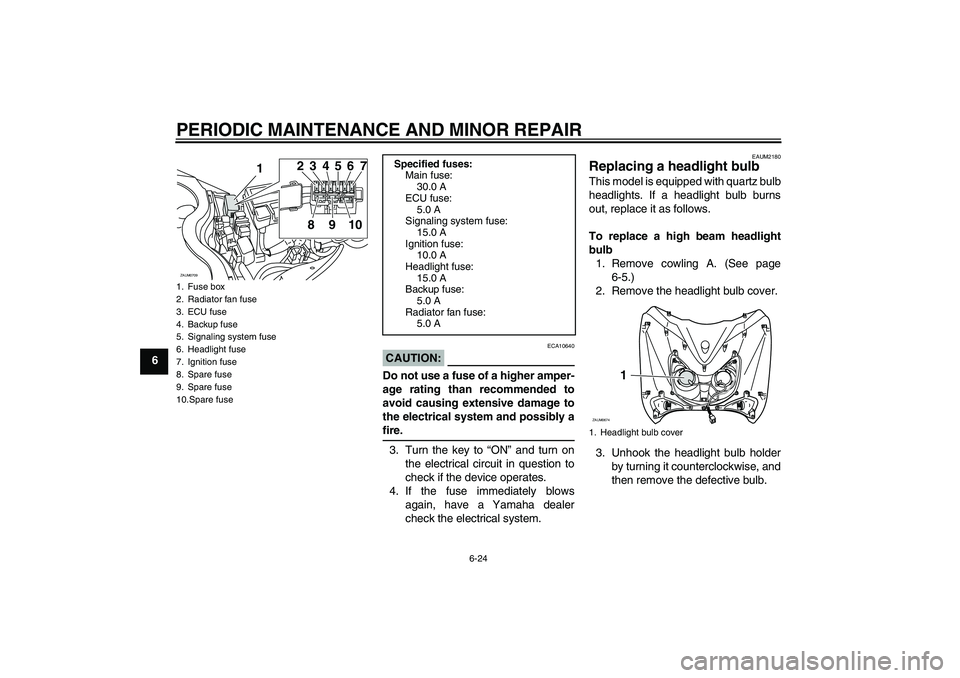
1. Fuse box
2. Radiator fan fuse
3. ECU fuse
4. Backup fuse
5. Signaling system fuse
6. Headlight fuse
7. Ignition fuse
8. Spare fuse
9. Spare fuse
10.Spare fuse
1
ZAUM0709
23
8910456 7
Specified fuses:
Main fuse:
30.0 A
ECU fuse:
5.0 A
Signaling system fuse:
15.0 A
Ignition fuse:
10.0 A
Headlight fuse:
15.0 A
Backup fuse:
5.0 A
Radiator fan fuse:
5.0 A
1. Headlight bulb cover
1
ZAUM0674
U16PE0E0.book Page 24 Tuesday, May 8, 2007 10:26 AM
Page 63 of 80

PERIODIC MAINTENANCE AND MINOR REPAIR
6-25
6
WARNING
EWA10790
Headlight bulbs get very hot. There-
fore, keep flammable products away
from a lit headlight bulb, and do not
touch the bulb until it has cooleddown.
4. Place a new headlight bulb into po-
sition, and then secure it with the
bulb holder by turning it clockwise.CAUTION:
ECA10650
Take care not to damage the follow-
ing parts:
�
Headlight bulb
Do not touch the glass part of
the headlight bulb to keep it free
from oil, otherwise the transpar-
ency of the glass, the luminosity
of the bulb, and the bulb life will
be adversely affected. Thor-
oughly clean off any dirt and fin-
gerprints on the headlight bulb
using a cloth moistened with al-
cohol or thinner.
�
Headlight lens
Do not affix any type of tinted
film or stickers to the headlight
lens.
Do not use a headlight bulb of awattage higher than specified.
5. Install the headlight bulb cover.
6. Install the cowling.
7. Have a Yamaha dealer adjust the
headlight beam if necessary.
To replace a low beam headlight
bulb
1. Remove cowling A. (See page
6-5.)
2. Remove the headlight bulb cover.3. Disconnect the headlight coupler.
4. Unhook the headlight bulb holder,
and then remove the defective
bulb.
1. Headlight bulb holderZAUM0675
1
1. Headlight bulb cover
1. Headlight bulb
2. Headlight coupler
1
ZAUM0677 ZAUM0678
1
2
U16PE0E0.book Page 25 Tuesday, May 8, 2007 10:26 AM
Page 64 of 80

PERIODIC MAINTENANCE AND MINOR REPAIR
6-26
6
WARNING
EWA10790
Headlight bulbs get very hot. There-
fore, keep flammable products away
from a lit headlight bulb, and do not
touch the bulb until it has cooleddown.
5. Place a new headlight bulb into po-
sition, and then secure it with the
bulb holder.CAUTION:
ECA10650
Take care not to damage the follow-
ing parts:�
Headlight bulb
Do not touch the glass part of
the headlight bulb to keep it free
from oil, otherwise the transpar-
ency of the glass, the luminosity
of the bulb, and the bulb life will
be adversely affected. Thor-
oughly clean off any dirt and fin-
gerprints on the headlight bulb
using a cloth moistened with al-
cohol or thinner.
�
Headlight lens
Do not affix any type of tinted
film or stickers to the headlight
lens.
Do not use a headlight bulb of awattage higher than specified.
6. Connect the headlight coupler.
7. Install the headlight bulb cover.
8. Install the cowling.
9. Have a Yamaha dealer adjust the
headlight beam if necessary.
EAUT1260
Replacing a front turn signal
light bulb CAUTION:
ECA10670
It is advisable to have a Yamahadealer perform this job.
1. Place the scooter on the center-
stand.
2. Remove cowling A. (See page
6-5.)
3. Remove the socket (together with
the bulb) by turning it counter-
clockwise.
4. Remove the defective bulb by
pushing it in and turning it counter-
clockwise.
1. Do not touch the glass part of the bulb.
1. Turn signal light bulb socket
1
ZAUM0465
U16PE0E0.book Page 26 Tuesday, May 8, 2007 10:26 AM
Page 74 of 80

SPECIFICATIONS
8-2
8
Transmission type:
V-belt automatic
Operation:
Centrifugal automatic typeChassis:Frame type:
Steel tube underbone
Caster angle:
26.00 °
Trail:
96.0 mm (3.78 in)Front tire:Type:
Tubeless
Size:
120/70-16 M/C 57P
Manufacturer/model:
PIRELLI/SPORT DEMON FRONTRear tire:Type:
Tubeless
Size:
140/70-15 69P
Manufacturer/model:
PIRELLI/SPORT DEMONLoading:Maximum load:
185 kg (408 lb)
(Total weight of rider, passenger, cargo and
accessories)Tire air pressure (measured on cold
tires):Loading condition:
0–90 kg (0–198 lb)Front:
170 kPa (25 psi) (1.70 kgf/cm²)
Rear:
190 kPa (28 psi) (1.90 kgf/cm²)
Loading condition:
90–185 kg (198–408 lb)
Front:
180 kPa (26 psi) (1.80 kgf/cm²)
Rear:
200 kPa (29 psi) (2.00 kgf/cm²)
Front wheel:Wheel type:
Cast wheel
Rim size:
16 M/C x MT3.00Rear wheel:Wheel type:
Cast wheel
Rim size:
15 M/C x MT4.00Front brake:Type:
Single disc brake
Operation:
Right hand operation
Recommended fluid:
DOT 4Rear brake:Type:
Single disc brake
Operation:
Left hand operation
Recommended fluid:
DOT 4
Front suspension:Type:
Telescopic fork
Spring/shock absorber type:
Coil spring/oil damper
Wheel travel:
100.0 mm (3.94 in)Rear suspension:Type:
Unit swing
Spring/shock absorber type:
Coil spring/oil damper
Wheel travel:
105.0 mm (4.13 in)Electrical system:Ignition system:
Transistorized coil ignition (digital)
Charging system:
AC magnetoBattery:Model:
GTX9-BS
Voltage, capacity:
12 V, 8.0 AhHeadlight:Bulb type:
Halogen bulbBulb voltage, wattage × quantity:Low beam headlight:
12 V, 55.0 W × 1
High beam headlight:
12 V, 55.0 W × 1
Tail/brake light:
12 V, 5.0 W/21.0 W × 2
U16PE0E0.book Page 2 Tuesday, May 8, 2007 10:26 AM