PERIODIC MAINTENANCE AND MINOR REPAIR
6-3
2
3
4
5
67
8
9
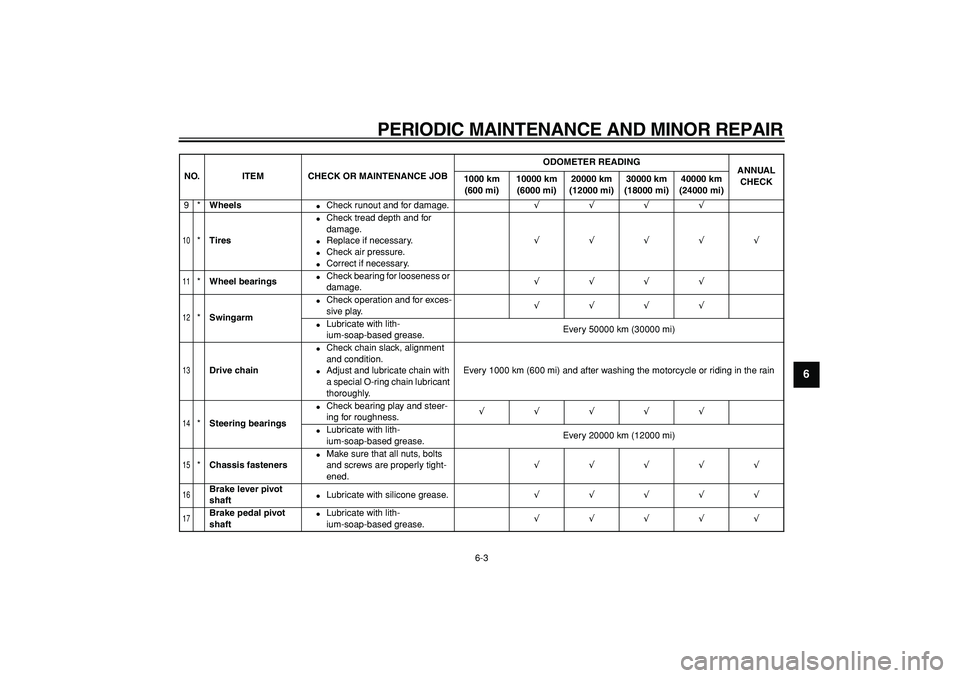
9*
Wheels
�
Check runout and for damage.
√√√√
10
*
Tires
�
Check tread depth and for
damage.
�
Replace if necessary.
�
Check air pressure.
�
Correct if necessary.
√√√√√
11
*
Wheel bearings
�
Check bearing for looseness or
damage.
√√√√
12
*
Swingarm
�
Check operation and for exces-
sive play.
√√√√
�
Lubricate with lith-
ium-soap-based grease.Every 50000 km (30000 mi)
13
Drive chain
�
Check chain slack, alignment
and condition.
�
Adjust and lubricate chain with
a special O-ring chain lubricant
thoroughly.Every 1000 km (600 mi) and after washing the motorcycle or riding in the rain
14
*
Steering bearings
�
Check bearing play and steer-
ing for roughness.
√√√√√
�
Lubricate with lith-
ium-soap-based grease.Every 20000 km (12000 mi)
15
*
Chassis fasteners
�
Make sure that all nuts, bolts
and screws are properly tight-
ened.
√√√√√
16
Brake lever pivot
shaft
�
Lubricate with silicone grease.
√√√√√
17
Brake pedal pivot
shaft
�
Lubricate with lith-
ium-soap-based grease.
√√√√√
NO. ITEM CHECK OR MAINTENANCE JOBODOMETER READING
ANNUAL
CHECK 1000 km
(600 mi)10000 km
(6000 mi)20000 km
(12000 mi)30000 km
(18000 mi)40000 km
(24000 mi)
PERIODIC MAINTENANCE AND MINOR REPAIR
6-23
2
3
4
5
67
8
9
4. If the drive chain slack is incorrect,
adjust it as follows.
EAU22951
To adjust the drive chain slack
1. Loosen the axle nut, the brake cal-
iper bracket bolt and the locknut on
each side of the swingarm.
2. To tighten the drive chain, turn the
adjusting bolt on each side of theswingarm in direction (a). To loos-
en the drive chain, turn the adjust-
ing bolt on each side of the
swingarm in direction (b), and then
push the rear wheel forward.
NOTE:
Using the alignment marks on each
side of the swingarm, make sure that
both chain pullers are in the same posi-
tion for proper wheel alignment.
CAUTION:
ECA10570
Improper drive chain slack will over-
load the engine as well as other vital
parts of the motorcycle and can lead
to chain slippage or breakage. To
prevent this from occurring, keep
the drive chain slack within the
specified limits.
3. Tighten the locknuts, and then
tighten the axle nut and the brake
caliper bracket bolt to the specified
torques.
1. Drive chain slack
1
1. Axle nut
2. Drive chain slack adjusting bolt
3. Locknut
4. Alignment marks
1. Brake caliper bracket bolt
2. Brake caliper bracket3
4 1
2 (b)
(a)
1
2