2008 VOLVO S80 display
[x] Cancel search: displayPage 176 of 275
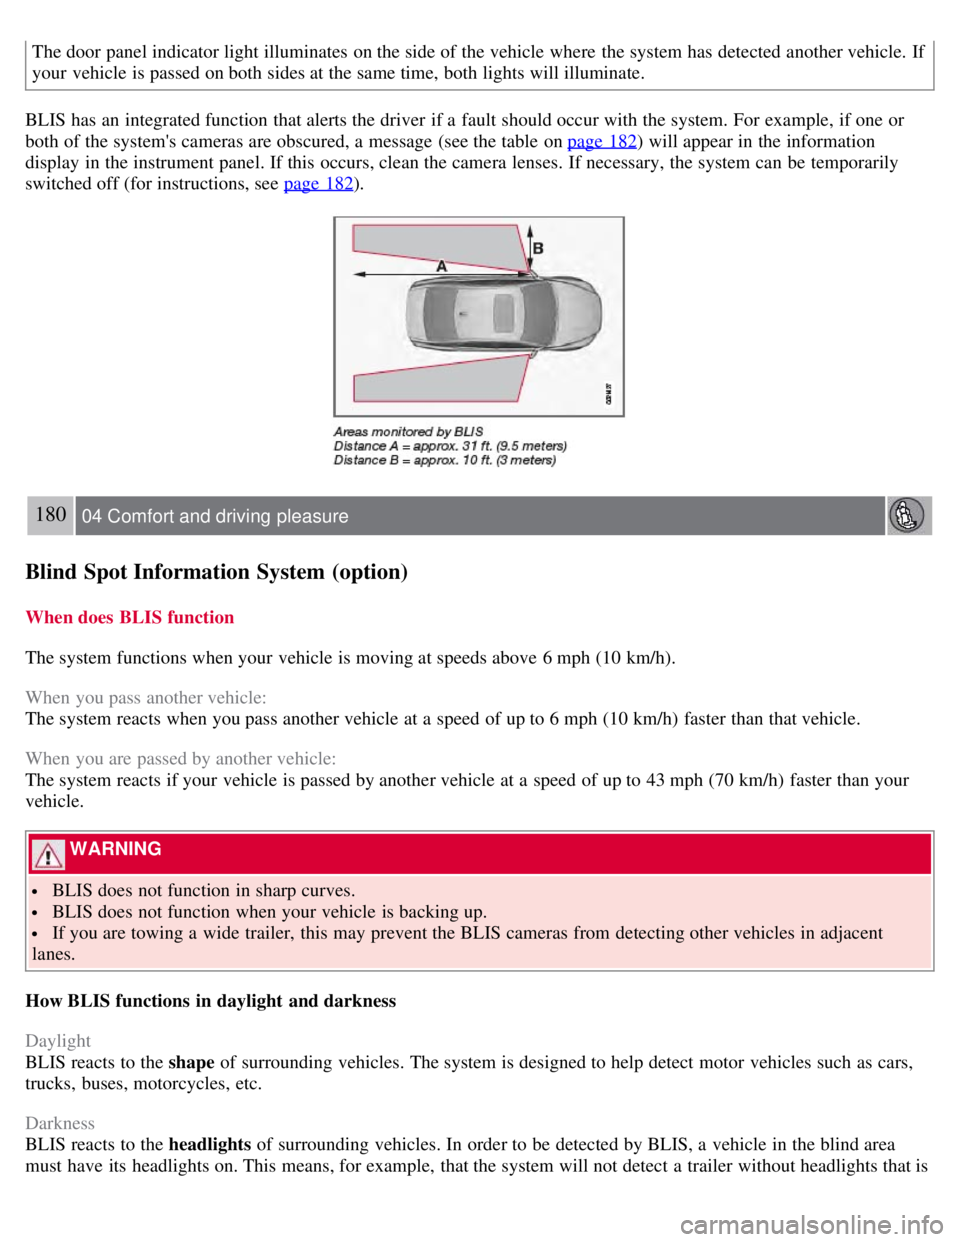
The door panel indicator light illuminates on the side of the vehicle where the system has detected another vehicle. If
your vehicle is passed on both sides at the same time, both lights will illuminate.
BLIS has an integrated function that alerts the driver if a fault should occur with the system. For example, if one or
both of the system's cameras are obscured, a message (see the table on page 182
) will appear in the information
display in the instrument panel. If this occurs, clean the camera lenses. If necessary, the system can be temporarily
switched off (for instructions, see page 182
).
180 04 Comfort and driving pleasure
Blind Spot Information System (option)
When does BLIS function
The system functions when your vehicle is moving at speeds above 6 mph (10 km/h).
When you pass another vehicle:
The system reacts when you pass another vehicle at a speed of up to 6 mph (10 km/h) faster than that vehicle.
When you are passed by another vehicle:
The system reacts if your vehicle is passed by another vehicle at a speed of up to 43 mph (70 km/h) faster than your
vehicle.
WARNING
BLIS does not function in sharp curves.
BLIS does not function when your vehicle is backing up.
If you are towing a wide trailer, this may prevent the BLIS cameras from detecting other vehicles in adjacent
lanes.
How BLIS functions in daylight and darkness
Daylight
BLIS reacts to the shape of surrounding vehicles. The system is designed to help detect motor vehicles such as cars,
trucks, buses, motorcycles, etc.
Darkness
BLIS reacts to the headlights of surrounding vehicles. In order to be detected by BLIS, a vehicle in the blind area
must have its headlights on. This means, for example, that the system will not detect a trailer without headlights that is
Page 177 of 275
being towed behind a car or truck.
WARNING
BLIS does not react to cyclists or mopeds.
BLIS does not react to vehicles that are standing still.
The function of the BLIS cameras may be affected by intense light, or when driving at night in areas where there
are no external sources of light (e.g., street lights, other vehicles, etc.). In such cases, the system may react as if the
cameras were obscured.
In both of the above mentioned conditions, a message will appear in the information display.
When driving in such conditions, the system's function will be limited or it may be temporarily switched off. See
page 182
for instructions.
When the message is no longer displayed, BLIS will return to normal function.
The BLIS cameras have the same limitation as the human eye. In other words, their "vision is impaired" by
adverse weather conditions such as heavy snowfall, dense fog, etc.
181 04 Comfort and driving pleasure
Blind Spot Information System (option)
Limitations
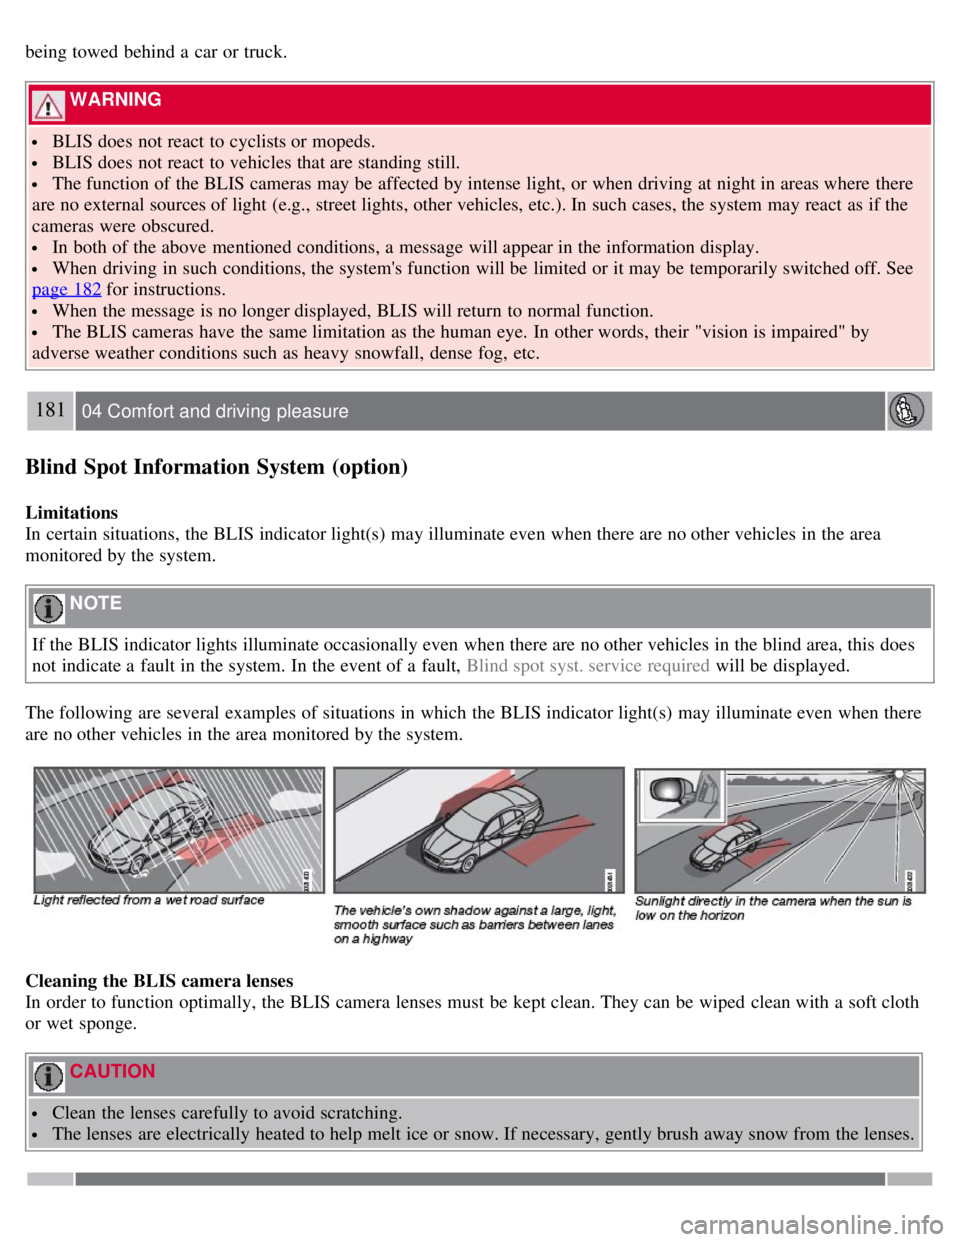
In certain situations, the BLIS indicator light(s) may illuminate even when there are no other vehicles in the area
monitored by the system.
NOTE
If the BLIS indicator lights illuminate occasionally even when there are no other vehicles in the blind area, this does
not indicate a fault in the system. In the event of a fault, Blind spot syst. service required will be displayed.
The following are several examples of situations in which the BLIS indicator light(s) may illuminate even when there
are no other vehicles in the area monitored by the system.
Cleaning the BLIS camera lenses
In order to function optimally, the BLIS camera lenses must be kept clean. They can be wiped clean with a soft cloth
or wet sponge.
CAUTION
Clean the lenses carefully to avoid scratching.
The lenses are electrically heated to help melt ice or snow. If necessary, gently brush away snow from the lenses.
Page 178 of 275
182 04 Comfort and driving pleasure
Blind Spot Information System (option)
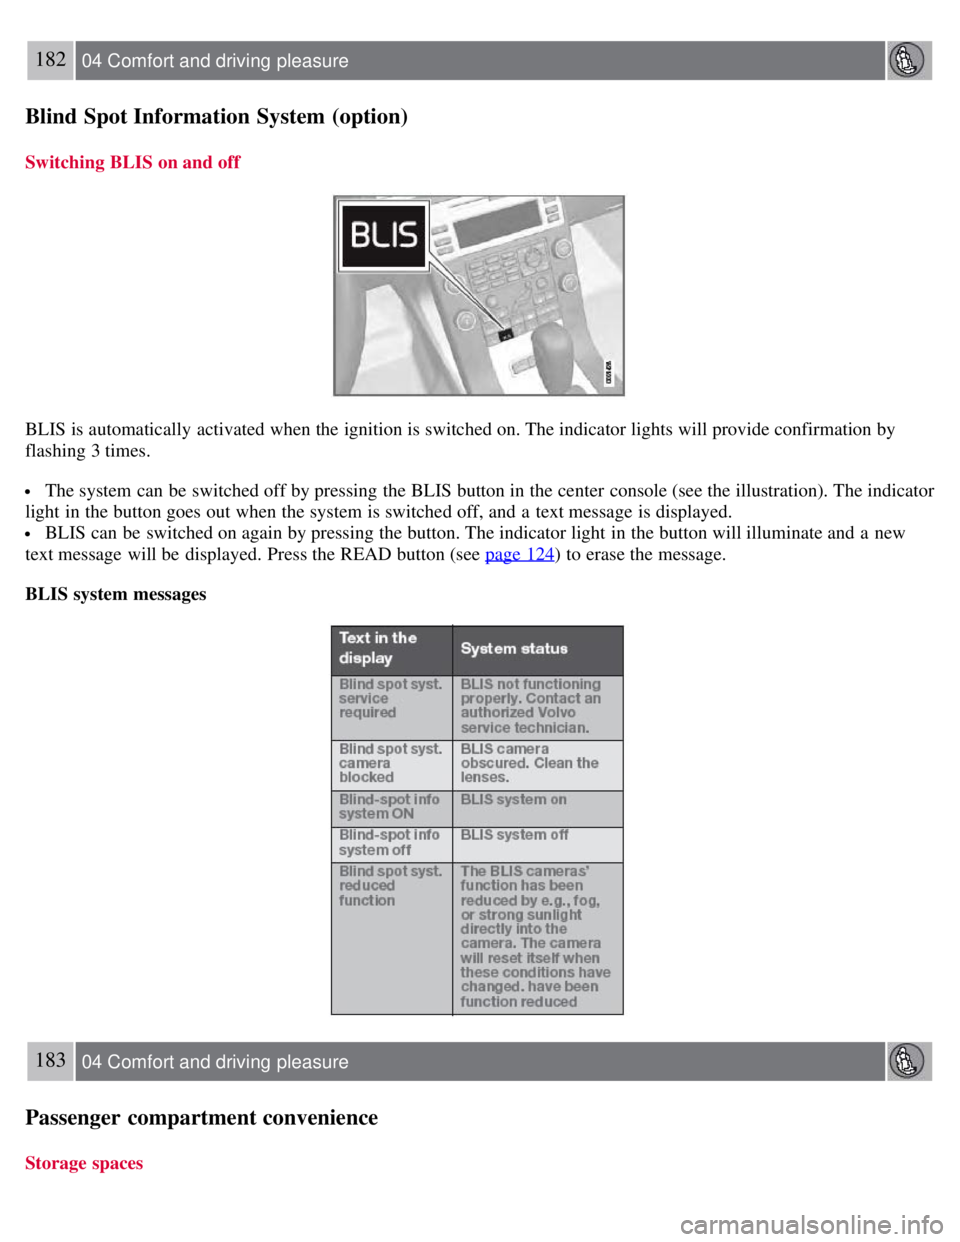
Switching BLIS on and off
BLIS is automatically activated when the ignition is switched on. The indicator lights will provide confirmation by
flashing 3 times.
The system can be switched off by pressing the BLIS button in the center console (see the illustration). The indicator
light in the button goes out when the system is switched off, and a text message is displayed.
BLIS can be switched on again by pressing the button. The indicator light in the button will illuminate and a new
text message will be displayed. Press the READ button (see page 124
) to erase the message.
BLIS system messages
183 04 Comfort and driving pleasure
Passenger compartment convenience
Storage spaces
Page 188 of 275
With the exception of gas line antifreeze during winter months, do not add solvents, thickeners, or other store -bought
additives to your vehicle's fuel, cooling, or lubricating systems. Overuse may damage your engine, and some of these
additives contain organically volatile chemicals. Do not needlessly expose yourself to these chemicals.
194 05 During your trip
Refueling
WARNING
Never carry a cell phone that is switched on while refueling your vehicle. If the phone rings, this may cause a spark
that could ignite gasoline fumes, resulting in fire and injury.
WARNING
Carbon monoxide is a poisonous, colorless, and odorless gas. It is present in all exhaust gases. If you ever smell
exhaust fumes inside the vehicle, make sure the passenger compartment is ventilated, and immediately return the
vehicle to a trained and qualified Volvo service technician for correction.
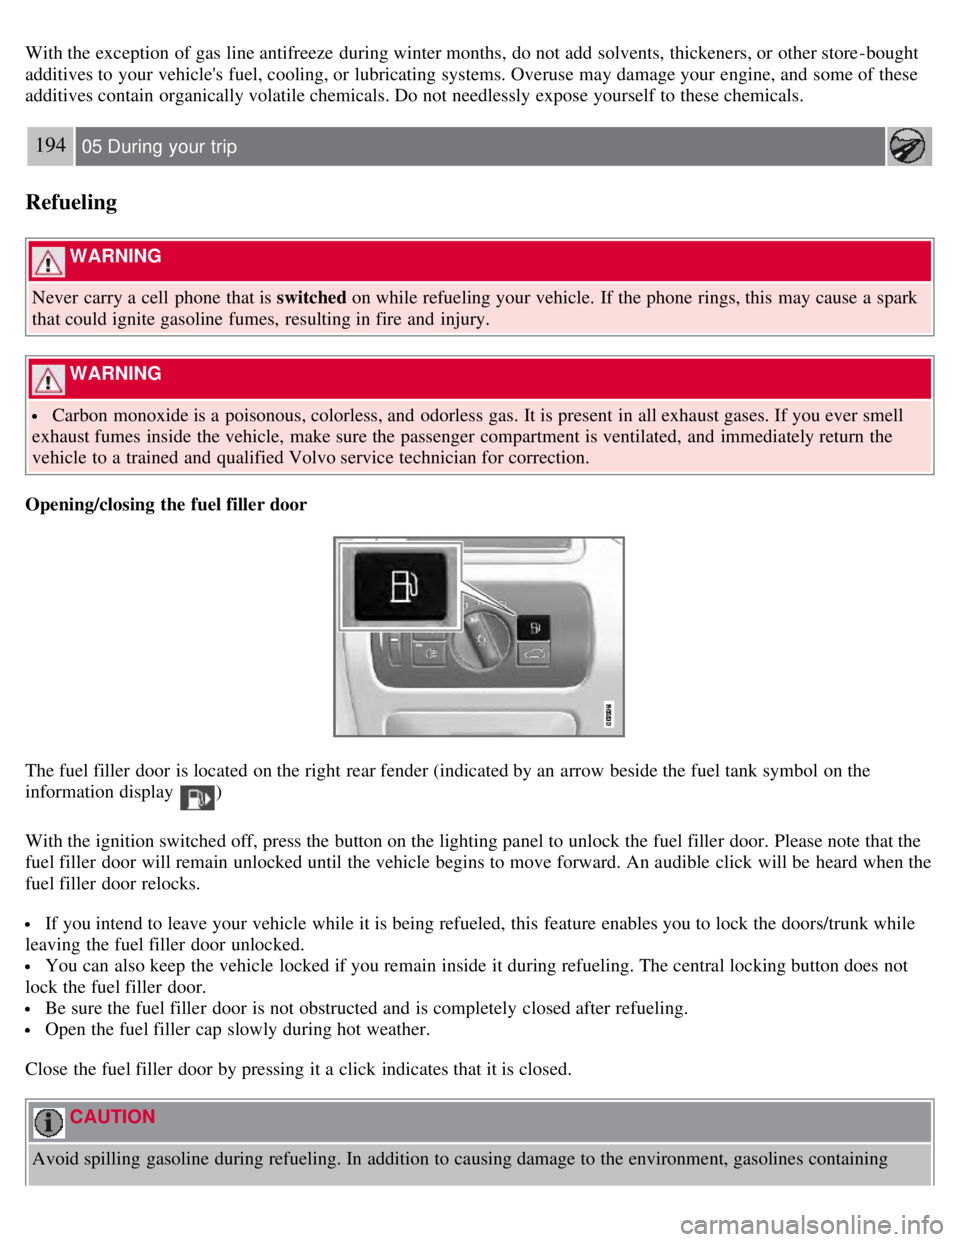
Opening/closing the fuel filler door
The fuel filler door is located on the right rear fender (indicated by an arrow beside the fuel tank symbol on the
information display
)
With the ignition switched off, press the button on the lighting panel to unlock the fuel filler door. Please note that the
fuel filler door will remain unlocked until the vehicle begins to move forward. An audible click will be heard when the
fuel filler door relocks.
If you intend to leave your vehicle while it is being refueled, this feature enables you to lock the doors/trunk while
leaving the fuel filler door unlocked.
You can also keep the vehicle locked if you remain inside it during refueling. The central locking button does not
lock the fuel filler door.
Be sure the fuel filler door is not obstructed and is completely closed after refueling.
Open the fuel filler cap slowly during hot weather.
Close the fuel filler door by pressing it a click indicates that it is closed.
CAUTION
Avoid spilling gasoline during refueling. In addition to causing damage to the environment, gasolines containing
Page 194 of 275

201 05 During your trip
Towing a trailer
Introduction
Volvo recommends the use of Volvo trailer hitches that are specially designed for the vehicle.
NOTE
See page 270
for the maximum trailer and tongue weights recommended by Volvo.
Observe the legal requirements of the state/province in which the vehicles are
All Volvo models are equipped with energy- absorbing shock-mounted bumpers. Trailer hitch installation should
not interfere with the proper operation of this bumper system.
Trailer towing does not normally present any particular problems, but take into consideration:
Increase tire pressure to recommended full. See the tire inflation tables on pages 240 and 241.
When your vehicle is new, avoid towing heavy trailers during the first 620 miles (1,000 km).
Maximum speed when towing a trailer: 50 mph (80 km/h).
Engine and transmission are subject to increased loads. Therefore, engine coolant temperature should be closely
watched when driving in hot climates or hilly terrain. Use a lower gear and turn off the air conditioner if the
temperature gauge needle enters the red range.
If the automatic transmission begins to overheat, a message will be displayed in the text window.
Avoid overload and other abusive operation.
Hauling a trailer affects handling, durability, and economy.
It is necessary to balance trailer brakes with the towing vehicle brakes to provide a safe stop (check and observe
state/local regulations).
Do not connect the trailer's brake system directly to the vehicle's brake system.
More frequent vehicle maintenance is required.
Remove the ball and drawbar assembly when the hitch is not being used.
Volvo recommends the use of synthetic engine oil when towing a trailer over long distances or in mountainous
areas.
WARNING
Bumper-attached trailer hitches must not be used on Volvos, nor should safety chains be attached to the bumper.
Trailer hitches attaching to the vehicle rear axle must not be used.
Never connect a trailer's hydraulic brake system directly to the vehicle brake system, nor a trailer's lighting system
directly to the vehicle lighting system. Consult your nearest authorized Volvo retailer for correct installation.
When towing a trailer, the trailer's safety wire must be correctly fastened to the hole or hook provided in the
trailer hitch on the vehicle. The safety wire should never be fastened to or wound around the drawbar ball.
202 05 During your trip
Towing a trailer
NOTE
Page 200 of 275

Each time the car is refueled:
Check the engine oil level.
Clean the windshield, windshield wipers, headlights, and tail lights.
Monthly:
Check cold tire pressure in all tires. Inspect the tires for wear.
Check that engine coolant and other fluid levels are between the indicated "min" and "max" markings.
Clean interior glass surfaces with a glass cleaner and soft paper towels.
Wipe driver information displays with a soft cloth.
Visually inspect battery terminals for corrosion. Corrosion may indicate a loose terminal connector, or a battery near
the end of its useful service life. Consult your Volvo retailer for additional information.
As needed:
Wash the car, including the undercarriage, to reduce wear that can be caused by a buildup of dirt, and corrosion that
can be caused by salt residues.
Clean leaves and twigs from air intake vents at the base of the windshield, and from other places where they may
collect.
NOTE
Complete service information for qualified technicians is available online for purchase or subscription at
www.volvotechinfo.com
.
210 06 Maintenance and specifications
Maintaining your car
Emission inspection readiness
What is an Onboard Diagnostic System (OBD II)?
OBD II is part of your vehicle's computerized engine management system. It stores diagnostic information about your
vehicle's emission controls. It can light the Check Engine light (MIL) if it detects an emission control "fault." A "fault"
is a component or system that is not performing within an expected range. A fault may be permanent or temporary.
OBD II will store a message about any fault.
How do states use OBD II for emission inspections?
Many states connect a computer directly to a vehicle's OBD II system. The inspector can then read "faults." In some
states, this type of inspection has replaced the tailpipe emission test.
How can my vehicle fail OBD II emission inspection?
Your vehicle can fail OBD II emission inspection for any of the following reasons.
If your Check Engine (MIL) light is lit, your vehicle may fail inspection.
If your vehicle's Check Engine light was lit, but went out without any action on your part, OBD II will still have a
recorded fault. Your vehicle may pass or fail, depending on the inspection practices in your area.
If you had recent service that required disconnecting the battery, OBD II diagnostic information may be incomplete
and "not ready" for inspection. A vehicle that is not ready may fail inspection.
How can I prepare for my next OBD II emission inspection?
Page 205 of 275
Checking the level
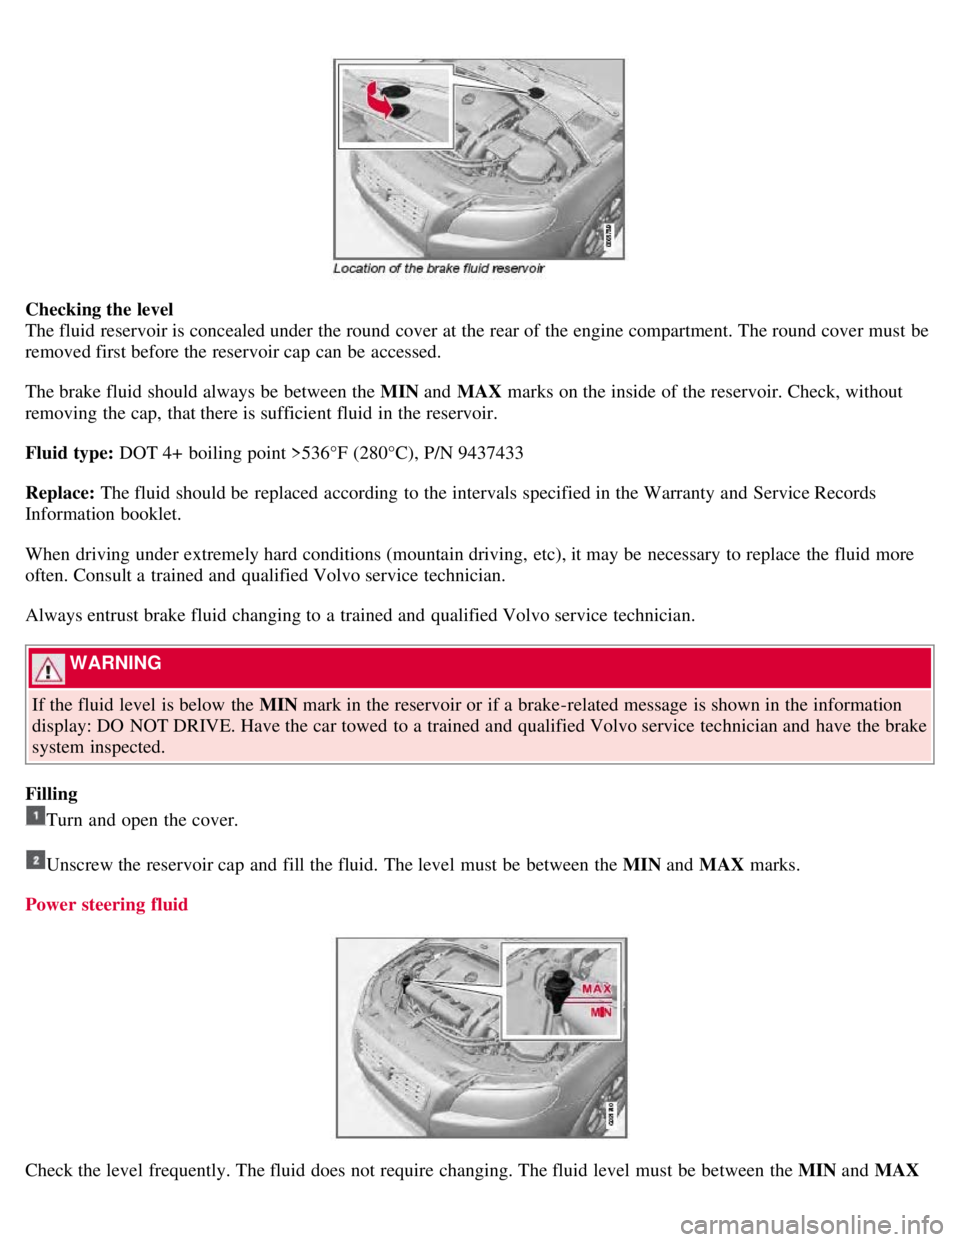
The fluid reservoir is concealed under the round cover at the rear of the engine compartment. The round cover must be
removed first before the reservoir cap can be accessed.
The brake fluid should always be between the MIN and MAX marks on the inside of the reservoir. Check, without
removing the cap, that there is sufficient fluid in the reservoir.
Fluid type: DOT 4+ boiling point >536°F (280°C), P/N 9437433
Replace: The fluid should be replaced according to the intervals specified in the Warranty and Service Records
Information booklet.
When driving under extremely hard conditions (mountain driving, etc), it may be necessary to replace the fluid more
often. Consult a trained and qualified Volvo service technician.
Always entrust brake fluid changing to a trained and qualified Volvo service technician.
WARNING
If the fluid level is below the MIN mark in the reservoir or if a brake-related message is shown in the information
display: DO NOT DRIVE. Have the car towed to a trained and qualified Volvo service technician and have the brake
system inspected.
Filling
Turn and open the cover.
Unscrew the reservoir cap and fill the fluid. The level must be between the MIN and MAX marks.
Power steering fluid
Check the level frequently. The fluid does not require changing. The fluid level must be between the MIN and MAX
Page 213 of 275
3. Remove the defective bulb by pressing it in slightly and turning it before pulling it out.
4. Plug in the connector.
5. Press the bulb holder until it clicks into place and reinstall the cover.
221 06 Maintenance and specifications
Replacing bulbs
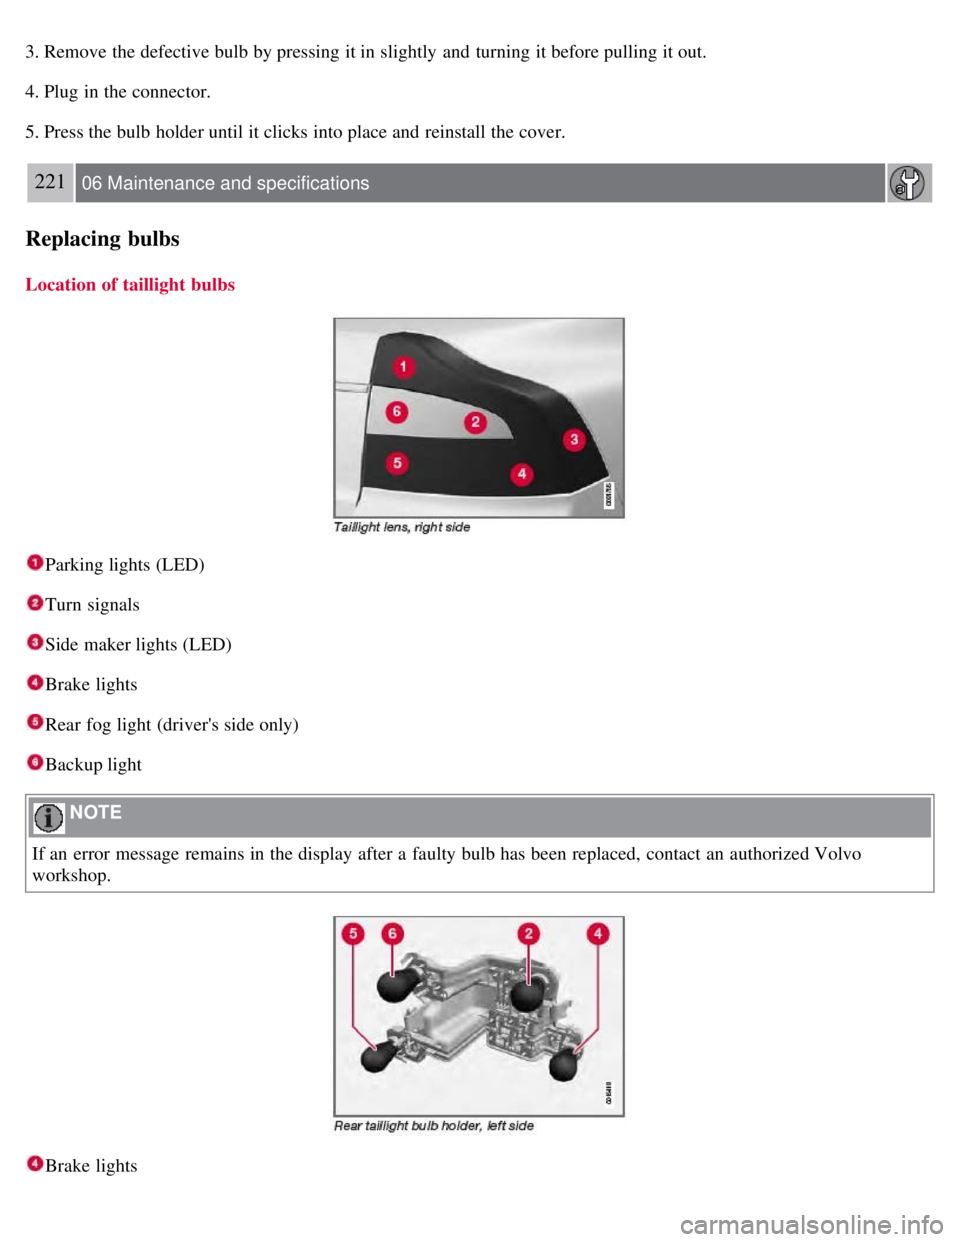
Location of taillight bulbs
Parking lights (LED)
Turn signals
Side maker lights (LED)
Brake lights
Rear fog light (driver's side only)
Backup light
NOTE
If an error message remains in the display after a faulty bulb has been replaced, contact an authorized Volvo
workshop.
Brake lights