Page 189 of 275
alcohol can cause damage to painted surfaces, which may not be covered under the New Vehicle Limited Warranty.
195 05 During your trip
Refueling
Manually opening the fuel filler door
If necessary, the fuel filler door can be opened manually.
Open the side hatch in the trunk (on the same side as the fuel filler door).
Grasp the green cord with a handle.
Pull the cord straight rearward until the fuel filler door clicks open.
196 05 During your trip
Refueling
Opening/closing the fuel cap
Fuel vapor expands in hot weather. Open the filler cap slowly.
After refueling, close the fuel filler cap by turning it clockwise until it clicks into place.
CAUTION
Do not refuel with the engine running1. Turn the ignition off or to position I. If the ignition is on, an incorrect
Page 190 of 275

reading could occur in the fuel gauge.
Avoid overfilling the fuel tank. Do not press the handle on the filler nozzle more than one extra time. Too much
fuel in the tank in hot weather conditions can cause the fuel to overflow. Overfilling could also cause damage to the
emission control systems.
1If the fuel filler cap is not closed tightly or if the engine is running when the vehicle is refueled, the Check Engine Light (malfunction indicator
lamp) may indicate a fault. However, your vehicle's performance will not be affected. Use only Volvo original or approved fuel filler caps.
Emission controls
Three-way catalytic converter
Keep your engine properly tuned. Certain engine malfunctions, particularly involving the electrical, fuel or
distributor ignition systems, may cause unusually high three-way catalytic converter temperatures. Do not continue to
operate your vehicle if you detect engine misfire, noticeable loss of power or other unusual operating conditions, such
as engine overheating or backfiring. A properly tuned engine will help avoid malfunctions that could damage the three-
way catalytic converter.
Do not park your vehicle over combustible materials, such as grass or leaves, which can come into contact with the
hot exhaust system and cause such materials to ignite under certain wind and weather conditions.
Excessive starter cranking (in excess of one minute), or an intermittently firing or flooded engine can cause three-
way catalytic converter or exhaust system overheating.
Remember that tampering or unauthorized modifications to the engine, the Engine Control Module, or the vehicle
may be illegal and can cause three-way catalytic converter or exhaust system overheating. This includes: altering fuel
injection settings
197 05 During your trip
Refueling
or components, altering emission system components or location or removing components, and/or repeated use of
leaded fuel.
NOTE
Unleaded fuel is required for vehicles with three-way catalytic converters.
Heated oxygen sensors
The heated oxygen sensors monitor the oxygen content of the exhaust gases. Readings are fed into a control module
that continuously monitors engine functions and controls fuel injection. The ratio of fuel to air into the engine is
continuously adjusted for efficient combustion to help reduce harmful emissions.
198 05 During your trip
Loading
Introduction
The load carrying capacity of your vehicle is determined by factors such as the number of passengers, the amount of
cargo, the weight of any accessories that may be installed, etc.
NOTE
Page 196 of 275

204 05 During your trip
Emergency towing
Towing eyelet
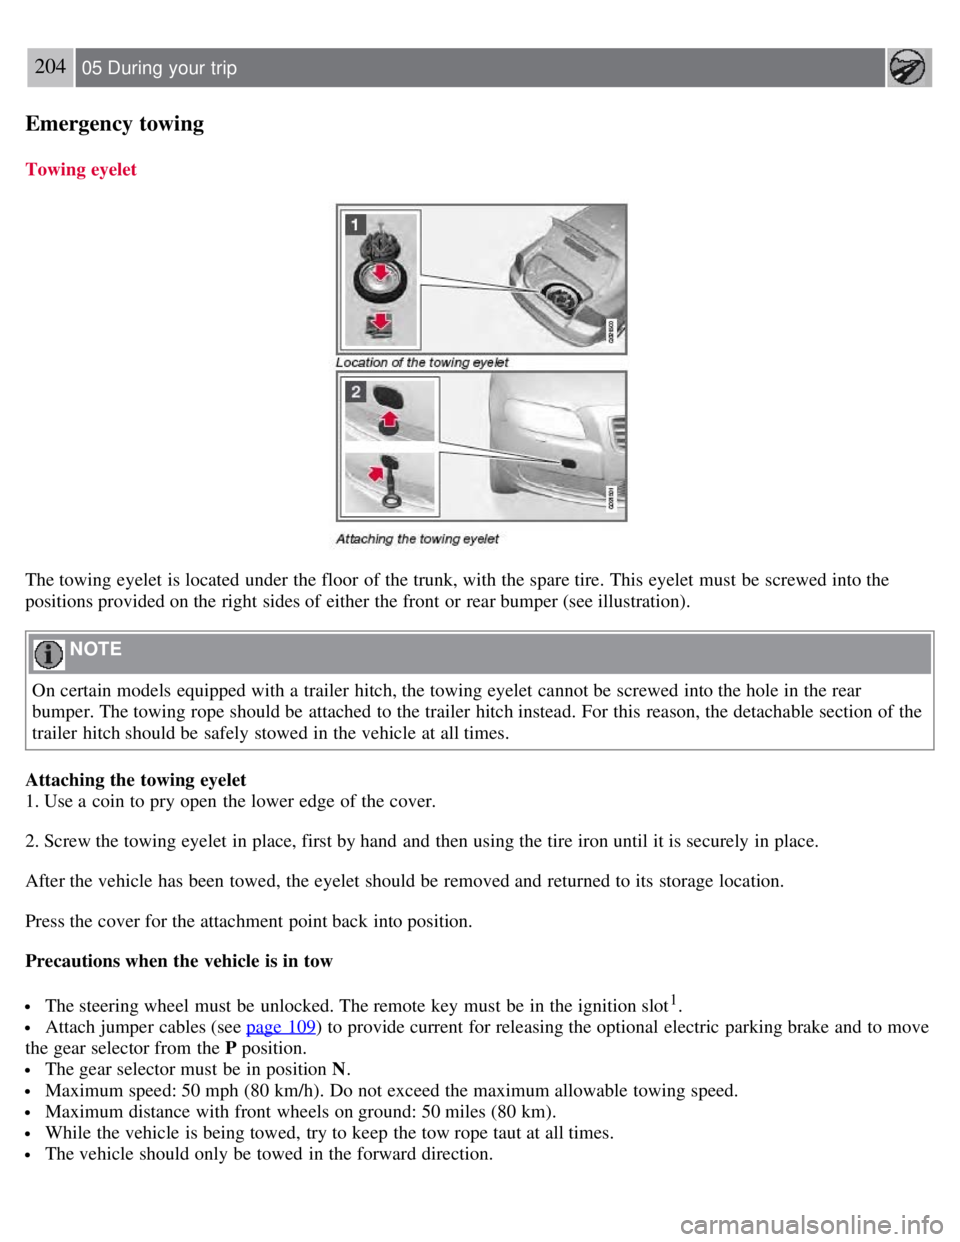
The towing eyelet is located under the floor of the trunk, with the spare tire. This eyelet must be screwed into the
positions provided on the right sides of either the front or rear bumper (see illustration).
NOTE
On certain models equipped with a trailer hitch, the towing eyelet cannot be screwed into the hole in the rear
bumper. The towing rope should be attached to the trailer hitch instead. For this reason, the detachable section of the
trailer hitch should be safely stowed in the vehicle at all times.
Attaching the towing eyelet
1. Use a coin to pry open the lower edge of the cover.
2. Screw the towing eyelet in place, first by hand and then using the tire iron until it is securely in place.
After the vehicle has been towed, the eyelet should be removed and returned to its storage location.
Press the cover for the attachment point back into position.
Precautions when the vehicle is in tow
The steering wheel must be unlocked. The remote key must be in the ignition slot1.
Attach jumper cables (see page 109) to provide current for releasing the optional electric parking brake and to move
the gear selector from the P position.
The gear selector must be in position N .
Maximum speed: 50 mph (80 km/h). Do not exceed the maximum allowable towing speed.
Maximum distance with front wheels on ground: 50 miles (80 km).
While the vehicle is being towed, try to keep the tow rope taut at all times.
The vehicle should only be towed in the forward direction.
Page 202 of 275

The appearance of the engine compartment may vary depending on engine model.
Coolant expansion tank
Power steering fluid reservoir
Engine oil dipstick
Radiator
Filler cap for engine oil
Cover over brake fluid reservoir
Battery
Relay and fuse box
Washer fluid reservoir
Air cleaner
WARNING
The cooling fan may start or continue to operate (for up to 6 minutes) after the engine has been switched off.
WARNING
The ignition should always be completely switched off before performing any operations in the engine compartment.
The distributor ignition system operates at very high voltages. Special safety precautions must be followed to prevent
injury. Always turn the ignition off when:
Replacing distributor ignition components e.g. plugs, coil, etc.
Do not touch any part of the distributor ignition system while the engine is running. This may result in unintended
movements and body injury.
212 06 Maintenance and specifications
Engine oil
Checking the engine oil
The oil level should be checked every time the vehicle is refueled. This is especially important during the period up to
the first scheduled maintenance service.
See page 272 for oil specifications.
Refer to the Warranty and Service Records Information booklet for information on the oil change intervals.
Volvo recommends Castrol.
CAUTION
Not checking the oil level regularly can result in serious engine damage if the oil level becomes too low.
Oil that is lower than the specified quality can damage the engine.
Page 206 of 275

marks. For capacities and recommended fluid grade, see page 275.
WARNING
If a problem should occur in the power steering system or if the vehicle has no electrical current and must be towed,
it is still possible to steer the vehicle. However, keep in mind that greater effort will be required to turn the steering
wheel.
CAUTION
Keep the area around the power steering fluid reservoir clean when checking.
216 06 Maintenance and specifications
Replacing bulbs
Introduction
All bulb specifications are listed on page 223
. The following bulbs should only be replaced by a trained and qualified
Volvo service technician:
Dome lighting
Reading lights
Glove compartment lighting
Turn signals in the door mirror
Approach lighting in the door mirror
Brake lights
Active Bi -Xenon® and LED bulbs
WARNING
Active Bi -Xenon® headlights (option) - due to the high voltage used by these headlights, these bulbs should only
be replaced by a trained and qualified Volvo service technician.
Turn off the lights and remove the remote key from the ignition before changing any bulbs.
Headlight housing
Page 207 of 275

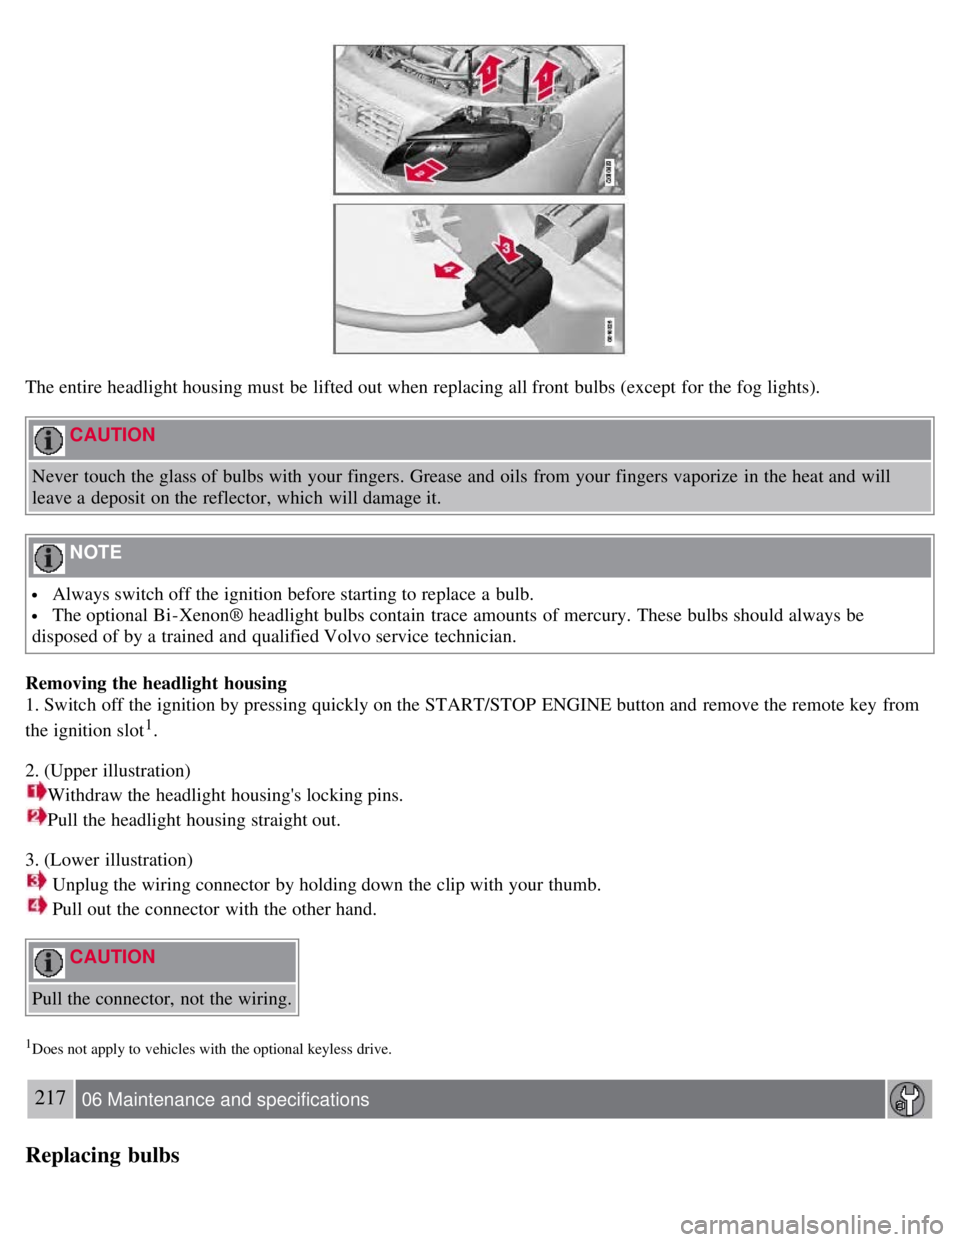
The entire headlight housing must be lifted out when replacing all front bulbs (except for the fog lights).
CAUTION
Never touch the glass of bulbs with your fingers. Grease and oils from your fingers vaporize in the heat and will
leave a deposit on the reflector, which will damage it.
NOTE
Always switch off the ignition before starting to replace a bulb.
The optional Bi -Xenon® headlight bulbs contain trace amounts of mercury. These bulbs should always be
disposed of by a trained and qualified Volvo service technician.
Removing the headlight housing
1. Switch off the ignition by pressing quickly on the START/STOP ENGINE button and remove the remote key from
the ignition slot
1.
2. (Upper illustration)
Withdraw the headlight housing's locking pins.
Pull the headlight housing straight out.
3. (Lower illustration)
Unplug the wiring connector by holding down the clip with your thumb.
Pull out the connector with the other hand.
CAUTION
Pull the connector, not the wiring.
1Does not apply to vehicles with the optional keyless drive.
217 06 Maintenance and specifications
Replacing bulbs
Page 208 of 275

4. Lift out the housing and place it on a soft surface to avoid scratching the lens.
5. Replace the defective bulb(s), see page 223
.
Reinserting the headlight housing
1. Plug in the connector until it clicks into place.
2. Reinstall the headlight housing and locking pins. Check that they are correctly inserted. The headlight housing must
be properly inserted and secured in place before the lighting is switched on or the remote key is inserted into the
ignition slot.
3. Check that the lights function properly.
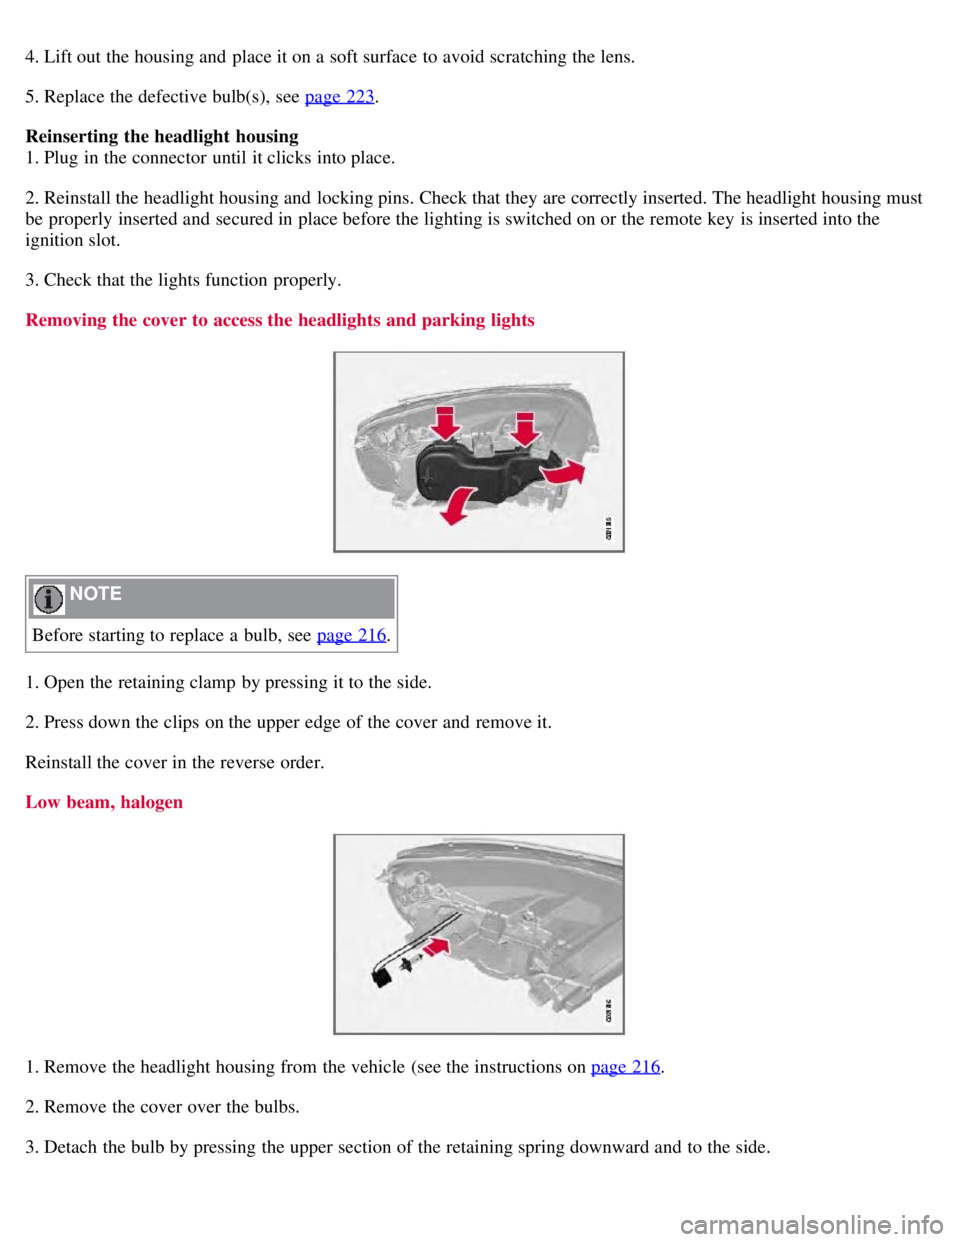
Removing the cover to access the headlights and parking lights
NOTE
Before starting to replace a bulb, see page 216
.
1. Open the retaining clamp by pressing it to the side.
2. Press down the clips on the upper edge of the cover and remove it.
Reinstall the cover in the reverse order.
Low beam, halogen
1. Remove the headlight housing from the vehicle (see the instructions on page 216.
2. Remove the cover over the bulbs.
3. Detach the bulb by pressing the upper section of the retaining spring downward and to the side.
Page 216 of 275
Replacing bulbs
Specification, bulbs
224 06 Maintenance and specifications
Wiper blades and washer fluid
Wiper blades
The wiper blades are different lengths. The blade on the driver's side is longer than the blade on the passenger side.
Service position
The wiper blades must be in the service (vertical) position for replacement or washing.
1. Switch off the ignition (ignition mode 0, see page 80
) and keep the remote key in the ignition slot1.
2. Move the right steering wheel lever up and hold it for at least 1 second. The wipers will then move to the vertical
position on the windshield.