2008 VOLVO S80 ignition
[x] Cancel search: ignitionPage 131 of 275
133 04 Comfort and driving pleasure
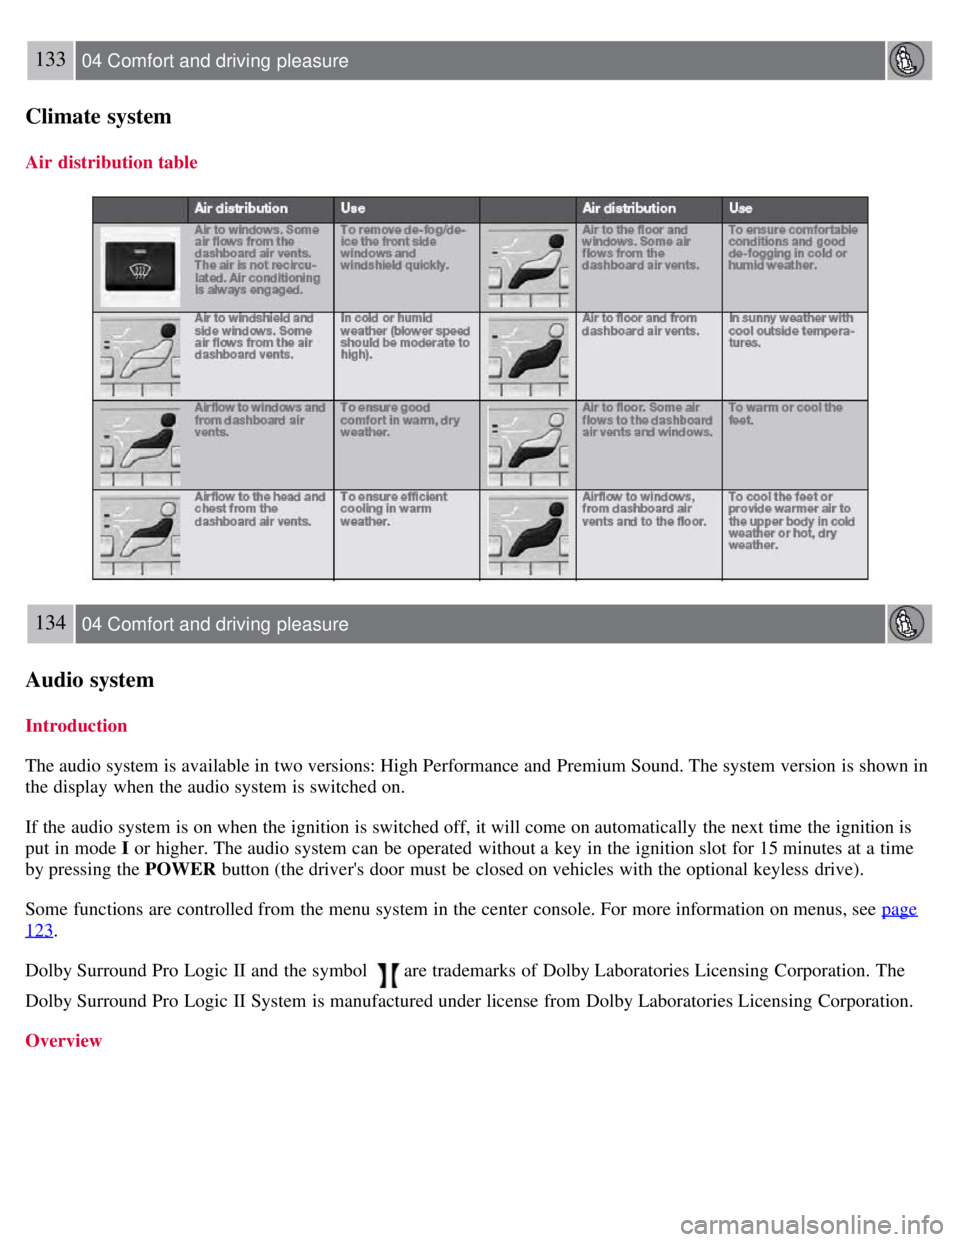
Climate system
Air distribution table
134 04 Comfort and driving pleasure
Audio system
Introduction
The audio system is available in two versions: High Performance and Premium Sound. The system version is shown in
the display when the audio system is switched on.
If the audio system is on when the ignition is switched off, it will come on automatically the next time the ignition is
put in mode I or higher. The audio system can be operated without a key in the ignition slot for 15 minutes at a time
by pressing the POWER button (the driver's door must be closed on vehicles with the optional keyless drive).
Some functions are controlled from the menu system in the center console. For more information on menus, see page
123.
Dolby Surround Pro Logic II and the symbol
are trademarks of Dolby Laboratories Licensing Corporation. The
Dolby Surround Pro Logic II System is manufactured under license from Dolby Laboratories Licensing Corporation.
Overview
Page 143 of 275
3. Press ENTER to activate or deactivate the function.
NOTE
When the song has ended, the radio will remain tuned to the channel on which the song was played.
Radio text
The text that is displayed about the song that is currently playing can be changed. Use the AUTO button or the menu
to display the Artist, Title, Composer, or switch radio text off.
145 04 Comfort and driving pleasure
Audio system
Advanced settings
This menu function enables you to make settings on certain Sirius satellite radio functions. To access this menu:
1. Press MENU .
2. Scroll to the Sirius menu.
3. Select Advanced Sirius settings .
WARNING
Settings should be made when the vehicle is at a standstill.
The following settings can be made in the Sirius menu:
The list of saved songs can be displayed
Channel skip settings can be made
Channel lock settings can be made
The channel access code can be displayed or changed
Your Sirius ID can be displayed
Skip options
This function is used to remove a channel from the list of available channels.
Skipping a channel
1. Select CHANNEL SKIP LIST and press ENTER.
2. Select a category in the list and press ENTER .
3. Skip channels in the list presented by pressing ENTER or right arrow key.
Unskip all channels
This permanently removes all channels from the skip list and makes them available for selection.
Temp. unskip all ch.
This function will temporarily unskip all channels and make them available for selection. The channels remain on the
skip list and will again be skipped the next time the ignition is switched on.
Page 144 of 275
Channel lock
Access to specific channels can be restricted (locked). A locked channel will not provide audio, song titles, or artist
information.
NOTE
All channels are initially unlocked.
Locking a channel:
1. Select Sirius ID in the menu and select LOCK OPTIONS and press ENTER.
2. Select CHANNEL LOCK LIST and press ENTER
3. Enter the channel access code
1 and press ENTER .
4. Select a category in the list and press ENTER .
5. Lock channels in the list presented by pressing ENTER or right arrow.
The channel is now locked and a checked box will be displayed to indicate this. It will be necessary to enter the
channel access code
1 in order to listen to a locked channel.
Unlocking a channel
A channel's access code
1 is required to unlock a channel.
Unlock all channels
This permanently removes all channels from the locked list and makes them available for selection.
Temp. unlock all ch.
This function will temporarily unlock all channels and make them available for selection. The channels remain on the
locked list and will again be locked the next time the ignition is switched on.
1The default code is 0000. If you have changed the code and forgotten it, see the section "If you have forgotten the access code."
146 04 Comfort and driving pleasure
Audio system
CHANGE CODE
This function makes it possible to change the channel access code. The default code is 0000.
To change the code:
1. Select CHANGE CODE and press ENTER.
2. Enter the current code and press ENTER .
3. Enter the new code and press ENTER .
4. Confirm the new code and press ENTER .
If an incorrect code is entered, the text WRONG CODE! is displayed.
Page 147 of 275

vehicle is pointing. Eight different directions are shown with the abbreviations: N (north), NE (north east), E (east), SE
(southeast), S (south), SW (southwest), W (west) and NW (northwest).
The compass is displayed automatically when the vehicle is started or in ignition mode II . To switch the compass
on/off use a pen or similar object and press in the button on the rear side of the mirror.
Calibration
The compass may need to be calibrated if, for example, the vehicle is driven into a new magnetic zone. The characters
CAL are shown in the mirror's display if calibration is necessary.
1. Stop the vehicle in a large open area, away from traffic.
2. Start the vehicle.
3. Using a pen or similar object, press and hold the button on the rear side of mirror until CAL is shown again (after
approx. 6 seconds).
4. Drive as usual. CAL disappears from the display when calibration is complete. Alternative calibration method:
Drive slowly in a circle at a speed of no more than 5 mph (8 km/h) until CAL disappears from the display when
calibration is complete.
Selecting a magnetic zone
The earth is divided into 15 magnetic zones. The correct zone must be selected for the compass to work correctly.
1. Put the ignition in mode II .
2. Using a pen or similar object, press and hold the button on the rear side of mirror for at least 3 seconds. The number
for the current area will be shown.
3. Press the button repeatedly until the number for the required geographic area (1-15) is shown.
Page 178 of 275
182 04 Comfort and driving pleasure
Blind Spot Information System (option)
Switching BLIS on and off
BLIS is automatically activated when the ignition is switched on. The indicator lights will provide confirmation by
flashing 3 times.
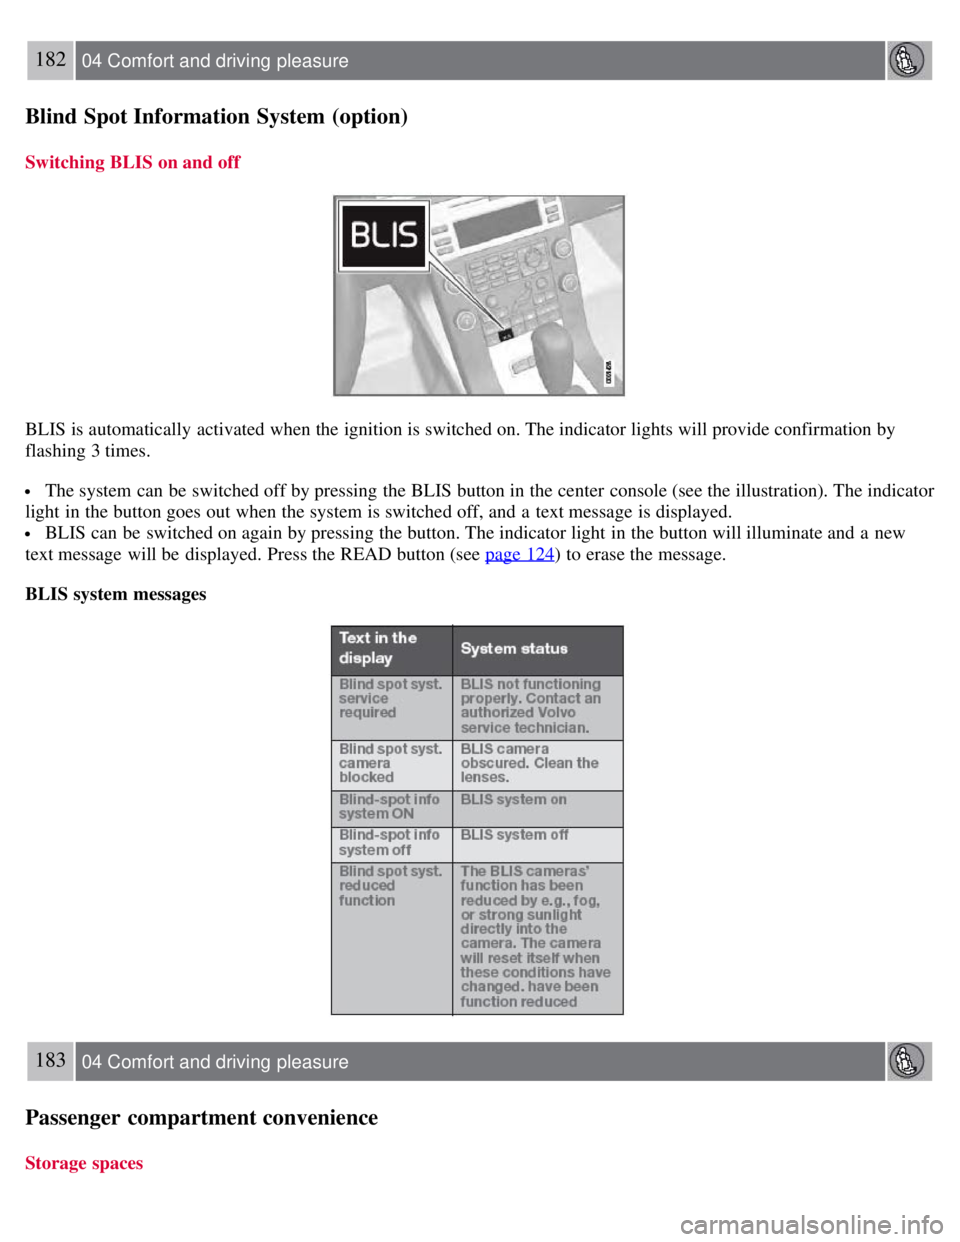
The system can be switched off by pressing the BLIS button in the center console (see the illustration). The indicator
light in the button goes out when the system is switched off, and a text message is displayed.
BLIS can be switched on again by pressing the button. The indicator light in the button will illuminate and a new
text message will be displayed. Press the READ button (see page 124
) to erase the message.
BLIS system messages
183 04 Comfort and driving pleasure
Passenger compartment convenience
Storage spaces
Page 181 of 275
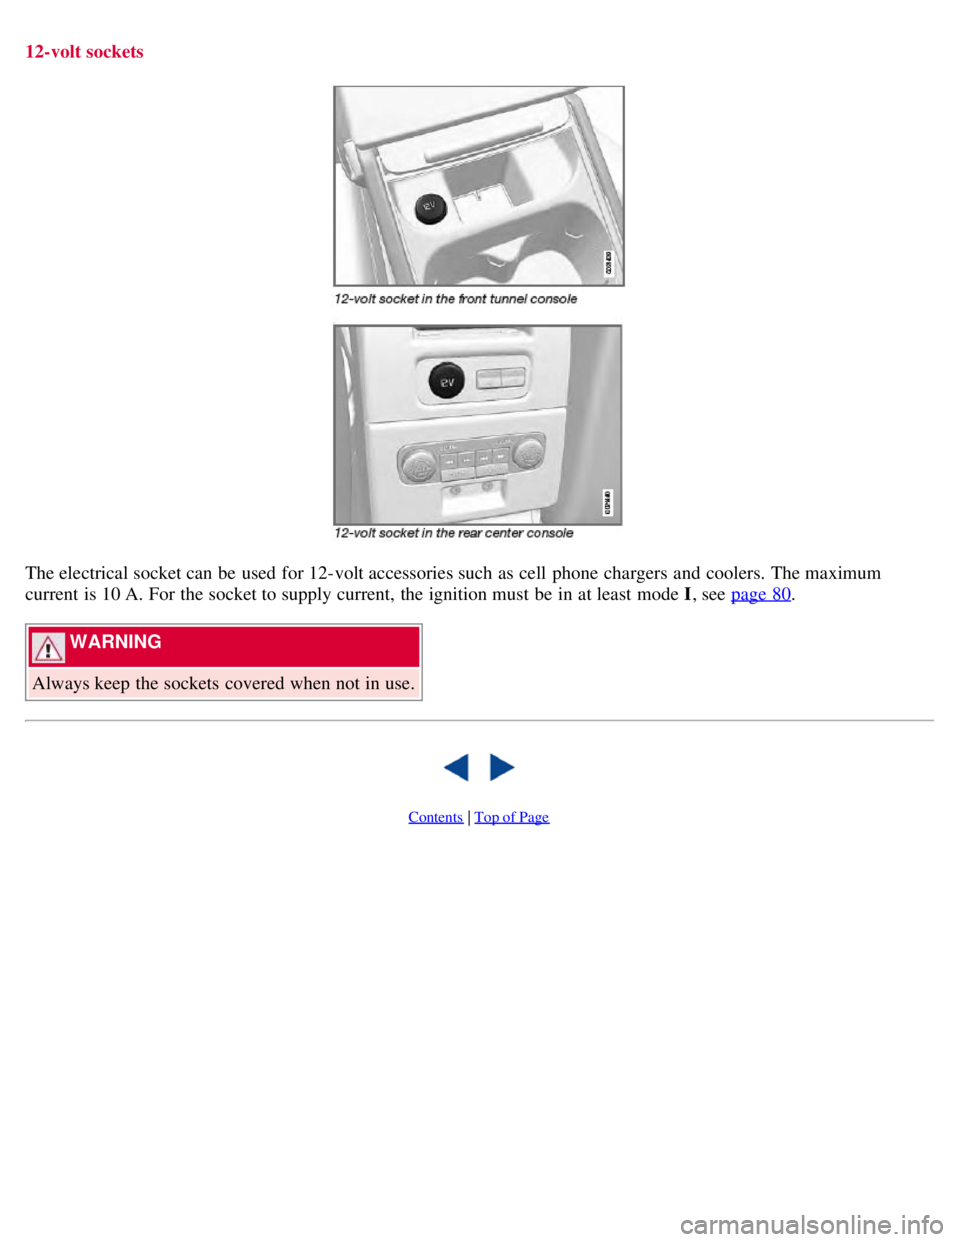
12-volt sockets
The electrical socket can be used for 12-volt accessories such as cell phone chargers and coolers. The maximum
current is 10 A. For the socket to supply current, the ignition must be in at least mode I, see page 80
.
WARNING
Always keep the sockets covered when not in use.
Contents | Top of Page
Page 184 of 275

CAUTION
Engine damage will occur if water is drawn into the air cleaner.
If the vehicle is driven through water deeper than 9 in (25 cm), water may enter the differential and the
transmission. This reduces the oil's lubricating capacity and may shorten the service life of these components.
Do not allow the vehicle to stand in water up to the door sills longer than absolutely necessary. This could result
in electrical malfunctions.
If the engine has been stopped while the vehicle is in water, do not attempt to restart it. Have the vehicle towed
out of the water.
Engine and cooling system
Under special conditions, for example when driving in hilly terrain, extreme heat or with heavy loads, there is a risk
that the engine and cooling system will overheat. Proceed as follows to avoid overheating the engine.
Maintain a low speed when driving with a trailer up long, steep hills.
Do not turn the engine off immediately when stopping after a hard drive.
WARNING
The cooling fan may start or continue to operate (for up to 6 minutes) after the engine has been switched off.
Remove any auxiliary lights from in front of the grille when driving in hot weather conditions.
Do not exceed engine speeds of 4500 rpm if driving with a trailer in hilly terrain. The oil temperature could become
too high.
Conserving electrical current
Keep the following in mind to help minimize battery drain:
When the engine is not running, avoid using ignition mode II . Many electrical systems (the audio system, the
optional navigation system, power windows, etc) will function in ignition modes 0 and I . These modes reduce drain on
the battery.
Please keep in mind that using systems, accessories, etc., that consume a great deal of current when the engine is not
running could result in the battery being completely drained.
The optional 12 volt socket in the trunk provides electrical current even with the ignition switched off, which drains
the battery.
190 05 During your trip
Driving recommendations
Before a long distance trip
It is always worthwhile to have your vehicle checked by a trained and qualified Volvo service technician before
driving long distances. Your retailer will also be able to supply you with bulbs, fuses, spark plugs and wiper blades for
your use in the event that problems occur.
As a minimum, the following items should be checked before any long trip:
Check that engine runs smoothly and that fuel consumption is normal.
Check for fuel, oil, and fluid leakage
Have the transmission oil level checked.
Check condition of drive belts.
Check state of the battery's charge.
Page 188 of 275
With the exception of gas line antifreeze during winter months, do not add solvents, thickeners, or other store -bought
additives to your vehicle's fuel, cooling, or lubricating systems. Overuse may damage your engine, and some of these
additives contain organically volatile chemicals. Do not needlessly expose yourself to these chemicals.
194 05 During your trip
Refueling
WARNING
Never carry a cell phone that is switched on while refueling your vehicle. If the phone rings, this may cause a spark
that could ignite gasoline fumes, resulting in fire and injury.
WARNING
Carbon monoxide is a poisonous, colorless, and odorless gas. It is present in all exhaust gases. If you ever smell
exhaust fumes inside the vehicle, make sure the passenger compartment is ventilated, and immediately return the
vehicle to a trained and qualified Volvo service technician for correction.
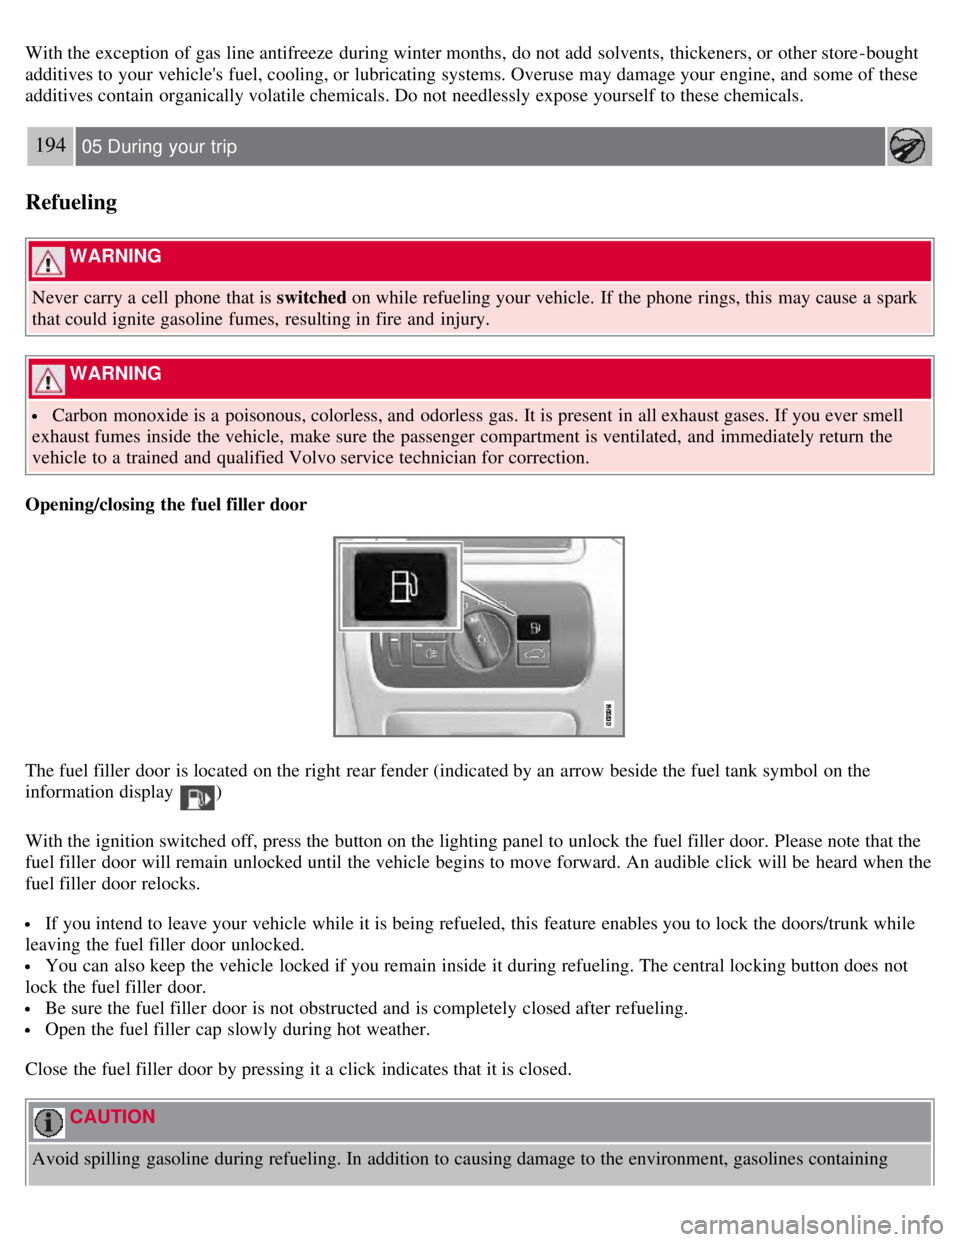
Opening/closing the fuel filler door
The fuel filler door is located on the right rear fender (indicated by an arrow beside the fuel tank symbol on the
information display
)
With the ignition switched off, press the button on the lighting panel to unlock the fuel filler door. Please note that the
fuel filler door will remain unlocked until the vehicle begins to move forward. An audible click will be heard when the
fuel filler door relocks.
If you intend to leave your vehicle while it is being refueled, this feature enables you to lock the doors/trunk while
leaving the fuel filler door unlocked.
You can also keep the vehicle locked if you remain inside it during refueling. The central locking button does not
lock the fuel filler door.
Be sure the fuel filler door is not obstructed and is completely closed after refueling.
Open the fuel filler cap slowly during hot weather.
Close the fuel filler door by pressing it a click indicates that it is closed.
CAUTION
Avoid spilling gasoline during refueling. In addition to causing damage to the environment, gasolines containing