2008 VOLVO S80 light
[x] Cancel search: lightPage 103 of 275
button. During programming, your handheld transmitter may automatically stop transmitting. Continue to press and
hold the desired HomeLink button while you press and re-press ("cycle") your handheld transmitter every two seconds
until the frequency signal has been learned. The indicator light will flash slowly and then rapidly after several seconds
upon successful training. DO NOT release until the HomeLink indicator light flashes slowly and then rapidly. When
the indicator light flashes rapidly, both buttons may be released. (The rapid flashing indicates successful training.)
105 03 Your driving environment
HomeLink® Universal Transceiver
4. Press and hold the trained HomeLink button and observe the indicator light.
If the indicator light is solid/continuous, training is complete and your device should activate when the HomeLink
button is pressed and released.
If the indicator light blinks rapidly for 2 seconds and then turns a solid/continuous light, proceed with the following
training instructions for a rolling code device. A second person may make the following steps quicker and easier.
Please use a ladder or other device. Do not stand on your vehicle to perform the next steps.
5. At the garage door opener receiver (motorhead unit) in the garage, locate the "learn" or "smart" button (usually near
where the hanging antenna wire is attached to the unit). If there is difficulty locating the training button reference the
garage door opener's manual or contact us.
6. Press and release the "learn" or "smart" button (the name and color of the button may vary by manufacturer).
NOTE
Once the button is pressed, there are 30 seconds in which to initiate the next step.
7. Return to the vehicle and firmly press and hold the trained HomeLink button for two seconds and release. Repeat
the "press/hold/release" sequence up to 3 times to complete the training process.
NOTE
During programming, your hand -held transmitter may automatically stop transmitting. Continue to press and hold
the desired HomeLink button while you press and repress ("cycle") your hand -held transmitter every two seconds
until the frequency signal has been learned. The indicator light will flash slowly and then rapidly after several
seconds upon successful training. If necessary, follow steps 5-7 to complete the training for a rolling code device.
To train additional HomeLink buttons, begin with step two.
Rolling Code Programming
Rolling code garage door openers that are "code-protected" and manufactured after 1996 may be determined by the-
following:
Reference the garage door opener owner's manual for verification.
The handheld transmitter appears to program the HomeLink Universal Transceiver but does not activate the garage
door.
Press and hold the trained HomeLink button. The garage door opener has the rolling code feature if the indicator
light flashes rapidly and then turns solid after 2 seconds.
To train a garage door with the rolling code feature, follow these instructions (the aid of a second person may make the
Page 104 of 275
training quicker and easier):
1. Locate the training button on the garage door opener motor head unit. Exact location and color of the button may
vary by garage door opener brand. If there is difficulty locating the training button, reference the garage door opener
owner's manual or please visit our Web site at www.homelink.com
.
2. Press the training button on the garage door opener motor head unit (which activates the "training light").
NOTE
Following step 2, there are 30 seconds in which to initiate step 3.
3. Firmly press and release the programmed HomeLink® button. Press and release the HomeLink button a second time
to complete the training process. (Some garage door openers may require
106 03 Your driving environment
HomeLink® Universal Transceiver
you to do this procedure a third time to complete the training.)
The garage door opener should now recognize the HomeLink Wireless Control System. The remaining two buttons
may now be trained if this has not previously been done. Refer to the Programming portion of this text. The
HomeLink Wireless Control System (once programmed) or the original handheld transmitter may be used to activate
the garage door. In the event that there are still difficulties in programming the HomeLink Wireless Control System,
please visit our Web site, www.homelink.com
.
Reprogramming a Single HomeLink Button
To program a device to HomeLink using a HomeLink button previously trained, follow these steps:
1. Press and hold the desired HomeLink button. Do NOT release until step 4 has been completed.
2. When the indicator light begins to flash slowly ( after 20 seconds), position the handheld transmitter 1 to 3 inches
away from the HomeLink surface.
3. Press and hold the handheld transmitter button. The HomeLink indicator light will flash, first slowly and then
rapidly.
4. When the indicator light begins to flash rapidly, release both buttons.
The previous device has now been erased and the new device can be activated by pushing the HomeLink button that
has just been programmed. This procedure will not affect any other programmed HomeLink.
Erasing Channels
Individual buttons cannot be erased. However, to erase all three programmed buttons:
1. Press and hold the two outside buttons until the indicator light begins to flash (after 20 seconds).
2. Release both buttons.
The HomeLink® Wireless Control System is now in the training (learning) mode and can be programmed at any time
following steps 2 through 4 in the Programming section.
Page 106 of 275
the vehicle.
Never remove the remote key from the ignition slot while driving or when the vehicle is being towed. The
steering lock could otherwise be activated, making it impossible to steer the vehicle. Never remove the remote key
with keyless drive function (option) from the vehicle while driving or during towing.
Always place the gear selector in Park and apply the parking brake before leaving the vehicle. Never leave the
vehicle unattended with the engine running.
Always open garage doors fully before starting the engine inside a garage to ensure adequate ventilation. The
exhaust gases contain carbon monoxide, which is invisible and odorless but very poisonous.
108 03 Your driving environment
Starting the engine
NOTE
The idling speed can be noticeably higher than normal during cold starts. This is to enable emission control system
can reach normal operating temperature as quickly as possible, which helps reduce exhaust emissions
1.
Keylock: Your vehicle is equipped with a keylock system. When the engine is switched off, the gear selector must
be in the Park position before the key can be removed
2 from the ignition slot.
1If the gear selector is in the D or R positions and the car is not moving, engine speed (rpm) will be lower and it will take longer for the engine to
reach normal operating temperature.
2Does not apply to vehicles with the optional keyless drive.
CAUTION
When starting in cold weather, the automatic transmission may shift up at slightly higher engine speeds than
normal until the automatic transmission fluid reaches normal operating temperature.
Do not race a cold engine immediately after starting. Oil flow may not reach some lubrication points fast enough
to prevent engine damage.
The engine should be idling when you move the gear selector. Never accelerate until after you feel the
transmission engage. Accelerating immediately after selecting a gear will cause harsh engagement and premature
transmission wear.
Selecting P or N when idling at a standstill for prolonged periods of time will help prevent overheating of the
automatic transmission fluid.
Keyless drive (option)
Follow steps 3-4 for starting the engine.
NOTE
For the vehicle to start, one of the vehicle's remote keys must be in the passenger compartment.
Steering wheel lock
The steering wheel lock is deactivated when the remote key is inserted into the ignition slot
1 and activated when the
remote key is removed from the ignition slot.
Always take the remote key or keyless drive remote when leaving the vehicle to help reduce the risk of theft.
1 On vehicles with the optional keyless drive, the steering lock is deactivated when the start button is pressed for the first time (assuming that a
Page 110 of 275
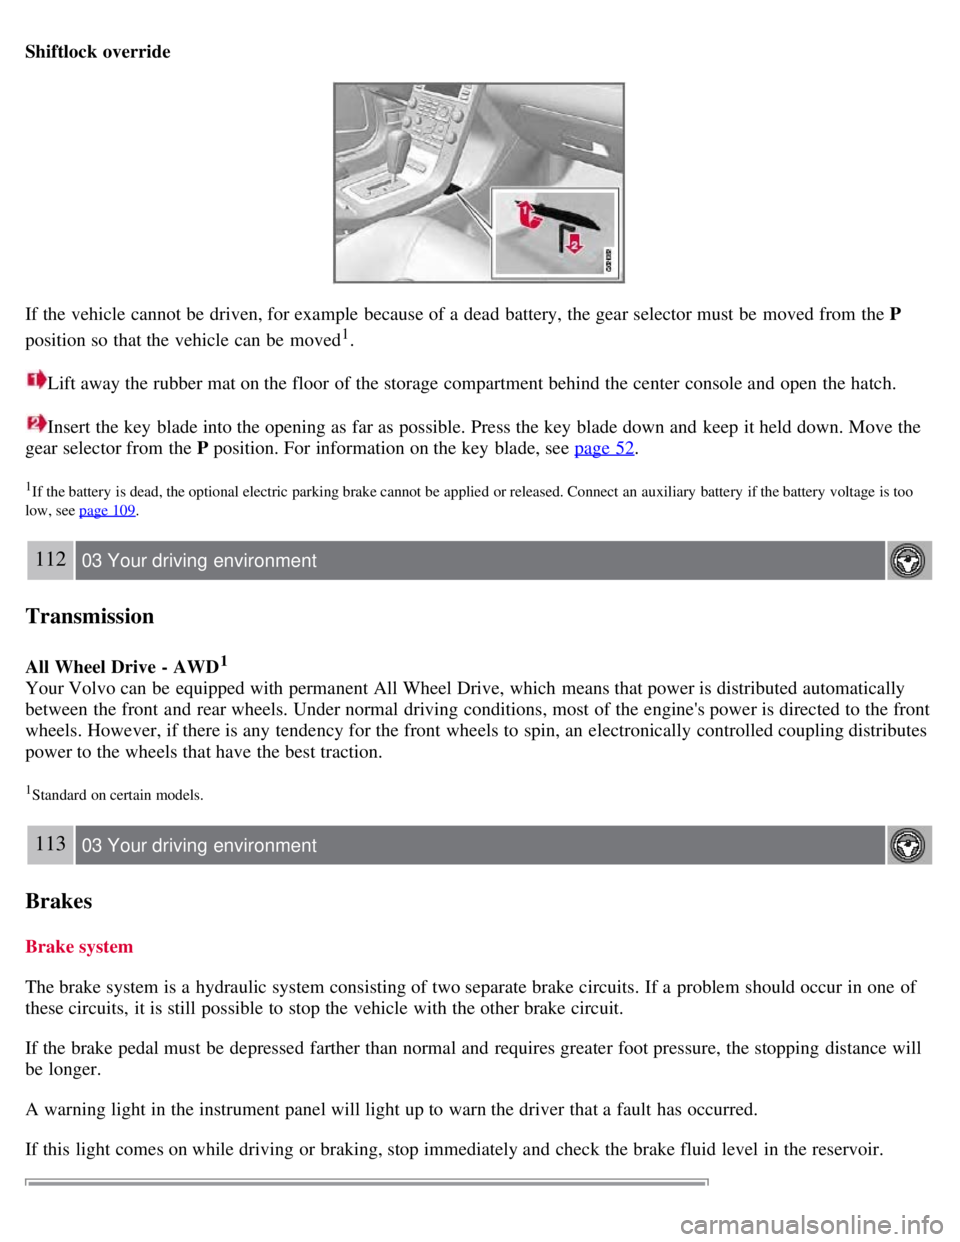
Shiftlock override
If the vehicle cannot be driven, for example because of a dead battery, the gear selector must be moved from the P
position so that the vehicle can be moved
1.
Lift away the rubber mat on the floor of the storage compartment behind the center console and open the hatch.
Insert the key blade into the opening as far as possible. Press the key blade down and keep it held down. Move the
gear selector from the P position. For information on the key blade, see page 52
.
1If the battery is dead, the optional electric parking brake cannot be applied or released. Connect an auxiliary battery if the battery voltage is too
low, see page 109
.
112 03 Your driving environment
Transmission
All Wheel Drive - AWD1
Your Volvo can be equipped with permanent All Wheel Drive, which means that power is distributed automatically
between the front and rear wheels. Under normal driving conditions, most of the engine's power is directed to the front
wheels. However, if there is any tendency for the front wheels to spin, an electronically controlled coupling distributes
power to the wheels that have the best traction.
1Standard on certain models.
113 03 Your driving environment
Brakes
Brake system
The brake system is a hydraulic system consisting of two separate brake circuits. If a problem should occur in one of
these circuits, it is still possible to stop the vehicle with the other brake circuit.
If the brake pedal must be depressed farther than normal and requires greater foot pressure, the stopping distance will
be longer.
A warning light in the instrument panel will light up to warn the driver that a fault has occurred.
If this light comes on while driving or braking, stop immediately and check the brake fluid level in the reservoir.
Page 113 of 275
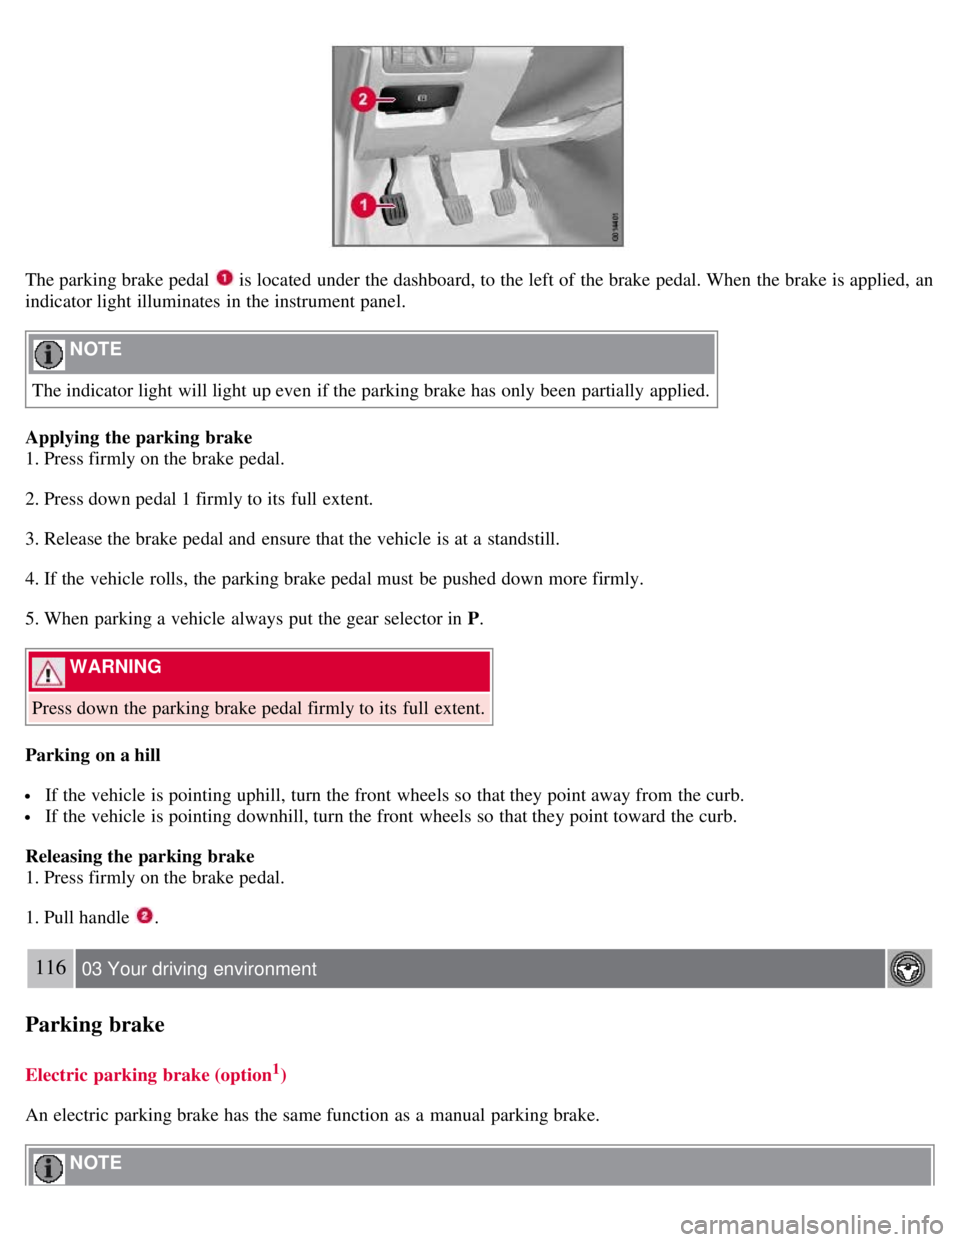
The parking brake pedal is located under the dashboard, to the left of the brake pedal. When the brake is applied, an
indicator light illuminates in the instrument panel.
NOTE
The indicator light will light up even if the parking brake has only been partially applied.
Applying the parking brake
1. Press firmly on the brake pedal.
2. Press down pedal 1 firmly to its full extent.
3. Release the brake pedal and ensure that the vehicle is at a standstill.
4. If the vehicle rolls, the parking brake pedal must be pushed down more firmly.
5. When parking a vehicle always put the gear selector in P .
WARNING
Press down the parking brake pedal firmly to its full extent.
Parking on a hill
If the vehicle is pointing uphill, turn the front wheels so that they point away from the curb.
If the vehicle is pointing downhill, turn the front wheels so that they point toward the curb.
Releasing the parking brake
1. Press firmly on the brake pedal.
1. Pull handle
.
116 03 Your driving environment
Parking brake
Electric parking brake (option1)
An electric parking brake has the same function as a manual parking brake.
NOTE
Page 114 of 275
A faint sound from the parking brake's electric motor can be heard when the parking brake is being applied. This
sound can also be heard during the automatic function check of the parking brake.
The brake pedal will move slightly when the electric parking brake is applied or released.
Low battery voltage
If the battery voltage is too low, the parking brake cannot be applied or released. Connect an auxiliary battery if the
battery voltage is too low, see page 109
.
1The electric parking brake is available as an option on certain models.
Applying the electric parking brake
1. Press firmly on the brake pedal.
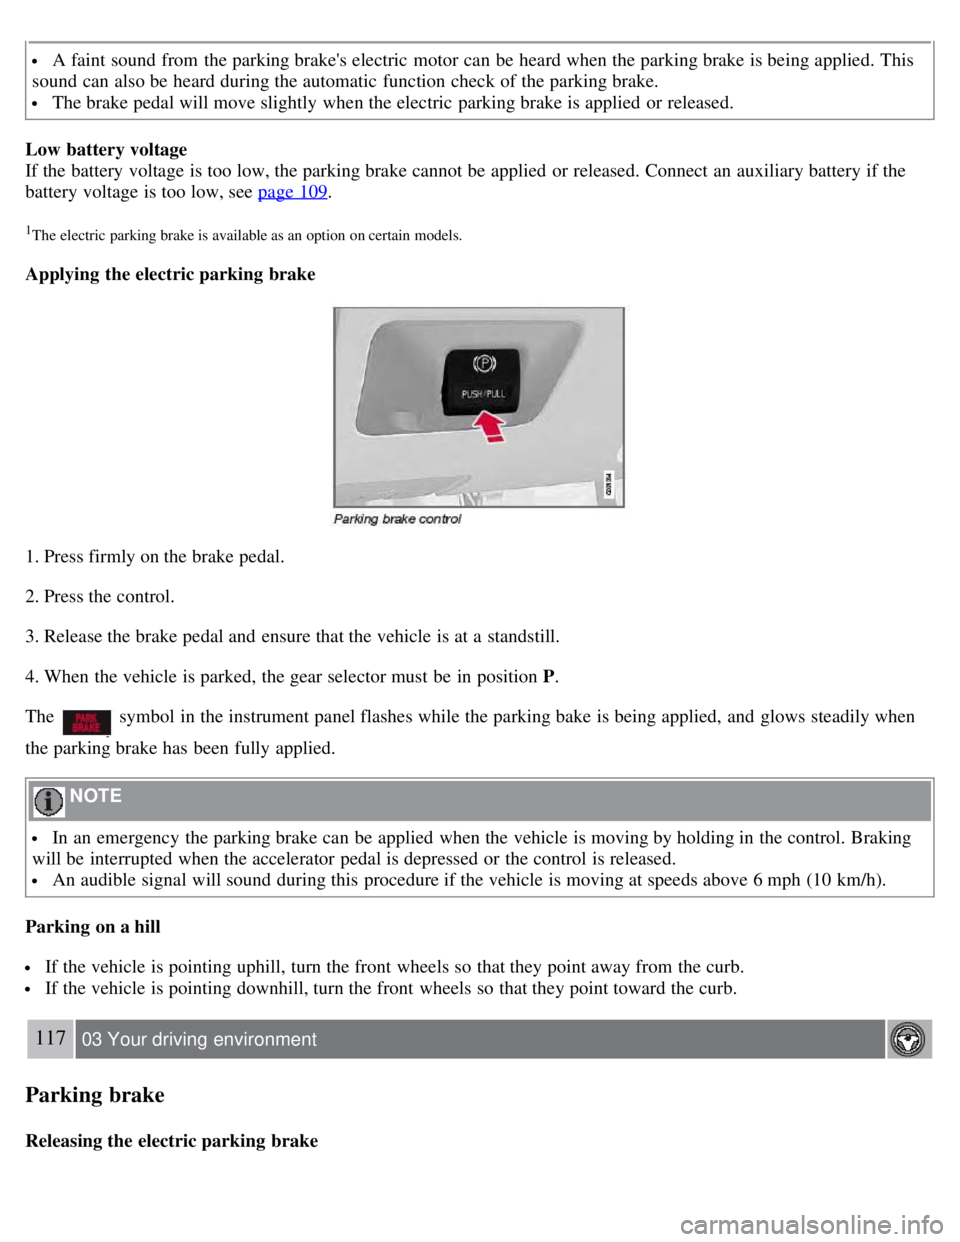
2. Press the control.
3. Release the brake pedal and ensure that the vehicle is at a standstill.
4. When the vehicle is parked, the gear selector must be in position P .
The
symbol in the instrument panel flashes while the parking bake is being applied, and glows steadily when
the parking brake has been fully applied.
NOTE
In an emergency the parking brake can be applied when the vehicle is moving by holding in the control. Braking
will be interrupted when the accelerator pedal is depressed or the control is released.
An audible signal will sound during this procedure if the vehicle is moving at speeds above 6 mph (10 km/h).
Parking on a hill
If the vehicle is pointing uphill, turn the front wheels so that they point away from the curb.
If the vehicle is pointing downhill, turn the front wheels so that they point toward the curb.
117 03 Your driving environment
Parking brake
Releasing the electric parking brake
Page 120 of 275
The navigation button can be used instead of ENTER and EXIT when navigating the menu hierarchy. The right arrow
is equal to ENTER and the left arrow to EXIT .
The menu options are numbered and can also be selected directly with the numerical keypad (1-9 only).
123 04 Comfort and driving pleasure
Menus and messages
Menu overview
Car key memory
Seat & mirror positions
Car settings
Fold mirr. when locking (option on certain markets only)
Collision warning settings (option)
Light settings
Lock settings
Parking camera settings (accessory)
Steering force level (option)
Information
Climate settings
Automatic blower adjust
Recirculation timer
Auto. rear defroster
Reset climate settings
Main menu AM
Audio settings
1
Sound stage
Equalizer, front
Equalizer, rear
Auto. volume control
Resets all audio settings.
Page 123 of 275

126 04 Comfort and driving pleasure
Climate system
Introduction
Air conditioning
The vehicle is equipped with Electronic Climate Control (ECC). The climate control system cools, heats or
dehumidifies the air in the passenger compartment.
NOTE
The air conditioning can be switched off, but to ensure the best possible climate comfort in the passenger
compartment and to prevent the windows from misting, it should always be on.
In warm weather, a small amount of water may accumulate under the car when it has been parked. This water is
condensation from the A/C system and is normal.
Sensor location
The sunlight sensor is located on the top side of the dashboard.
NOTE
The sunlight sensor monitors which side of the car that is most exposed to sunlight. This can mean that the
temperature may differ between the right and left-side air vents, even if the temperatures set for both sides of the
passenger compartment are the same.