2008 VOLKSWAGEN JETTA warning
[x] Cancel search: warningPage 216 of 477

Booklet 3.1 Controls and Equipment
Applies to vehicles: H ighline instrumen t cluster and multi-function steering wheel
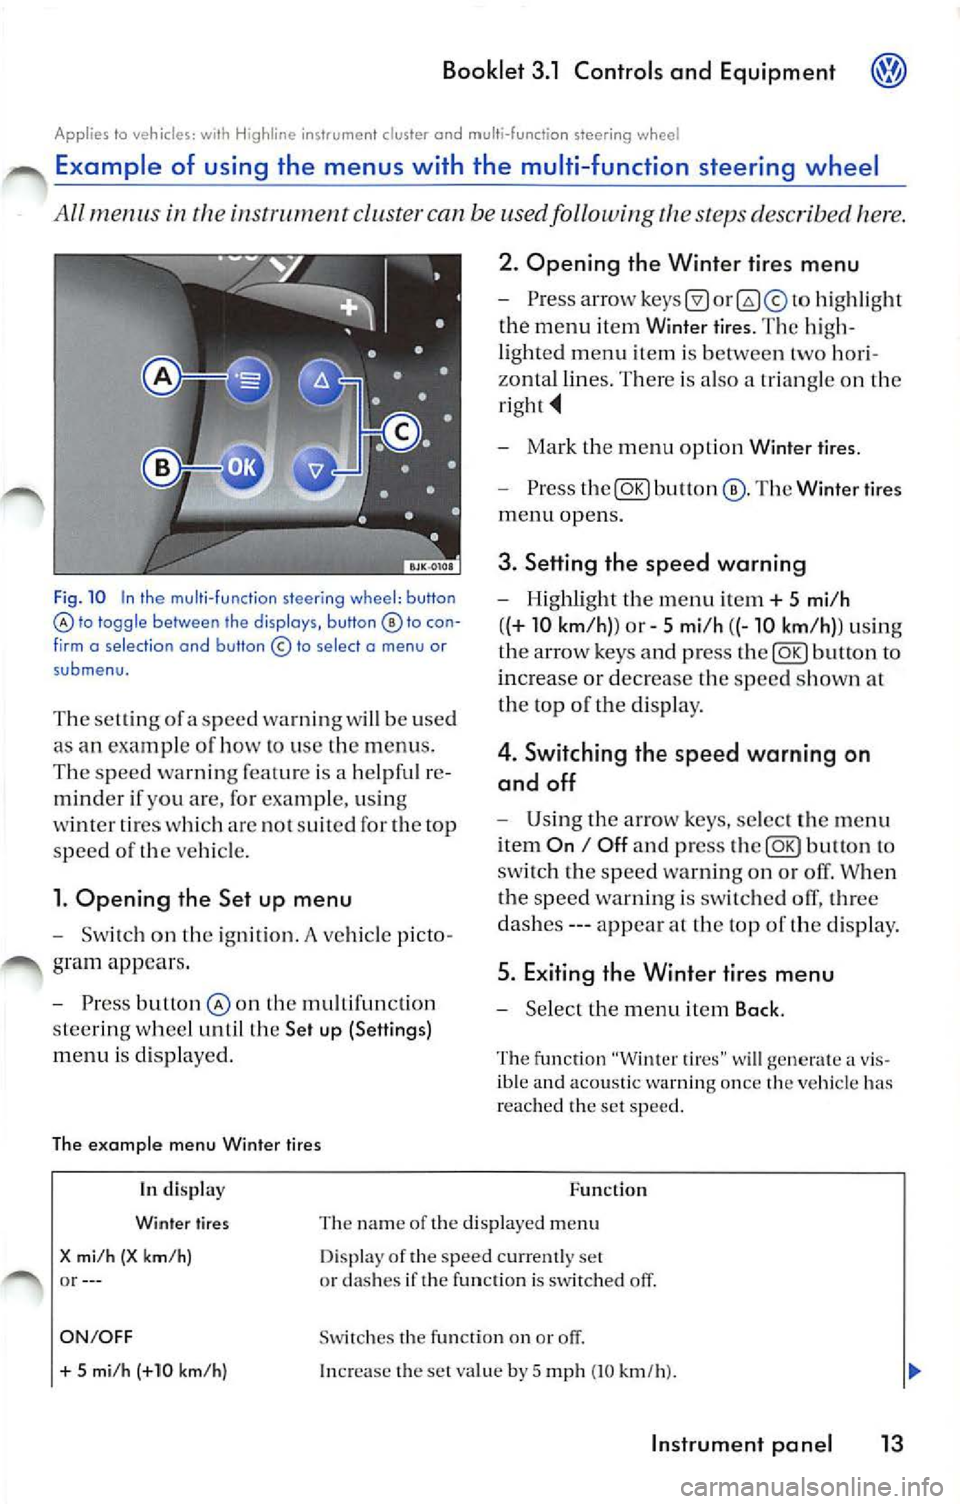
Example of using the menus with the mult i- function steering wheel
All menus in the i nstrwnen t cluster can be used following the steps described here.
Fig . 10 In the multi -fu nction steering wh eel: button lo toggle between the disp lays, button to con
f irm o se lect ion and button © to select o menu or
submenu.
T he se lling of a speed warning w ill be used
as an exam pie of how lo use the menus .
The speed warn ing feat ure is a helpfu l re
minder if you are, for example, usi ng
wi nter ti res whi ch arc no t suit ed for th e top
s p ee d of
ve hicle.
l. Opening the Set up menu
Switch on the ignition. A ve hicle p icto
gram appea rs .
Press butlon the mult ifunct io n
s tee rin g whee l until the Set up (Settings)
menu is disp layed.
The example menu Winter tires 2. Opening the Winter
tires menu
hig hli ght
the menu item Winier tires. The hig h
li ghted menu item is between two hori
zonta l lines. Th ere is also a trian gle on the
Mark the m enu opt ion Wint er tire s.
Press The Winter tires
menu opens.
3. Setting th e speed warning
Highlight th e menu it em+ 5 mi/h
( (+
10 km /h )) or 5 mi /h ((-10 km /h)) usi ng
th e ar row keys and p ress
butto n to
increa se or decrease the speed s how n at
th e top of t he di sp lay.
4 . Switching the speed warning on
and off
U sing th e arrow keys , select th e menu
i tem
On I Off a nd press to
sw itch the sp ee d wa rnin g on o r off. When
t h e s peed warnin g is swi tched olT, three
da she s --- appea r at the top of the disp lay .
5. Exiting the Winter tires menu
Se lect the m enu item Back .
The fu nction "Winter tires" w ill generate a v is
ible and acoustic warn ing once the ve hicl e has
r eac hed th e set speed .
In di splay
Winter tires
X mi /h (X km/ h) or--- Function
Th e na m e of the displaye d m enu
D isp lay of the speed cur ren tly set
or dashes if the function is switched off.
ON/OFF Swi tc h es the fu nction on or
+ 5 mi /h (+10 km/h ) In crease the set va lue by 5 mp h (10 km/h ).
Instrument pan el 13
Page 217 of 477

Booklet 3.1 Controls and Equipment
Function
In di splay
5 mi /h (-10 km/h)
Bock Dec reases t he se t va lue by 5 mph (10 km /h }.
Th e
Winter tires men u is close d and th e las t d is pla yed menu is
o pene d.
Tips
The m en us s ho wn in t he di spl ay dep end s on th e
veh icle elec tronic s an d th e o ption leve l of your
App lies lo ve hicles: wi th H igh line i nstr u ment cluster
ve hi cle. If you a re not s ure, as k yo ur authori zed
Vo lkswage n dea ler for as sis ta nce.
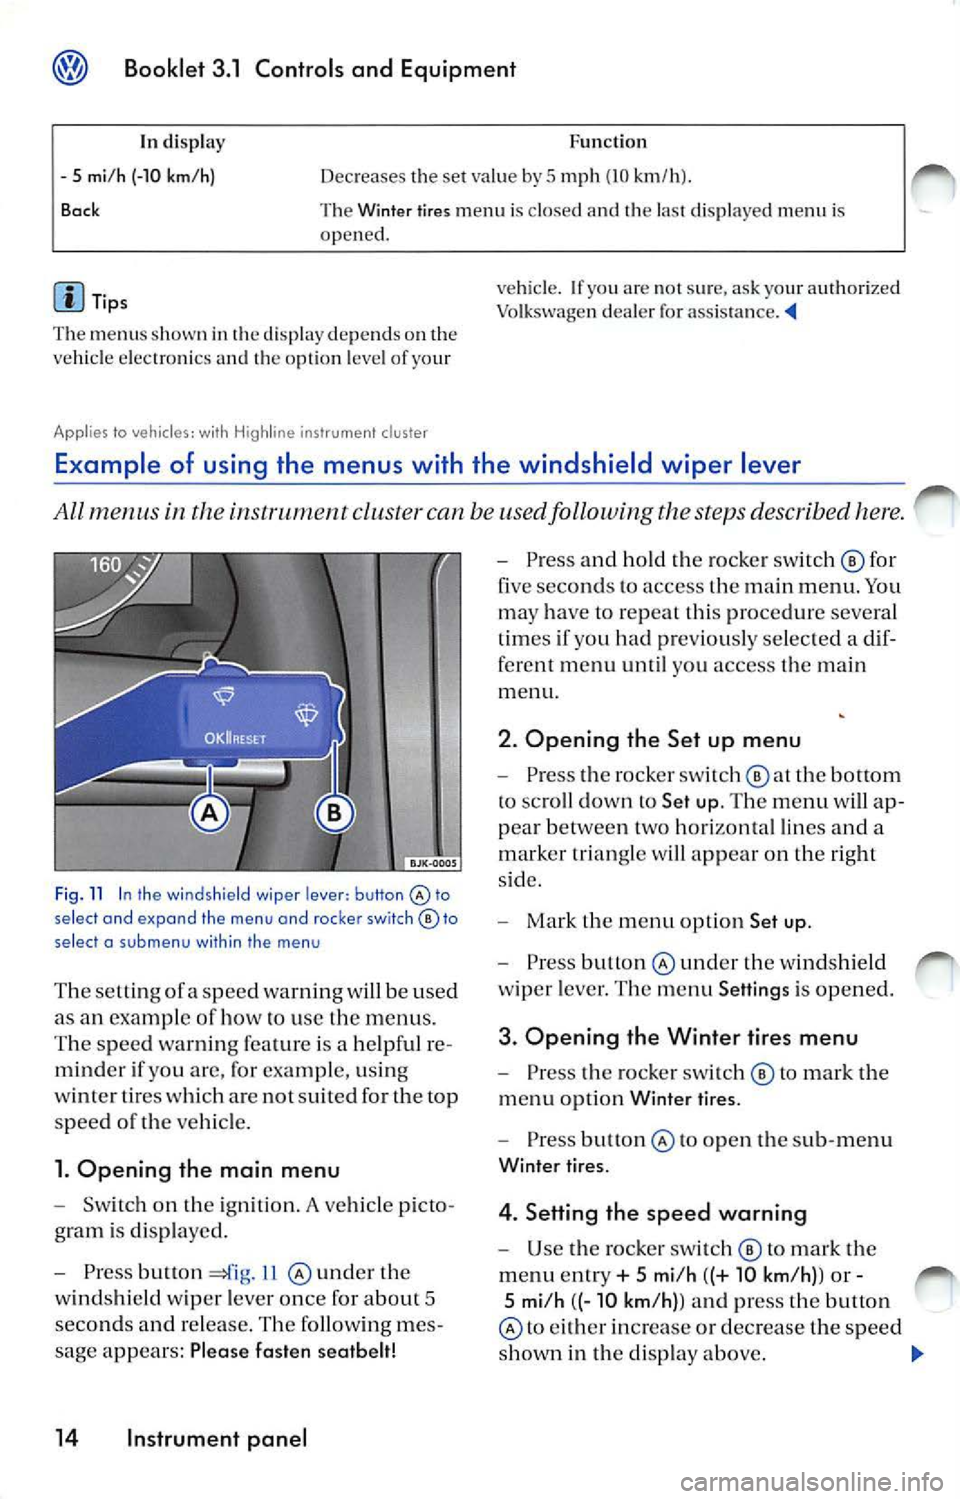
Example of using the menus with the windshield wiper lever
All menus in the cluste r can be used following the steps described here.
Fig . 11 In the wind shield wiper lever: button select and expand the menu and roc ker switch© to
select a su b m enu with in the men u
The se tting ofa sp eed warnin g will be used
as an examp le of how to use the menu s.
T he s pee d wa rnin g fe atu re is a help ful re
mind er if yo u are, for exa mpl e, u sin g
w int er tires w hich are not suit ed for the top
spee d
the ve hicl e.
1. Opening the main menu
Switch on the ig ni tion. A vehicle p icto
g ram is di spl aye d.
Press button 11 und er th e
w in ds hield wiper leve r o nce for abou t 5
seco nds and re lease . The followin g me s
sage appears: Plea se fasten seatbelt!
14 Instrument panel
Press an d hold the ro cke r sw itch © for
five seco nds to access the m ain men u. Yo u
ma y have to repeat this pro cedur e severa l
t im es if you had pr eviously se lec ted a dif
ferent me nu until you access the main
m enu.
2. Opening the Set up menu
Press the rocker switch the bottom
to sc roll dow n to Set up. The menu will ap
p ea r betwee n two hori zon ta l lin es and a
m arker tr ia n gle w ill app ear on the right
s id e.
Mark the m en u opt io n Set up .
Press under the w indshi eld
w ip er leve r. Th e m enu Setting s is opened.
3. Opening the Winter tires menu
Pr ess the ro cke r swi tc h © to m ark the
m enu opti on Wint er ti res.
Pre ss to o pen th e sub-m enu
Winter tir es.
4. Setting the speed warning
U se the ro cker sw itch © to mark the
m enu ent ry + 5 mi/h ((+ 10 km /h) ) or -
5 mi/h ((- 10 km /h) ) a nd press the button
to eith er in crease or de crease the spe ed
s h ow n in th e di sp lay above.
Page 218 of 477

Booklet 3.1 Controls and Equipment
5. Switching th e spee d warning on
and off
U se the ro cker switc h © to select
m enu point ON I OFF an d pr ess th e
bu tton @
sw itc h th e spe ed warnin g ei
on o r off. Thr ee das hes ---app ear al
t h e top of th e di sp lay if th e sp ee d wa rning
is sw itch ed off.
Th e ex amp le menu Winter tires
6. E xiting the Winter t ires menu
Sc roll dow n to Back and pre ss butt on
The function "Wi nter tire s" w ill gen erate a vis
ib le an d aco ustic wa rning on ce the ve hicle has
r eac hed the set sp eed.
In disp lay
Wi nter tires
X mi /h (X km /h )
or --- Func
tio n
Th e name of th e di sp layed men u
D is pl ay of th e s pee d curr entl y se t
o r clas hes if th e function is sw itc h ed off.
ON/ OFF Swit c h es th e fun ctio n on or off.
+ 5 mi/ h (+1 0 km /h )
- 5 mi/h (-10 km /h )
B ock I
n crease the set va lu e by
5 mph (10 km /h ).
Decreases the set va lue by
5 mp h (10 km /h ).
T he W inter tires m en u is cl osed a nd the las t di spl aye d menu i s
ope ned.
d is p la y depe nds o n th e
ve hicl e e lectro nics and th e op tio n leve l o f yo ur
Vehicle status menu
vehicle. If yo u are not sur e, ask your Vo lkswagen dea le r fo r ass is ta nce . ._
Thi s m enu will disp lay warning or information text s.
Op eni ng the Veh icl e status m enu
Se lec t Vehicle statu s men u and press
b u tto n
14 , fig . 11 @ und er th e
w indshie ld wipe r leve r.
O r
Pr ess but ton 13 , fi g. 10 th e
mul ti-func tion stee rin g w hee l
unt il th e
Veh icl e s tatu s menu i s di sp laye d.
Where applicabl e P
ri ori ty
2 warning s and i nformatio n tex ts w ill
d issa pea r from the disp la yed automatica lly af te r
so me time, but the y w ill be s tored in th e Vehi cle
s ta tu s m enu .
I f th ere are no priorit y
I warnin gs, then the pri
or ity 2 wa rnin gs will appear one af ter th e oth er.
If th ere are no prio rit y
I or priority 2 wa rnin gs
p rese nt, OK or N o en try w ill appea r in th e
d is pl ay . ._
Instrument panel 15
Page 223 of 477

® Booklet 3.1 Controls and Equipment
In display Function
-1 Z
one
Ba ck Dec
reases the se t va lue by I
Th e Compass m enu is cl osed and the last displayed menu is ope ned.
Tips
The menu s sho wn in the disp lay dep end s on th e
ve hicl e electro nics and the o ption leve l of your
Warning lights
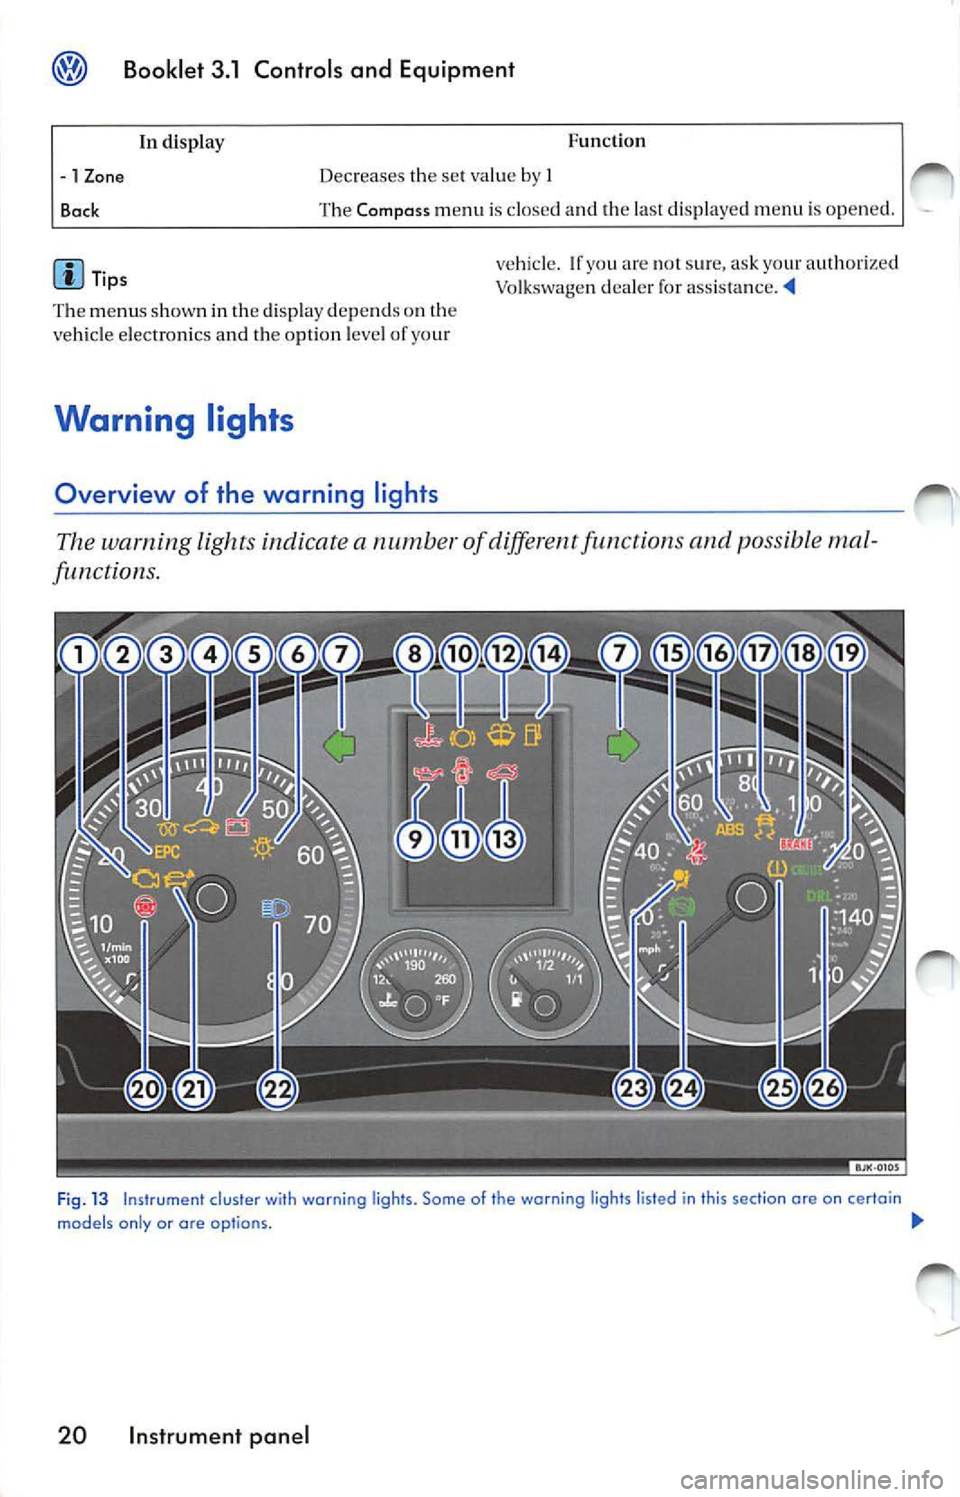
Overview of the warning lights
vehicle. If yo u are no t s ure, ask your authorize d
Vo lkswage n dealer for
The warning light s indicate a numb er of diff ere n t functions and possibl e mal
functions.
Fi g. 13 Instrument cluster wi th warning ligh ts. Some of the warning lights listed in this section ore on certain
models only or are op tio ns. !JI,,
20 Instrument panel
Page 224 of 477

Booklet 3 .1 Control s and Equipm ent @
Sy mbol Meaning or warning lig hts Further
Exhau st sys tem m alrun cti o n
EPC Elec troni c Power Contr ol (gaso line eng in e only)
G low plug sys te m (d iese l e n gin e)
Ill umi nated: Glow p lug sys tem switch ed on
F lashi ng: engine malrun cti on.
Electronic immobilizer
-Genera tor ma lrunc1ion fi::i
bulb
Turn sig nal s
Cool ant te mp erat ure I Coo lant
l evel 1'
I oil pre ssur e
Bra ke pad wear indicator
Doo rs open
washer leve l
Dis play fo r engin e hood or rear lid o pen --
Fu el l ev el too low
Fa ste n sea l be lts! 2.1 , ch ap te r "Sea t
or in anti-lock 27
sys te m
Fla shi ng: ESP or ASR in operation,
ll Ill umi nated: ESP or AS R 1io n or sw itch ed
Parki ng applied or low brake fluid l eve l o r 28 m alrunct ion
· or
Crui se contr ol sys te m sw itch ed on
Powe r stee ring sys te m
In strum ent pan el 2 1
Page 225 of 477

Booklet 3.1 Controls and Equipment
It em Symbol Meaning of warning Lights Fur ther informa tion
. Fue l fi lle r ca p not prop erl y clo sed 29
Hi gh beam 29
Ai rba g or b elt t en sio ner sys te m 2. 1. ch apt er "Mo nitorin g the m alfun cti on o r airb ag disabl ed
vanced airbag system"
Depress pedal 30
Tire press ure m onitorin g syste m 30
(TPMSJ
or
Day time running lights
WARNING
Failur e to heed warn ing l ig ht s and o ther im
por tan t ve hicle informatio n can lead to a
b rea kdow n in
coll is io n an d se rio us
p erso nal injur y.
• Neve r ign ore w arn ing lig ht s and warn ing
t ex ts !
• Whe neve r sta ll ed o r sto pp ed for re pa ir,
move the vehicle a safe dis ta nce ofT the road ,
s top the en gine, and turn on th e emergency
na sher and u se other warn ing device s to
approac hin g
Tip s
• Some warn ing lig hts ar e also displ aye d in th e
instru ment cluster. The pri orit y of malfun ctio ns
i s di spl ayed w ith red and yellow sy mbo ls and
d isp laye d with addition al in for mat ion.
• I f o n e o f th e ligh ts mark ed wit h
comes o n
wh ile yo u are driving , mo ve a safe dista n ce off
th e road. Turn off the en gine , turn the e mer
ge ncy flas her o n and use o ther
devices
t o alert ot her motorists. Go to listed page in yo ur
book let fo r ex planations.
• Some fea tures menti oned are
eq uipment on some models options on
This warning light exh aust system.
W arnin g lig ht
flashe s:
Mi sfiring
damage th e co nverter .
Red uce sp ee d and drive caref ull y to the neares t
au thorized Vo lkswage n dea le rs hip . I lave the e n
g in e c hecke d.
T he follow in g tex t is di spla yed in th e ins trument
clu ster disp lay: Emissions workshop !
22 Instrument pan el
Wa rnin g li g ht i s illumin ated:
A malfun cti on ha s deve loped d urin g driving
w hi ch ha s red uced the qualit y of th e ex haust
e mi ssio n s.
spe ed an d dri ve c arefull y to
th e nearest a uthorized Vo lk swage n deale rs h ip.
H ave the engi ne checke d.
The fo llow ing tex t is displayed i n the instrum ent
cl uste r display: Emissio ns
Page 226 of 477

Booklet 3.1 Control s and Equipm ent @
Applies to vehicles: with gasoline engine
Electronic Power Control (EPC}
This warning light monitors the engine management system on gasoline eng ines.
The warn ing light £ C (Electron ic Power Contr ol)
li ght s up whe n th e ig niti on is switched o n to
show that the light i s work ing prope rly.
It sh ould
go out when the e ngine has s tarted running.
! fa ma lf un ction develo ps in th e engine manage·
m ent sys tem whil e yo u are dr iv ing, thi s warning
Applies to vehicles: with o diesel engine li
ght wi ll light up. Ha ve the e ngin e checked by an
au thori zed Vo lkswage n dea ler or qua lified shop as soo n as po ssible.
Th e followi ng tex t is disp laye d on the
m en t c lu ster: Engine
Glow plug system I Engine malfunction
The indicator l amp lights up to show that the glow plugs are preheating . It flashes
if the re is an engine malfunction.
Warning light
stays lit up
Th e wa rning light lights up whil e th e
plug s are prehea ting. Whe n the warnin g light
goes off, the en gine sh ould be s tarted right away.
The warn ing light do es not light up if th e en ·
gi ne is at opera tin g te mperature . Th e eng ine
ca n be s tart ed imm ediate ly.
There is a fault in the
plu g sys te m if the
wa rnin g ligh t does not li ght up when the en ·
Electronic immobilizer -
gine is cold. Co ntact an au thorized Volkswage n
d ea le r or a qualifi ed workshop.
Warning lig ht
flash es
lfa mal func tion deve lops in th e eng ine manag e
m ent sys te m whil e yo u are drivin g, th e glow plug
light will flas h . The engine sh ou ld be checked
b y an author ize d Volkswagen dea le r or
quali·
fi ed wo rksh op as soo n as possib le .
Th e fo llow ing te xt is di spla yed on the instru·
m ent cluster: Engine
This wa rning light flashes if an unauthoriz ed key is used.
T here is a ch ip in th e key. It a u tomatica lly deac·
ti vat es the imm obilize r when th e key is in se rted
in to th e igniti on lock. T he immobili zer will be
a cti vated again aut oma tica lly as s oo n as you
p ull th e ke y out of the ig nit ion lock.
T his wa rning lig ht will light up for appro xi
m ate ly 3 seconds wh en th e ignit ion is switc hed
on . Thi s warni ng ligh t fl ashes if an un auth orized
k ey is use d . The in format io n text displayed in t
h e in strument clu ste r di spla y is: Imm obilizer
active ! Th e ve hicle cannot b e used in th at case .
The en gin e c an , h oweve r, be sta rt ed i f th e
pria te co ded genu ine Vo lksw age n ke y is used.
Tip s
Th e veh ic le ca nnot be opera te d proper ly if you
d o not h ave
genuine Vo lk swagen
In strum ent panel 23
Page 227 of 477

Booklet 3.1 Controls and Equipment
Generator
This warning light signal s a m alfun ction in ge nerator.
Th e w arni ng lig ht lig ht s up when th e ig niti on
i s sw itch ed on . It sh ould go o ut when th e e ngin e
s tart s runnin g.
If th e w arnin g ligh t
lights up while driv ing .
t h e ge nera to r i s no lo nge r ch a rgi ng th e ba ucry.
Burned-out light bulb
Yo u sh ou ld imm ed ia tely drive 1 0 q u al ifie d d eale rs hip .
I l owever, you sh o uld avoid usin g elec tr ic a l
is no t ab so lut ely necessa ry be
cau se w ill d rain th e ba ttery furth er.
The warning light lights a bul b exte rior li ghtin g is
T he w arnin g lig ht light s up when a bulb i n vehicl e's exte ri or light in g is no t
Turn
Th e warnin g light fla sh es w hen sig nal s ar e bein g use d.
Depen ding on w hich tu rn signa l is opera ted, ei
th er th e lef t or in dicato r la mp fl ashes.
Bo th indi cato r light s w ill flas h at th e sam e tim e the em erge ncy wa rnin g light s are
sw itch ed on.
I f one tu rn sig nal fa ils, th e in dica to r l amp will
s tart flas hin g tw ice as
Engine coolant level I temperatu re
Th e warning symbo l li ght s if th e coolant is too high or if
coolant l eve l is too low .
There is a fault if:
• The wa rning symbol do es not go out again a few seco nds.
• Th e warning symb ol li g ht s up or fl ashes
w hil e th e ve hicle is m ov in g. Thr ee wa rnings
Thi s m ean s that eith er th e coo la nt leve l is too
l ow or coolant t emp eratur e is hi gh .
C oo lant level too low
The followin g information tex t is di spla yed: STOP Check coolant Owner's manual! 3.2 "Tip s and Advice" , c h apt er
"C oolant "
24 Instrument panel
Fir st l ook at th e coo la nt te mp eratur e gauge. If
t h e nee dle is in th e no rmal ran ge, top ofTw ith
coo lant at
ea rliest
Coo lant temperature too high
The fo llow ing in form atio n t ext is di spla yed: ST OP Check coolant Owner's manual!.
lo ok a t the coo la nt gau ge. The is 1 00 high if the need le is
over 10 th e far ri ght on th e di al. Stop the veh icle, olT the engi ne and wait for it to cool
down. Chec k th e coo lant level.
I f
coo la nt leve l is corr ect, th e ove rheat ing
m ay be cau sed b y fa n C hec k th e
r a diat or fa n fuse and have re pla ced if neces
s a ry 3 .2 'Tip s and /\dvi ce", c h apt er
" Fu ses".