Page 424 of 621
414
2008 TUNDRA from Apr. ’08 Prod. (OM 34477U)
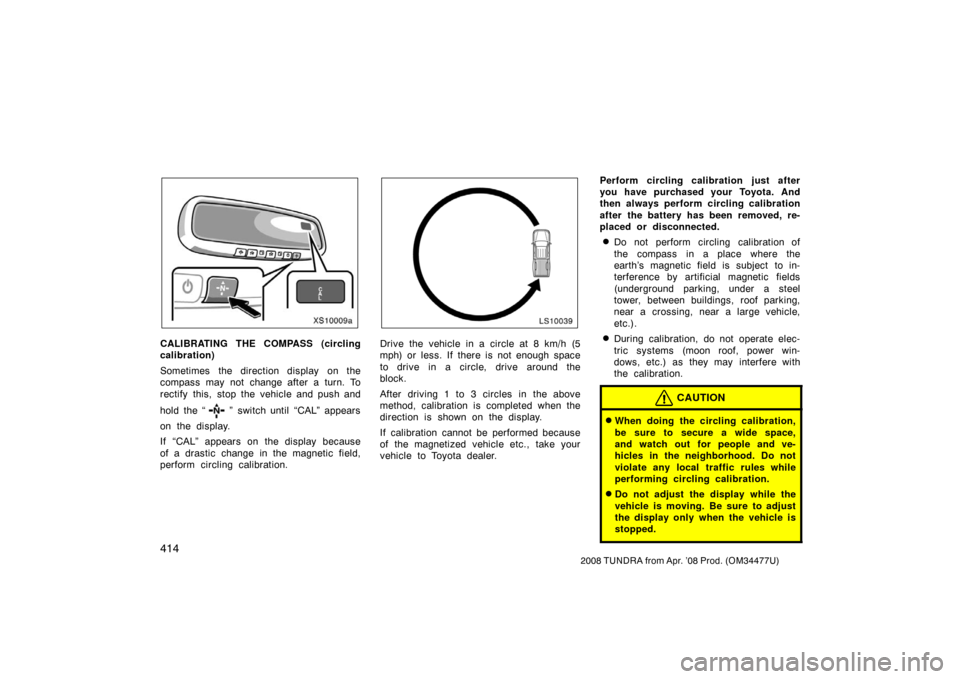
XS10009a
CALIBRATING THE COMPASS (circling
calibration)
Sometimes the direction display on the
compass may not change after a turn. To
rectify this, stop the vehicle and push and
hold the “
” switch until “CAL” appears
on the display.
If “CAL” appears on the display because
of a drastic change in the magnetic field,
perform circling calibration.
LS10039
Drive the vehicle in a circle at 8 km/h (5
mph) or less. If there is not enough space
to drive in a circle, drive around the
block.
After driving 1 to 3 circles in the above
method, calibration is completed when the
direction is shown on the display.
If calibration cannot be performed because
of the magnetized vehicle etc., take your
vehicle to Toyota dealer. Perform circling calibration just after
you have purchased your Toyota. And
then always perform circling calibration
after the battery has been removed, re-
placed or disconnected.
�Do not perform circling calibration of
the compass in a place where the
earth’s magnetic field is subject to in-
terference by artificial magnetic fields
(underground parking, under a steel
tower, between buildings, roof parking,
near a crossing, near a large vehicle,
etc.).
�During calibration, do not operate elec-
tric systems (moon roof, power win-
dows, etc.) as they may interfere with
the calibration.
CAUTION
�When doing the circling calibration,
be sure to secure a wide space,
and watch out for people and ve-
hicles in the neighborhood. Do not
violate any local traffic rules while
performing circling calibration.
�Do not adjust the display while the
vehicle is moving. Be sure to adjust
the display only when the vehicle is
stopped.
Page 425 of 621
415
2008 TUNDRA from Apr. ’08 Prod. (OM 34477U)
XS10076a
Type A (separate seats)
XS10016
Type B (bench seats)
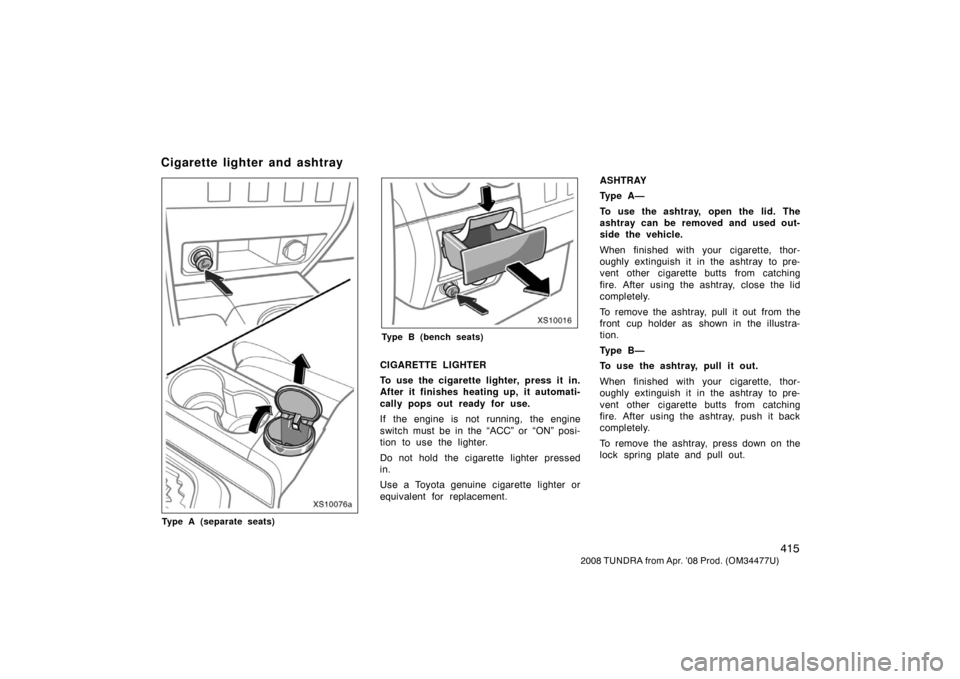
CIGARETTE LIGHTER
To use the cigarette lighter, press it in.
After it finishes heating up, it automati-
cally pops out ready for use.
If the engine is not running, the engine
switch must be in the “ACC” or “ON” posi-
tion to use the lighter.
Do not hold the cigarette lighter pressed
in.
Use a Toyota genuine cigarette lighter or
equivalent for replacement. ASHTRAY
Ty p e A —
To use the ashtray, open the lid. The
ashtray can be removed and used out-
side the vehicle.
When finished with your cigarette, thor-
oughly extinguish it in the ashtray to pre-
vent other cigarette butts from catching
fire. After using the ashtray, close the lid
completely.
To remove the ashtray, pull it out from the
front cup holder as shown in the illustra-
tion.
Ty p e B —
To use the ashtray, pull it out.
When finished with your cigarette, thor-
oughly extinguish it in the ashtray to pre-
vent other cigarette butts from catching
fire. After using the ashtray, push it back
completely.
To remove the ashtray, press down on the
lock spring plate and pull out.
Cigarette lighter and ashtray
Page 431 of 621
421
2008 TUNDRA from Apr. ’08 Prod. (OM 34477U)
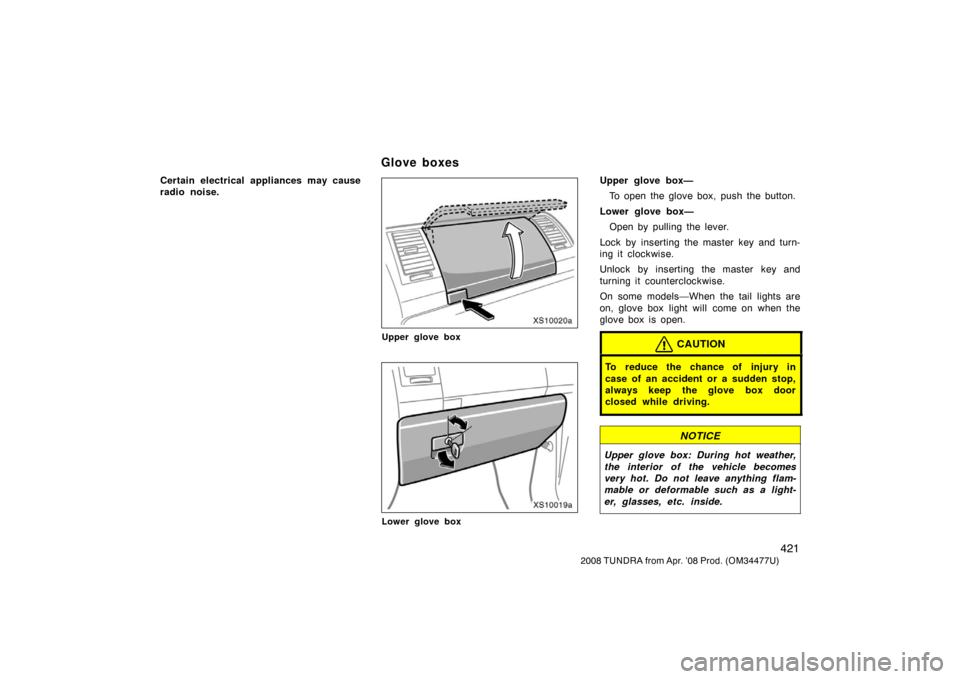
Certain electrical appliances may cause
radio noise.
XS10020a
Upper glove box
XS10019a
Lower glove box
Upper glove box—
To open the glove box, push the button.
Lower glove box— Open by pulling the lever.
Lock by inserting the master key and turn-
ing it clockwise.
Unlock by inserting the master key and
turning it counterclockwise.
On some models—When the tail lights are
on, glove box light will come on when the
glove box is open.
CAUTION
To reduce the chance of injury in
case of an accident or a sudden stop,
always keep the glove box door
closed while driving.
NOTICE
Upper glove box: During hot weather,
the interior of the vehicle becomes
very hot. Do not leave anything flam-
mable or deformable such as a light-
er, glasses, etc. inside.
Glove boxes
Page 432 of 621
422
2008 TUNDRA from Apr. ’08 Prod. (OM 34477U)
Garage door opener
XS10011
Indicator light
Buttons
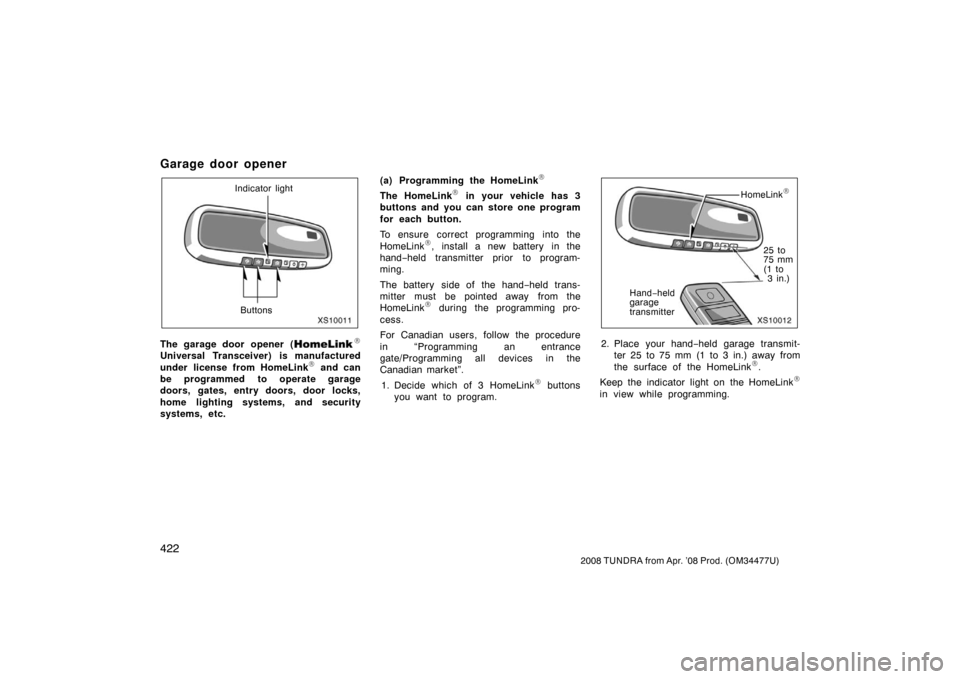
The garage door opener (\b
Universal Transceiver) is manufactured
under license from HomeLink\b and can
be programmed to operate garage
doors, gates, entry doors, door locks,
home lighting systems, and security
systems, etc. (a) Programming the HomeLink
\b
The HomeLink\b in your vehicle has 3
buttons and you can store one program
for each button.
To ensure correct programming into the
HomeLink
\b, install a new battery in the
hand− held transmitter prior to program-
ming.
The battery side of the hand −held trans-
mitter must be pointed away from the
HomeLink
\b during the programming pro-
cess.
For Canadian users, follow the procedure
in “Programming an entrance
gate/Programming all devices in the
Canadian market”.
1. Decide which of 3 HomeLink
\b buttons
you want to program.
XS10012
HomeLink\b
25 to
75 mm
(1 to 3 in.)
Hand −held
garage
transmitter
2. Place your hand −held garage transmit-
ter 25 to 75 mm (1 to 3 in.) away from
the surface of the HomeLink
\b.
Keep the indicator light on the HomeLink
\b
in view while programming.
Page 434 of 621
424
2008 TUNDRA from Apr. ’08 Prod. (OM 34477U)
The ceiling mounted garage door opener
motor should now recognize the
HomeLink
\b unit and be able activate the
garage door up/down.
4. Repeat steps 1 through 3 for each re- maining HomeLink
\b button to program
another rolling code system.
Programming an entrance gate/Program-
ming all devices in the Canadian market 1. Decide which of the 3 HomeLink
\b but-
tons you want to program.
2. Place your hand− held gate/device
transmitter 25 to 75 mm (1 to 3 in.)
away from the surface of the
HomeLink
\b.
Keep the indicator light on the HomeLink
\b
in view while programming. 3. Press and hold the selected HomeLink
\b button.
4. Continuously press and release ( cycle)
the hand− held gate/device transmitter
button every two seconds until step 5
is complete.
5. When the indicator light on the Home- Link
\b changes from a slow to a rapid
flash after 20 seconds, you can release
both buttons. 6. Test the operation of the HomeLink
\b by
pressing the newly programmed button.
Check to see if the gate/device oper-
ates correctly.
7. Repeat steps 1 through 6 for each re- maining HomeLink
\b button to program
another device.
Programming other devices
To program other devices such as home
security systems, home door locks or
lighting, contact your authorized Toyota
dealer for assistance.
Reprogramming a button
Individual HomeLink
\b buttons cannot be
erased. However, to reprogram a single
button, follow the procedure “Programming
the HomeLink
\b”.
(b) Operating the HomeLink
\b
To operate the HomeLink\b, press the
appropriate HomeLink\b button to activate
the programmed device. The HomeLink\b
indicator light should come on. The
HomeLink\b continues to send the signal
for up to 20 seconds as long as the
button is pressed.
XS10015
(c) Erasing the entire HomeLink\b
memory (all three programs)
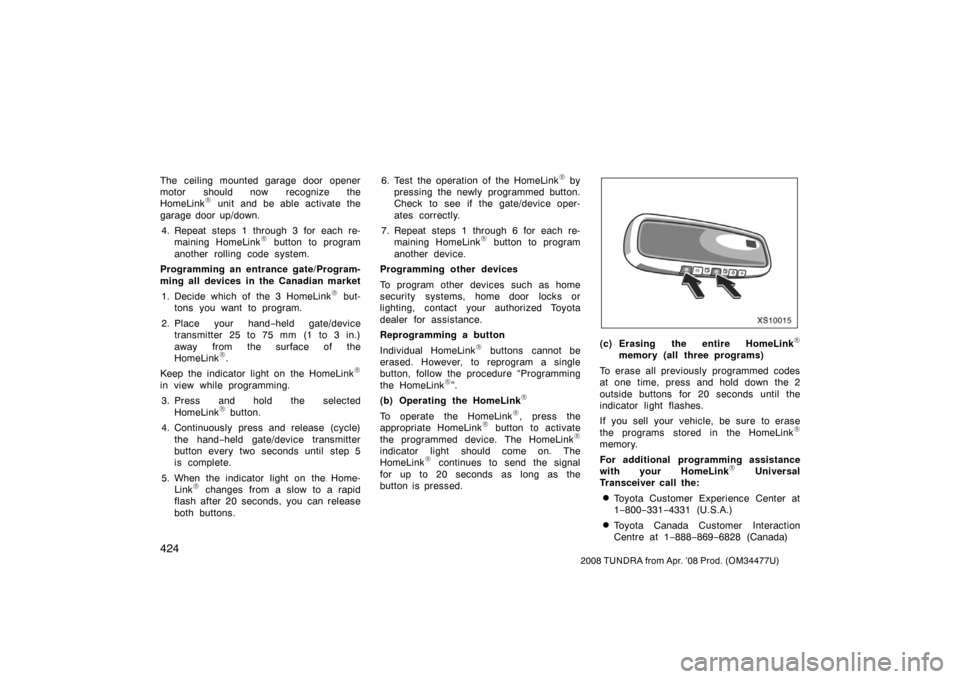
To erase all previously programmed codes
at one time, press and hold down the 2
outside buttons for 20 seconds until the
indicator light flashes.
If you sell your vehicle, be sure to erase
the programs stored in the HomeLink
\b
memory.
For additional programming assistance
with your HomeLink
\b Universal
Transceiver call the:
�Toyota Customer Experience Center at
1 −800− 331−4331 (U.S.A.)
�Toyota Canada Customer Interaction
Centre at 1 −888− 869−6828 (Canada)
Page 441 of 621
431
2008 TUNDRA from Apr. ’08 Prod. (OM 34477U)
Tissue pocket
XS10045
Type A (back of the front center seatback)
XS10046
Type B (center console box)
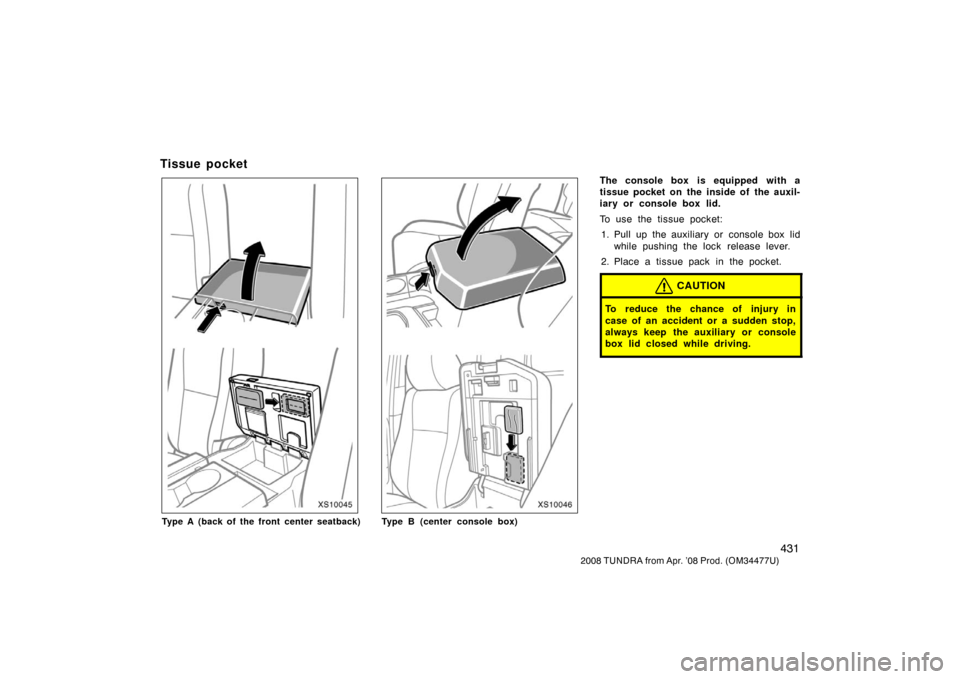
The console box is equipped with a
tissue pocket on the inside of the auxil-
iary or console box lid.
To use the tissue pocket:
1. Pull up the auxiliary or console box lid while pushing the lock release lever.
2. Place a tissue pack in the pocket.
CAUTION
To reduce the chance of injury in
case of an accident or a sudden stop,
always keep the auxiliary or console
box lid closed while driving.
Page 442 of 621
432
2008 TUNDRA from Apr. ’08 Prod. (OM 34477U)
Center console box
XS10075Inside—
Outside—
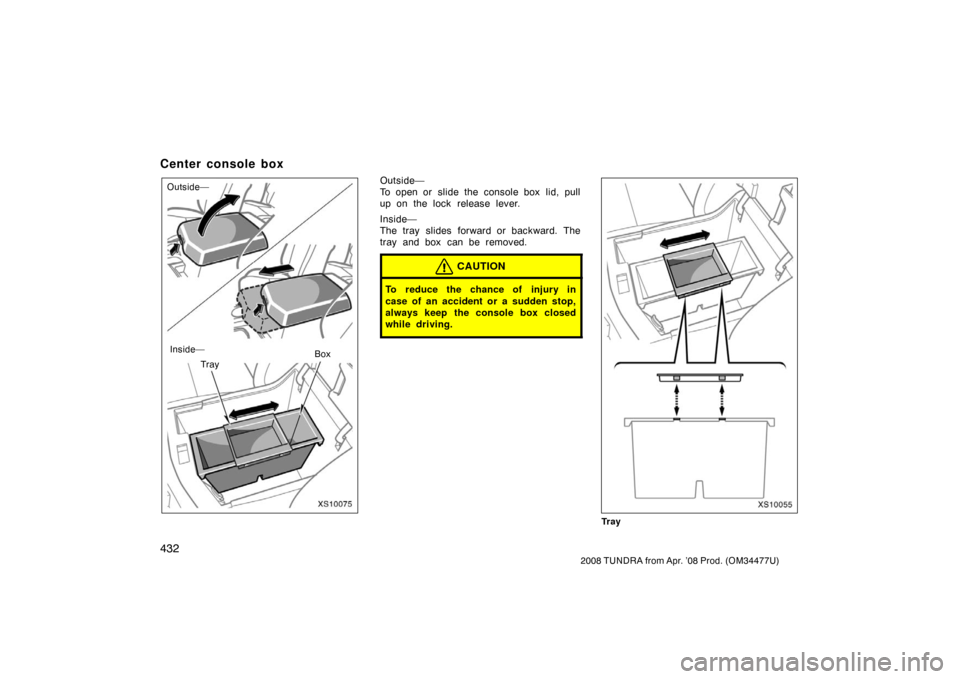
Tray BoxOutside—
To open or slide the console box lid, pull
up on the lock release lever.
Inside—
The tray slides forward or backward. The
tray and box can be removed.
CAUTION
To reduce the chance of injury in
case of an accident or a sudden stop,
always keep the console box closed
while driving.
XS10055
Tr a y
Page 446 of 621
436
2008 TUNDRA from Apr. ’08 Prod. (OM 34477U)
The bottle holders are designed to hold
bottles securely.
Type A only—
The adapter for bottle holder is detach-
able. Replace it in its original position
when using the bottle holder. Otherwise
the drinks will not be held securely.
CAUTION
Do not attempt to use the holder for
any other purpose for which it was
intended. Inappropriately sized or
shaped objects may be thrown about
in the compartment and possibly in-
jure people in the vehicle during a
sudden braking or an accident.
NOTICE
Do not put a cup or open bottle in
the bottle holder because the con-
tents may spill when the door opens
or closes.
XS10071a
Before using the box, lift up the rear
seats. (For detailed information, see
“—Raising rear seat cushion (Double
cab models)” on page 61 in Section
13.)
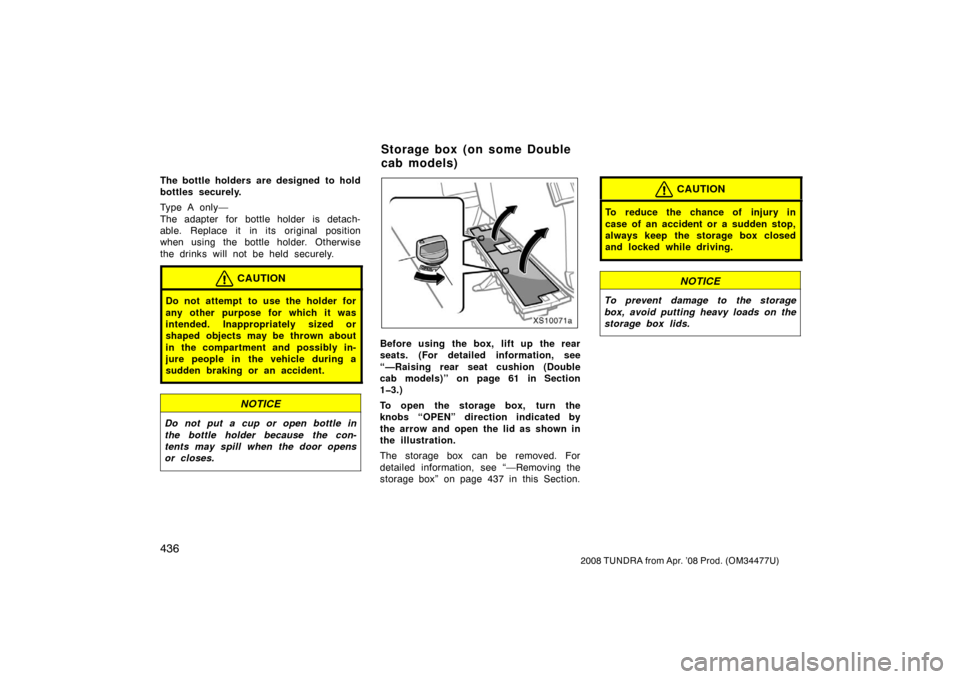
To open the storage box, turn the
knobs “OPEN” direction indicated by
the arrow and open the lid as shown in
the illustration.
The storage box can be removed. For
detailed information, see “—Removing the
storage box” on page 437 in this Section.
CAUTION
To reduce the chance of injury in
case of an accident or a sudden stop,
always keep the storage box closed
and locked while driving.
NOTICE
To prevent damage to the storage
box, avoid putting heavy loads on the
storage box lids.
Storage box (on some Double
cab models)