Page 221 of 400
224
3−2. Using the audio system
Using the steering wheel audio switches (if equipped)
Turning on the power
Press when the audio system is turned OFF.
The audio system can be turned off by holding the switch down until the
system turns off.
Changing the audio source
Press when the audio system is turned ON. The audio source
changes as follows each time is pressed.
CD player without changer:
FM1 FM2 CD AUX AM
CD player with changer:
FM1 FM2 CD changer AUX AM SAT1 SAT2SAT3
Adjusting the volume
Press “+” on to increase the volume and “–” to decrease the
volume.
Press and hold “+” or “–” on to continue increasing or decreasing
the volume. Some audio features can be contro lled using the switches on the
steering wheel.
Vo l u m e
Radio: Select radio stations
CD: Select tracks, files
(MP3 and WMA) and discs
Power on, select audio
source
Page 261 of 400
265
4−2. Maintenance
4
Maintenance and care
General maintenance
Engine compartment
Items Check points
Battery Maintenance−free. ( P. 283)
Brake fluid At the correct level? ( P. 280)
Engine coolant At the correct level? ( P. 279)
Engine oil At the correct level? ( P. 275)
Exhaust system No fumes or strange sounds?
Power steering fluid At the correct level? (
P. 282)
Radiator/condenser/hosesNot blocked with foreign matter?
(
P. 280)
Washer fluid At the correct level? (
P. 286)
Listed below are the general maintenance items that should be per�
formed at the intervals specified
in the “Scheduled Maintenance
Guide” or “Owner ’s Manual Supp lement”. It is recommended that
any problem you notice should be brought to the attention of your
Toyota dealer or qualifie
d service shop for advice.
Page 266 of 400
270 4−3. Do−it−yourself maintenance
Items Parts and tools
Light bulbs ( P. 314)�Bulb with same number and watt−
age rating as original
�Phillips−head screwdriver
Power steering fluid level
( P. 282)�Automatic transmission fluid
DEXRON
® II or III
�Rag or paper towel
�Funnel (used only for adding
power steering fluid)
Radiator and condenser
( P. 280)
Tire inflation pressure ( P. 292)�Tire pressure gauge
�Compressed air source
Washer fluid ( P. 286)�Water
�Washer fluid containing antifreeze
(for winter use)
�Funnel (used only for adding
washer fluid)
Page 270 of 400
274
4−3. Do−it−yourself maintenance
Engine compar tment
Washer fluid tank (P. 286)
Power steering fluid reservoir
(P. 282)
Radiator cap
Engine oil level dipstick
(P. 275)
Engine coolant reservoir
(
P. 279)Engine oil filler cap
(P. 275)
Brake fluid reservoir
(P. 280)
Fuse box (
P. 303)
Battery (
P. 283)
Condenser ( P. 280)
Radiator (P. 280)
5214
910
6873
Page 278 of 400
282 4−3. Do−it−yourself maintenance
Power steering fluid
� Fluid level
The fluid level should be within the appropriate range.
Full (when cold)
Add fluid (when cold)
Full (when hot)
Add fluid (when hot)
Hot: Vehicle has been driven around 50 mph (80 km/h) for 20
minutes, or slightly longer in frigid temperatures. (Fluid
temperature, 140°F − 175°F [60°C − 80°C])
Cold: Engine has not been run for about 5 hours. (Room tem−
perature, 50°F − 85°F[10°C − 30°C])
�
Checking the fluid level
Make sure to check the fluid type and prepare the necessary items.
Clean all dirt off the reservoir.
Remove the cap by turn
ing it counterclockwise.
Wipe the dipstick clean.
Reinstall and remove the reservoir cap again.
Check the fluid level.
Fluid type Automatic transmission fluid DEXRON® II or III
Items Rag or paper towel and funnel (only for adding fluid)
Page 279 of 400
283
4−3. Do−it−yourself maintenance
4
Maintenance and care
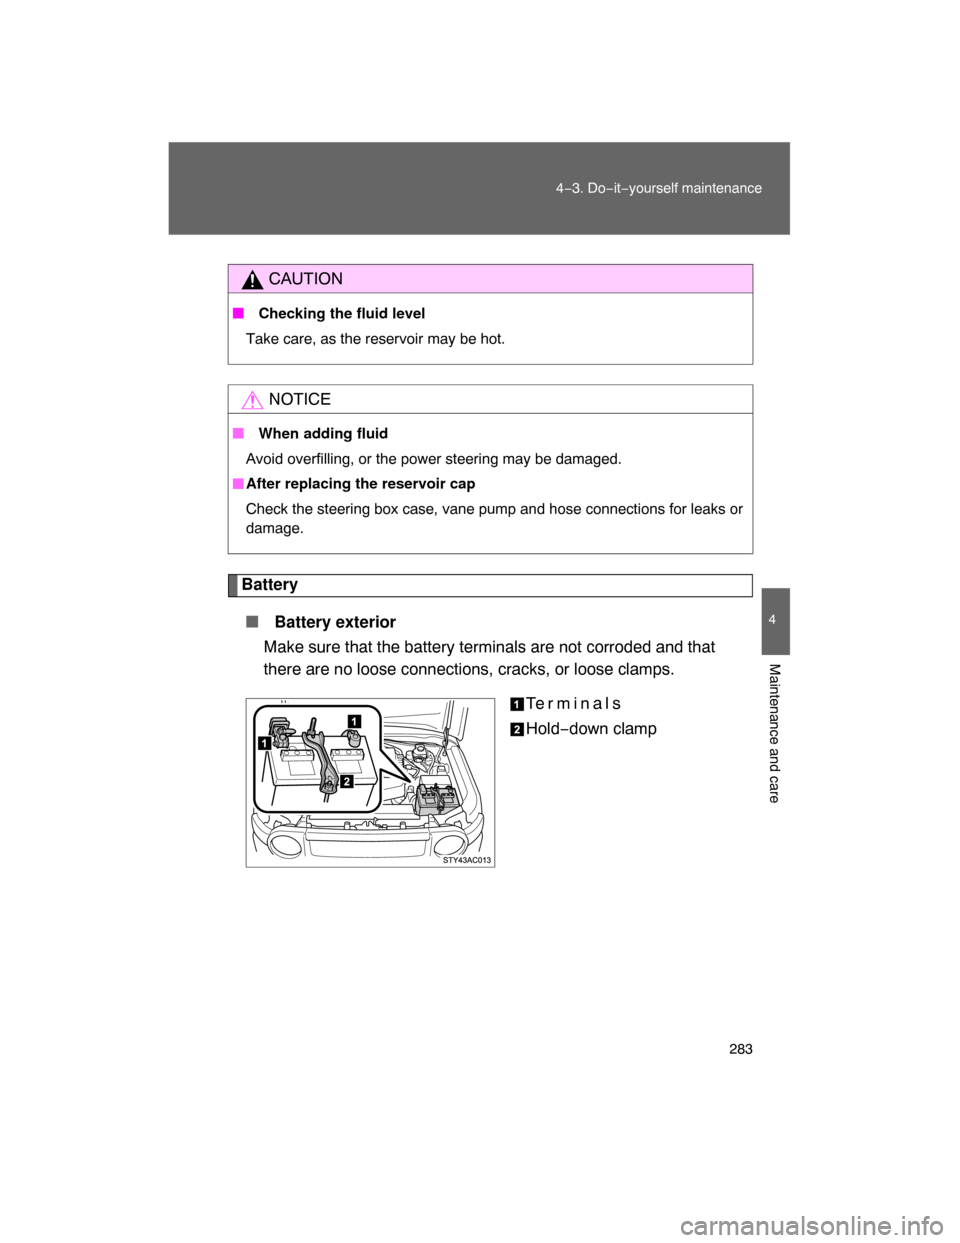
Battery
� Battery exterior
Make sure that the battery terminals are not corroded and that
there are no loose connections,
cracks, or loose clamps.
Terminals
Hold−down clamp
CAUTION
� Checking the fluid level
Take care, as the reservoir may be hot.
NOTICE
� When adding fluid
Avoid overfilling, or the power steering may be damaged.
�After replacing the reservoir cap
Check the steering box case, vane pump and hose connections for leaks or
damage.
Page 318 of 400
 or the ON
(engine running) position.
4WD models with an automatic")
5
When trouble arises
323 5−1. Essential information
� Emergency towing procedure
The engine switch must be in the ACC (engine off) or the ON
(engine running) position.
4WD models with an automatic transmission: Shift the front−wheel
drive control lever in H2.
4WD models with a manual transmission: Unlock the center differ−
ential.
Put the shift lever in N.
Release the parking brake.
CAUTION
� Caution while towing
� Use extreme caution when towing the vehicle.
Avoid sudden starts or erratic driving maneuvers which place excessive
stress on the emergency towing eyelet and the cables or chains.
� If the engine is not running, the power assist for the brakes and steering
will not function, making steering and braking more difficult.
NOTICE
� To prevent causing serious damage to the transmission
(vehicles with an automatic transmission)
Never tow this vehicle from the rear with the four wheels on the ground.
This may cause serious damage to the transmission.
�Emergency towing eyelet precautions
�Before emergency towing, check that the eyelet is not broken or damaged.
�Fasten the towing cable or chain securely to the eyelet.
�Do not jerk the eyelet. Apply steady and even force.
�
To avoid damaging the eyelet, do not pull from the side or at a vertical
angle. Always pull straight ahead.
Page 363 of 400
369
6−1. Specifications
6
Vehicle specifications
Brakes
*1: Minimum pedal clearance when depressed with a force of 110 lbf (490 N,
50 kgf) with the engine running.
*2: Parking brake lever travel when pulled with a force of 44.1 lbf (196 N, 20.0
kgf).
Chassis lubrication
Steering
Pedal clearance*12.1 in. (54 mm) Min.
Pedal free play 0.04 0.24 in. (1
6 mm)
Brake pad wear limit
0.04 in. (1.0 mm)
Parking brake lining wear limit 0.04 in. (1.0 mm)
Parking brake lever travel
*25 — 7 clicks
Fluid type FMVSS No. 116 DOT 3 or SAE J1703
Propeller shafts Spider
Slide yokeLithium base chassis grease, NLGI No.2
Molybdenum — disulfide lithium base
chassis grease, NLGI No.2 or lithium
base multipurpose grease, NLGI No.2
Free play
Less than 1.2 in. (30 mm)
Power steering fluid typeAutomatic transmission fluid DEXRON
®II or
III

Turning on the power
Press when the audio system is turned OFF.
The audio system can be turned off by holding")

Brake fluid At the correct level? ( P. 280)
Engine coola")


Power steering fluid reservoir
(P. 282)
Radiator cap
Engine oil level dipstick
(P. 275)
Engine coolant reservoi")

 with the engine running.
*2: Parking brake lever travel whe")