Page 93 of 230

ADVANCED FUNCTIONS
11 3 �
Voice guidance in all modes
When the “Voice Guidance in All Modes”
feature is turned on, the voice guidance in
all modes can be heard.
When the “Voice Guidance in All Modes”
feature is turned off, voice guidance can-
not be heard when using the audio system.
To turn the “Voice Guidance in All Modes”
on:
1. Push the “MENU” button.
2. Touch “Setup” on the “Menu”
screen.
Then touch
to display page 2 of the
“Setup” screen.
3. Touch “ON” of “Voice Guidance in
All Modes”.
The selected button is highlighted.
4. Touch “OK”.
�Auto voice guidance
When the “Auto Voice Guidance” feature is
turned on, the voice guidance can be
heard automatically.
When the “Auto Voice Guidance” feature is
turned off, the voice guidance can be
heard only if the “MAP/VOICE” button is
pushed.
To turn the “Auto Voice Guidance” mode
on:
1. Push the “MENU” button.
2. Touch “Setup” on the “Menu”
screen.
Then touch
twice to display page 3 of
the “Setup” screen.
3. Touch “ON” of “Auto Voice Guid-
ance”.
The selected button is highlighted.
4. Touch “OK”.
Page 108 of 230

OTHER FUNCTIONS
128
�Microphone
You can use the microphone above
when talking on the phone.
The other party’s voice outputs from the
driver’s speaker. When the received calls
or received voice outputs, the audio from
the audio system or voice guidance from
the navigation system will be muted.
INFORMATION
�Talk alternately with the other party
on the phone. If you talk at the
same time, the voice may not reach
each other. (It is not a malfunction.)
�Keep the volume of receiving voice
down. Otherwise, echo is coming
up. When you talk on the phone,
speak clearly towards the micro-
phone.
�In the following situations, your
voice may not reach the other
party.
�Driving on unpaved road. (Mak-
ing a traffic noise.)
�Driving at the high speed.
�The window is open.
�Turning the air�conditioning
vents towards the microphone.
�The sound of the air�condition-
ing fan is loud.
1Indicates the condition of
Bluetooth� connection.
“Blue” indicates an excellent connection
to Bluetooth�.
“Yellow” indicates a bad connection to
Bluetooth�, resulting in possible deteriora-
tion of voice quality.
: No connection to Bluetooth�.
2Indicates the amount of battery
charge left.
Empty Full
It is not displayed while the Bluetooth� is
connecting or the phone book data is be-
ing transferred.
The amount left does not always corre-
spond with the one of your cellular phone.
This system doesn’t have a charging func-
tion.
3Indicates the receiving area.
“Rm” is displayed when receiving in
Roaming area.
“Hm” is displayed when receiving in
Home area.
Page 154 of 230
OTHER FUNCTIONS
174
The speech command system enables
you to operate the navigation system
and audio system by giving a com-
mand.
�Type A
�Type B
1. Push the talk switch.
A beep sounds and on screen message is
displayed with an indicator at the top left.
2. Say a command while the indicator
is shown on the display.
If you want to check the command list,
touch “Help” to display the help screen.
(See “Help screen” on page 177.) When
you touch “Cancel”, the previous
screen returns.
If the navigation system does not respond
or the confirmation screen does not disap-
pear, please push the talk switch and try
again.
If no command is given, a beep sounds
and the indicator disappears 6 seconds
later.
If the system does not recognize your
speech, the system will respond with this
message (“System does not recognize
this command, please rephrase your com-
mand.”). Start the operation from the be-
ginning.
Speech command system
Page 160 of 230
OTHER FUNCTIONS
180
(a) Automatic transition
You can select a function that enables au-
tomatic return to the navigation screen
from the audio screen.
Select “ON” or “OFF” and then touch
“OK”.
“ON”: The navigation screen automatical-
ly returns from the audio screen 20 sec-
onds after the end of audio screen opera-
tion.
“OFF”: The audio screen remains on.(b) Switch color
You can select the color of the touch
screen buttons.
Select “Green” or “Orange” and then
touch “OK”.
Page 165 of 230
SECTION 6
AUDIO SYSTEM
185
AUDIO SYSTEM
Audio system
�Quick reference 186. . . . . . . . . . . . . . . . . . . . . . . . . . . . . . . . . . . . . . .
�Using your audio system 187. . . . . . . . . . . . . . . . . . . . . . . . . . . . . . .
Some basics187 . . . . . . . . . . . . . . . . . . . . . . . . . . . . . . . . . . . . . . . .
Radio operation193 . . . . . . . . . . . . . . . . . . . . . . . . . . . . . . . . . . . . .
CD changer operation204 . . . . . . . . . . . . . . . . . . . . . . . . . . . . . . .
�Audio remote controls 216. . . . . . . . . . . . . . . . . . . . . . . . . . . . . . . . .
�Audio system operating hints 217. . . . . . . . . . . . . . . . . . . . . . . . . . .
Page 166 of 230

AUDIO SYSTEM
186
1Function menu display screen
To control the radio or CD changer,
touch the touch screen buttons. For
details, see page 189.
2“TUNE·FILE” knob
Turn this knob to move the station
band and files up or down. For de-
tails, see pages 193 and 212.
3“AM·SAT” button
Push this button to choose an AM or
SAT station. For details, see pages
189 and 193.
4“FM1” or “FM2” button
Push this button to choose an FM sta-
tion. For details, see pages 189 and
193.
5“DISC·AUX” button
Push this button to turn the CD
changer and AUX on. For details,
see pages 189, 192, 207 and 208.
6“SCAN” button
Push this button to scan radio sta-
tions. For details, see pages 194 and
200.
7“AUDIO” button
Push this button to display the audio
control screen. For details, see page
188.
8“ CLOSE” button
Push this button to display the
“LOAD·EJECT” screen or close the
display. For details, see page 206.
9“SEEK·TRACK” button
Push either side of this button to seek
up or down for a station, or to access
a desired track or file. For details, see
pages 194, 200, 208 and 212.
10“POWER·VOLUME” knob
Push this knob to turn the audio sys-
tem on and off, and turn it to adjust the
volume. For details, see page 188.
Quick reference
Page 167 of 230

AUDIO SYSTEM
187
This section describes some of the basic
features of your audio system. Some in-
formation may not pertain to your system.
Vehicles with smart key system —
Your audio system works when the “EN-
GINE START STOP” switch is in ACCES-
SORY or IGNITION ON mode.
Vehicles without smart key system —
Your audio system works when the engine
switch is in “ACC” or “ON” position.
NOTICE
To prevent the battery from being dis-
charged, do not leave the audio sys-
tem on longer than necessary when
the engine is not running.
CAUTION
For vehicles sold in U.S.A. and
Canada:
�Part 15 of the FCC Rules
FCC Warning:
Changes or modifications in con-
struction not expressly approved by
the party responsible for compliance
could void the user’s authority to op-
erate the equipment. Radio frequen-
cy exposure. This device is approved
for Mobile Application only and, to
comply with applicable FCC radio fre-
quency exposure regulations, must
be used with a distance of at least 7.9
in. (20 cm) between the antenna and
the body of any person at all time dur-
ing use.
�Laser products
�Do not take this unit apart or
attempt to make any changes
yourself. This is an intricate
unit that uses a laser pickup to
retrieve information from the
surface of compact discs. The
laser is carefully shielded so
that its rays remain inside the
cabinet. Therefore, never try to
disassemble the player or alter
any of its parts since you may
be exposed to laser rays and
dangerous voltages.
�This product utilizes a laser.
Use of controls or adjustments
or performance of procedures
other than those specified
herein may result in hazardous
radiation exposure.
Using your audio system —
— Some basics
Page 168 of 230
AUDIO SYSTEM
188 �
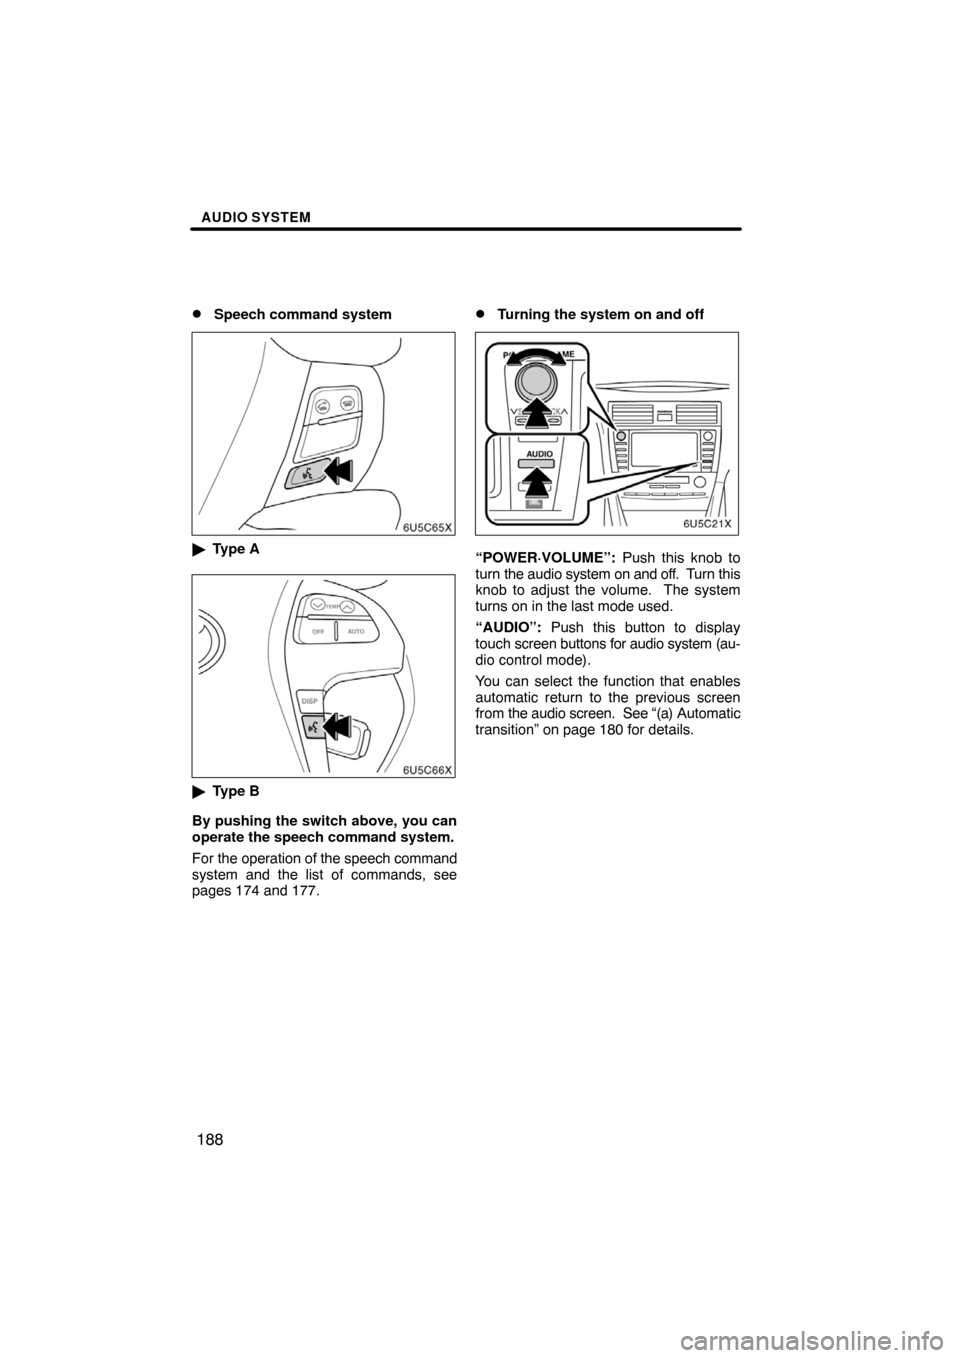
Speech command system
�Type A
�Type B
By pushing the switch above, you can
operate the speech command system.
For the operation of the speech command
system and the list of commands, see
pages 174 and 177.
�Turning the system on and off
“POWER·VOLUME”: Push this knob to
turn the audio system on and off. Turn this
knob to adjust the volume. The system
turns on in the last mode used.
“AUDIO”: Push this button to display
touch screen buttons for audio system (au-
dio control mode).
You can select the function that enables
automatic return to the previous screen
from the audio screen. See “(a) Automatic
transition” on page 180 for details.

 Automatic transition
You can select a function that enables au-
tomatic return to the navigation screen
from the audio screen.
Select “ON” or “OFF” and then touch
“OK")