2008 SUZUKI SX4 lock
[x] Cancel search: lockPage 27 of 278
2-14
BEFORE DRIVING
80J21-03E
Tailgate (SX4)
80JC059
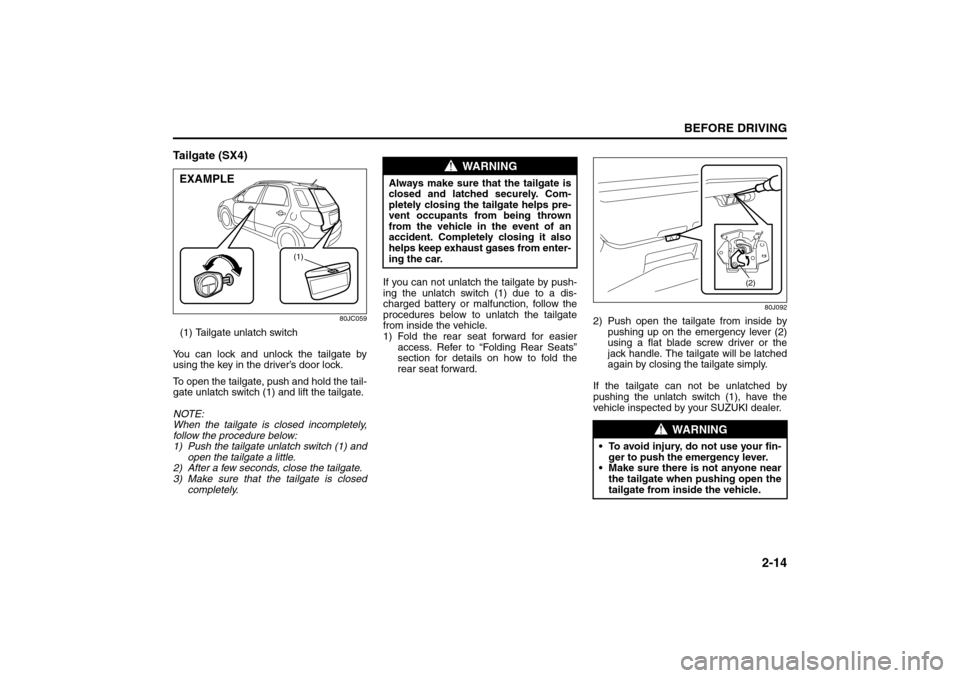
(1) Tailgate unlatch switch
You can lock and unlock the tailgate by
using the key in the driver’s door lock.
To open the tailgate, push and hold the tail-
gate unlatch switch (1) and lift the tailgate.
NOTE:
When the tailgate is closed incompletely,
follow the procedure below:
1) Push the tailgate unlatch switch (1) and
open the tailgate a little.
2) After a few seconds, close the tailgate.
3) Make sure that the tailgate is closed
completely.If you can not unlatch the tailgate by push-
ing the unlatch switch (1) due to a dis-
charged battery or malfunction, follow the
procedures below to unlatch the tailgate
from inside the vehicle.
1) Fold the rear seat forward for easier
access. Refer to “Folding Rear Seats”
section for details on how to fold the
rear seat forward.
80J092
2) Push open the tailgate from inside by
pushing up on the emergency lever (2)
using a flat blade screw driver or the
jack handle. The tailgate will be latched
again by closing the tailgate simply.
If the tailgate can not be unlatched by
pushing the unlatch switch (1), have the
vehicle inspected by your SUZUKI dealer.
(1)
EXAMPLE
WARNING
Always make sure that the tailgate is
closed and latched securely. Com-
pletely closing the tailgate helps pre-
vent occupants from being thrown
from the vehicle in the event of an
accident. Completely closing it also
helps keep exhaust gases from enter-
ing the car.
WARNING
To avoid injury, do not use your fin-
ger to push the emergency lever.
Make sure there is not anyone near
the tailgate when pushing open the
tailgate from inside the vehicle.
(2)
Head Restraints: 3
Seat Belts and Child Restraint Systems: 3
Page 28 of 278
2-15BEFORE DRIVING
80J21-03E
Trunk Lid (SX4 SEDAN)
55KS005
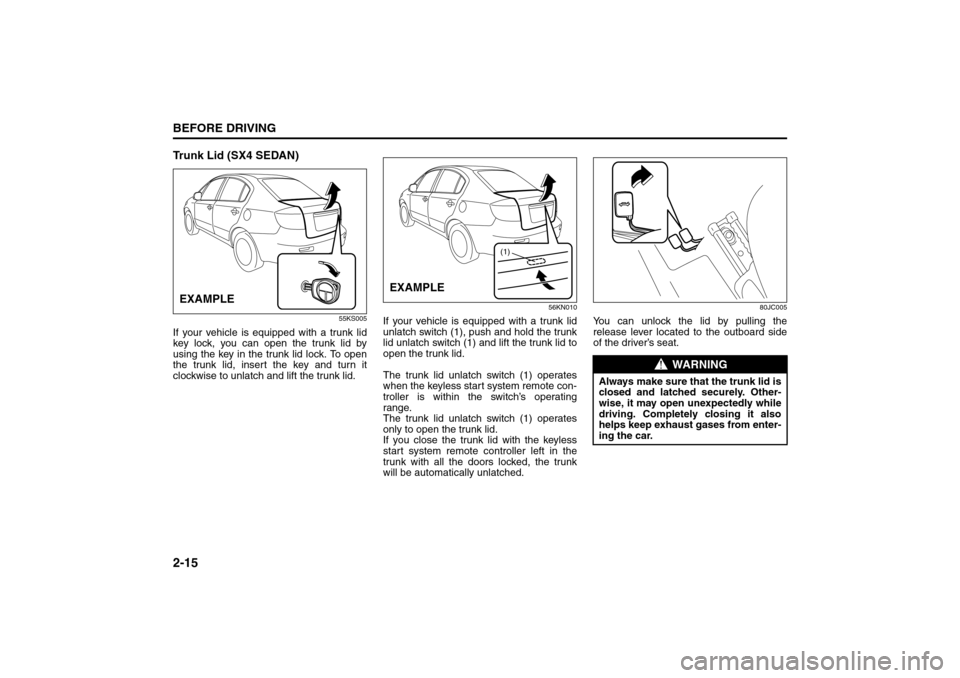
If your vehicle is equipped with a trunk lid
key lock, you can open the trunk lid by
using the key in the trunk lid lock. To open
the trunk lid, insert the key and turn it
clockwise to unlatch and lift the trunk lid.
56KN010
If your vehicle is equipped with a trunk lid
unlatch switch (1), push and hold the trunk
lid unlatch switch (1) and lift the trunk lid to
open the trunk lid.
The trunk lid unlatch switch (1) operates
when the keyless start system remote con-
troller is within the switch’s operating
range.
The trunk lid unlatch switch (1) operates
only to open the trunk lid.
If you close the trunk lid with the keyless
start system remote controller left in the
trunk with all the doors locked, the trunk
will be automatically unlatched.
80JC005
You can unlock the lid by pulling the
release lever located to the outboard side
of the driver’s seat.
EXAMPLE
(1)
EXAMPLE
WARNING
Always make sure that the trunk lid is
closed and latched securely. Other-
wise, it may open unexpectedly while
driving. Completely closing it also
helps keep exhaust gases from enter-
ing the car.
Seat Belts and Child Restraint Systems: 3
Page 29 of 278
2-16
BEFORE DRIVING
80J21-03E
Internal Trunk Release
(SX4 SEDAN)
54G297
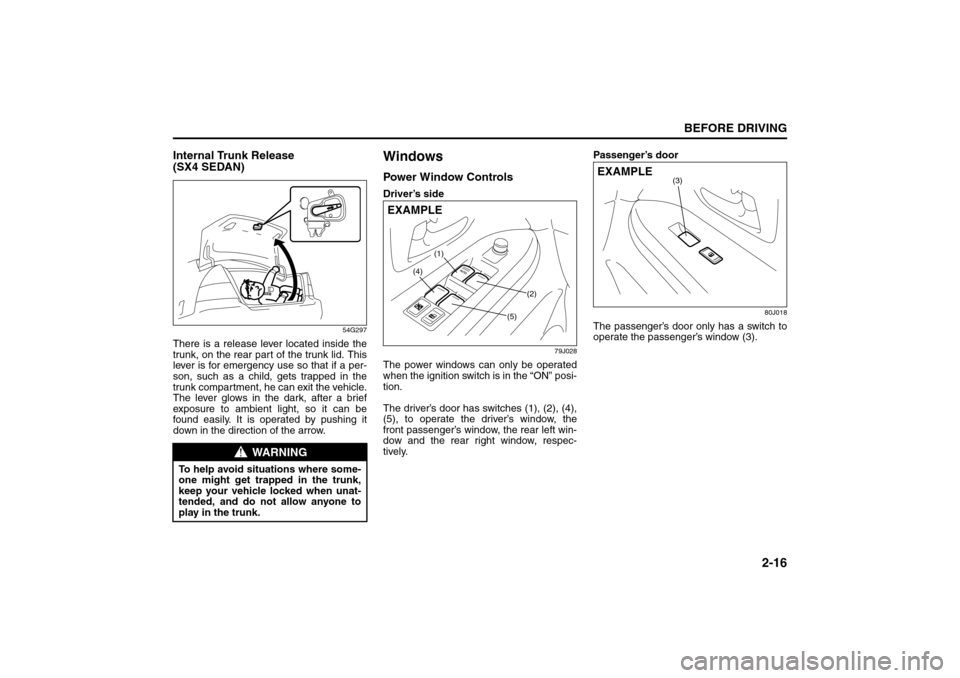
There is a release lever located inside the
trunk, on the rear part of the trunk lid. This
lever is for emergency use so that if a per-
son, such as a child, gets trapped in the
trunk compartment, he can exit the vehicle.
The lever glows in the dark, after a brief
exposure to ambient light, so it can be
found easily. It is operated by pushing it
down in the direction of the arrow.
WindowsPower Window ControlsDriver’s side
79J028
The power windows can only be operated
when the ignition switch is in the “ON” posi-
tion.
The driver’s door has switches (1), (2), (4),
(5), to operate the driver’s window, the
front passenger’s window, the rear left win-
dow and the rear right window, respec-
tively.Passenger’s door
80J018
The passenger’s door only has a switch to
operate the passenger’s window (3).
WARNING
To help avoid situations where some-
one might get trapped in the trunk,
keep your vehicle locked when unat-
tended, and do not allow anyone to
play in the trunk.
(1)
(2)
(4)
(5)
EXAMPLE
(3)
EXAMPLE
Seat Belts and Child Restraint Systems: 3
Page 30 of 278
2-17BEFORE DRIVING
80J21-03E
81A009
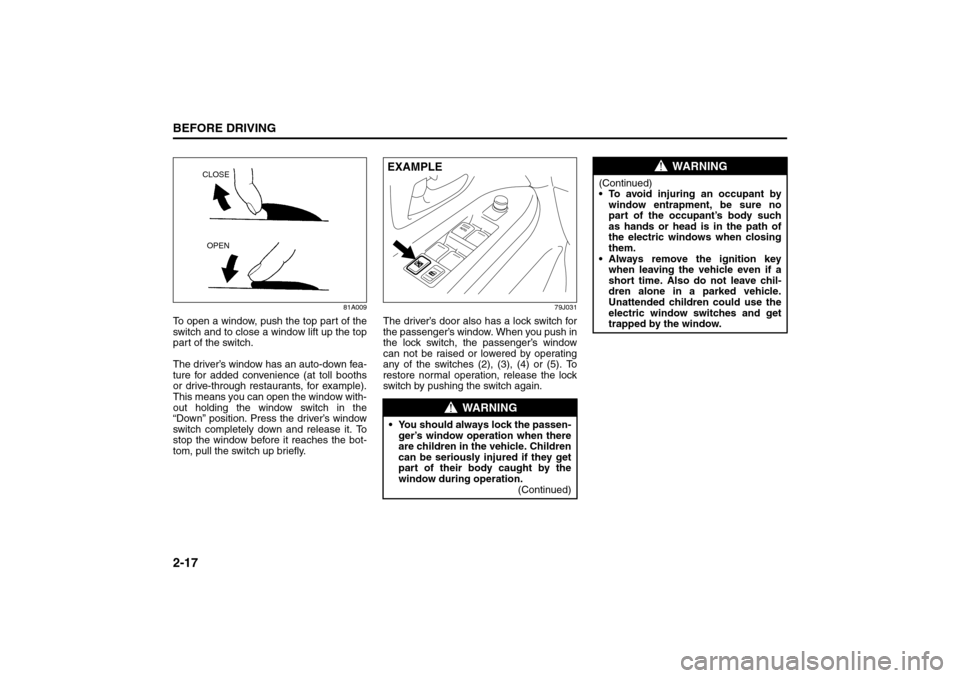
To open a window, push the top part of the
switch and to close a window lift up the top
part of the switch.
The driver’s window has an auto-down fea-
ture for added convenience (at toll booths
or drive-through restaurants, for example).
This means you can open the window with-
out holding the window switch in the
“Down” position. Press the driver’s window
switch completely down and release it. To
stop the window before it reaches the bot-
tom, pull the switch up briefly.
79J031
The driver’s door also has a lock switch for
the passenger’s window. When you push in
the lock switch, the passenger’s window
can not be raised or lowered by operating
any of the switches (2), (3), (4) or (5). To
restore normal operation, release the lock
switch by pushing the switch again.
CLOSE
OPEN
WARNING
You should always lock the passen-
ger’s window operation when there
are children in the vehicle. Children
can be seriously injured if they get
part of their body caught by the
window during operation.
(Continued)EXAMPLE
WARNING
(Continued)
To avoid injuring an occupant by
window entrapment, be sure no
part of the occupant’s body such
as hands or head is in the path of
the electric windows when closing
them.
Always remove the ignition key
when leaving the vehicle even if a
short time. Also do not leave chil-
dren alone in a parked vehicle.
Unattended children could use the
electric window switches and get
trapped by the window.
Seat Belts and Child Restraint Systems: 3
Page 33 of 278
2-20
BEFORE DRIVING
80J21-03E
Adjusting Seat PositionFront seat
80J093
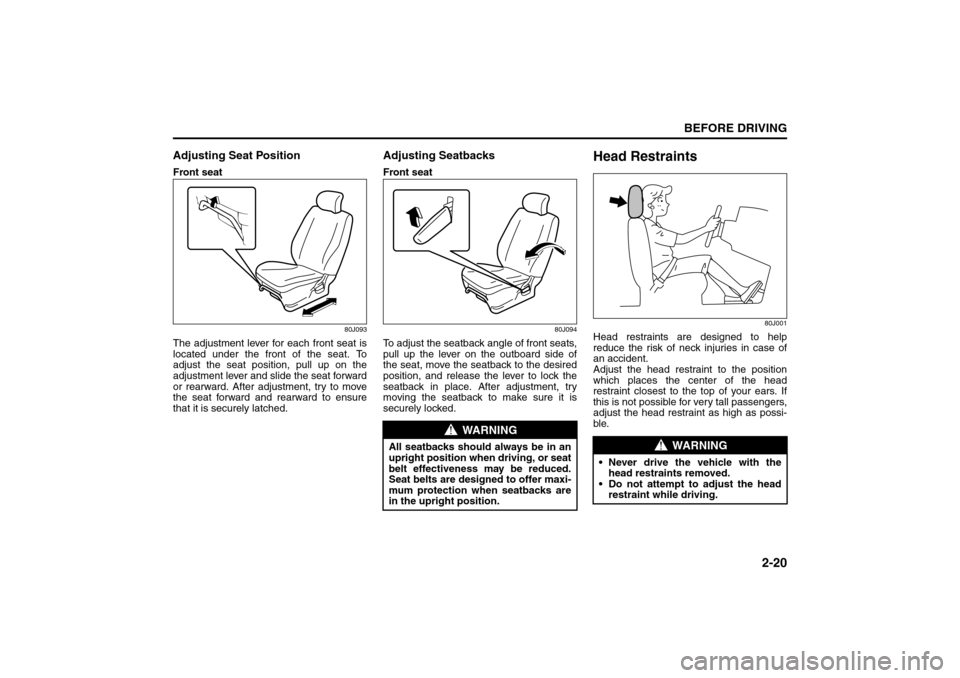
The adjustment lever for each front seat is
located under the front of the seat. To
adjust the seat position, pull up on the
adjustment lever and slide the seat forward
or rearward. After adjustment, try to move
the seat forward and rearward to ensure
that it is securely latched.
Adjusting SeatbacksFront seat
80J094
To adjust the seatback angle of front seats,
pull up the lever on the outboard side of
the seat, move the seatback to the desired
position, and release the lever to lock the
seatback in place. After adjustment, try
moving the seatback to make sure it is
securely locked.
Head Restraints
80J001
Head restraints are designed to help
reduce the risk of neck injuries in case of
an accident.
Adjust the head restraint to the position
which places the center of the head
restraint closest to the top of your ears. If
this is not possible for very tall passengers,
adjust the head restraint as high as possi-
ble.
WARNING
All seatbacks should always be in an
upright position when driving, or seat
belt effectiveness may be reduced.
Seat belts are designed to offer maxi-
mum protection when seatbacks are
in the upright position.
WARNING
Never drive the vehicle with the
head restraints removed.
Do not attempt to adjust the head
restraint while driving.
Seat Belts and Child Restraint Systems: 3
Page 37 of 278
2-24
BEFORE DRIVING
80J21-03E
Lap-Shoulder BeltEmergency Locking Retractor (ELR)
The seat belt has an emergency locking
retractor (ELR), which is designed to lock
the seat belt only during a sudden stop or
impact. It also may lock if you pull the belt
across your body very quickly. If this hap-
pens, let the belt go back to unlock it, then
pull the belt across your body more slowly.
Automatic Locking Retractor (ALR)
The front passenger’s seat belt and the
rear seat belts have emergency locking
retractors (ELRs) that can be temporarily
converted to function as automatic locking
retractors (ALRs). The ALR mode should
be used if you need to secure a child
restraint system in the seat. Refer to the
“Child Restraint Systems” section for
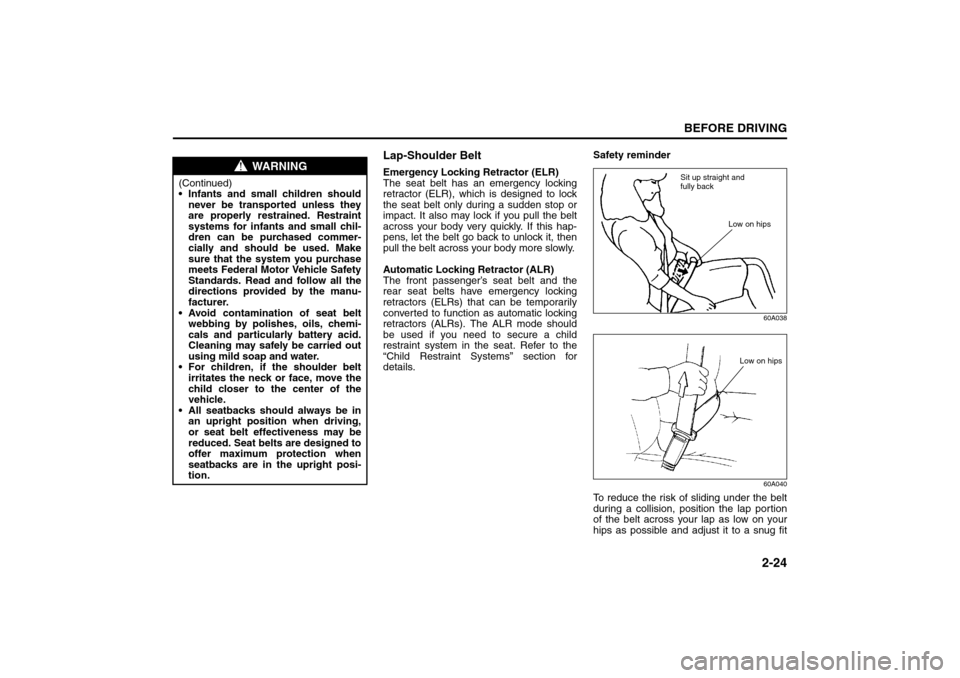
details.Safety reminder
60A038
60A040
To reduce the risk of sliding under the belt
during a collision, position the lap portion
of the belt across your lap as low on your
hips as possible and adjust it to a snug fit
WARNING
(Continued)
Infants and small children should
never be transported unless they
are properly restrained. Restraint
systems for infants and small chil-
dren can be purchased commer-
cially and should be used. Make
sure that the system you purchase
meets Federal Motor Vehicle Safety
Standards. Read and follow all the
directions provided by the manu-
facturer.
Avoid contamination of seat belt
webbing by polishes, oils, chemi-
cals and particularly battery acid.
Cleaning may safely be carried out
using mild soap and water.
For children, if the shoulder belt
irritates the neck or face, move the
child closer to the center of the
vehicle.
All seatbacks should always be in
an upright position when driving,
or seat belt effectiveness may be
reduced. Seat belts are designed to
offer maximum protection when
seatbacks are in the upright posi-
tion.
Sit up straight and
fully back
Low on hips
Low on hips
Seat Belts and Child Restraint Systems: 3
Page 41 of 278
2-28
BEFORE DRIVING
80J21-03E
Front passenger’s seat belt reminder
The front passenger’s seat belt reminder
will activate only when there is a passen-
ger sitting in the front seat. In some situa-
tions, however, such as when you place
heavy objects in the front seat, the seat
belt reminder can be activated as if there
were a passenger present. The front pas-
senger’s seat belt reminder works in the
same manner as the driver’s seat belt
reminder, except that it is not activated
until 10 seconds after the ignition switch is
turned to the “ON” position.
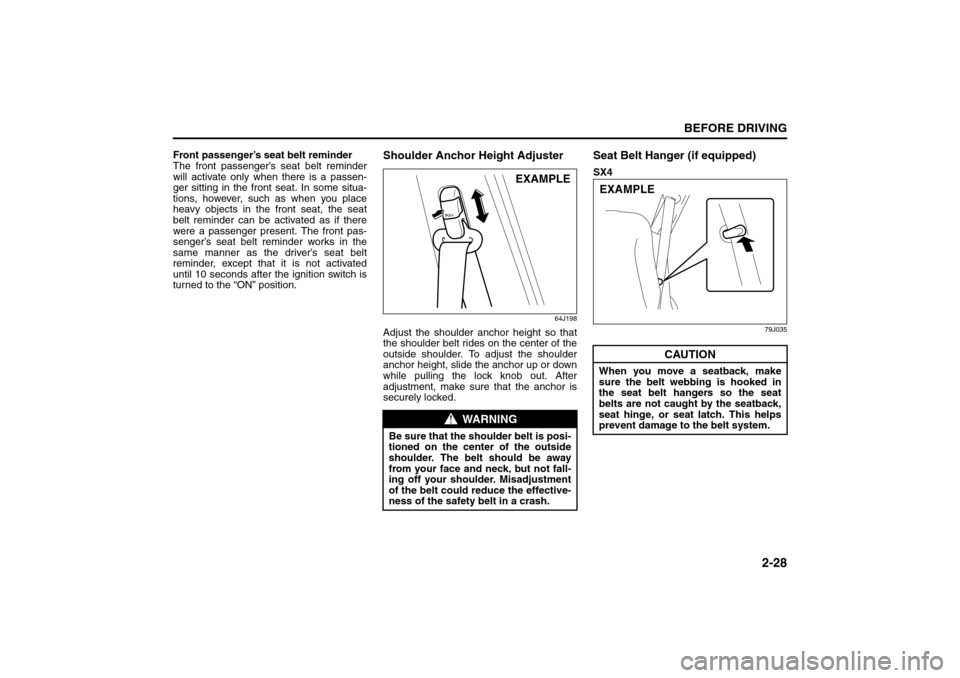
Shoulder Anchor Height Adjuster
64J198
Adjust the shoulder anchor height so that
the shoulder belt rides on the center of the
outside shoulder. To adjust the shoulder
anchor height, slide the anchor up or down
while pulling the lock knob out. After
adjustment, make sure that the anchor is
securely locked.
Seat Belt Hanger (if equipped)SX4
79J035
WARNING
Be sure that the shoulder belt is posi-
tioned on the center of the outside
shoulder. The belt should be away
from your face and neck, but not fall-
ing off your shoulder. Misadjustment
of the belt could reduce the effective-
ness of the safety belt in a crash.
EXAMPLE
CAUTION
When you move a seatback, make
sure the belt webbing is hooked in
the seat belt hangers so the seat
belts are not caught by the seatback,
seat hinge, or seat latch. This helps
prevent damage to the belt system.EXAMPLE
Seat Belts and Child Restraint Systems: 3
Page 45 of 278
2-32
BEFORE DRIVING
80J21-03E
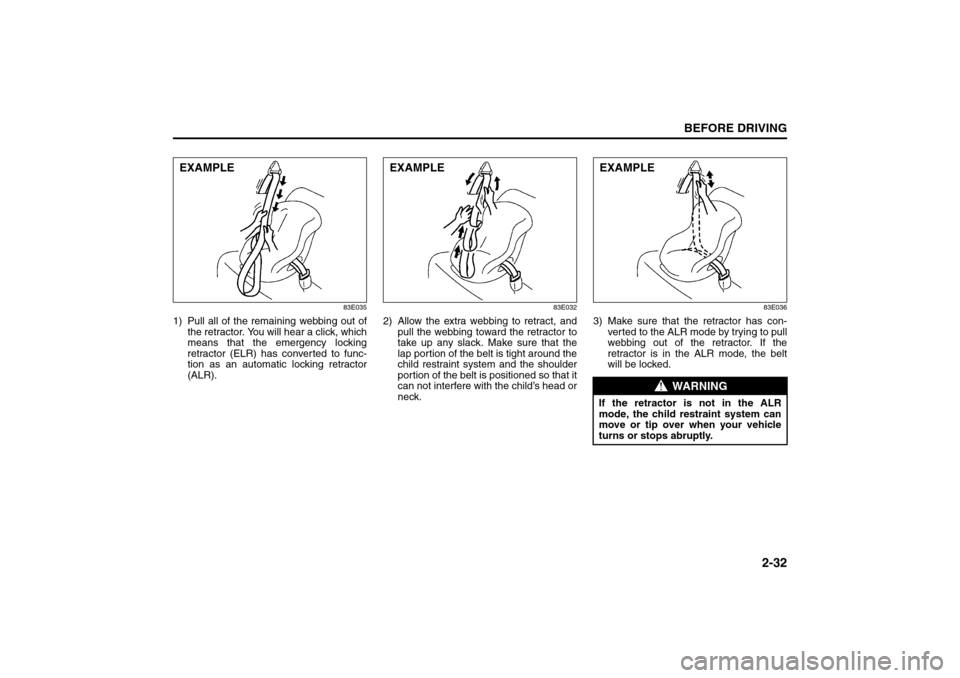
83E035
1) Pull all of the remaining webbing out of
the retractor. You will hear a click, which
means that the emergency locking
retractor (ELR) has converted to func-
tion as an automatic locking retractor
(ALR).
83E032
2) Allow the extra webbing to retract, and
pull the webbing toward the retractor to
take up any slack. Make sure that the
lap portion of the belt is tight around the
child restraint system and the shoulder
portion of the belt is positioned so that it
can not interfere with the child’s head or
neck.
83E036
3) Make sure that the retractor has con-
ver ted to the ALR mode by trying to pull
webbing out of the retractor. If the
retractor is in the ALR mode, the belt
will be locked.
EXAMPLE
EXAMPLE
WARNING
If the retractor is not in the ALR
mode, the child restraint system can
move or tip over when your vehicle
turns or stops abruptly.EXAMPLE
Seat Belts and Child Restraint Systems: 3