2008 SUBARU TRIBECA coolant level
[x] Cancel search: coolant levelPage 241 of 409

Preparing to driveYou should perform the following checks
and adjustments every day before you
start driving.
1. Check that all windows, mirrors, and
lights are clean and unobstructed.
2. Check the appearance and condition
of the tires. Also check tires for proper
inflation.
3. Look under the vehicle for any sign of
leaks.
4. Check that the hood and rear gate are
fully closed.
5. Check the adjustment of the seat.
6. Check the adjustment of the inside
and outside mirrors.
7. Fasten your seatbelt. Check that your
passengers have fastened their seatbelts.
8. Check the operation of the warning
and indicator lights when the ignition
switch is turned to the“ON”position.
9. Check the gauges, indicator and warn-
ing lights after starting the engine.NOTEEngine oil, engine coolant, brake fluid,
washer fluid and other fluid levels
should be checked daily, weekly or at
fuel stops.
Starting the engine
CAUTION
. Do not operate the starter motor
continuously for more than 10
seconds. If the engine fails to
start after operating the starter
for 5 to 10 seconds, wait for 10
seconds or more before trying
again.
. If you restart the engine while the
vehicle is moving, shift the se-
lector lever into the “N ” position.
Do not attempt to place the
selector lever of a moving vehicle
into the “P ” position.
1. Apply the parking brake.
2. Turn off unnecessary lights and ac-
cessories.
3. Shift the selector lever to the “P”or “N”
position (preferably “P ” position). The
starter will only operate when the select
lever is at the “P”or “N”position.
4. Turn the ignition switch to the “ON”
position and check the operation of the
warning and indicator lights. Refer to the
“ Warning and indicator lights ”section
(chapter 3).
5. Turn the ignition switch to the “START”position
without depressing the accelera-
tor pedal. Release the key immediately
after the engine has started.
If the engine does not start, try the
following.
(1) Turn the ignition switch to the
“LOCK ”position and wait for at least
10 seconds. After checking that the
parking brake is firmly set, turn the
ignition switch to the “START”position
while depressing the accelerator pedal
slightly (approximately a quarter of the
full stroke). Release the accelerator
pedal as soon as the engine starts.
(2) If this fails to start the engine, turn
the ignition switch back to the “LOCK”
position and wait for at least 10
seconds. Then fully depress the accel-
erator pedal and turn the ignition
switch to the “START”position. If the
engine starts, quickly release the
accelerator pedal.
(3) If this fails to start the engine, turn
the ignition switch again to the “LOCK”
position. After waiting for 10 seconds
or longer, turn the ignition switch to the
“START ”position without depressing
the accelerator pedal.
(4)
If the engine still refuses to start,
contact your nearest SUBARU dealer
for assistance.
6. Confirm that all warning and indicator
Starting and operating
7-7
– CONTINUED –
ProCarManuals.com
Page 310 of 409

9-14
In case of emergency
5. Start the engine of the vehicle with the
booster battery and run it at moderate
speed. Then start the engine of the vehicle
that has the discharged battery.
6. When finished, carefully disconnect
the cables in exactly the reverse order.
Engine overheating
WARNING
Never attempt to remove the radia-
tor cap until the engine has been
shut off and has fully cooled down.
When the engine is hot, the coolant
is under pressure. Removing the
cap while the engine is still hot
could release a spray of boiling hot
coolant, which could burn you very
seriously.
If the engine overheats, safely pull off the
road and stop the vehicle in a safe place.& If steam is coming from the
engine compartmentTurn off the engine and get everyone
away from the vehicle until it cools down.&If no steam is coming from
the engine compartment1. Keep the engine running at idling
speed.
2. Open the hood to ventilate the engine
compartment.
Confirm that the cooling fan is turning. If
the fan is not turning, immediately turn off the engine and contact your authorized
dealer for repair.
3. After the engine coolant temperature
has dropped, turn off the engine.
If the temperature gauge stays at the
overheated zone, turn off the engine.
4. After the engine has fully cooled down,
check the coolant level in the reserve
tank.
If the coolant level is below the
“LOW ”
mark, add coolant up to the “FULL”mark.
5. If there is no coolant in the reserve
tank, add coolant to the reserve tank.
Then remove the radiator cap and fill the
radiator with coolant.
If you remove the radiator cap from a hot
radiator, first wrap a thick cloth around the
radiator cap, then turn the cap counter-
clockwise slowly without pressing down
until it stops. Release the pressure from
the radiator. After the pressure has been
fully released, remove the cap by pressing
down and turning it.
ProCarManuals.com
Page 323 of 409

Maintenance schedule................................... 11-3
Maintenance precautions............................... 11-3
Before checking or servicing in the engine compartment ................................................. 11-4
When you do checking or servicing in the engine compartment while the engine is running ....... 11-4
Engine hood................................................... 11-4
Engine compartment overview ...................... 11-6
Engine oil ........................................................ 11-7
Checking the oil level ...................................... 11-7
Changing the oil and oil filter ........................... 11-8
Recommended grade and viscosity ................. 11-9
Recommended grade and viscosity under severe driving conditions ....................................... 11-10
Cooling system............................................ 11-11
Hose and connections ................................... 11-11
Engine coolant .............................................. 11-11
Air cleaner element ...................................... 11-14
Replacing the air cleaner element .................. 11-14
Spark plugs.................................................. 11-15
Recommended spark plugs ........................... 11-15
Drive belts.................................................... 11-15
Automatic transmission fluid ...................... 11-15
Checking the fluid level................................. 11-15
Recommended fluid ...................................... 11-16
Front differential gear oil ............................. 11-17
Checking the oil level.................................... 11-17
Recommended grade and viscosity ............... 11-17
Rear differential gear oil.............................. 11-18
Checking the gear oil level ............................ 11-18 Recommended grade and viscosity
............... 11-18
Power steering fluid..................................... 11-19
Checking the fluid level ................................. 11-19
Recommended fluid ...................................... 11-20
Brake fluid..................................................... 11-20
Checking the fluid level ................................. 11-20
Recommended brake fluid ............................ 11-21
Brake booster............................................... 11-21
Brake pedal ................................................... 11-21
Checking the brake pedal free play ............... 11-21
Checking the brake pedal reserve distance ..................................................... 11-22
Replacement of brake pad and lining ......... 11-22
Breaking-in of new brake pads and
linings ........................................................ 11-22
Parking brake stroke .................................... 11-23
Tires and wheels ........................................... 11-23
Types of tires................................................ 11-23
Tire pressure monitoring system (TPMS) ....... 11-24
Tire inspection .............................................. 11-25
Tire pressures and wear ............................... 11-25
Wheel balance .............................................. 11-27
Wear indicators ............................................ 11-28
Tire rotation direction mark ........................... 11-28
Tire rotation .................................................. 11-28
Tire replacement ........................................... 11-29
Wheel replacement ....................................... 11-29
Aluminum wheels......................................... 11-30
Chrome plated wheels (if equipped) ........... 11-31
Windshield washer fluid ............................... 11-32
Maintenance and service
11
ProCarManuals.com
Page 328 of 409

11-6
Maintenance and service
Engine compartment overview
1) Air cleaner element (page 11-14)
2) Power steering fluid reservoir(page 11-19)
3) Differential gear oil level gauge (page 11-17)
4) Automatic transmission fluid level gauge (page 11-15)
5) Brake fluid reservoir (page 11-20)
6) Fuse box (page 11-38)
7) Battery (page 11-37)
8) Windshield washer tank (page 11-32)
9) Radiator cap (page 11-11)
10) Engine oil filler cap (page 11-7)
11) Engine coolant reservoir (page 11-11)
12) Engine oil level gauge (page 11-7)
ProCarManuals.com
Page 333 of 409

Cooling system
WARNING
Never attempt to remove the radia-
tor cap until the engine has been
shut off and has cooled down
completely. Since the coolant is
under pressure, you may suffer
serious burns from a spray of boil-
ing hot coolant when the cap is
removed.
CAUTION
.The cooling system has been
filled at the factory with a high
quality, corrosion-inhibiting,
year-around coolant which pro-
vides protection against freezing
down to −33 8F( −36 8C).
Subaru engines use aluminum
components that require the
anti-corrosive and anti-freeze
properties of Subaru Genuine
Coolant, which is specifically
formulated for the Subaru cool-
ing system. Failure to use Subaru
Genuine Coolant along with
Subaru Cooling System Condi-
tioner at the recommended main- tenance intervals may result in
problems, including, but not lim-
ited to shortened life of engine
components and cooling system
clogging, coolant leaks and en-
gine damage from overheating.
Problems caused by the failure to
use Subaru Genuine Coolant and
Subaru Cooling System Condi-
tioner at recommended intervals
are not covered under the
Subaru Limited Warranty.
While there may be other generic
products that may provide the
required protection, they have
not been tested for compatibility
with Subaru engines and cooling
system components, and there-
fore not recommended.
. Do not splash the engine coolant
over painted parts. The alcohol
contained in the engine coolant
may damage the paint surface.
& Hose and connectionsYour vehicle employs an electric cooling
fan which is thermostatically controlled to
operate when the engine coolant reaches
a specific temperature.
If the radiator cooling fan does not operate even when the engine coolant tempera-
ture gauge exceeds the normal operating
range, the cooling fan circuit may be
defective. Check the fuse and replace it
if necessary. If the fuse is not blown, have
the cooling system checked by your
SUBARU dealer.
If frequent addition of coolant is neces-
sary, there may be a leak in the engine
cooling system. It is recommended that
the cooling system and connections be
checked for leaks, damage, or looseness.
&
Engine coolant! Checking the coolant levelCheck the coolant level at each fuel stop.
1. Check the coolant level on the outside
of the reservoir while the engine is cool.
Maintenance and service
11-11
–CONTINUED –
ProCarManuals.com
Page 334 of 409

11-12
Maintenance and service
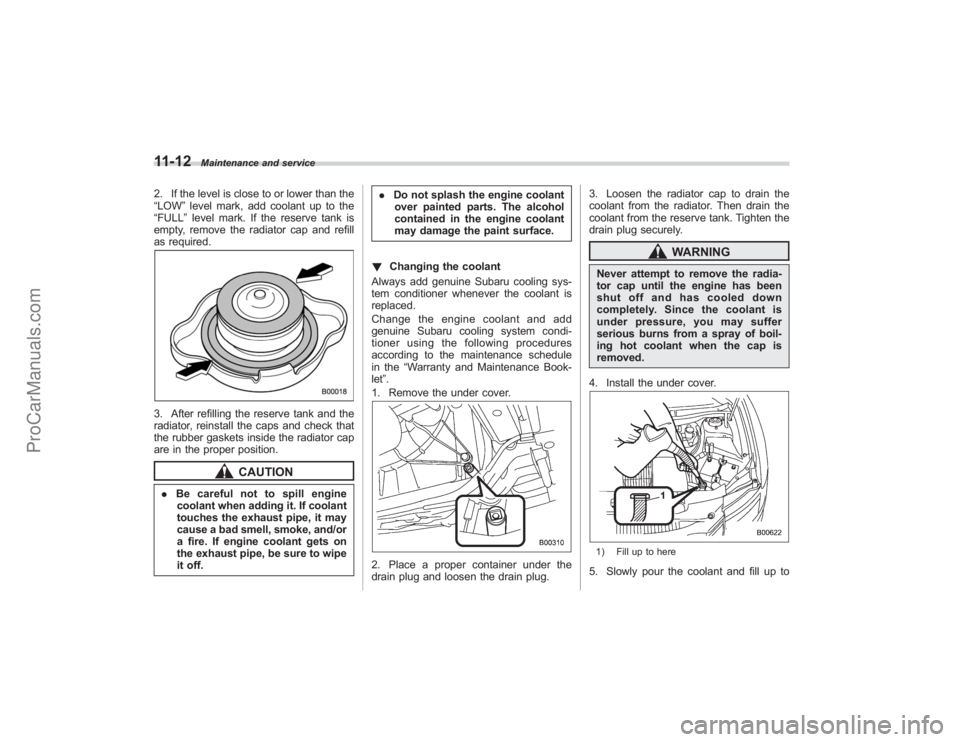
2. If the level is close to or lower than the
“LOW”level mark, add coolant up to the
“FULL ”level mark. If the reserve tank is
empty, remove the radiator cap and refill
as required.3. After refilling the reserve tank and the
radiator, reinstall the caps and check that
the rubber gaskets inside the radiator cap
are in the proper position.
CAUTION
. Be careful not to spill engine
coolant when adding it. If coolant
touches the exhaust pipe, it may
cause a bad smell, smoke, and/or
a fire. If engine coolant gets on
the exhaust pipe, be sure to wipe
it off. .
Do not splash the engine coolant
over painted parts. The alcohol
contained in the engine coolant
may damage the paint surface.
! Changing the coolant
Always add genuine Subaru cooling sys-
tem conditioner whenever the coolant is
replaced.
Change the engine coolant and add
genuine Subaru cooling system condi-
tioner using the following procedures
according to the maintenance schedule
in the “Warranty and Maintenance Book-
let ”.
1. Remove the under cover.
2. Place a proper container under the
drain plug and loosen the drain plug. 3. Loosen the radiator cap to drain the
coolant from the radiator. Then drain the
coolant from the reserve tank. Tighten the
drain plug securely.
WARNING
Never attempt to remove the radia-
tor cap until the engine has been
shut off and has cooled down
completely. Since the coolant is
under pressure, you may suffer
serious burns from a spray of boil-
ing hot coolant when the cap is
removed.
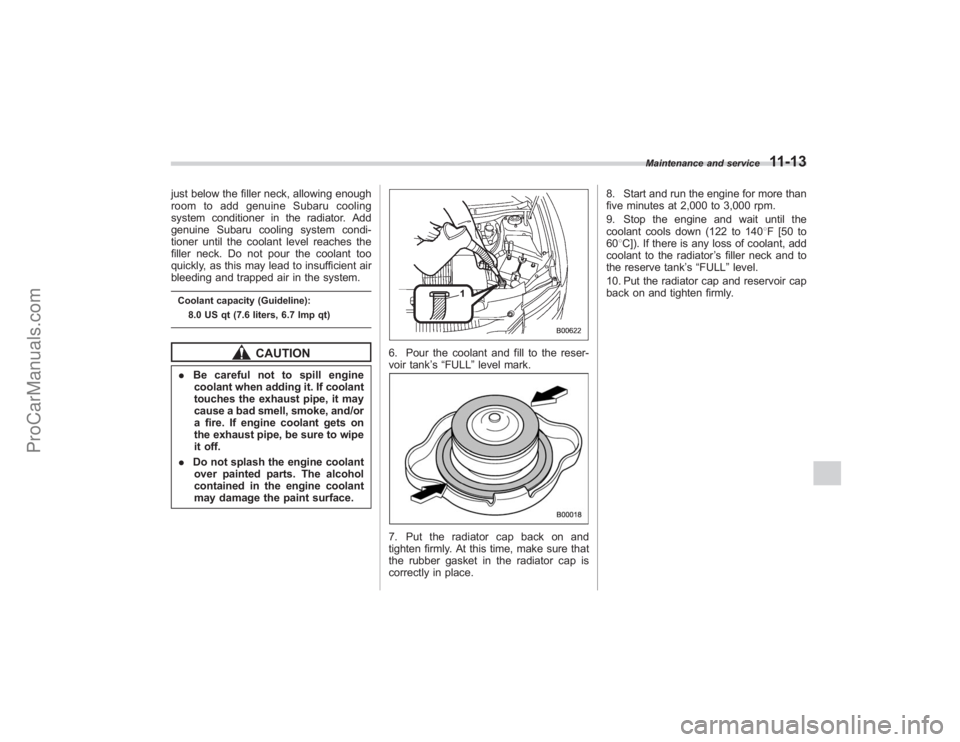
4. Install the under cover.1) Fill up to here5. Slowly pour the coolant and fill up to
ProCarManuals.com
Page 335 of 409

just below the filler neck, allowing enough
room to add genuine Subaru cooling
system conditioner in the radiator. Add
genuine Subaru cooling system condi-
tioner until the coolant level reaches the
filler neck. Do not pour the coolant too
quickly, as this may lead to insufficient air
bleeding and trapped air in the system.Coolant capacity (Guideline):8.0 US qt (7.6 liters, 6.7 Imp qt)
CAUTION
. Be careful not to spill engine
coolant when adding it. If coolant
touches the exhaust pipe, it may
cause a bad smell, smoke, and/or
a fire. If engine coolant gets on
the exhaust pipe, be sure to wipe
it off.
. Do not splash the engine coolant
over painted parts. The alcohol
contained in the engine coolant
may damage the paint surface.
6. Pour the coolant and fill to the reser-
voir tank ’s “FULL ”level mark.7. Put the radiator cap back on and
tighten firmly. At this time, make sure that
the rubber gasket in the radiator cap is
correctly in place. 8. Start and run the engine for more than
five minutes at 2,000 to 3,000 rpm.
9. Stop the engine and wait until the
coolant cools down (122 to 140
8F [50 to
60 8C]). If there is any loss of coolant, add
coolant to the radiator ’s filler neck and to
the reserve tank ’s “FULL ”level.
10. Put the radiator cap and reservoir cap
back on and tighten firmly.
Maintenance and service
11-13
ProCarManuals.com
Page 354 of 409

11-32
Maintenance and service
Windshield washer fluid
CAUTION
Never use engine coolant as washer
fluid because it could cause paint
damage.If you spray washer fluid on the windshield
but the windshield washer fluid warning
light comes on or the supply of washer
fluid drops, check the level of washer fluid
in the tank.
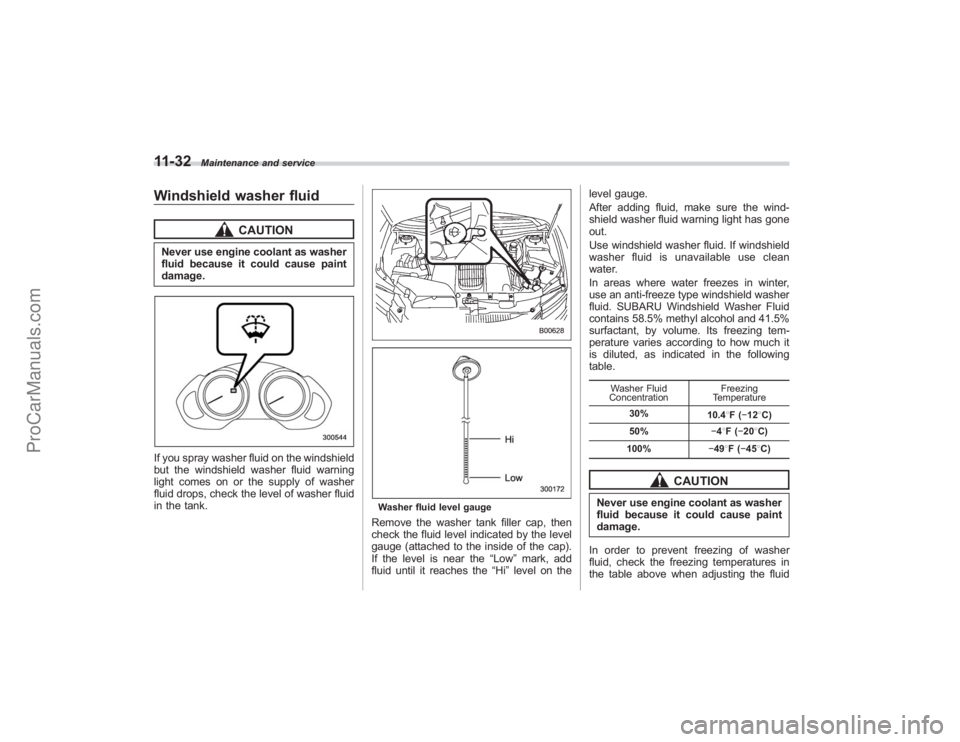
Washer fluid level gaugeRemove the washer tank filler cap, then
check the fluid level indicated by the level
gauge (attached to the inside of the cap).
If the level is near the“Low”mark, add
fluid until it reaches the “Hi”level on the level gauge.
After adding fluid, make sure the wind-
shield washer fluid warning light has gone
out.
Use windshield washer fluid. If windshield
washer fluid is unavailable use clean
water.
In areas where water freezes in winter,
use an anti-freeze type windshield washer
fluid. SUBARU Windshield Washer Fluid
contains 58.5% methyl alcohol and 41.5%
surfactant, by volume. Its freezing tem-
perature varies according to how much it
is diluted, as indicated in the following
table.
Washer Fluid
Concentration Freezing
Temperature
30% 10.48F( −12 8C)
50% −48F( −20 8C)
100% −498F( −45 8C)
CAUTION
Never use engine coolant as washer
fluid because it could cause paint
damage.
In order to prevent freezing of washer
fluid, check the freezing temperatures in
the table above when adjusting the fluid
ProCarManuals.com