2008 SUBARU TRIBECA battery
[x] Cancel search: batteryPage 24 of 409

22Function settingsA SUBARU dealer can change the settings of the functions shown in the following table to meet your personal requirements. Contact
the nearest SUBARU dealer for details. If your vehicle is equipped with navigation system, the settings for some of these functions can
be changed using the monitor. For details, please refer to the Owner’s Manual supplement for the monitor.Item Function Possible settingsDefault setting Page
Alarm system Alarm system Operation / Non-operationOperation 2-15
Monitoring start delay time (after closure of
doors) 0 second / 30 seconds
30 seconds 2-15
Impact sensor operation (only vehicles with
shock sensors (dealer option)) Operation / Non-operation
Non-operation 2-18
Passive arming Operation / Non-operationNon-operation 2-17
Remote keyless entry system Hazard warning flasher Operation / Non-operationOperation 2-7
Audible signal Operation / Non-operationOperation 2-10
Key lock-in prevention Key lock-in prevention Operation / Non-operationOperation 2-6
Rear window defogger Rear window defogger Operation for 15 minutes / Continuous
operation Operation for 15
minutes3-37
Windshield wiper deicer (if
equipped) Windshield wiper deicer
Operation for 15 minutes / Continuous
operation Operation for 15
minutes3-36
Map light/Dome light Operation in interlock with remote keyless
entry system OFF / Short / Normal / Long
Normal6-2
Battery drainage prevention
function Battery drainage prevention function Operation / Non-operation
Operation 2-6
ProCarManuals.com
Page 29 of 409
.When any trouble or a malfunc-
tion occurs during the retrieval of
the seat position, stop the retrie-
val of the seat position using any
of the control switches for man-
ual adjustment, seat memory set
button, seat memory registered
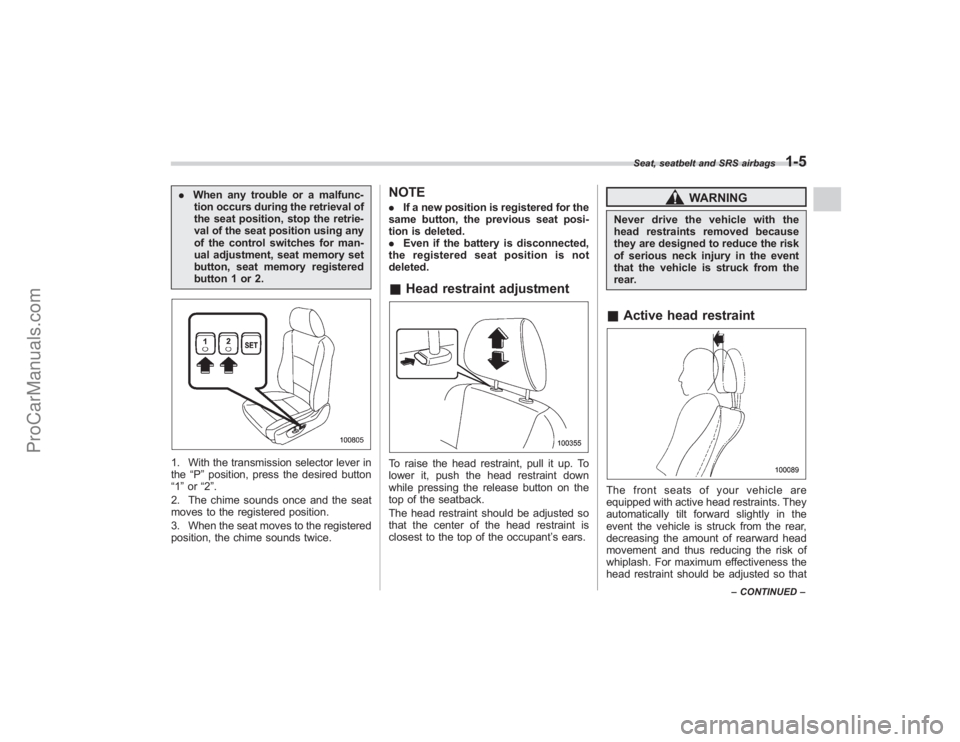
button 1 or 2.1. With the transmission selector lever in
the “P”position, press the desired button
“1 ”or “2”.
2. The chime sounds once and the seat
moves to the registered position.
3. When the seat moves to the registered
position, the chime sounds twice.
NOTE. If a new position is registered for the
same button, the previous seat posi-
tion is deleted.
. Even if the battery is disconnected,
the registered seat position is not
deleted.& Head restraint adjustmentTo raise the head restraint, pull it up. To
lower it, push the head restraint down
while pressing the release button on the
top of the seatback.
The head restraint should be adjusted so
that the center of the head restraint is
closest to the top of the occupant ’s ears.
WARNING
Never drive the vehicle with the
head restraints removed because
they are designed to reduce the risk
of serious neck injury in the event
that the vehicle is struck from the
rear.& Active head restraintThe front seats of your vehicle are
equipped with active head restraints. They
automatically tilt forward slightly in the
event the vehicle is struck from the rear,
decreasing the amount of rearward head
movement and thus reducing the risk of
whiplash. For maximum effectiveness the
head restraint should be adjusted so that
Seat, seatbelt and SRS airbags
1-5
–CONTINUED –
ProCarManuals.com
Page 31 of 409
When the vehicle’s interior is warmed
enough or before you leave the vehicle,
be sure to turn the switch off.
CAUTION
. There is a possibility that people
with delicate skin may suffer
slight burns even at low tempera-
tures if they use the seat heater
for a long period of time. When
using the heater, always be sure
to warn the persons concerned.
. Do not put anything on the seat
which insulates against heat,
such as a blanket, cushion, or
similar items. This may cause the
seat heater to overheat.NOTEUse of the seat heater for a long period
of time while the engine is not running
can cause battery discharge.
Rear seats (5-seater models)/
Second-row seats (7-seater
models)
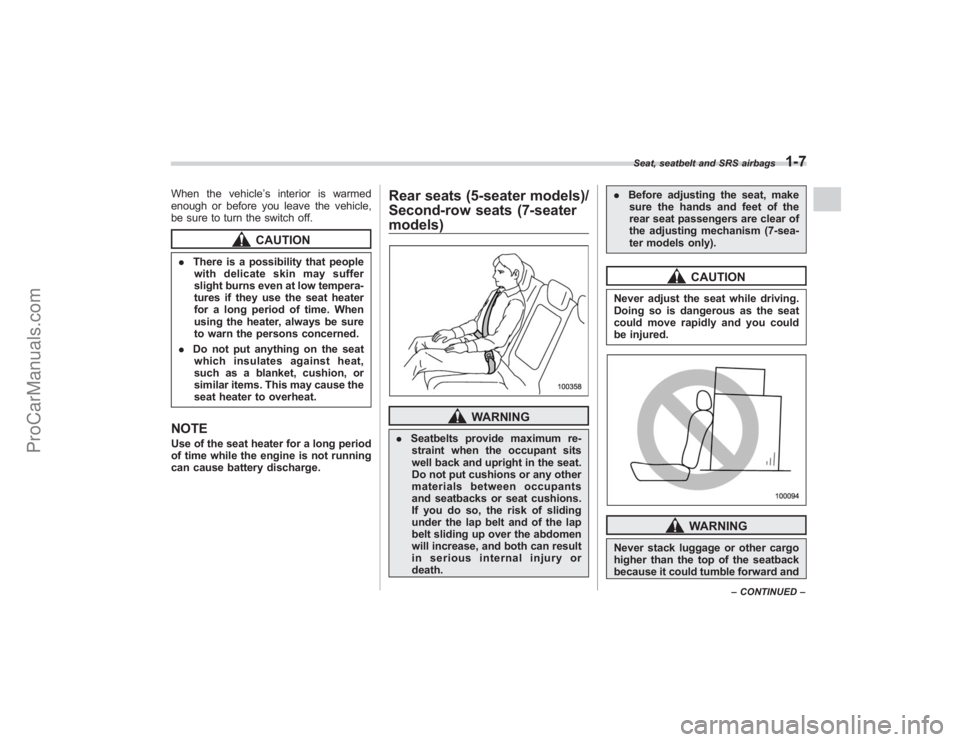
WARNING
. Seatbelts provide maximum re-
straint when the occupant sits
well back and upright in the seat.
Do not put cushions or any other
materials between occupants
and seatbacks or seat cushions.
If you do so, the risk of sliding
under the lap belt and of the lap
belt sliding up over the abdomen
will increase, and both can result
in serious internal injury or
death. .
Before adjusting the seat, make
sure the hands and feet of the
rear seat passengers are clear of
the adjusting mechanism (7-sea-
ter models only).
CAUTION
Never adjust the seat while driving.
Doing so is dangerous as the seat
could move rapidly and you could
be injured.
WARNING
Never stack luggage or other cargo
higher than the top of the seatback
because it could tumble forward and
Seat, seatbelt and SRS airbags
1-7
– CONTINUED –
ProCarManuals.com
Page 51 of 409

&Seatbelt maintenanceTo clean the seatbelts, use a mild soap
and lukewarm water. Never bleach or dye
the belts because this could seriously
affect their strength.
Inspect the seatbelts and attachments
including the webbing and all hardware
periodically for cracks, cuts, gashes,
tears, damage, loose bolts or worn areas.
Replace the seatbelts even if only minor
damage is found.
CAUTION
. Keep the belts free of polishes,
oils, chemicals and particularly
battery acid.
. Never attempt to make modifica-
tions or changes that will prevent
the seatbelt from operating prop-
erly.
Front seatbelt pretensionersThe driver ’s and front passenger ’s seat-
belts have a seatbelt pretensioner. The
seatbelt pretensioners for the driver ’s seat
and front passenger ’s seat operate at the
same time as the frontal, and side SRS
airbags. If the vehicle rolls over, they
operate simultaneously with the curtain
airbag.
The front and side airbag sensors and the
rollover sensor are used as the preten-
sioner sensors. If a sensor detects a
certain predetermined amount of force
during a frontal collision, a side impact
collision or a rollover collision of the
vehicle, the front seatbelt is quickly drawn
back in by the retractor to take up the
slack so that the belt more effectively restrains the front seat occupant.
When a seatbelt pretensioner is activated,
an operating noise will be heard and a
small amount of smoke will be released.
These occurrences are normal and not
harmful. This smoke does not indicate a
fire in the vehicle.
Once the seatbelt pretensioner has been
activated, the seatbelt retractor remains
locked. Consequently, the seatbelt can not
be pulled out and retracted and therefore
must be replaced.
NOTE.
Seatbelt pretensioners are not de-
signed to activate in minor frontal
impacts, in minor side impacts or rear
impacts.
. The seatbelt pretensioners for the
driver ’s seat and front passenger ’s
seat operate at the same time as the
frontal, and side SRS airbags. If the
vehicle rolls over, they operate simul-
taneously with the curtain airbag.
. Pretensioners are designed to func-
tion on a one-time-only basis. In the
event that a pretensioner is activated,
both the driver ’s and front passenger ’s
seatbelt retractor assemblies must be
replaced and only by an authorized
SUBARU dealer. When replacing seat-
Seat, seatbelt and SRS airbags
1-27
– CONTINUED –
ProCarManuals.com
Page 95 of 409
Keys.................................................................. 2-2
Key number plate ............................................. 2-2
Immobilizer....................................................... 2-3
Security ID plate ............................................... 2-3
Security indicator light ..................................... 2-4
Key replacement .............................................. 2-4
Door locks........................................................ 2-4
Locking and unlocking from the outside .. ......... 2-4
Locking and unlocking from the inside ............. 2-5
Battery drainage prevention function ................ 2-6
Power door locking switches.......................... 2-6
Key lock-in prevention function ........................ 2-7
Remote keyless entry system......................... 2-7
Locking the doors............................................ 2-8
Unlocking the doors ......................................... 2-9
Unlocking the rear gate .................................... 2-9
Illuminated entry .............................................. 2-9
Vehicle finder function ...................................... 2-9
Sounding a panic alarm .................................. 2-10
Selecting audible signal operation .................. 2-10
Replacing the battery ..................................... 2-10
Replacing lost transmitters .............................. 2-11
Alarm system................................................. 2-15
System operation ............................................ 2-15
Activating and deactivating the alarm system ......................................................... 2-15
If you have accidentally triggered the alarm system ......................................................... 2-15
Arming the system ......................................... 2-15
Disarming the system ..................................... 2-17
Valet mode ..................................................... 2-17
Passive arming ............................................... 2-17
Tripped sensor identification ........................... 2-18
Shock sensors (dealer option).. ....................... 2-18
Child safety locks.......................................... 2-19
Windows ......................................................... 2-19
Power windows .............................................. 2-19
Rear gate........................................................ 2-22
Moonroof (if equipped) .................................. 2-23
Tilt function.................................................... 2-24
Sliding function .............................................. 2-24
Anti-entrapment function ................................. 2-24
Sun shade ...................................................... 2-25
Keys and doors
2
ProCarManuals.com
Page 100 of 409
2-6
Keys and doors
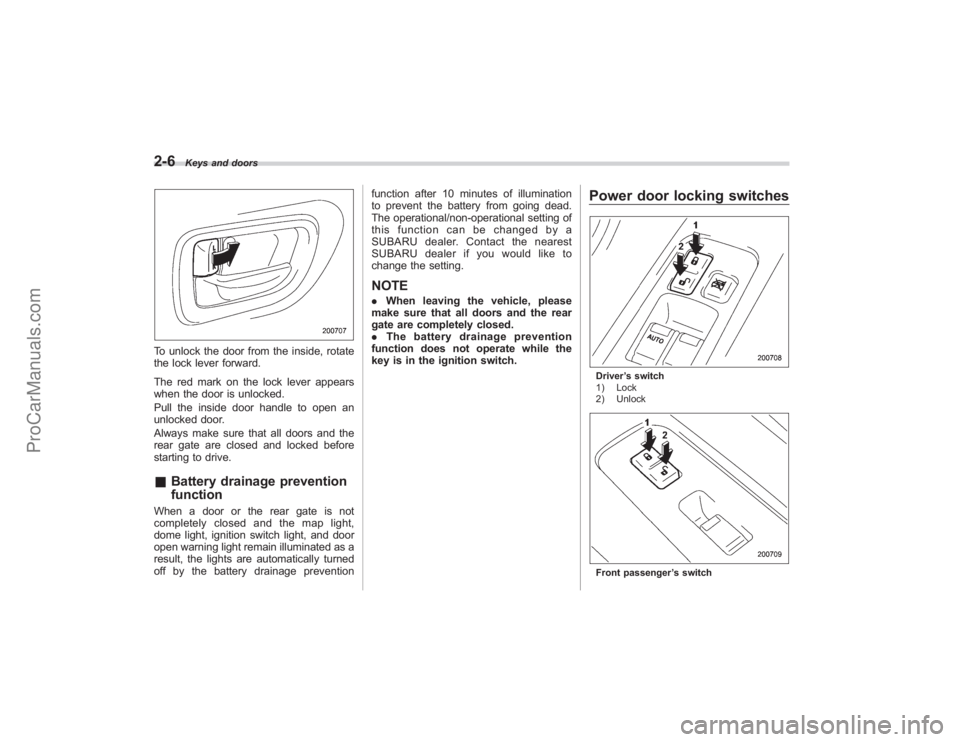
To unlock the door from the inside, rotate
the lock lever forward.
The red mark on the lock lever appears
when the door is unlocked.
Pull the inside door handle to open an
unlocked door.
Always make sure that all doors and the
rear gate are closed and locked before
starting to drive.&Battery drainage prevention
functionWhen a door or the rear gate is not
completely closed and the map light,
dome light, ignition switch light, and door
open warning light remain illuminated as a
result, the lights are automatically turned
off by the battery drainage prevention function after 10 minutes of illumination
to prevent the battery from going dead.
The operational/non-operational setting of
this function can be changed by a
SUBARU dealer. Contact the nearest
SUBARU dealer if you would like to
change the setting.
NOTE.
When leaving the vehicle, please
make sure that all doors and the rear
gate are completely closed.
. The battery drainage prevention
function does not operate while the
key is in the ignition switch.
Power door locking switchesDriver ’s switch
1) Lock
2) UnlockFront passenger ’s switch
ProCarManuals.com
Page 104 of 409
2-10
Keys and doors
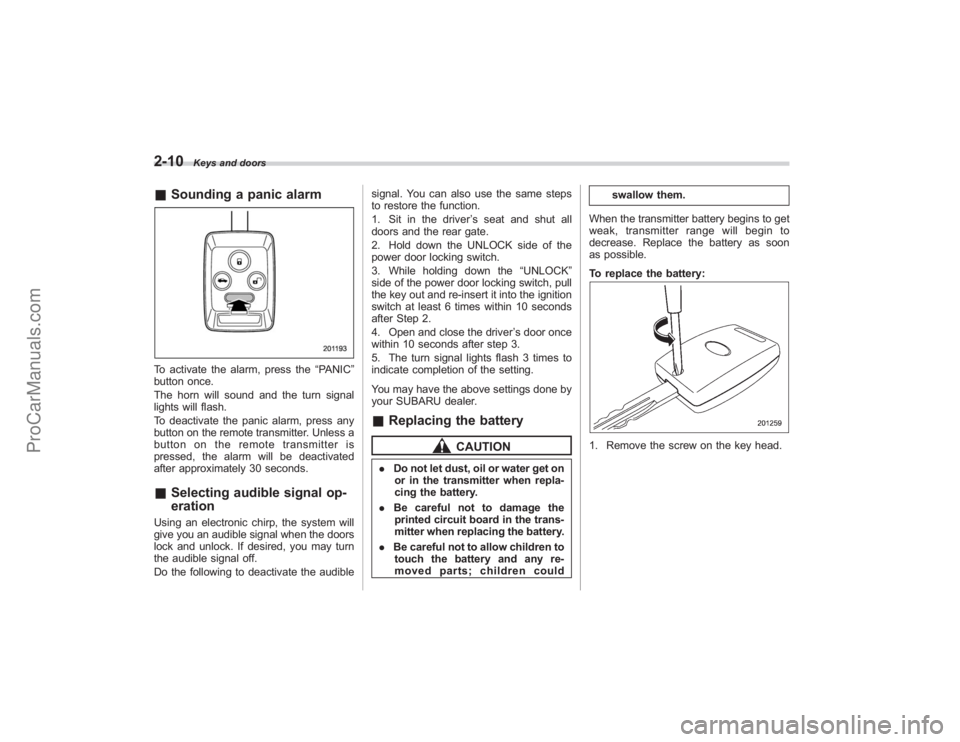
&Sounding a panic alarmTo activate the alarm, press the “PANIC”
button once.
The horn will sound and the turn signal
lights will flash.
To deactivate the panic alarm, press any
button on the remote transmitter. Unless a
button on the remote transmitter is
pressed, the alarm will be deactivated
after approximately 30 seconds.& Selecting audible signal op-
erationUsing an electronic chirp, the system will
give you an audible signal when the doors
lock and unlock. If desired, you may turn
the audible signal off.
Do the following to deactivate the audible signal. You can also use the same steps
to restore the function.
1. Sit in the driver
’s seat and shut all
doors and the rear gate.
2. Hold down the UNLOCK side of the
power door locking switch.
3. While holding down the “UNLOCK”
side of the power door locking switch, pull
the key out and re-insert it into the ignition
switch at least 6 times within 10 seconds
after Step 2.
4. Open and close the driver ’s door once
within 10 seconds after step 3.
5. The turn signal lights flash 3 times to
indicate completion of the setting.
You may have the above settings done by
your SUBARU dealer.
& Replacing the battery
CAUTION
. Do not let dust, oil or water get on
or in the transmitter when repla-
cing the battery.
. Be careful not to damage the
printed circuit board in the trans-
mitter when replacing the battery.
. Be careful not to allow children to
touch the battery and any re-
moved parts; children could swallow them.
When the transmitter battery begins to get
weak, transmitter range will begin to
decrease. Replace the battery as soon
as possible.
To replace the battery:
1. Remove the screw on the key head.
ProCarManuals.com
Page 105 of 409
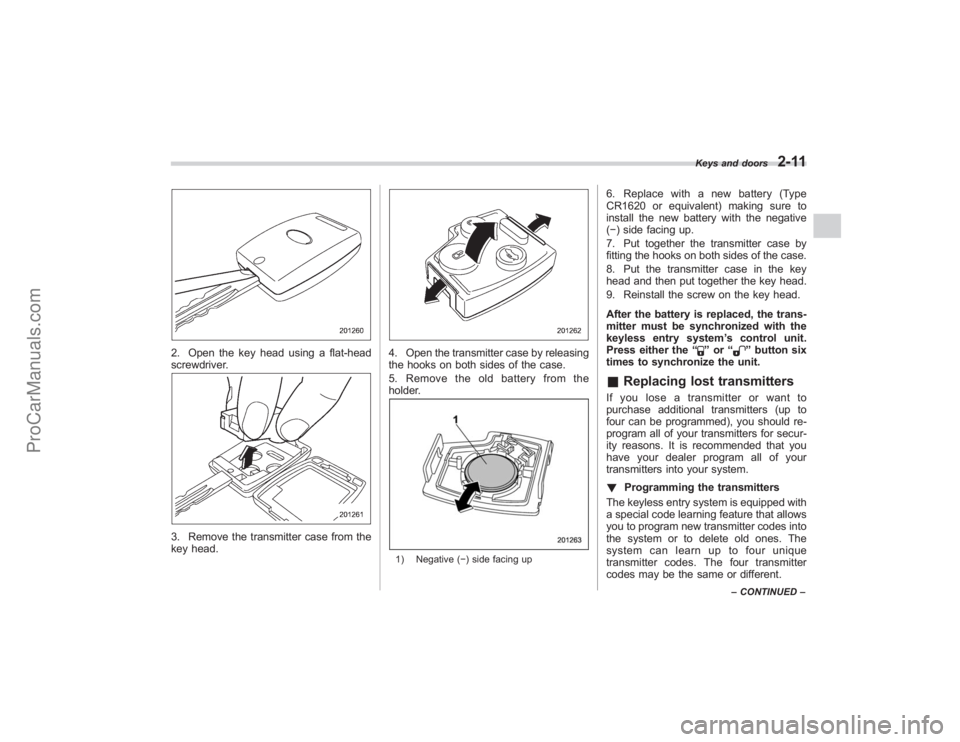
2. Open the key head using a flat-head
screwdriver.3. Remove the transmitter case from the
key head.
4. Open the transmitter case by releasing
the hooks on both sides of the case.
5. Remove the old battery from the
holder.1) Negative (−) side facing up
6. Replace with a new battery (Type
CR1620 or equivalent) making sure to
install the new battery with the negative
(−) side facing up.
7. Put together the transmitter case by
fitting the hooks on both sides of the case.
8. Put the transmitter case in the key
head and then put together the key head.
9. Reinstall the screw on the key head.
After the battery is replaced, the trans-
mitter must be synchronized with the
keyless entry system ’s control unit.
Press either the “
”or “
”button six
times to synchronize the unit.
& Replacing lost transmittersIf you lose a transmitter or want to
purchase additional transmitters (up to
four can be programmed), you should re-
program all of your transmitters for secur-
ity reasons. It is recommended that you
have your dealer program all of your
transmitters into your system.
! Programming the transmitters
The keyless entry system is equipped with
a special code learning feature that allows
you to program new transmitter codes into
the system or to delete old ones. The
system can learn up to four unique
transmitter codes. The four transmitter
codes may be the same or different.
Keys and doors
2-11
– CONTINUED –
ProCarManuals.com