2008 SUBARU TRIBECA ECU
[x] Cancel search: ECUPage 69 of 409
seat as far from the steering
wheel as practical while still
maintaining full vehicle control
and the front passenger should
move the seat as far back as
possible and sit upright and well
back in the seat.
. Do not place any objects over or
near the SRS airbag cover or
between you and the SRS airbag.
If the SRS airbag deploys, those
objects could interfere with its
proper operation and could be
propelled inside the vehicle and
cause injury.
WARNING
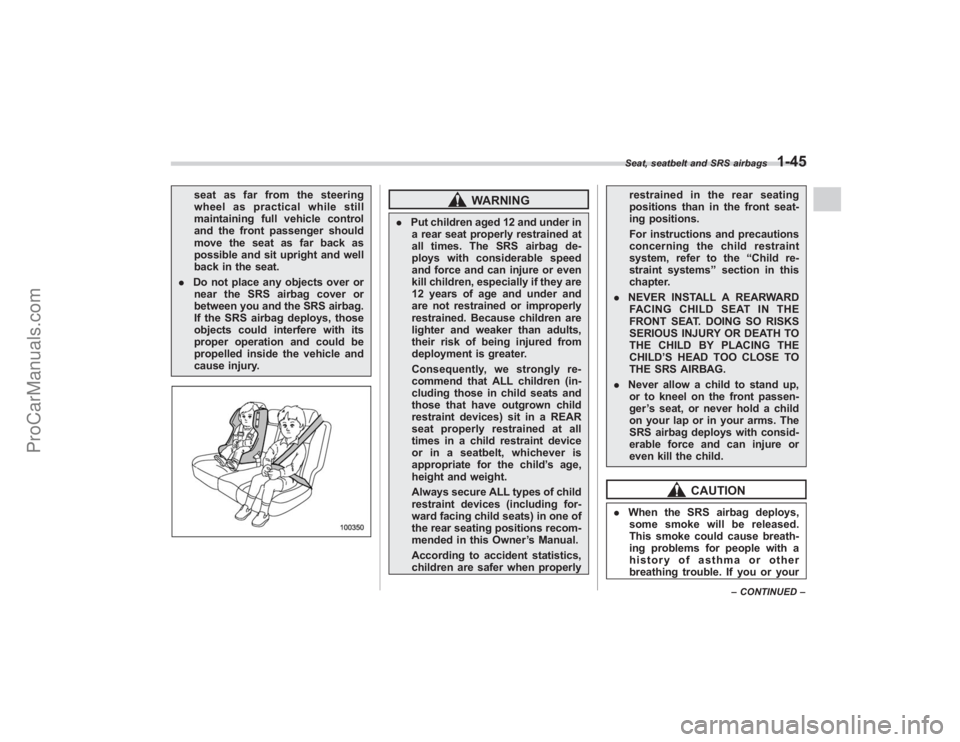
. Put children aged 12 and under in
a rear seat properly restrained at
all times. The SRS airbag de-
ploys with considerable speed
and force and can injure or even
kill children, especially if they are
12 years of age and under and
are not restrained or improperly
restrained. Because children are
lighter and weaker than adults,
their risk of being injured from
deployment is greater.
Consequently, we strongly re-
commend that ALL children (in-
cluding those in child seats and
those that have outgrown child
restraint devices) sit in a REAR
seat properly restrained at all
times in a child restraint device
or in a seatbelt, whichever is
appropriate for the child ’s age,
height and weight.
Always secure ALL types of child
restraint devices (including for-
ward facing child seats) in one of
the rear seating positions recom-
mended in this Owner ’s Manual.
According to accident statistics,
children are safer when properly restrained in the rear seating
positions than in the front seat-
ing positions.
For instructions and precautions
concerning the child restraint
system, refer to the
“Child re-
straint systems ”section in this
chapter.
. NEVER INSTALL A REARWARD
FACING CHILD SEAT IN THE
FRONT SEAT. DOING SO RISKS
SERIOUS INJURY OR DEATH TO
THE CHILD BY PLACING THE
CHILD ’S HEAD TOO CLOSE TO
THE SRS AIRBAG.
. Never allow a child to stand up,
or to kneel on the front passen-
ger ’s seat, or never hold a child
on your lap or in your arms. The
SRS airbag deploys with consid-
erable force and can injure or
even kill the child.
CAUTION
. When the SRS airbag deploys,
some smoke will be released.
This smoke could cause breath-
ing problems for people with a
history of asthma or other
breathing trouble. If you or yourSeat, seatbelt and SRS airbags
1-45
– CONTINUED –
ProCarManuals.com
Page 95 of 409
Keys.................................................................. 2-2
Key number plate ............................................. 2-2
Immobilizer....................................................... 2-3
Security ID plate ............................................... 2-3
Security indicator light ..................................... 2-4
Key replacement .............................................. 2-4
Door locks........................................................ 2-4
Locking and unlocking from the outside .. ......... 2-4
Locking and unlocking from the inside ............. 2-5
Battery drainage prevention function ................ 2-6
Power door locking switches.......................... 2-6
Key lock-in prevention function ........................ 2-7
Remote keyless entry system......................... 2-7
Locking the doors............................................ 2-8
Unlocking the doors ......................................... 2-9
Unlocking the rear gate .................................... 2-9
Illuminated entry .............................................. 2-9
Vehicle finder function ...................................... 2-9
Sounding a panic alarm .................................. 2-10
Selecting audible signal operation .................. 2-10
Replacing the battery ..................................... 2-10
Replacing lost transmitters .............................. 2-11
Alarm system................................................. 2-15
System operation ............................................ 2-15
Activating and deactivating the alarm system ......................................................... 2-15
If you have accidentally triggered the alarm system ......................................................... 2-15
Arming the system ......................................... 2-15
Disarming the system ..................................... 2-17
Valet mode ..................................................... 2-17
Passive arming ............................................... 2-17
Tripped sensor identification ........................... 2-18
Shock sensors (dealer option).. ....................... 2-18
Child safety locks.......................................... 2-19
Windows ......................................................... 2-19
Power windows .............................................. 2-19
Rear gate........................................................ 2-22
Moonroof (if equipped) .................................. 2-23
Tilt function.................................................... 2-24
Sliding function .............................................. 2-24
Anti-entrapment function ................................. 2-24
Sun shade ...................................................... 2-25
Keys and doors
2
ProCarManuals.com
Page 96 of 409
2-2
Keys and doors
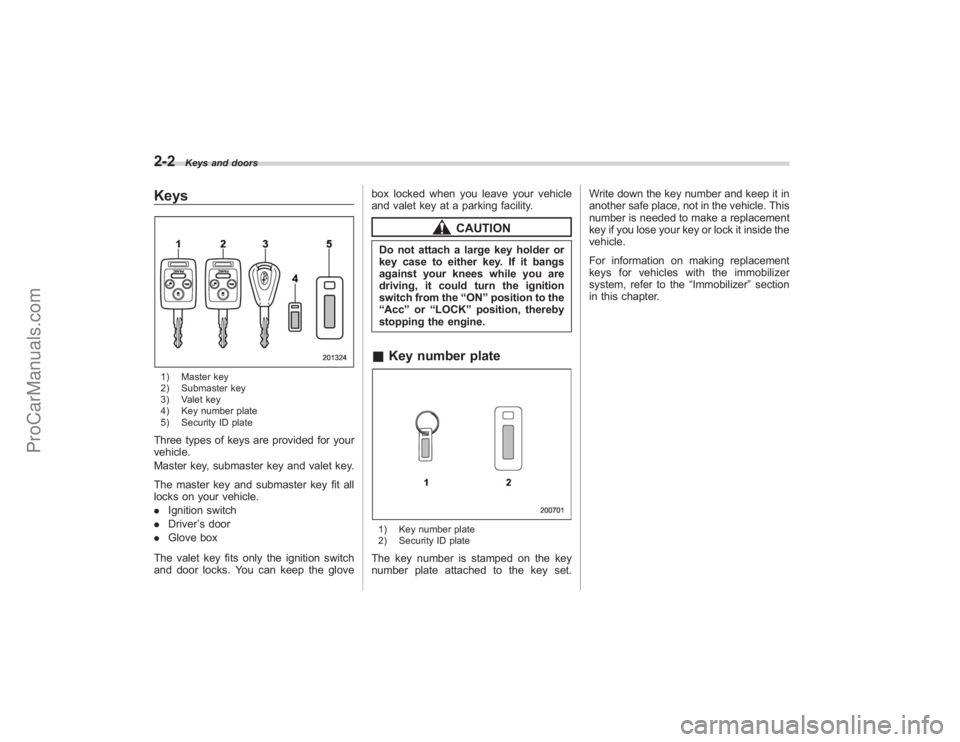
Keys1) Master key
2) Submaster key
3) Valet key
4) Key number plate
5) Security ID plateThree types of keys are provided for your
vehicle.
Master key, submaster key and valet key.
The master key and submaster key fit all
locks on your vehicle.
.Ignition switch
. Driver ’s door
. Glove box
The valet key fits only the ignition switch
and door locks. You can keep the glove box locked when you leave your vehicle
and valet key at a parking facility.
CAUTION
Do not attach a large key holder or
key case to either key. If it bangs
against your knees while you are
driving, it could turn the ignition
switch from the
“ON ”position to the
“ Acc ”or “LOCK ”position, thereby
stopping the engine.& Key number plate1) Key number plate
2) Security ID plateThe key number is stamped on the key
number plate attached to the key set. Write down the key number and keep it in
another safe place, not in the vehicle. This
number is needed to make a replacement
key if you lose your key or lock it inside the
vehicle.
For information on making replacement
keys for vehicles with the immobilizer
system, refer to the
“Immobilizer ”section
in this chapter.
ProCarManuals.com
Page 97 of 409
ImmobilizerThe immobilizer system is designed to
prevent an unauthorized person from
starting the engine. Only keys registered
with your vehicle’s immobilizer system can
be used to operate your vehicle. Even if
an unregistered key fits into the ignition
switch and can be turned to the “START”
position, the engine will automatically stop
after several seconds.
Each immobilizer key contains a trans-
ponder in which the key ’s ID code is
stored. When a key is inserted into the
ignition switch and turned to the “ON”
position, the transponder transmits the
key ’s ID code to the immobilizer system ’s
receiver. If the transmitted ID code
matches the ID code registered in the
immobilizer system, the system allows the
engine to be started. Since the ID code is
transmitted and acted upon almost in-
stantly, the immobilizer system does not
impede normal starting of the engine.
If the engine fails to start, pull out the key
once before trying again. Refer to the
“Ignition switch ”section in chapter 3.
This device complies with Part 15 of
the FCC Rules and with RSS-210 of
Industry Canada. Operation is subject
to the following two conditions: (1) This device may not cause harmful inter-
ference, and (2) this device must
accept any interference received, in-
cluding interference that may cause
undesired operation.
Changes or modifications not ex-
pressly approved by the party respon-
sible for compliance could void the
user
’s authority to operate the equip-
ment.
NOTETo protect your vehicle from theft,
please pay close attention to the fol-
lowing security precautions:
. Never leave your vehicle unattended
with its keys inside.
. Before leaving your vehicle, close all
windows and lock the doors and rear
gate.
. Do not leave spare keys or any
record of your key number in the
vehicle.
CAUTION
. Do not place the key under direct
sunlight or anywhere it may
become hot. .
Do not get the key wet. If the key
gets wet, wipe it dry with a cloth
immediately.
& Security ID plate1) Key number plate
2) Security ID plateThe security ID is stamped on the security
ID plate attached to the key set. Write
down the security ID and keep it in
another safe place, not in the vehicle.
This number is needed to make a replace-
ment key if you lose your key or lock it
inside the vehicle.
This number is also needed for replace-
ment or repair of the engine control unit,
integrated unit, and combination meter.
Keys and doors
2-3
–CONTINUED –
ProCarManuals.com
Page 98 of 409
2-4
Keys and doors
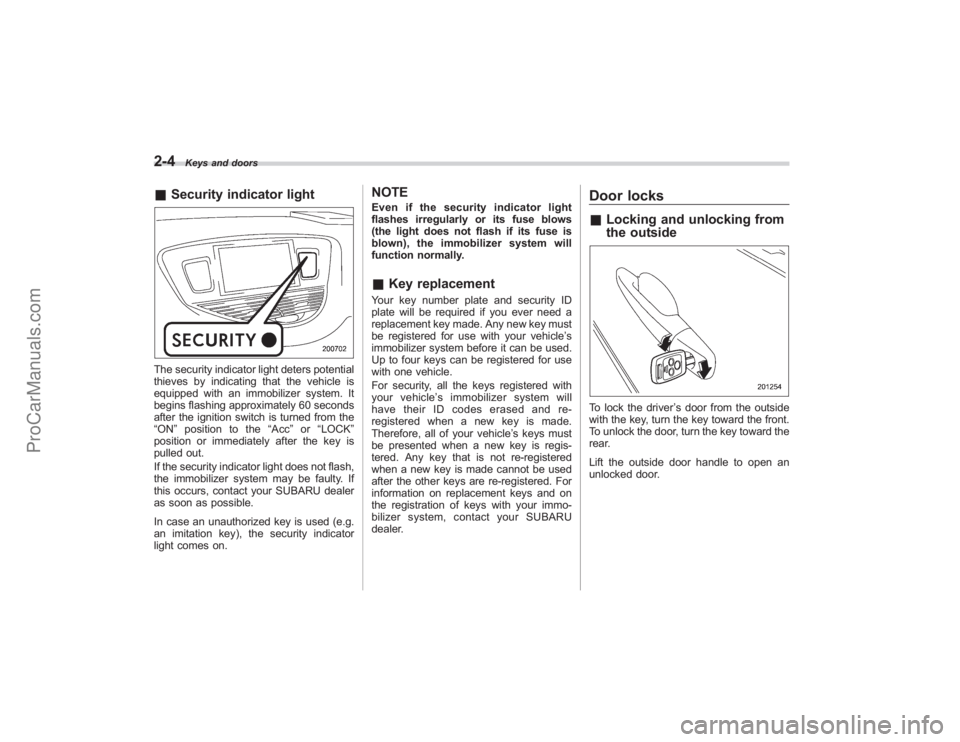
&Security indicator lightThe security indicator light deters potential
thieves by indicating that the vehicle is
equipped with an immobilizer system. It
begins flashing approximately 60 seconds
after the ignition switch is turned from the
“ON ”position to the “Acc”or “LOCK ”
position or immediately after the key is
pulled out.
If the security indicator light does not flash,
the immobilizer system may be faulty. If
this occurs, contact your SUBARU dealer
as soon as possible.
In case an unauthorized key is used (e.g.
an imitation key), the security indicator
light comes on.
NOTEEven if the security indicator light
flashes irregularly or its fuse blows
(the light does not flash if its fuse is
blown), the immobilizer system will
function normally.& Key replacementYour key number plate and security ID
plate will be required if you ever need a
replacement key made. Any new key must
be registered for use with your vehicle’ s
immobilizer system before it can be used.
Up to four keys can be registered for use
with one vehicle.
For security, all the keys registered with
your vehicle ’s immobilizer system will
have their ID codes erased and re-
registered when a new key is made.
Therefore, all of your vehicle’ s keys must
be presented when a new key is regis-
tered. Any key that is not re-registered
when a new key is made cannot be used
after the other keys are re-registered. For
information on replacement keys and on
the registration of keys with your immo-
bilizer system, contact your SUBARU
dealer.
Door locks& Locking and unlocking from
the outsideTo lock the driver ’s door from the outside
with the key, turn the key toward the front.
To unlock the door, turn the key toward the
rear.
Lift the outside door handle to open an
unlocked door.
ProCarManuals.com
Page 105 of 409
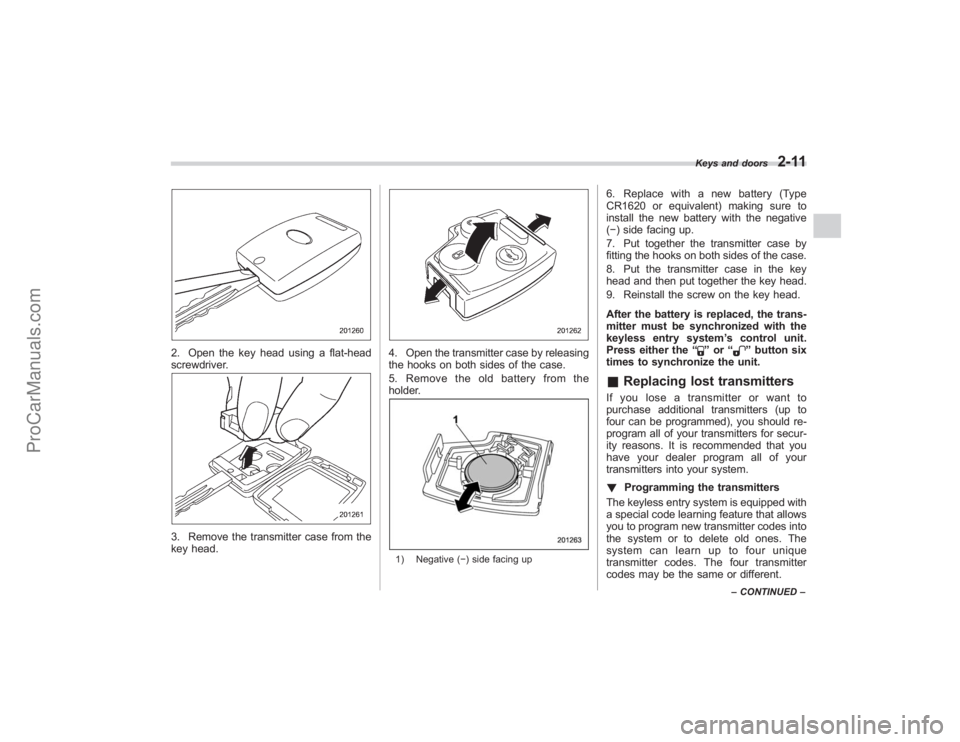
2. Open the key head using a flat-head
screwdriver.3. Remove the transmitter case from the
key head.
4. Open the transmitter case by releasing
the hooks on both sides of the case.
5. Remove the old battery from the
holder.1) Negative (−) side facing up
6. Replace with a new battery (Type
CR1620 or equivalent) making sure to
install the new battery with the negative
(−) side facing up.
7. Put together the transmitter case by
fitting the hooks on both sides of the case.
8. Put the transmitter case in the key
head and then put together the key head.
9. Reinstall the screw on the key head.
After the battery is replaced, the trans-
mitter must be synchronized with the
keyless entry system ’s control unit.
Press either the “
”or “
”button six
times to synchronize the unit.
& Replacing lost transmittersIf you lose a transmitter or want to
purchase additional transmitters (up to
four can be programmed), you should re-
program all of your transmitters for secur-
ity reasons. It is recommended that you
have your dealer program all of your
transmitters into your system.
! Programming the transmitters
The keyless entry system is equipped with
a special code learning feature that allows
you to program new transmitter codes into
the system or to delete old ones. The
system can learn up to four unique
transmitter codes. The four transmitter
codes may be the same or different.
Keys and doors
2-11
– CONTINUED –
ProCarManuals.com
Page 108 of 409
2-14
Keys and doors
NOTE.When you finish entering the eighth
digit, an electronic tone will sound for
30 seconds.
. If the interval between one push of
the switch and the next exceeds 5
seconds, an error will occur. In this
event, perform the procedure again
beginning with part 4. If an error occurs
six times, perform the procedure again
starting with part 3.
8. Before the electronic tone stops
sounding, use the power door locking
switch to reenter the transmitter code
beginning with the leftmost digit.NOTEIf you do not start entering the number
using the lock knob before the electro-
nic tone stops sounding, an error will
occur. In this event, perform the proce-
dure again beginning with part 3.
9. When you have finished entering the
code a second time, an electronic tone will
sound for 1 second and automatic door
locking and unlocking operation will take
place once to indicate completion of
registration, provided the code entered
the second time is identical to that entered
the first time.
NOTEIf the code entered the second time is
not identical to the code entered the
first time, an error will occur. In this
event, perform the procedure again
beginning with part 5. If an error occurs
five times, perform the procedure again
starting with part 3.
10. If you wish to program another trans-
mitter code into the system (up to four
transmitter codes can be programmed into
the system), perform the procedure begin-
ning with part 4. When you have finished
programming all of the necessary trans-
mitter codes into the system, remove the
key from the ignition switch.
11. Test every registered transmitter to
confirm correct operation.
! Deleting old transmitter codes
The control unit of the keyless entry
system has four memory locations to store
transmitter codes, giving it the ability to
operate with up to four transmitters. When
you lose a transmitter, the lost transmit-
ter ’s code remains in the memory. For
security reasons, lost transmitter codes
should be deleted from the memory.
To delete old transmitter codes, program
four transmitter codes into the system. If
you have only one current transmitter, program it four times. If you have two
current transmitters, program each one
twice. If you have three current transmit-
ters, program two of them once and the
third one twice. This process will leave
only current transmitter codes in the
system
’s memory.
NOTEMake sure no one else is operating
their keyless entry system within range
of your vehicle when programming
transmitters. If someone else were to
operate their remote transmitter while
you are programming your transmit-
ters, it is possible that their transmitter
code will be programmed into your
system, allowing them unauthorized
access to your vehicle.
ProCarManuals.com
Page 111 of 409
.The 30-second standby time can be
eliminated if you prefer. Have it per-
formed by your SUBARU dealer.
. The system is in the standby mode
for a 30-second period after locking the
doors with the remote transmitter. The
security indicator light will flash at
short intervals during this period.
. If any of the following actions is
done during the standby period, the
system will not switch to the surveil-
lance state.
.Doors are unlocked using the
remote transmitter.
. Any door (including the rear gate)
is opened.
. Ignition switch is turned to the
“ ON ”position.& Disarming the systemBriefly press the “
”button (for less than
2 seconds) on the remote transmitter. The
driver ’s door will unlock, an electronic
chirp will sound twice, the turn signal
lights will flash twice and the indicator
light will go off.
To unlock all other doors and the rear
gate, briefly press the “
”button a
second time within 5 seconds.
NOTEIf the interval between the first and
second presses of the “
”button (for
unlocking of all of the doors and the
rear gate) is extremely short, the sys-
tem may not respond.
! Emergency disarming
If you cannot disarm the system using the
transmitter (i.e. the transmitter is lost,
broken or the transmitter battery is too
weak), you can disarm the system without
using the transmitter.
The system can be disarmed if you turn
the ignition switch from the “LOCK” to the
“ON ”position with a registered key.
& Valet modeWhen you choose the valet mode, the
alarm system does not operate. In valet
mode, the remote transmitter is used only
for locking and unlocking the doors and
rear gate and panic activation.
To enter the valet mode, change the
setting of your vehicle’ s alarm system for
deactivation mode. (Refer to “Activating
and deactivating the alarm system ”in this
section.) The security indicator light will
continue to flash once every 3 seconds
indicating that the system is in the valet
mode. To exit valet mode, change the setting of
your vehicle’
s alarm system for activation
mode. (Refer to “Activating and deactivat-
ing the alarm system ”in this section.)
& Passive armingWhen passive arming mode has been
programmed by the dealer, arming of the
system is automatically accomplished
without using the remote transmitter. Note
that in this mode, DOORS MUST BE
MANUALLY LOCKED.
! To enter the passive mode
If you wish to program the passive arming
mode, have it done by your SUBARU
dealer.
! Arming the system
CAUTION
In passive mode, the system will
automatically activate the alarm but
WILL NOT automatically lock the
doors. In order to lock the doors
you must either lock them as in-
dicated in step 4 below or with the
key once they have been closed.
Failure to lock the doors manually
will result in a higher security risk.
1. Turn the ignition switch to the “ON”
Keys and doors
2-17
–CONTINUED –
ProCarManuals.com