2008 SUBARU TRIBECA flat tire
[x] Cancel search: flat tirePage 302 of 409
9-6
In case of emergency
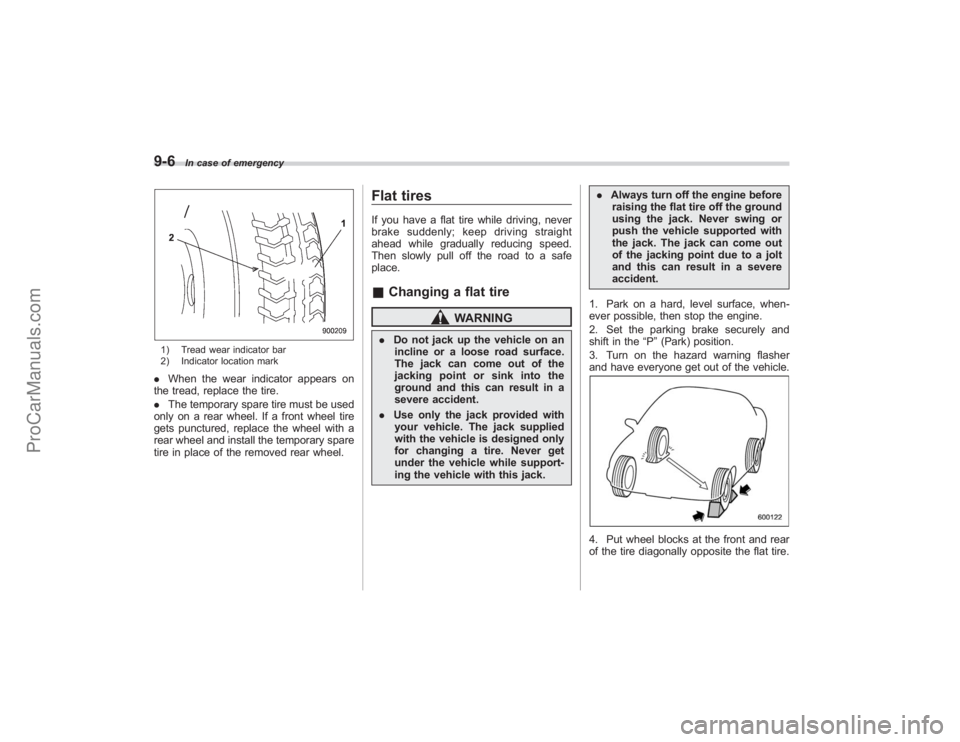
1) Tread wear indicator bar
2) Indicator location mark.When the wear indicator appears on
the tread, replace the tire.
. The temporary spare tire must be used
only on a rear wheel. If a front wheel tire
gets punctured, replace the wheel with a
rear wheel and install the temporary spare
tire in place of the removed rear wheel.
Flat tiresIf you have a flat tire while driving, never
brake suddenly; keep driving straight
ahead while gradually reducing speed.
Then slowly pull off the road to a safe
place.& Changing a flat tire
WARNING
. Do not jack up the vehicle on an
incline or a loose road surface.
The jack can come out of the
jacking point or sink into the
ground and this can result in a
severe accident.
. Use only the jack provided with
your vehicle. The jack supplied
with the vehicle is designed only
for changing a tire. Never get
under the vehicle while support-
ing the vehicle with this jack. .
Always turn off the engine before
raising the flat tire off the ground
using the jack. Never swing or
push the vehicle supported with
the jack. The jack can come out
of the jacking point due to a jolt
and this can result in a severe
accident.
1. Park on a hard, level surface, when-
ever possible, then stop the engine.
2. Set the parking brake securely and
shift in the “P”(Park) position.
3. Turn on the hazard warning flasher
and have everyone get out of the vehicle.
4. Put wheel blocks at the front and rear
of the tire diagonally opposite the flat tire.
ProCarManuals.com
Page 303 of 409
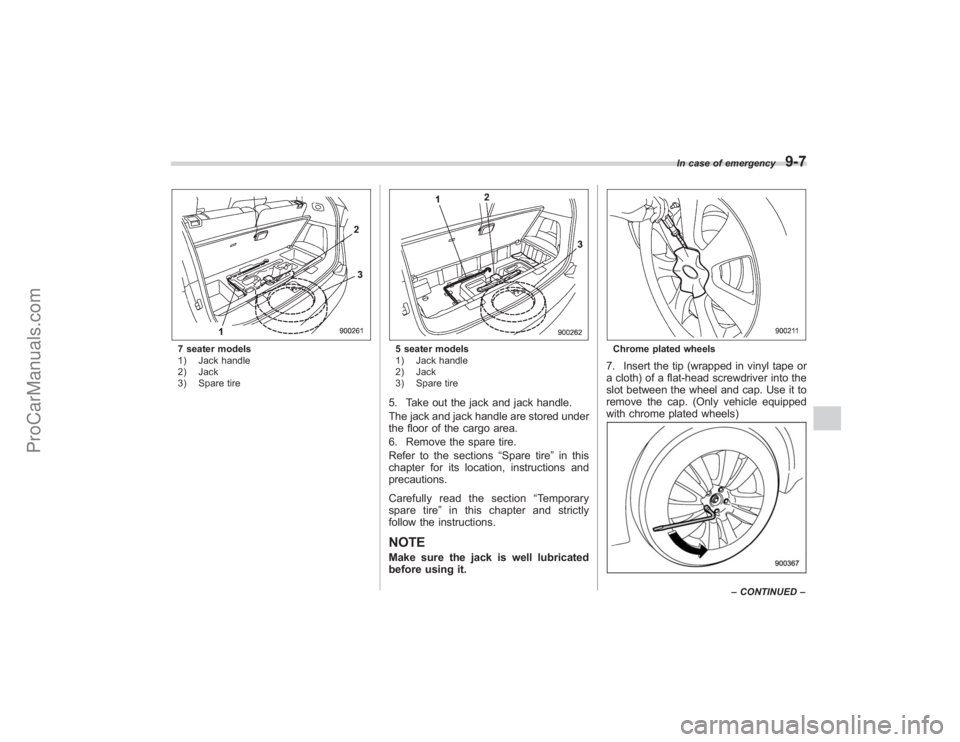
7 seater models
1) Jack handle
2) Jack
3) Spare tire
5 seater models
1) Jack handle
2) Jack
3) Spare tire5. Take out the jack and jack handle.
The jack and jack handle are stored under
the floor of the cargo area.
6. Remove the spare tire.
Refer to the sections“Spare tire ”in this
chapter for its location, instructions and
precautions.
Carefully read the section “Temporary
spare tire ”in this chapter and strictly
follow the instructions.NOTEMake sure the jack is well lubricated
before using it.
Chrome plated wheels7. Insert the tip (wrapped in vinyl tape or
a cloth) of a flat-head screwdriver into the
slot between the wheel and cap. Use it to
remove the cap. (Only vehicle equipped
with chrome plated wheels)
In case of emergency
9-7
– CONTINUED –
ProCarManuals.com
Page 304 of 409
9-8
In case of emergency
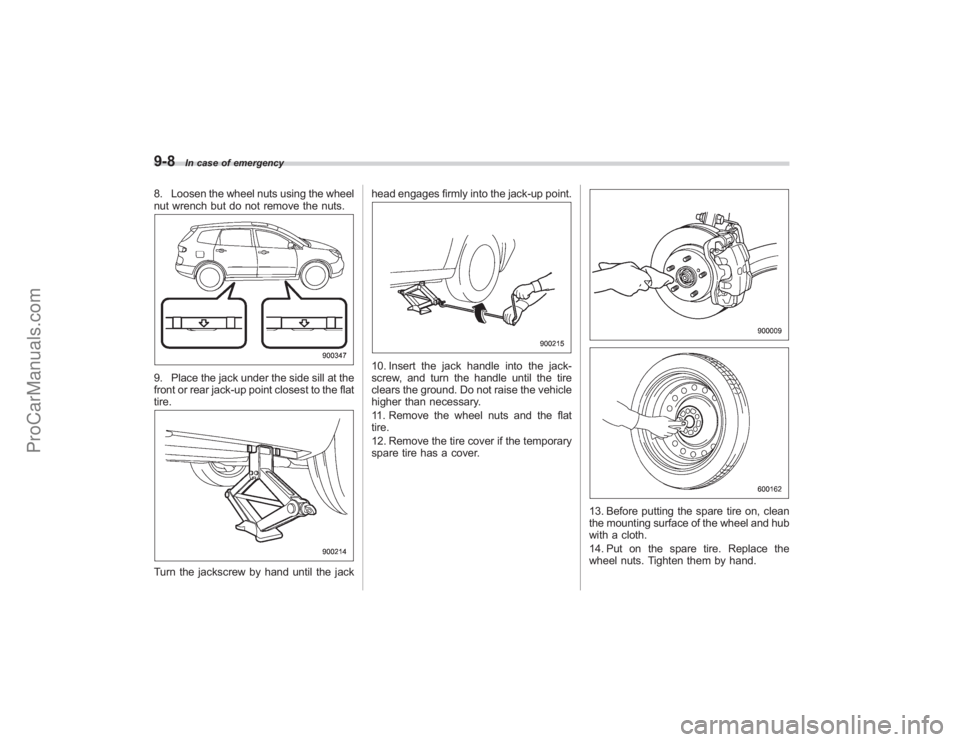
8. Loosen the wheel nuts using the wheel
nut wrench but do not remove the nuts.9. Place the jack under the side sill at the
front or rear jack-up point closest to the flat
tire.Turn the jackscrew by hand until the jackhead engages firmly into the jack-up point.
10. Insert the jack handle into the jack-
screw, and turn the handle until the tire
clears the ground. Do not raise the vehicle
higher than necessary.
11. Remove the wheel nuts and the flat
tire.
12. Remove the tire cover if the temporary
spare tire has a cover.
13. Before putting the spare tire on, clean
the mounting surface of the wheel and hub
with a cloth.
14. Put on the spare tire. Replace the
wheel nuts. Tighten them by hand.
ProCarManuals.com
Page 306 of 409
9-10
In case of emergency
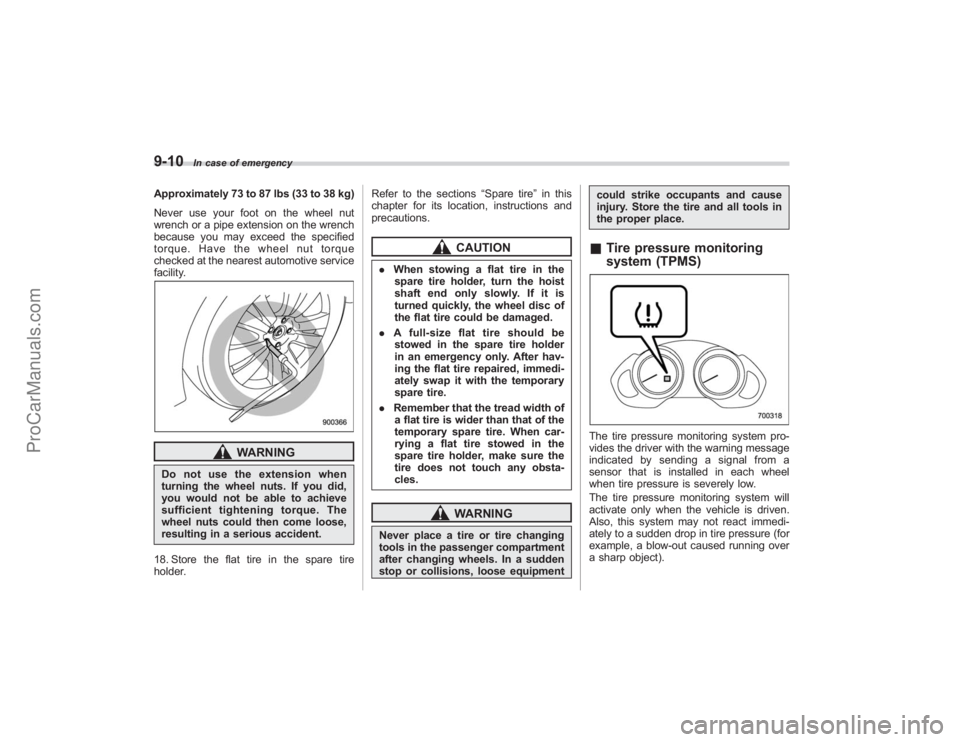
Approximately 73 to 87 lbs (33 to 38 kg)
Never use your foot on the wheel nut
wrench or a pipe extension on the wrench
because you may exceed the specified
torque. Have the wheel nut torque
checked at the nearest automotive service
facility.
WARNING
Do not use the extension when
turning the wheel nuts. If you did,
you would not be able to achieve
sufficient tightening torque. The
wheel nuts could then come loose,
resulting in a serious accident.
18. Store the flat tire in the spare tire
holder. Refer to the sections
“Spare tire ”in this
chapter for its location, instructions and
precautions.
CAUTION
. When stowing a flat tire in the
spare tire holder, turn the hoist
shaft end only slowly. If it is
turned quickly, the wheel disc of
the flat tire could be damaged.
. A full-size flat tire should be
stowed in the spare tire holder
in an emergency only. After hav-
ing the flat tire repaired, immedi-
ately swap it with the temporary
spare tire.
. Remember that the tread width of
a flat tire is wider than that of the
temporary spare tire. When car-
rying a flat tire stowed in the
spare tire holder, make sure the
tire does not touch any obsta-
cles.
WARNING
Never place a tire or tire changing
tools in the passenger compartment
after changing wheels. In a sudden
stop or collisions, loose equipment could strike occupants and cause
injury. Store the tire and all tools in
the proper place.
&
Tire pressure monitoring
system (TPMS)The tire pressure monitoring system pro-
vides the driver with the warning message
indicated by sending a signal from a
sensor that is installed in each wheel
when tire pressure is severely low.
The tire pressure monitoring system will
activate only when the vehicle is driven.
Also, this system may not react immedi-
ately to a sudden drop in tire pressure (for
example, a blow-out caused running over
a sharp object).
ProCarManuals.com
Page 307 of 409
WARNING
If the low tire pressure warning light
comes on while driving, never brake
suddenly and keep driving straight
ahead while gradually reducing
speed. Then slowly pull off the road
to a safe place. Otherwise an acci-
dent involving serious vehicle da-
mage and serious personal injury
could occur.
Check the pressure for all four tires
and adjust the pressure to the COLD
tire pressure shown on the vehicle
placard on the door pillar on the
driver’s side. If this light still comes
on while driving after adjusting the
tire pressure, a tire may have sig-
nificant damage and a fast leak that
causes the tire to lose air rapidly. If
you have a flat tire, replace it with a
spare tire as soon as possible.
When a spare tire is mounted or a
wheel rim is replaced without the
original pressure sensor/transmitter
being transferred, the low tire pres-
sure warning light will illuminate
steadily after blinking for approxi-
mately one minute. This indicates
the TPMS is unable to monitor all
four road wheels. Contact your
SUBARU dealer as soon as possible for tire and sensor replacement and/
or system resetting.
Do not inject any tire liquid or
aerosol tire sealant into the tires,
as this may cause a malfunction of
the tire pressure sensors.
If the light illuminates steadily after
blinking for approximately one min-
ute, promptly contact a SUBARU
dealer to have the system inspected.
Jump starting
WARNING
.
Battery fluid is SULFURIC ACID.
Do not let it come in contact with
the eyes, skin, clothing or the
vehicle.
If battery fluid gets on you,
thoroughly flush the exposed
area with water immediately. Get
medical help if the fluid has
entered your eyes.
If battery fluid is accidentally
swallowed, immediately drink a
large amount of milk or water,
and obtain immediate medical
help.
Keep everyone including chil-
dren away from the battery.
. The gas generated by a battery
explodes if a flame or spark is
brought near it. Do not smoke or
light a match while jump starting.
. Never attempt jump starting if the
discharged battery is frozen. It
could cause the battery to burst
or explode.
. Whenever working on or around
a battery, always wear suitable
In case of emergency
9-11
– CONTINUED –
ProCarManuals.com
Page 313 of 409
4. Tighten the towing hook securely
using a wheel nut wrench.
After towing, remove the towing hook from
the vehicle and stow it in the tool bag.
Put the thread hole cover on the rear
bumper.
WARNING
.Do not use the towing hook
except when towing your vehicle.
. Be sure to remove the towing
hook after towing. Leaving the
towing hook mounted on the
vehicle could interfere with prop-
er operation of the SRS airbag
system in a frontal collision.
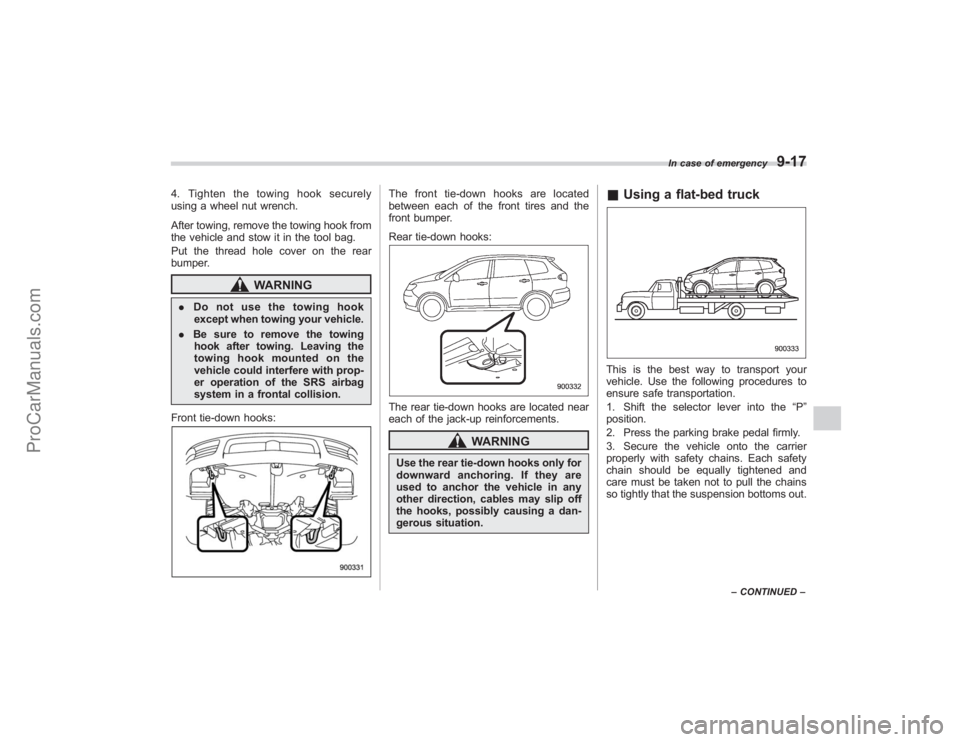
Front tie-down hooks:
The front tie-down hooks are located
between each of the front tires and the
front bumper.
Rear tie-down hooks:The rear tie-down hooks are located near
each of the jack-up reinforcements.
WARNING
Use the rear tie-down hooks only for
downward anchoring. If they are
used to anchor the vehicle in any
other direction, cables may slip off
the hooks, possibly causing a dan-
gerous situation.
& Using a flat-bed truckThis is the best way to transport your
vehicle. Use the following procedures to
ensure safe transportation.
1. Shift the selector lever into the “P ”
position.
2. Press the parking brake pedal firmly.
3. Secure the vehicle onto the carrier
properly with safety chains. Each safety
chain should be equally tightened and
care must be taken not to pull the chains
so tightly that the suspension bottoms out.
In case of emergency
9-17
– CONTINUED –
ProCarManuals.com
Page 316 of 409
9-20
In case of emergency
For how to use the jack, refer to“Flat tires”
section in this chapter.
ProCarManuals.com
Page 346 of 409
11-24
Maintenance and service
replace all four tires.
!Winter (snow) tires
Winter tires are best suited for driving on
snow-covered and icy roads. However
winter tires do not perform as well as
summer tires and all season tires on roads
other than snow-covered and icy roads.& Tire pressure monitoring
system (TPMS)The tire pressure monitoring system pro-
vides the driver with a warning message
by sending a signal from a sensor that is
installed in each wheel when tire pressure
is severely low. The tire pressure monitor-
ing system will activate only when the
vehicle is driven. Also, this system may
not react immediately to a sudden drop in
tire pressure (for example, a blow-out
caused by running over a sharp object).
If you adjust the tire pressures in a warm
garage and will then drive the vehicle in
cold outside air, the resulting drop in tire
pressures may cause the low tire pressure
warning light to come on. To avoid this
problem when adjusting the tire pressures
in a warm garage, inflate the tires to
pressures higher than those shown on the
tire placard. Specifically, inflate them by an
extra 1 psi (6.9 kPa, 0.07 kgf/cm
2) for
every difference of 10 8F (5.6 8C) between the temperature in the garage and the
temperature outside. By way of example,
the following table shows the required tire
pressures that correspond to various out-
side temperatures when the temperature
in the garage is 60
8F (15.6 8C).
Standard tire pressures:
Front: 33 psi (230 kPa, 2.3 kgf/cm
2)
Rear: 32 psi (220 kPa, 2.2 kgf/cm2)
Garage temperature: 60 8F (15.6 8C)
Outside
temperature Adjusted pressure
[psi (kPa, kgf/cm
2)]
front rear
30 8F( −18C) 36 (250, 2.5) 35 (240, 2.4)
10 8F( −12 8C) 38
(265, 2.65) 37
(255, 2.55)
−10 8F
( −23 8C) 40 (280, 2.8) 39 (270, 2.7)
If the low tire pressure warning light
comes on when you drive the vehicle in
cold outside air after adjusting the tire
pressures in a warm garage, re-adjust the
tire pressures using the method described
above. Then, increase the vehicle speed
to at least 20 mph (32 km/h) and check to
see that the low tire pressure warning light
goes off a few minutes later. If the low tire
pressure warning light does not go off, the
tire pressure monitoring system may not be functioning normally. In this event, go
to a SUBARU dealer to have the system
inspected as soon as possible.
While the vehicle is driven, friction be-
tween tires and the road surface causes
the tires to warm up. After illumination of
the low tire pressure warning light, any
increase in the tire pressures caused by
an increase in the outside air temperature
or by an increase in the temperature in the
tires can cause the low tire pressure
warning light to go off.
System resetting is necessary when the
wheels are changed (for example, a
switch to snow tires) and new TPMS
valves are installed on the newly fitted
wheels. Have this work performed by a
SUBARU dealer following wheel replace-
ment.
It may not be possible to install TPMS
valves on certain wheels that are on the
market. Therefore, if you change the
wheels (for example, a switch to snow
tires), use wheels that have the same part
number as the standard-equipment
wheels. Without four operational TPMS
valve/sensors on the wheels, the TPMS
will not fully function and the warning light
in the instrument panel will illuminate
steadily after blinking for approximately
one minute.
ProCarManuals.com