2008 SUBARU TRIBECA oil temperature
[x] Cancel search: oil temperaturePage 249 of 409
If you inadvertently have turned the igni-
tion switch to the“LOCK”position with the
selector lever in the “N”position, proceed
as follows. By referring to the “Shift lock
release ”section in this chapter, remove
the cover. Then, with a screwdriver in-
serted into the hole, move the selector
lever to the “P”position while pressing the
release button. If the selector lever re-
verse inhibiting function fails, have the
vehicle inspected by the nearest SUBARU
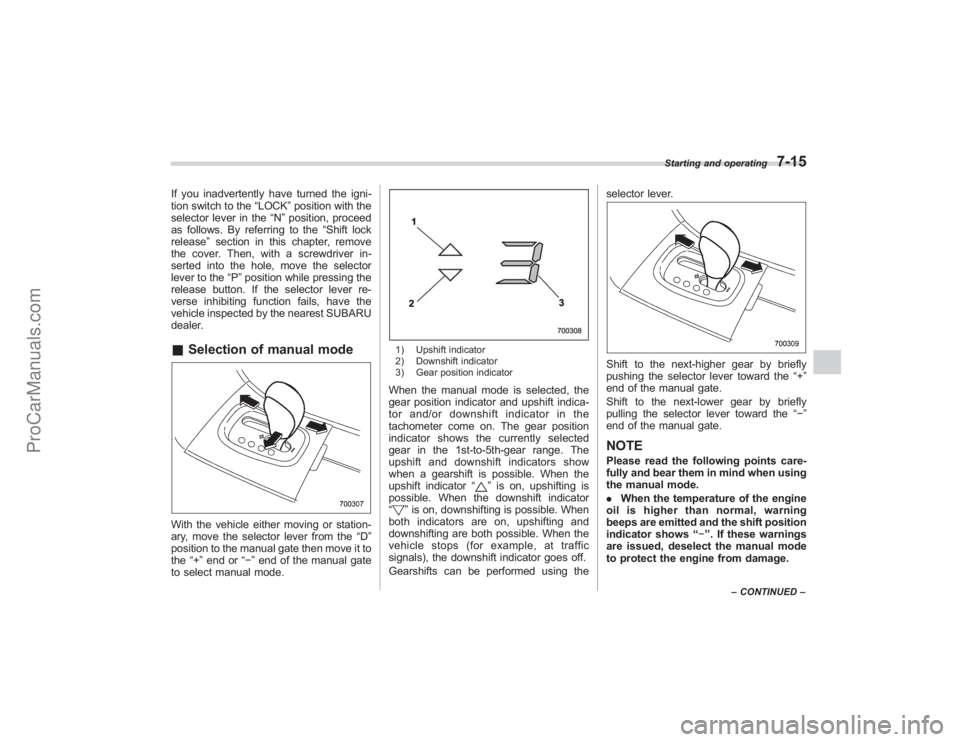
dealer.& Selection of manual modeWith the vehicle either moving or station-
ary, move the selector lever from the “D”
position to the manual gate then move it to
the “+”end or “−”end of the manual gate
to select manual mode.
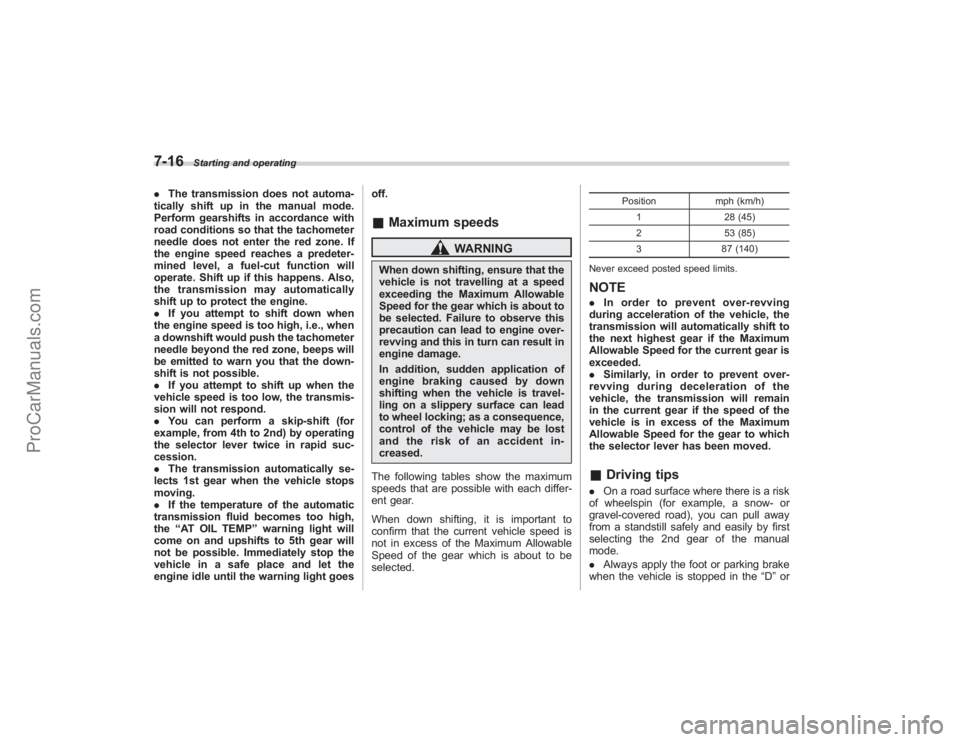
1) Upshift indicator
2) Downshift indicator
3) Gear position indicatorWhen the manual mode is selected, the
gear position indicator and upshift indica-
tor and/or downshift indicator in the
tachometer come on. The gear position
indicator shows the currently selected
gear in the 1st-to-5th-gear range. The
upshift and downshift indicators show
when a gearshift is possible. When the
upshift indicator “
”is on, upshifting is
possible. When the downshift indicator
“
” is on, downshifting is possible. When
both indicators are on, upshifting and
downshifting are both possible. When the
vehicle stops (for example, at traffic
signals), the downshift indicator goes off.
Gearshifts can be performed using the selector lever.
Shift to the next-higher gear by briefly
pushing the selector lever toward the
“+”
end of the manual gate.
Shift to the next-lower gear by briefly
pulling the selector lever toward the “−”
end of the manual gate.NOTEPlease read the following points care-
fully and bear them in mind when using
the manual mode.
. When the temperature of the engine
oil is higher than normal, warning
beeps are emitted and the shift position
indicator shows “− ”. If these warnings
are issued, deselect the manual mode
to protect the engine from damage.
Starting and operating
7-15
– CONTINUED –
ProCarManuals.com
Page 250 of 409
7-16
Starting and operating
.The transmission does not automa-
tically shift up in the manual mode.
Perform gearshifts in accordance with
road conditions so that the tachometer
needle does not enter the red zone. If
the engine speed reaches a predeter-
mined level, a fuel-cut function will
operate. Shift up if this happens. Also,
the transmission may automatically
shift up to protect the engine.
. If you attempt to shift down when
the engine speed is too high, i.e., when
a downshift would push the tachometer
needle beyond the red zone, beeps will
be emitted to warn you that the down-
shift is not possible.
. If you attempt to shift up when the
vehicle speed is too low, the transmis-
sion will not respond.
. You can perform a skip-shift (for
example, from 4th to 2nd) by operating
the selector lever twice in rapid suc-
cession.
. The transmission automatically se-
lects 1st gear when the vehicle stops
moving.
. If the temperature of the automatic
transmission fluid becomes too high,
the “AT OIL TEMP ”warning light will
come on and upshifts to 5th gear will
not be possible. Immediately stop the
vehicle in a safe place and let the
engine idle until the warning light goes off.
&
Maximum speeds
WARNING
When down shifting, ensure that the
vehicle is not travelling at a speed
exceeding the Maximum Allowable
Speed for the gear which is about to
be selected. Failure to observe this
precaution can lead to engine over-
revving and this in turn can result in
engine damage.
In addition, sudden application of
engine braking caused by down
shifting when the vehicle is travel-
ling on a slippery surface can lead
to wheel locking; as a consequence,
control of the vehicle may be lost
and the risk of an accident in-
creased.
The following tables show the maximum
speeds that are possible with each differ-
ent gear.
When down shifting, it is important to
confirm that the current vehicle speed is
not in excess of the Maximum Allowable
Speed of the gear which is about to be
selected.
Position mph (km/h)
1 28 (45)
2 53 (85)
3 87 (140)
Never exceed posted speed limits.
NOTE. In order to prevent over-revving
during acceleration of the vehicle, the
transmission will automatically shift to
the next highest gear if the Maximum
Allowable Speed for the current gear is
exceeded.
. Similarly, in order to prevent over-
revving during deceleration of the
vehicle, the transmission will remain
in the current gear if the speed of the
vehicle is in excess of the Maximum
Allowable Speed for the gear to which
the selector lever has been moved.& Driving tips. On a road surface where there is a risk
of wheelspin (for example, a snow- or
gravel-covered road), you can pull away
from a standstill safely and easily by first
selecting the 2nd gear of the manual
mode.
. Always apply the foot or parking brake
when the vehicle is stopped in the “D”or
ProCarManuals.com
Page 275 of 409
underbody. Clear off any such matter from
the underbody. If the vehicle is used with
these materials trapped or adhering to the
underbody, a mechanical breakdown or
fire could occur.
.Secure all cargo carried inside the
vehicle and make certain that it is not
piled higher than the seatbacks. During
sudden stops or jolts, unsecured cargo
could be thrown around in the vehicle and
cause injury. Do not pile heavy loads on
the roof. Those loads raise the vehicle ’s
center of gravity and make it more prone
to tip over.
. If you must rock the vehicle to free it
from sand or mud, depress the accelerator
pedal slightly and move the selector lever
back and forth between “D ” and “R ”
repeatedly. Do not race the engine. For
the best possible traction, avoid spinning
the wheels when trying to free the vehicle.
. When the road surface is extremely
slippery, you can obtain better traction by
starting the vehicle with the transmission
in 2nd than 1st.
. Never equip your vehicle with tires
larger than those specified in this manual.
. Wash the vehicle ’s underbody after off-
road driving. Suspension components are
particularly prone to dirt buildup, so they
need to be washed thoroughly.
. Frequent driving of an AWD vehicle under hard-driving conditions such as
rough roads or off roads will necessitate
more frequent replacement of engine oil,
brake fluid and transmission oil than that
specified in the maintenance schedule
described in the
“Warranty and Mainte-
nance Booklet ”.
Remember that damage done to your
SUBARU while operating it off-road and
not using common sense precautions
such as those listed above is not eligible
for warranty coverage.
Winter driving& Operation during cold
weatherCarry some emergency equipment, such
as tire chains, a window scraper, a bag of
sand, flares, a small shovel, and jumper
cables.
Check the battery and cables. Cold
temperatures reduce battery capacity.
The battery must be in good condition to
provide enough power for cold winter
starts.
Use an engine oil of proper grade and
viscosity for cold weather. Heavy summer
oil will cause harder starting.
Keep the door locks from freezing by
Driving tips
8-7
–CONTINUED –
ProCarManuals.com
Page 295 of 409

.Backing up with a trailer is difficult and
takes practice. When backing up with a
trailer, never accelerate or steer rapidly.
When turning back, grip the bottom of the
steering wheel with one hand and turn it to
the left for a left turn, and turn it to the right
for a right turn.
. If the ABS warning light illuminates
while the vehicle is in motion, stop towing
the trailer and have repairs performed
immediately by the nearest SUBARU
dealer.
! Driving on grades
. Before going down a steep hill, slow
down and shift into lower gear (if neces-
sary, use 1st gear) in order to utilize the
engine braking effect and prevent over-
heating of your vehicle’ s brakes. Do not
make sudden downshifts.
. When driving uphill in hot weather, the
air conditioner may turn off automatically
to protect the engine from overheating.
. When driving uphill in hot weather, pay
attention to the water temperature gauge
pointer and AT OIL TEMP warning light
since the engine and transmission are
relatively prone to overheating under
these conditions. If the water temperature
gauge pointer approaches the OVER-
HEAT zone or the AT OIL TEMP warning
light illuminates, immediately switch off the air conditioner and stop the vehicle at the
nearest safe place. Refer to the
“Engine
overheating ”section in chapter 9, and
“Warning and indicator lights ”section in
chapter 3.
NOTEThe temperature of engine coolant is
less likely to rise to the OVERHEAT
zone in the “D ” position than in the
manual mode position.
. Avoid using the accelerator pedal to
stay stationary on an uphill slope instead
of using the parking brake or foot brake.
That may cause the transmission fluid to
overheat.
! Parking on a grade
Always block the wheels under both
vehicle and trailer when parking. Apply
the parking brake firmly. You should not
park on a hill or slope. But if parking on a
hill or slope cannot be avoided, you
should take the following steps:
1. Apply the brakes and hold the pedal
down.
2. Have someone place wheel blocks
under both the vehicle and trailer wheels.
3. When the wheel blocks are in place,
release the regular brakes slowly until the
blocks absorb the load.
4. Apply the regular brakes and then apply the parking brake; slowly release
the regular brakes.
5. Shift into
“P”and shut off the engine.
Driving tips
8-27
ProCarManuals.com
Page 310 of 409

9-14
In case of emergency
5. Start the engine of the vehicle with the
booster battery and run it at moderate
speed. Then start the engine of the vehicle
that has the discharged battery.
6. When finished, carefully disconnect
the cables in exactly the reverse order.
Engine overheating
WARNING
Never attempt to remove the radia-
tor cap until the engine has been
shut off and has fully cooled down.
When the engine is hot, the coolant
is under pressure. Removing the
cap while the engine is still hot
could release a spray of boiling hot
coolant, which could burn you very
seriously.
If the engine overheats, safely pull off the
road and stop the vehicle in a safe place.& If steam is coming from the
engine compartmentTurn off the engine and get everyone
away from the vehicle until it cools down.&If no steam is coming from
the engine compartment1. Keep the engine running at idling
speed.
2. Open the hood to ventilate the engine
compartment.
Confirm that the cooling fan is turning. If
the fan is not turning, immediately turn off the engine and contact your authorized
dealer for repair.
3. After the engine coolant temperature
has dropped, turn off the engine.
If the temperature gauge stays at the
overheated zone, turn off the engine.
4. After the engine has fully cooled down,
check the coolant level in the reserve
tank.
If the coolant level is below the
“LOW ”
mark, add coolant up to the “FULL”mark.
5. If there is no coolant in the reserve
tank, add coolant to the reserve tank.
Then remove the radiator cap and fill the
radiator with coolant.
If you remove the radiator cap from a hot
radiator, first wrap a thick cloth around the
radiator cap, then turn the cap counter-
clockwise slowly without pressing down
until it stops. Release the pressure from
the radiator. After the pressure has been
fully released, remove the cap by pressing
down and turning it.
ProCarManuals.com
Page 331 of 409
8. Clean the rubber seal seating area of
the bottom of engine and install the oil
filter by hand turning. Be careful not to
twist or damage the seal.
9. Tighten the oil filter by the amount
indicated in the following table after the
seal makes contact with the bottom of
engine.Oil filter color Part numberAmount of ro-
tation
Black 15208AA031 3/4 rotation
CAUTION
.Never over tighten the oil filter
because that can result in an oil
leak.
. Thoroughly wipe off any engine
oil that has spilled over the
exhaust pipe and/or under-cover.
If left unremoved, the oil could
catch fire.
10. Reinstall the cover under the oil filter.
11. Pour engine oil through the filler neck.
Oil capacity (Guideline): 6.7 US qt (6.3 liters, 5.5 Imp qt)The oil quantity indicated above is only a
guideline. The necessary quantity of oil
depends on the quantity of oil that has
been drained. The quantity of drained oil
differs slightly depending on the tempera-
ture of the oil and the time the oil is left
flowing out. After refilling the engine with
oil, therefore, you must use the dipstick to
confirm that the level is correct.
12. Start the engine and make sure that no
oil leaks appear around the filter ’s rubber
seal and drain plug.
13. Run the engine until it reaches the
normal operating temperature. Then stop
the engine and wait a few minutes to allow
the oil drain back. Check the oil level
again and if necessary, add more engine
oil.& Recommended grade and
viscosity
CAUTION
Use only engine oil with the recom-
mended grade and viscosity.
Oil grade:
ILSAC GF-4, which can be identified with
the ILSAC certification mark (Starburst
mark)
or API classification SM with the words
“ENERGY CONSERVING ”These recommended oil grades can be
identified by looking for either or both of
the following marks displayed on the oil
container.ILSAC Certification Mark (Starburst Mark)Maintenance and service
11-9
–
CONTINUED –
ProCarManuals.com
Page 332 of 409
11-10
Maintenance and service
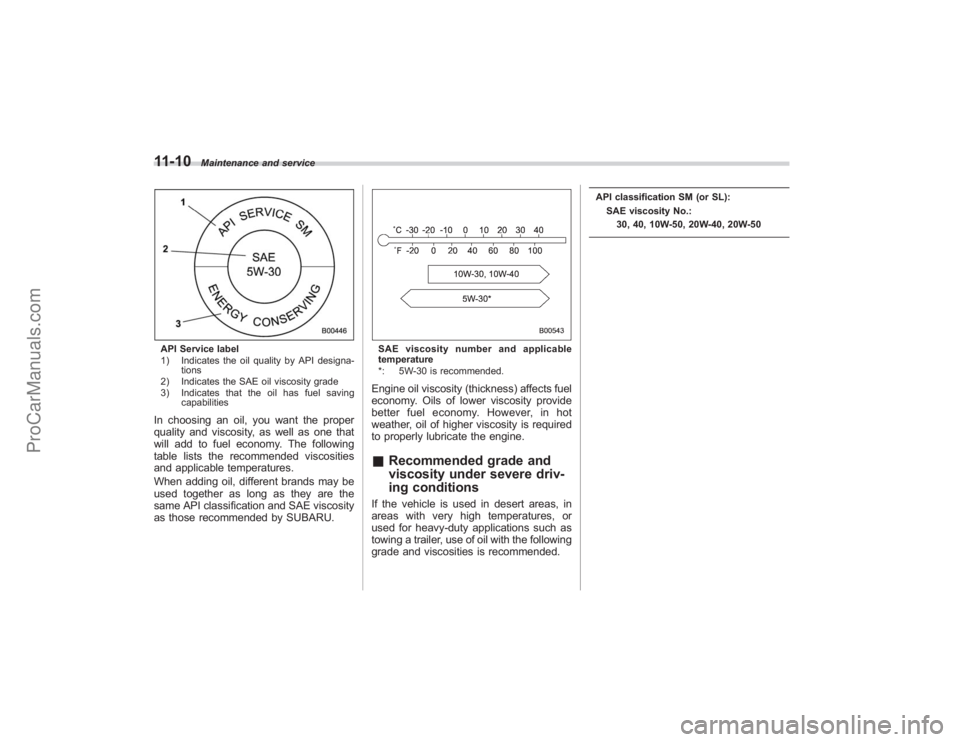
API Service label
1) Indicates the oil quality by API designa-tions
2) Indicates the SAE oil viscosity grade
3) Indicates that the oil has fuel saving capabilitiesIn choosing an oil, you want the proper
quality and viscosity, as well as one that
will add to fuel economy. The following
table lists the recommended viscosities
and applicable temperatures.
When adding oil, different brands may be
used together as long as they are the
same API classification and SAE viscosity
as those recommended by SUBARU.
SAE viscosity number and applicable
temperature
*: 5W-30 is recommended.Engine oil viscosity (thickness) affects fuel
economy. Oils of lower viscosity provide
better fuel economy. However, in hot
weather, oil of higher viscosity is required
to properly lubricate the engine.&Recommended grade and
viscosity under severe driv-
ing conditionsIf the vehicle is used in desert areas, in
areas with very high temperatures, or
used for heavy-duty applications such as
towing a trailer, use of oil with the following
grade and viscosities is recommended.
API classification SM (or SL):
SAE viscosity No.:30, 40, 10W-50, 20W-40, 20W-50
ProCarManuals.com
Page 333 of 409

Cooling system
WARNING
Never attempt to remove the radia-
tor cap until the engine has been
shut off and has cooled down
completely. Since the coolant is
under pressure, you may suffer
serious burns from a spray of boil-
ing hot coolant when the cap is
removed.
CAUTION
.The cooling system has been
filled at the factory with a high
quality, corrosion-inhibiting,
year-around coolant which pro-
vides protection against freezing
down to −33 8F( −36 8C).
Subaru engines use aluminum
components that require the
anti-corrosive and anti-freeze
properties of Subaru Genuine
Coolant, which is specifically
formulated for the Subaru cool-
ing system. Failure to use Subaru
Genuine Coolant along with
Subaru Cooling System Condi-
tioner at the recommended main- tenance intervals may result in
problems, including, but not lim-
ited to shortened life of engine
components and cooling system
clogging, coolant leaks and en-
gine damage from overheating.
Problems caused by the failure to
use Subaru Genuine Coolant and
Subaru Cooling System Condi-
tioner at recommended intervals
are not covered under the
Subaru Limited Warranty.
While there may be other generic
products that may provide the
required protection, they have
not been tested for compatibility
with Subaru engines and cooling
system components, and there-
fore not recommended.
. Do not splash the engine coolant
over painted parts. The alcohol
contained in the engine coolant
may damage the paint surface.
& Hose and connectionsYour vehicle employs an electric cooling
fan which is thermostatically controlled to
operate when the engine coolant reaches
a specific temperature.
If the radiator cooling fan does not operate even when the engine coolant tempera-
ture gauge exceeds the normal operating
range, the cooling fan circuit may be
defective. Check the fuse and replace it
if necessary. If the fuse is not blown, have
the cooling system checked by your
SUBARU dealer.
If frequent addition of coolant is neces-
sary, there may be a leak in the engine
cooling system. It is recommended that
the cooling system and connections be
checked for leaks, damage, or looseness.
&
Engine coolant! Checking the coolant levelCheck the coolant level at each fuel stop.
1. Check the coolant level on the outside
of the reservoir while the engine is cool.
Maintenance and service
11-11
–CONTINUED –
ProCarManuals.com