Page 18 of 126
17
Menu Screen Keys and Functions
Menu screen key Function Reference
page
Destination EntryAddress page 26
Point of Interest page 32Select from Map page 35Emergency page 38Memory Point page 29Previous Destination page 34Intersection page 42Freeway Ent/Exit page 36Phone Number page 44Coordinates page 40
Stored LocationsMemory Points page 89
Avoid Area page 97Dest. & Way Pt. page 57Home page 100Previous Dest. page 102Preset Dests. page 104
VolumeVolume page 12
Navigation Set UpUser Settings page 71
Quick POI Selection page 74Language Selection page 76Navigation Information page 77Calibration page 79Set Clock page 82Restore System Defaults page 84
Route OptionsSearch Condition page 54
Detour page 55Route Pref. page 56Dest. & Way Pt. page 57Display Route page 65
Route Preview page 66
Page 22 of 126
21
Setting destination/waypoints by scrolling the mapEven if you do not know the exact address of your destination or a waypoint on your route to the destination,
you can set it by scrolling the map as follows:
1
Touch the screen and scroll the map until the crosshair reaches the
destination or a waypoint.
2
Select the (destination or waypoint) key.The key will separate into the destination key and the waypoint key.
Setting DestinationSetting Route
Page 26 of 126

25
3
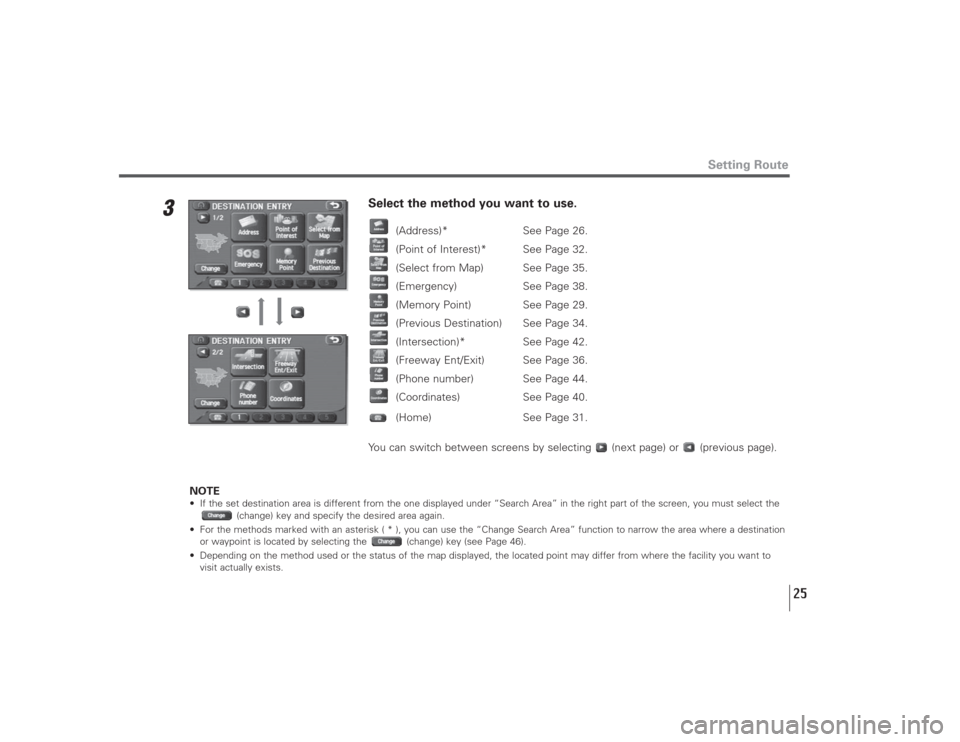
Select the method you want to use.
(Address)* See Page 26.
(Point of Interest)* See Page 32.
(Select from Map) See Page 35.
(Emergency) See Page 38.
(Memory Point) See Page 29.
(Previous Destination) See Page 34.
(Intersection)* See Page 42.
(Freeway Ent/Exit) See Page 36.
(Phone number) See Page 44.
(Coordinates) See Page 40.
(Home) See Page 31.
You can switch between screens by selecting (next page) or (previous page).
NOTE
• If the set destination area is different from the one displayed under “Search Area” in the right part of the screen, you must select the
(change) key and specify the desired area again.
• For the methods marked with an asterisk ( * ), you can use the “Change Search Area” function to narrow the area where a destination
or waypoint is located by selecting the (change) key (see Page 46).
• Depending on the method used or the status of the map displayed, the located point may differ from where the facility you want to
visit actually exists.
Setting Route
Page 27 of 126
26
Setting Route
■“Address” method1
Enter a house number using the keypad on the house number input
screen and select .
2
Enter the street name.If you enter enough letters to identify a street name and advance to Step 3, a list
showing several street names will be displayed. Select the desired street name from
the list.
:Use this key to delete the last character entered. Select it repeatedly if you
want to delete all the characters entered.
You can switch between keypad screens showing different characters by selecting
(others), (symbols) or (alphabet).
First, choose either of the two procedures below to follow the “address” method.
• Press the button or select , select (destination entry), and then select (address).
• Press the button and select (address).
Page 28 of 126
27
3
Select (list).
4
Select the desired street from the list.If the same street name exists in more than one city, a list of these cities will be
shown.
5
Select the correct city from the list.
:Use this key to input the city name from the keypad.
Setting Route
Page 30 of 126
29
■“Memory Point” methodIf you have saved some locations in the system’s memory, you can make use of an appropriate one to set the
destination.1
Select the category to which the address of the desired location
(memory point) is classified in the memory.
2
Select the address of the desired location (memory point).
:Use this key to display up to five previous suggestions.
:Use this key to display the previous suggestion.
:Use this key to display the next suggestion.
:Use this key to display up to five of the next suggestions.
Setting Route
First, choose either of the two procedures below to follow the “memory point” method.
• Press the button or select , select (destination entry), and then select (memory point).
• Press the button and select (memory point).
Page 31 of 126
30
Setting Route
3
Select (destination) or (waypoint).
NOTE• Select the (destination), (icon), (name), or (date) key to change the sequence in which memory points are
displayed.
• You cannot use the “Memory Point” method unless there are memory points stored. To store memory points, see Page 89.
Page 32 of 126
31
■“Home” method or method using stored destinationsIf you have stored your home address in the system’s memory, you can use it for your destination or a waypoint.
Similarly, if other locations are stored in the memory, they can be conveniently used for quick setting of destination
and waypoints.1
Select (home) or one of the locations programmed to keys
through .The map including your home location or the selected location will be displayed.
2
Select (destination) or (waypoint).
NOTEIcon (home) and keys through are displayed only when you have stored your home location and other locations in the
memory. For instructions on how to store your home location and other locations, see Page 100.
Setting Route
First, choose either of the two procedures below to follow the “home” method.
• Press the button or select , select (destination entry).
• Press the button.