Page 216 of 252

Fuses and light bulbs215
Using the systemSafetyDriving TipsGeneral MaintenanceBreakdown assistanceTechnical Data
23Lighting interior, storage compartment and luggage com-partment7,5
24Tailgate lock10
25Seat heaters20
26Heatable windscreen washing nozzles, windscreen cleaning system15
27Not assigned
28Petrol engine: AKF valve, petrol engine: Control flap10
29Injection - 1.2 ltr. engine10
30Fuel pump - petrol engine15
31Lambda probe10
32Diesel engine: Switch for brake light and clutch pedal, cruise control system, fuel pump relay and glow plug system relay5
33Engine control unit - diesel engine30
34Engine control unit 1.4 ltr.; 1.6 ltr.30
Fuel pump - diesel engine15
35Lighting of the instrument cluster and the switch5
36Main beam15/5a)
37Rear fog light7,5
38Fog lights10
39Blower30
40Rear window wiper10
41Not assigned
42Rear window heater25
43Horn20
44Front window wiper20
No.Power consumerAmperes
45Central control unit for convenience system15
46Not assigned
47Cigarette lighter, power socket in the luggage compartment b)15
48ABS15
49Turn signals15
50Radio, Telephone preinstallation, Multi-functional module10
51Electrical power window (at the front and rear on the left)25
52Electrical power window (at the front and rear on the right)25
53Electric sliding/tilting roof25
54Anti-theft alarm system15
55Not assigned
56Headlight cleaning system25
57Left low beam, headlight range adjustment15
58Low beam on the right15
a)Depending on headlight type - replace defect fuse by a new fuse of the same ampere number.b)If the engine is switched off already one electrical component which is connected can dis-charge the battery.
No.Power consumerAmperes
NKO A05F 20.book Page 215 Wednesday, April 2, 2008 1:02 PM
Page 219 of 252

Fuses and light bulbs218
WARNING
•Bulbs H7 and H4 are pressurised and may burst when changing the bulb - risk of injury!
•It is recommended to wear gloves and eye protection when changing a light bulb.
Note
This Owner's Manual only describes the replacement of bulbs where it is assumed that no major complications will arise. Other light bulbs should be changed by your specialist garage.
Front headlight
– Open the bonnet.
– For a vehicle with petrol engine remove the activated charcoal filter
system before replacing the bulb in the right front headlight
⇒fig. 199.
Positions of the light bulbs in the front headlight ⇒fig. 198.
- low beam and main beam
- parking lights
- Turn signal light (at the front)
OthersBulb
Side turn signal lightsWY5W
Licence plate lightC5W / T4W (5W)
3. Brake lightLED
Interior lighting front / rearC10W
Reading lightsW5W
Luggage compartment lightW5W
Storage compartment light - front passenger sideW5WFig. 198 Front headlight: Installing the light bulbs
Fig. 199 Removing the acti-vated charcoal filter system
AA
AB
AC
NKO A05F 20.book Page 218 Wednesday, April 2, 2008 1:02 PM
Page 220 of 252

Fuses and light bulbs219
Using the systemSafetyDriving TipsGeneral MaintenanceBreakdown assistanceTechnical Data
Switching on the low beam and main beam
– Open the bonnet.
– Remove the protective cap ⇒page 218, fig. 198.
– For headlights with module (halogen lamp H7) ⇒fig. 200 turn the
connector with the halogen lamp to the left up to the stop and
remove.
– For headlights with reflector (halogen lamp H4) pull off the connector
from the lamp, release the sprung wire clamp and pull out the halogen
lamp towards the rear.
– Replace the halogen lamp H7, insert the connector with the new
halogen lamp and turn to the right up to the stop.
– Replace the halogen lamp H4, insert into the opening in the reflector
(with the fixing lugs in the recesses), secure with the sprung wire
clamp, position the protective cap and mount the connector.
– We recommend that you have the headlight setting checked by a
Skoda Service Partner after replacing the light bulb.
Turn signal light (at the front)
– Open the bonnet.
– Turn the lamp holder to the left ⇒page 218, fig. 198 and remove
the lamp holder with the light bulb.
– Replace the defective light bulb.
– Insert the lamp holder with light bulb into the headlight. Secure the
lamp holder by turning it to the right until it locks in place.
Parking light at the front
– Open the bonnet.
– Remove the protective cap ⇒page 218, fig. 198.
– Grasp the light bulb holder and pull it out of the headlight.
– Replace the light bulb in the light bulb holder and re-insert into the
headlight.
Fog lights
Fig. 200 Removing the light bulb for the low beam and main beam light
AA
AC
AB
Fig. 201 Structure of the light bulb of the fog light
NKO A05F 20.book Page 219 Wednesday, April 2, 2008 1:02 PM
Page 223 of 252

Fuses and light bulbs222
Note
For slackening and tightening the plastic nut use a coin.
Changing light bulbs in the rear light unit
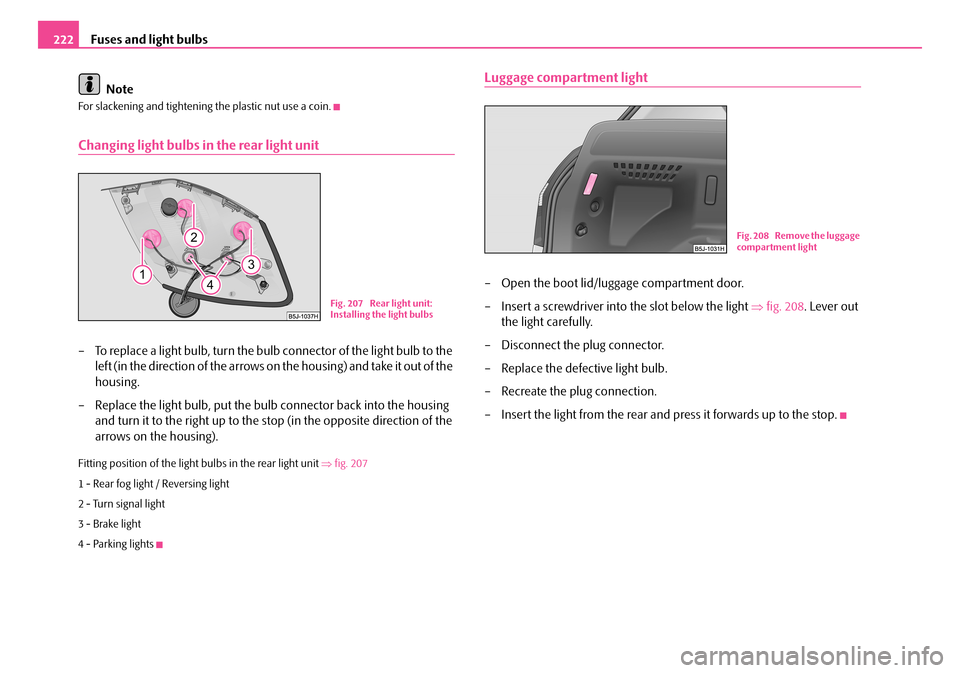
– To replace a light bulb, turn the bulb connector of the light bulb to the
left (in the direction of the arrows on the housing) and take it out of the
housing.
– Replace the light bulb, put the bulb connector back into the housing
and turn it to the right up to the stop (in the opposite direction of the
arrows on the housing).
Fitting position of the light bulbs in the rear light unit ⇒fig. 207
1 - Rear fog light / Reversing light
2 - Turn signal light
3 - Brake light
4 - Parking lights
Luggage compartment light
– Open the boot lid/luggage compartment door.
– Insert a screwdriver into the slot below the light ⇒fig. 208. Lever out
the light carefully.
– Disconnect the plug connector.
– Replace the defective light bulb.
– Recreate the plug connection.
– Insert the light from the rear and press it forwards up to the stop.
Fig. 207 Rear light unit: Installing the light bulbs
Fig. 208 Remove the luggage compartment light
NKO A05F 20.book Page 222 Wednesday, April 2, 2008 1:02 PM