2008 Seat Ibiza 5D spare wheel
[x] Cancel search: spare wheelPage 6 of 260
Contents
4Your vehicle maintenance and cleaning
. . . .
General notes . . . . . . . . . . . . . . . . . . . . . . . . . . .
Vehicle exterior maintenance . . . . . . . . . . . . . . .
Vehicle interior maintenance . . . . . . . . . . . . . . .
Accessories, parts replacement and
modifications
. . . . . . . . . . . . . . . . . . . . . . . . . . . .
Accessories and spare parts . . . . . . . . . . . . . . . .
Technical modifications . . . . . . . . . . . . . . . . . . .
Roof aerial* . . . . . . . . . . . . . . . . . . . . . . . . . . . . .
Mobile telephones and two-way radios . . . . . . .
Fitting a towing bracket* . . . . . . . . . . . . . . . . . . .
Checking and refilling levels
. . . . . . . . . . . . . .
Refuelling . . . . . . . . . . . . . . . . . . . . . . . . . . . . . . .
Petrol . . . . . . . . . . . . . . . . . . . . . . . . . . . . . . . . . .
Diesel . . . . . . . . . . . . . . . . . . . . . . . . . . . . . . . . . .
Working in the engine compartment . . . . . . . . .
Engine oil . . . . . . . . . . . . . . . . . . . . . . . . . . . . . . .
Coolant . . . . . . . . . . . . . . . . . . . . . . . . . . . . . . . . .
Washer fluid and windscreen wiper blades . . . .
Brake fluid . . . . . . . . . . . . . . . . . . . . . . . . . . . . . .
Battery . . . . . . . . . . . . . . . . . . . . . . . . . . . . . . . . .
Wheels . . . . . . . . . . . . . . . . . . . . . . . . . . . . . . . . .
If and when
. . . . . . . . . . . . . . . . . . . . . . . . . . . . . .
Vehicle tools, spare wheel . . . . . . . . . . . . . . . . .
Wheel change . . . . . . . . . . . . . . . . . . . . . . . . . . .
Tyre repair kit (Tyre-Mobility-System)* . . . . . . . .
Fuses . . . . . . . . . . . . . . . . . . . . . . . . . . . . . . . . . .
Bulb change . . . . . . . . . . . . . . . . . . . . . . . . . . . . .
Jump-starting . . . . . . . . . . . . . . . . . . . . . . . . . . . .
Towing and tow-starting . . . . . . . . . . . . . . . . . . .
Te c h n i c a l D a t a
. . . . . . . . . . . . . . . . . . . . . . .
General notes on the technical data
. . . . . . .
Outstanding information . . . . . . . . . . . . . . . . . .
Data on fuel consumption . . . . . . . . . . . . . . . . . Towing a trailer . . . . . . . . . . . . . . . . . . . . . . . . . .
Wheels . . . . . . . . . . . . . . . . . . . . . . . . . . . . . . . . .
Techn ical Data
. . . . . . . . . . . . . . . . . . . . . . . . . . . .
Checking fluid levels . . . . . . . . . . . . . . . . . . . . . .
Petrol engine 1.2 51kW (70 CV) . . . . . . . . . . . . .
Petrol engine 1.4l 63 kW (85 bhp) . . . . . . . . . . .
Petrol engine 1.6l 77 kW (105 bhp) . . . . . . . . . .
Diesel engine 1.4 litre TDI 59 kW (80 bhp) . . . .
Diesel engine 1.9l TDI 66 kW (90 bhp) . . . . . . .
Diesel engine 1.9l TDI 77 kW (105 bhp) . . . . . .
Dimensions and capacities . . . . . . . . . . . . . . . .
Index
. . . . . . . . . . . . . . . . . . . . . . . . . . . . . . . . . .
164
164
165
171
173
173
173
174
174
176
178
178
179
180
181
184
188
190
193
195
197
203
203
204
209
211
218
226
229
233
233
233
235 236
236
238
238
239
240
241
243
244
245
247
249
Ibiza250_angles Seite 4 Dienstag, 5. August 2008 1:11 13
Page 153 of 260
Intelligent technology151
Safety First
Operating instructions
Practical tips
Te c h n i c a l D a t a
stances, when the slipping of the wheels is required, can they be discon-
nected with the ESP button, for example.
•
With compact temporary spare wheel.
•
When using the snow chains.
•
When driving in deep snow or on loose surfaces
•
When the vehicle is bogged-down, to free it by “rocking.”
The TCS should be switched on again afterwards as soon as possible.
WARNING
•
It must be remembered that TCS cann ot defy the laws of physics. This
should be kept in mind, particular ly on slippery and wet roads and when
towing a trailer.
•
Always adapt your driving style to suit the condition of the roads and
the traffic situation. Do not let the extra safety afforded by TCS tempt you
into taking any risks when driving, this can cause accidents.Caution
•
In order to ensure that TCS function correctly, all four wheels must be
fitted with the same tyres. Any differences in the rolling radius of the tyres can
cause the system to reduce engine power when this is not desired.
•
Modifications to the vehicle (e.g. to the engine, the brake system, running
gear or any components affecting the wh eels and tyres) could affect the effi-
ciency of the ABS and TCS.
Electronic stabilisation programme (ESP)*General notes
The electronic stabilisation programme increases the
vehic l
e ' s stability on the road.The electronic stabilisation programme helps to reduce the danger of skid-
ding.
The electronic stabilisation programme (ESP) consists of ABS, EDL and TCS.
Electronic Stabilising Program (ESP)*
ESP reduces the danger of skidding by braking the wheels individually.
The system uses the steering wheel angle and road speed to calculate the
changes of direction desired by the driver, and constantly compares them
with the actual behaviour of the vehi cle. If the desired course is not being
maintained (for instance, if the car is starting to skid), then the ESP compen-
sates automatically by braking the appropriate wheel.
The forces acting on the braked wheel bring the vehicle back to a stable
condition. If the vehicle tends to oversteer, the system will act on the front
wheel on the outside of the turn.
WARNING
•
It must be remembered that ESP cann ot defy the laws of physics. This
should be kept in mind, particularly on slippery and wet roads and when
towing a trailer.
•
Always adapt your driving style to suit the condition of the roads and
the traffic situation. Do not let the extra safety afforded by ESP tempt you
into taking any risks when driving, this can cause accidents.
Ibiza250_angles Seite 151 Dienstag, 5. August 2008 1:11 13
Page 202 of 260
Checking and refilling levels
200easier to choose the correct tyres. Radial tyres have the tyre designations
marked on the sidewall, for example:
195/65 R15 91T
This contains the following information:
195 Tyre width in mm
65 Height/width ratio in %
R Tyre construction: Radial
15 Rim diameter in inches
91 Load rating code
T Speed rating
The tyres could also have the following information:•
A direction of rotation symbol
•
“Reinforced” denotes heavy-duty tyres.
The manufacturing date is also indicated on the tyre sidewall (possibly only
on the inner side of the wheel).
“DOT... 1103...” means, for example, that the tyre was produced in the 11th
week of 2003.
We recommend that work on tyres and wheels is carried out by an Authorised
Service Centre. They are familiar with the procedure and have the necessary
special tools and spare parts as well as the proper facilities for disposing of
the old tyres.
Any Authorised Service Centre has full information on the technical require-
ments when installing or changing tyres, wheels or wheel trims.
WARNING
•
We recommend that you use only wheels and tyres which have been
approved by SEAT for your model. Failure to do so could impair vehicle
handling. Risk of accident.
•
Avoid running the vehicle on tyres that are more than six years old. If
you have no alternative, you should dr ive slowly and with extra care at all
times.
•
Never use old tyres or those with an unknown “history of use”.
•
If wheel trims are retrofitted, you must ensure that the flow of air to the
brakes is not restricted. This could cause them to overheat.
•
All four wheels must be fitted with radial tyres of the same type, size
(rolling circumference) and the same tread pattern.For the sake of the environment
Old tyres must be disposed of accordi ng to the laws in the country concerned.
Note
•
For technical reasons, it is not generally possible to use the wheels from
other vehicles. This can also apply to wheels of the same model. The use of
wheels or tyres which have not been approved by SEAT for use with your
model may invalidate the vehicle's type approval for use on public roads.
•
If the spare tyre is not the same as the tyres that are mounted on the
vehicle - for example with winter tyres - you should only use the spare tyre for
a short period of time and drive with ex tra care. Refit the normal road wheel
as soon as possible.
Wheel bolts
Wheel bolts must be tightened to the correct torque.The design of wheel bolts is matched to the rims. If different wheel rims are
fitted, the correct wheel bolts with the right length and correctly shaped bolt
WARNING (continued)
Ibiza250_angles Seite 200 Dienstag, 5. August 2008 1:11 13
Page 203 of 260
Checking and refilling levels201
Safety First
Operating instructions
Practical tips
Te c h n i c a l D a t a
heads must be used. This ensures that wheels are fitted securely and that the
brake system functions correctly.
In certain circumstances, you may not
use wheel bolts from a different car -
even if it is the same model ⇒page 173.
WARNING
If the wheel bolts are not tightened correctly, the wheel could become
loose while driving. Risk of accident.•
The wheel bolts must be clean and turn easily. Never apply grease or oil
to them.
•
Use only wheel bolts which belong to the wheel.
•
If the prescribed torque of the wheel bolts is too low, they could loosen
whilst the vehicle is in motion. Risk of accident! If the tightening torque is
too high, the wheel bolts and threads can be damaged.Caution
The prescribed torque for wheel bolts for steel and alloy wheels is 120 Nm.Winter tyres
Winter tyres will improve the vehicles handling on snow and
ice.In winter conditions winter tyres will considerably improve the vehicles
handling. The design of summer tyre s (width, rubber compound, tread
pattern) gives less grip on ice and snow.
Winter tyres must be inflated to a pressure 0.2 bar higher than the pressures
specified for summer tyres (see sticker on tank flap).
Winter tyres must be fitted on all four wheels. Information on permitted
winter tyre sizes can be found in the vehicle's regis-
tration documents. Use only radial winter tyres. All tyre sizes listed in the
vehicle documentation also apply to winter tyres.
Winter tyres lose their effectiveness when the tread is worn down to a depth
of 4 mm.
The speed rating code ⇒page 199, “New tyres and wheels” determines the
following speed limits applicable to winter tyres: ⇒
Q max. 160 km/h
S max. 180 km/h
T max. 190 km/h
H max. 210 km/h
In some countries, vehicles which can exceed the speed rating of the fitted
tyre must have an appropriate sticker in the driver's field of view. These
stickers are available from your Authorised Service Centre. The legal require-
ments of each country must be followed.
Do not have winter tyres fitted for unnecessarily long periods. Vehicles with
summer tyres handle better when the roads are free of snow and ice.
If you have a flat tyre, please refer to the notes on the spare wheel
⇒ page 199, “New tyres and wheels”.
WARNING
The maximum speed for the winter tyres must not be exceeded. Otherwise,
this could lead to tyre damage and thus, an accident risk.
For the sake of the environment
Fit your summer tyres in good time. They are quieter, do not wear so quickly
and reduce fuel consumption.
Ibiza250_angles Seite 201 Dienstag, 5. August 2008 1:11 13
Page 205 of 260
If and when203
Safety First
Operating instructions
Practical tips
Te c h n i c a l D a t a
If and whenVehicle tools, spare wheelVeh icle To ols
The vehicle onboard tools are located under the floor panel in
the luggage compartment.–Lift floor panel.
– Take the onboard tools out of the vehicle.The tool kit includes:•
Jack*
•
Hook to remove integral* trim and screw caps.
•
Box spanner for wheel bolts*
•
Reversible screwdriver with handle (i ncluding hexagonal interior) for the
wheel bolts. The screwdriver is a combination tool.
•
Towing ring*
•
Adapter for the anti-theft wheel bolts*
Some of the items listed are only provided in certain models / model years,
or are optional extras.
WARNING
•
Do not use the hexagonal socket in the screwdriver handle to tighten
the wheel bolts as with this it is not possible to tighten the bolts to the
required torque. Risk of accident.
•
The jack supplied by the factory is only designed for changing wheels
on this model. On no account attempt to use it for lifting heavier vehicles
or other loads. Risk of injury.
•
Use the jack only on a firm, level ground.
•
Never start the engine when the vehicle is on the jack. Risk of accident.
•
I f w o r k is t o b e ca r r i e d o ut un d e r n ea t h t h e v e h i cle , t h is m u st b e s e c ure d
by suitable means. Otherwise, there is a risk of injury.
Spare wheel (emergency wheel)*
The compact temporary spare wheel (emergency wheel)
should only be used for the absolute minimum time required.The temporary spare wheel is stored under the floor panel in the luggage
compartment and is attached by a thumbnut.
How to use the compact temporary spare wheel
If you have a puncture or loss of pressure, the emergency wheel is only
intended for temporary use until you re ach a workshop. Change it for a duty
wheel as soon as possible.
Please note the following restrictions when using the compact temporary
spare wheel. This spare wheel has been specially designed for your vehicle,
thus, it cannot be changed with the spare wheel from another vehicle.
No other type of tyre (normal summer or winter tyre) may be fitted on the
compact temporary spare wheel rim.
WARNING (continued)
Ibiza250_angles Seite 203 Dienstag, 5. August 2008 1:11 13
Page 206 of 260
If and when
204Snow chains
For technical reasons, snow chains must not be used on the compact tempo-
rary spare wheel.
If you should have a puncture on one of the front wheels when using snow
chains, fit the compact temporary spare in place of one of the rear wheels.
You can then attach the snow chains to the wheel taken from the rear and use
this wheel to replace the punctured front wheel.
WARNING
•
The tyre pressures must be checked and corrected as soon as possible.
•
Do not drive faster than 80 km/h. Hi gher speeds can cause an accident.
•
Avoid heavy acceleration, hard braking and fast cornering. Risk of acci-
dent.
•
Never use two or more compact spare tyres at the same time, risk of
accident.
•
No other type of tyre (normal summer or winter tyre) may be fitted on
the compact temporary spare wheel rim.
Tyre repair kit*
The tyre repair kit (for vehicles not including a spare wheel) is
stored under the floor panel in the luggage compartment.Your vehicle is equipped with the Tyre Mobility System “Tyre repair kit”.
The tyre repair kit consists of a container with sealing compound to repair the
puncture and a compressor to generate the required tyre pressure. The kit will
reliably seal punctures up to a size of about 4 mm caused by the penetration
of a foreign body into the tyre.
Note
•
Seek professional assistance if the repair of a tyre puncture is not
possible with the sealing compound.
Wheel changePreparation work
What you must do before changing a wheel.– If you have a flat tyre or puncture, park the vehicle as far away from the flow of traffic as possible. Choose a location that is as
level as possible.
– All passengers should leave the vehicle. They should wait in a
safe area (for instance behind the roadside crash barrier).
– Switch the engine off. Switch the hazard warning lights on and place the warning triangles in position.
–Apply the handbrake firmly.
– Engage the first gear, or put the selector lever to position P for
those vehicles with an automatic gearbox.
– If you are towing a trailer, unhitch it from your vehicle.
–Take the vehicle tools and the spare wheel out of the luggage
compartment.
Ibiza250_angles Seite 204 Dienstag, 5. August 2008 1:11 13
Page 207 of 260
If and when205
Safety First
Operating instructions
Practical tips
Te c h n i c a l D a t a
WARNING
Switch on the hazard warning lights on and place the warning triangles in
position. This is for your own safety and also warns other road users.
Caution
If you have to change the wheel on a s lope, it is essential to lock the wheel
parallel and on the same axle as that to be changed, with a wedge or similar
in order to immobilise the vehicle.
Note
Please observe legal requirements when doing so.Changing a wheelChange the wheel as described below
– Remove the hub caps or the integral trim .
– Slacken the wheel bolts.
– Raise the car with the jack in the corresponding zone.
– Remove the wheel and then put on the spare wheel.
– Lower the vehicle.
– Tighten the wheel bolts firmly with the box spanner.
–Replace the hub cap.
After changing a wheel
After changing the wheel there are still tasks to complete.– Put the tools and jack back in the luggage compartment.
– Place the wheel with the defective tyre in the luggage compart-
ment and secure it.
– Check the tyre pressure of the newly fitted tyre as soon as
possible.
– Have the tightening torque of the wheel bolts checked as soon as possible with a torque wrench. The prescribed torque must be
120 Nm.
Note•
If you notice that the wheel bolts are corroded and difficult to turn when
changing a wheel, they must be replaced before having the wheel bolt torque
checked.
•
For your safety, drive at moderate speeds until the wheel bolt torque has
been checked.
Ibiza250_angles Seite 205 Dienstag, 5. August 2008 1:11 13
Page 210 of 260
If and when
208a large and stable base, if necessary. On a hard, slippery surface (such as
tiles) use a rubber mat or similar to prevent the jack from slipping.
WARNING
•
Take all precautions so that the base of the jack does not slip. Failure to
do so could result in an accident.
•
The vehicle can be damaged if the jack is not applied at the correct
jacking points. There is also a risk of injury since the jack can slip off
suddenly if it is not properly engaged.
Removing and fitting the wheel
For removal and fitting the wheel, the following tasks must be
completed.After loosening the wheel bolts and raising the vehicle with the jack,
cange the wheel as described below: Removing a wheel
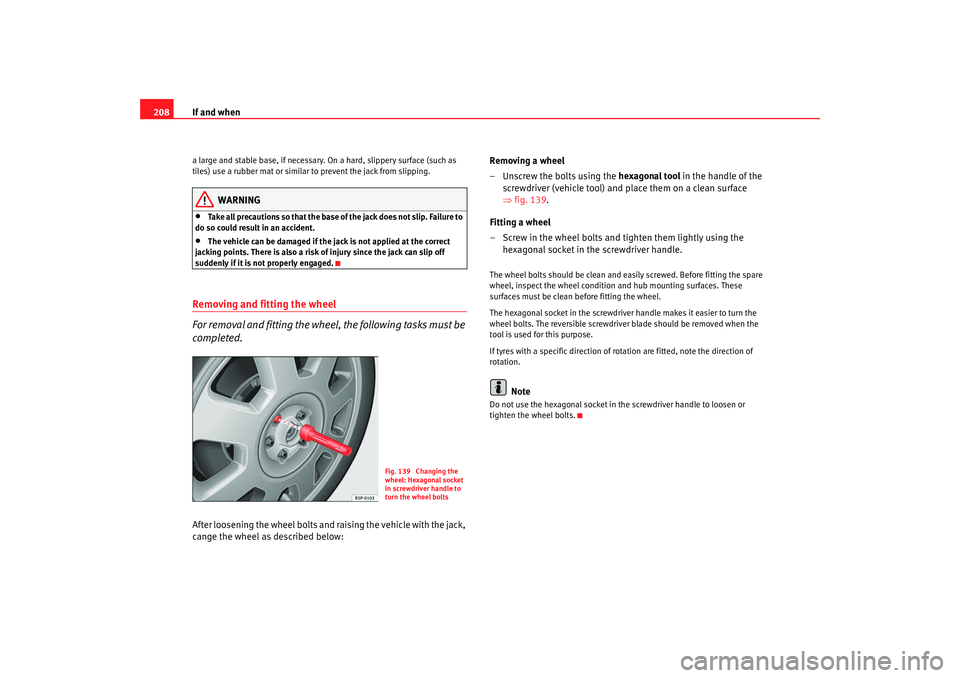
– Unscrew the bolts using the
hexagonal tool in the handle of the
screwdriver (vehicle tool) and place them on a clean surface
⇒ fig. 139.
Fitting a wheel
– Screw in the wheel bolts and tighten them lightly using the hexagonal socket in the screwdriver handle.
The wheel bolts should be clean and easily screwed. Before fitting the spare
wheel, inspect the wheel condition and hub mounting surfaces. These
surfaces must be clean before fitting the wheel.
The hexagonal socket in the screwdriver handle makes it easier to turn the
wheel bolts. The reversible screwdriver blade should be removed when the
tool is used for this purpose.
If tyres with a specific di rection of rotation are fitt ed, note the direction of
rotation.
Note
Do not use the hexagonal socket in the screwdriver handle to loosen or
tighten the wheel bolts.
Fig. 139 Changing the
wheel: Hexagonal socket
in screwdriver handle to
turn the wheel bolts
Ibiza250_angles Seite 208 Dienstag, 5. August 2008 1:11 13