2008 Seat Ibiza 5D bonnet
[x] Cancel search: bonnetPage 51 of 260
Cockpit49
Safety First
Operating instructions
Practical tips
Te c h n i c a l D a t a
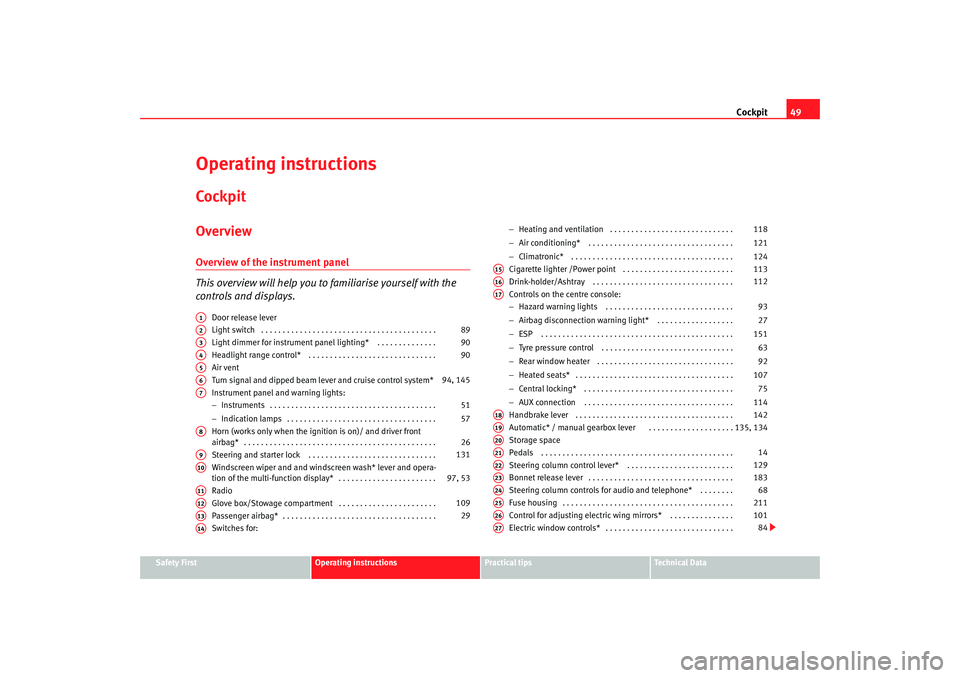
Operating instructionsCockpitOverviewOverview of the instrument panel
This overview will help you to familiarise yourself with the
controls and displays.
Door release lever
Light switch . . . . . . . . . . . . . . . . . . . . . . . . . . . . . . . . . . . . . . . . .
Light dimmer for instrument panel ligh ting* . . . . . . . . . . . . . .
Headlight range control* . . . . . . . . . . . . . . . . . . . . . . . . . . . . . .
Air vent
Turn signal and dipped beam lever and cruise control system*
Instrument panel an d warning lights:
− Instruments . . . . . . . . . . . . . . . . . . . . . . . . . . . . . . . . . . . . . . .
− Indication lamps . . . . . . . . . . . . . . . . . . . . . . . . . . . . . . . . . . .
Horn (works only when the igni tion is on)/ and driver front
airbag* . . . . . . . . . . . . . . . . . . . . . . . . . . . . . . . . . . . . . . . . . . . . .
Steering and starter lock . . . . . . . . . . . . . . . . . . . . . . . . . . . . . .
Windscreen wiper and and windscreen wash* lever and opera-
tion of the multi-function display* . . . . . . . . . . . . . . . . . . . . . . .
Radio
Glove box/Stowage compartment . . . . . . . . . . . . . . . . . . . . . . .
Passenger airbag* . . . . . . . . . . . . . . . . . . . . . . . . . . . . . . . . . . . .
Switches for: −
Heating and ventilation . . . . . . . . . . . . . . . . . . . . . . . . . . . . .
− Air conditioning* . . . . . . . . . . . . . . . . . . . . . . . . . . . . . . . . . .
− Climatronic* . . . . . . . . . . . . . . . . . . . . . . . . . . . . . . . . . . . . . .
Cigarette lighter /Power point . . . . . . . . . . . . . . . . . . . . . . . . . .
Drink-holder/Ashtray . . . . . . . . . . . . . . . . . . . . . . . . . . . . . . . . .
Controls on the centre console:
− Hazard warning lights . . . . . . . . . . . . . . . . . . . . . . . . . . . . . .
− Airbag disconnection warni ng light* . . . . . . . . . . . . . . . . . .
− ESP . . . . . . . . . . . . . . . . . . . . . . . . . . . . . . . . . . . . . . . . . . . . .
− Tyre pressure control . . . . . . . . . . . . . . . . . . . . . . . . . . . . . . .
− Rear window heater . . . . . . . . . . . . . . . . . . . . . . . . . . . . . . . .
− Heated seats* . . . . . . . . . . . . . . . . . . . . . . . . . . . . . . . . . . . . .
− Central locking* . . . . . . . . . . . . . . . . . . . . . . . . . . . . . . . . . . .
− AUX connection . . . . . . . . . . . . . . . . . . . . . . . . . . . . . . . . . . .
Handbrake lever . . . . . . . . . . . . . . . . . . . . . . . . . . . . . . . . . . . . .
A utomatic* / manual gearbox lever
. . . . . . . . . . . . . .
. . . . . .
Storage space
Pedals . . . . . . . . . . . . . . . . . . . . . . . . . . . . . . . . . . . . . . . . . . . . .
Steering column control lever* . . . . . . . . . . . . . . . . . . . . . . . . .
Bonnet release lever . . . . . . . . . . . . . . . . . . . . . . . . . . . . . . . . . .
Steering column controls for audio and telephone* . . . . . . . .
Fuse housing . . . . . . . . . . . . . . . . . . . . . . . . . . . . . . . . . . . . . . . .
Control for adjusting electric wing mirrors* . . . . . . . . . . . . . . .
Electric window controls* . . . . . . . . . . . . . . . . . . . . . . . . . . . . . .
A1A2
89
A3
90
A4
90
A5A6
94, 145
A7
51
57
A8
26
A9
131
A10
97, 53
A11A12
109
A13
29
A14
118
121
124
A15
113
A16
112
A17
93
27
151 63
92
107 75
114
A18
142
A19
135, 134
A20A21
14
A22
129
A23
183
A24
68
A25
211
A26
101
A27
84
Ibiza250_angles Seite 49 Dienstag, 5. August 2008 1:11 13
Page 61 of 260
Cockpit59
Safety First
Operating instructions
Practical tips
Te c h n i c a l D a t a
WARNING
•
Failure to observe warning lamps and warning messages can result in
serious personal injuries or damage to your vehicle.
•
The risk of an accident increases if your vehicle breaks down. Use a
warning triangle to draw the attention of other road users in order to
prevent danger to thirds.
•
The engine compartment is a dangerous area! Before you open the
bonnet to work on the engine or in the engine compartment, you must
switch the engine off and allow it to cool to reduce the risk of scalding or
other kind of injuries. Read and observe the relevant warnings
⇒ page 181.
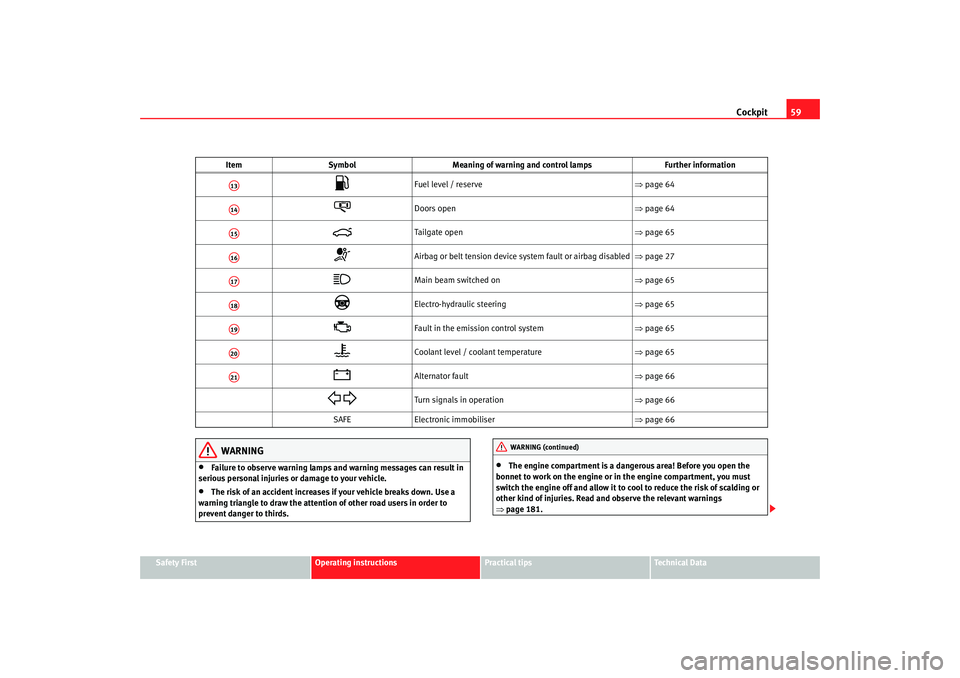
Fuel level / reserve ⇒page 64
Doors open ⇒page 64
Tailgate open ⇒page 65
Airbag or belt tension device system fault or airbag disabled ⇒page 27
Main beam switched on ⇒page 65
Electro-hydraulic steering ⇒page 65
Fault in the emission control system ⇒page 65
Coolant level / coolant temperature ⇒page 65
Alternator fault ⇒page 66
Turn signals in operation ⇒page 66
SAFE Electronic immobiliser ⇒page 66
Item
Symbol Meaning of warning and control lamps Further information
A13A14A15A16A17A18A19A20A21
WARNING (continued)
Ibiza250_angles Seite 59 Dienstag, 5. August 2008 1:11 13
Page 63 of 260
Cockpit61
Safety First
Operating instructions
Practical tips
Te c h n i c a l D a t a
Engine oil pressure
This warning lamp indicates that the engine oil pressure is
too low.If this warning symbol starts to flash, and is accompanied by three audible
warnings , switch off the engine and check the oil level. If the oil level is too
low, top up with oil.
If the symbol flashes although the oil level is correct, do not drive on. The
engine must not even run at idle speed. Obtain technical assistance.Bulb defect*
The indicator lights up when a bulb is not functioning.The warning lamp
lights up when there is a fault in the indicator lights,
headlights, position light or fog lights.
Rear fog light*
This warning lamp lights up when the rear fog light is switched on
. Further
information ⇒page 89.
Anti-lock brake system (ABS)
A warning lamp system monitors the ABS.
The warning lamp
should light up for a few seconds when the ignition is
switched on. It goes out again after th e system has run through an automatic
test sequence.
There is a fault in the ABS if:
•
The warning lamp
does not light up when the ignition is switched on.
•
The warning lamp does not go out again after a few seconds.
•
The warning lamp lights up when the vehicle is moving.
The vehicle can still be braked in the normal way (except that the ABS control
function will not function). Please take the vehicle to a qualified workshop as
soon as possible. For further information on the ABS see the ⇒page 150.
If there is a fault in the ABS, the ESP* and the tyre pressure warning lamp will
also light up.
Brake system fault
If the ABS warning lamp
lights up together with the brake warning lamp
, this indicates not only a fault in the ABS function, but also a possible fault
in the brake system ⇒.
WARNING
•
Before opening the bonnet, read and observe the warnings on
⇒ page 181, “Working in the engine compartment”.
•
If the brake warning lamp
should light up together with the ABS
warning lamp
, stop the vehicle immediately and check the brake fluid
level in the reservoir ⇒page 193, “Brake fluid”. If the fluid level has
dropped below the “MIN” mark you must not drive on. Risk of accident.
Obtain technical assistance.
Ibiza250_angles Seite 61 Dienstag, 5. August 2008 1:11 13
Page 68 of 260
Cockpit
66If the warning lamp lights up again after driving on for a short distance, stop
the vehicle and switch the engine off . Contact an Authorised Service Centre
or a qualified workshop.
Coolant level too low
If the warning li ght lights up, stop the vehicle, switch the engine off and wait
for it to cool down. First check the coolant level. If the level is below the “MIN”
mark, top up with coolant ⇒.
WARNING
•
If your vehicle is immobilised for any technical reasons, move it to a
safe distance from traffic. Turn the engine off, turn the hazard lights on and
place the warning triangle.
•
Never open the bonnet if you can see or hear steam or coolant escaping
from the engine compartment. Risk of scalding. Wait until you can no
longer see or hear escaping steam or coolant.
•
The engine compartment is a dangerous area! Before carrying out any
work in the engine compartment, swit ch off the engine and allow it to cool
down. Always note the corresponding warnings ⇒page 181.
Alternator
This warning lamp signals a fault in the alternator.
The warning lamp
lights up when the ignition is switched on. It should go
out when the engine has started running.
If the warning lamp lights up while driving, the alternator is no longer
charging the battery. You should immediately drive to the nearest qualified
workshop.
You should avoid using electrical equipm ent that is not absolutely necessary
because this will drain the battery. If the indicator flashes the voltage is insufficient for normal vehicle
operation.
Turn sig nals
The warning lamp flashes when the indicators are in opera-
tion.Depending on which indicator is operating, either the left
or right
indi-
cator lamp flashes. Both warning lamps will flash at the same time when the
hazard warning lights are switched on.
If any of both indicators fails, the warni ng lamp will start flashing twice faster
than normal.
Further information on the indicators ⇒page 94.
Electronic immobiliser* “Safe”
This warning lamp flashes if an unauthorised key is used.Inside the key there is a chip that deac tivates the electronic immobiliser auto-
matically when the key is inserted into the ignition. The immobiliser will be
activated again automatically as soon as you pull the key out of the ignition
lock.
The instrument panel display shows the following message
6): SAFE . The
vehicle cannot be started in this case.
The engine can, however, be started if the appropriate coded SEAT genuine
key is used.
6)Depending on the version of the model.
Ibiza250_angles Seite 66 Dienstag, 5. August 2008 1:11 13
Page 81 of 260
Unlocking and locking79
Safety First
Operating instructions
Practical tips
Te c h n i c a l D a t a
•
Never leave children or disabled persons in the vehicle. In case of emer-
gency, they may not be able to leave the vehicle and not manage on their
own.
•
Never forget the keys inside the vehicle. Otherwise, this could result in
serious injuries, accidents or even the theft of your vehicle. Always take the
key with you when you leave the vehicle.
•
An uncontrolled use of the key could start the engine or activate any
electric equipment(e.g. electric win dows), causing risk of accident. The
vehicle can be locked when using the remote control key. This could
complicate the aid in cas of emergency.Note
•
The remote control key functions only when you are within range
⇒ page 78, fig. 44 .
•
If the vehicle cannot be unlocked or locked by using the radio-frequency
remote control, the remote control key wi ll have to be re-synchronised. In this
case, please refer to your Technical Service.
Changing the batteryIf the battery indicator does not flash when the buttons are pushed, the
battery must be replaced.
Caution
The use of inappropriate batteries may damage the radio frequency remote
control. For this reason, always replace the dead battery with another of the
same size and power.
For the sake of the environment
The flat batteries must be thrown away in accordance with regulations
governing the protection of the environment.Anti-theft alarm system*Description of anti-theft alarm system*
The anti-theft alarm triggers if unauthorised movements are
detected around the vehicle.The anti-theft alarm makes it more difficult to break into the vehicle or steal
it. The system will emit acoustic an d optical warning signals if someone is
trying to force your vehicle.
The anti-theft alarm system is automatically connected on locking the
vehicle. For this, either rotate the key in the locking position or press button on the radio-frequency remote control*. The system is immediately
activated and the indicator light located on the driver's door will flash along
with the indicators, indicating that the alarm and the locking security system
(double lock) have been turned on.
If any of the doors or the bonnet are open, they will not be included in the
protection zones of the vehicle when the alarm is connected. If the door or the
bonnet are subsequently closed, they will automatically be included in the
protection areas of the vehicle and the indicators will flash accordingly when
the doors close.•
The indicator light will flash twice on opening and deactivating the alarm.
•
The indicator light will flash once on closing and activating the alarm.
WARNING (continued)
A2
Ibiza250_angles Seite 79 Dienstag, 5. August 2008 1:11 13
Page 82 of 260
Unlocking and locking
80When does the system trigger an alarm?
The system triggers an alarm if the following unauthorised actions are carried
out when the car is locked:•
Opening of vehicle with mechanical key without switching ignition on
within the following 15 seconds
•
Opening a door
•
Opening the bonnet
•
Opening the tailgate
•
Ignition switched on with a non-validated key.
•
Movements in the driving compartm ent (vehicles with a volume sensor)
•
To wi ng o f th e ve hi cl e
7)
•
Tilt angle (tow-away protection)
7)
•
Undue manipulation of the alarm
•
Battery handling
The acoustic signals sound and the indicators flash for approx. 30 seconds.
This may be repeated up to 10 times depending on the country.
How to switch the alarm off
To deactivate the anti-theft alarm, turn the key in the direction, to open, open
the door and switch the ignition on, or press the unlock button on the
remote control.
In vehicles equipped with an anti-theft alarm system, you have 15 seconds to
insert the key in the ignition lock and activate the ignition if the vehicle is
opened using the driver's door key.
Otherwise, the alarm will trigger for 30 sec. and the ignition will be blocked.
Note
•
After 28 days, the indicator light will be switched off to prevent the battery
from exhausting if the vehicle has been left parked for a long period of time.
The alarm system remains activated.
•
The alarm will trigger again if attempts are made to open another protec-
tion zone.
•
The alarm system can be activated or deactivated using the remote
control ⇒page 78.
Interior monitor and anti-towing alarm*
Monitoring or control function incorporated in the anti-theft
alarm* which detects unauthorized vehicle entry by means of
ultrasound.Activation
– It is connected automatically when the anti-theft alarm is acti-
vated.
Deactivation
– Open the vehicle with the key, either mechanically
8) or by
pressing the button on the remote control.
– Press the button on the remote control twice. The volumetric sensor and tilt sensors will be deactivated. The alarm system
remains activated.
7)For vehicles fitted with tow-away protection
8)The time period from when the door is opened until the key is inserted in the contact
should not exceed 15 sec., otherwise the alarm will be triggered.
Ibiza250_angles Seite 80 Dienstag, 5. August 2008 1:11 13
Page 100 of 260
Lights and visibility
98•
Always note the corresponding warnings on ⇒page 191.Caution
In icy conditions, always check that the wiper blades are not frozen to the
glass before using the wipers for the first time. If you switch on the wipers
when the wiper blades are frozen to the windscreen, you could damage both
the wiper blades and the wiper motor.
Note
•
The windscreen wipers will only work when the ignition is switched on.
•
The heat output of the heated jets* is controlled automatically when the
ignition is switched on, dependi ng upon the outside temperature.
•
In certain versions of vehicles with alarms, the windscreen wiper will only
work when the ignition is on and the bonnet closed.
•
When the intermittent wipe function is on, the intervals are directly
proportional to the speed. This way, the higher the vehicle speed the shorter
the intervals.
Rain sensor*
The rain sensor controls the frequency of the windscreen
wiper intervals, depending on the amount of rain.Switching on the rain sensor
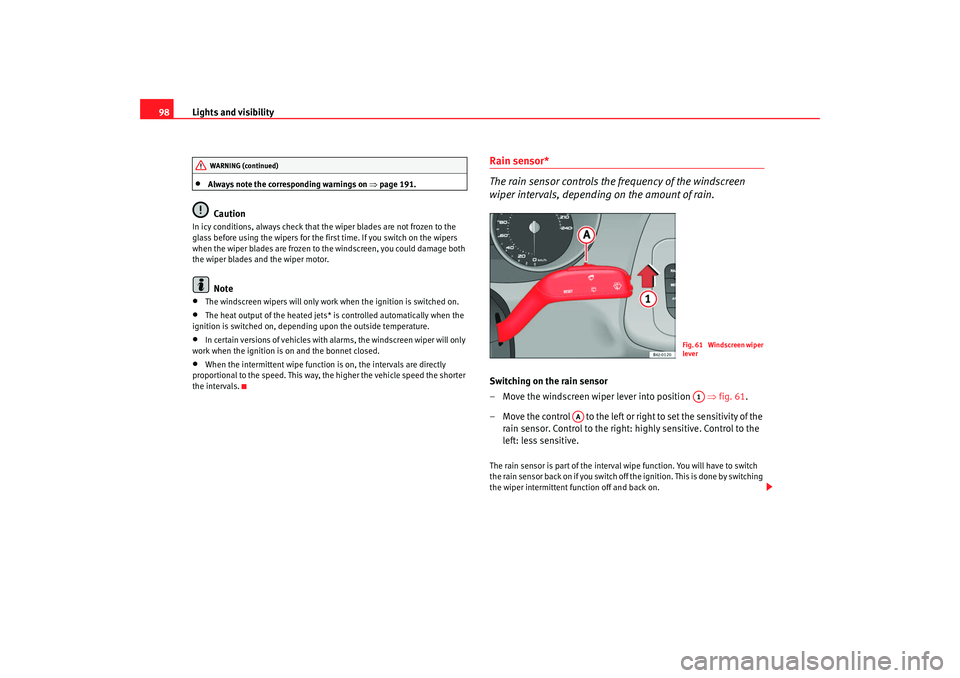
– Move the windscreen wiper lever into position ⇒fig. 61 .
– Move the control to the left or right to set the sensitivity of the rain sensor. Control to the right: highly sensitive. Control to the
left: less sensitive.The rain sensor is part of the interval wipe function. You will have to switch
the rain sensor back on if you switch off the ignition. This is done by switching
the wiper intermittent function off and back on.
WARNING (continued)
Fig. 61 Windscreen wiper
leverA1
AA
Ibiza250_angles Seite 98 Dienstag, 5. August 2008 1:11 13
Page 170 of 260
Your vehicle maintenance and cleaning
168If possible, use a de-icing spray to remove ice. If you use an ice scraper, push
it in one direction only without swinging it.
Use window cleaner or a silicone remove r to clean rubber, oil, grease and sili-
cone deposits off.
Wax deposits can be removed with a spec ial cleaner available in your Author-
ised Service Centre. Wax deposits on the windscreen could cause the wiper
blades to judder. If a window cleanser, specifically for removing wax, is added
to the windscreen washer fluid prevents wiper blades from juddering. Wax
deposits are not removed.
Caution
•
Never use warm or hot water to remove snow and ice from windows and
mirrors. This could cause the glass to crack!
•
The heating element for the rear window is located on the inner side of the
window. To prevent damage, do not put stickers on the heating elements
inside the window.
Cleaning windscreen wiper bladesClean wiper blades are essential to provide clear vision.
1. Use a soft cloth to remove dust and dirt from the windscreen wiper blades.
2. Use window cleanser to clean the windscreen wiper blades. Use a sponge or a cloth to remove stubborn stains.
Rubber seals maintenance
If rubber seals are well looked after, they will not freeze so
quickly.1. Use a soft cloth to remove dust and dirt from the rubber seals.
2. Apply a specialist care product to the rubber seals.The strips on the doors, windows, bonnet and rear lid will remain pliable and
last longer if they are treated with a suit able care product (for example sili-
cone spray).
Caring for rubber seals will also prevent premature ageing and leaks. The
doors will be easier to open. If rubber seals are well looked after, they will not
freeze so quickly in winter.Door lock cylinders
The door lock cylinders can freeze up in winter.To de-ice the lock cylinders you should only use spray with lubricating and
anti-corrosive properties.Cleaning chrome parts1. Clean chrome parts with a damp cloth.
2. Polish chrome parts with a soft, dry cloth.
Ibiza250_angles Seite 168 Dienstag, 5. August 2008 1:11 13